Disassembly [12/2013 - 11/2016]: Procedure
WARNING: This page is about a different car, the 2016 Toyota Highlander, 2015 Toyota Highlander, and 2014 Toyota Highlander. However, it is still accessible from the selected car via links, so may be relevant.
- REMOVE GENERATOR PULLEY CAP
- Using a screwdriver, remove the generator pulley cap.
 Courtesy of © TOYOTA, LICENSE AGREEMENT TMS1002 Courtesy of © TOYOTA, LICENSE AGREEMENT TMS1002
|
NOTE:
Do not reuse the generator pulley cap.
- REMOVE GENERATOR REAR END COVER
- Remove the 3 nuts and generator rear end cover.
 Courtesy of © TOYOTA, LICENSE AGREEMENT TMS1002 Courtesy of © TOYOTA, LICENSE AGREEMENT TMS1002
|
- REMOVE GENERATOR TERMINAL INSULATOR
- Remove the generator terminal insulator from the generator coil assembly.
 Courtesy of © TOYOTA, LICENSE AGREEMENT TMS1002 Courtesy of © TOYOTA, LICENSE AGREEMENT TMS1002
|
- REMOVE GENERATOR BRUSH HOLDER ASSEMBLY
- Remove the 2 screws and generator brush holder assembly from the generator coil assembly.
 Courtesy of © TOYOTA, LICENSE AGREEMENT TMS1002 Courtesy of © TOYOTA, LICENSE AGREEMENT TMS1002
|
- REMOVE GENERATOR COIL ASSEMBLY
- Remove the 4 bolts.
 Courtesy of © TOYOTA, LICENSE AGREEMENT TMS1002 Courtesy of © TOYOTA, LICENSE AGREEMENT TMS1002
|
- Using SST, remove the generator coil assembly.
- SST: 09950-40011
- 09951-04020
- 09952-04010
- 09953-04020
- 09954-04010
- 09955-04071
- 09957-04010
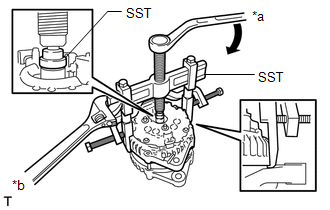 Courtesy of © TOYOTA, LICENSE AGREEMENT TMS1002 Courtesy of © TOYOTA, LICENSE AGREEMENT TMS1002
|
- Remove the washer.
 Courtesy of © TOYOTA, LICENSE AGREEMENT TMS1002 Courtesy of © TOYOTA, LICENSE AGREEMENT TMS1002
|
- REMOVE GENERATOR PULLEY WITH CLUTCH
- Secure the generator drive end frame in a vise between aluminum plates.
- Install SST (A) and (B) to the generator pulley with clutch as shown in the illustration.
 Courtesy of © TOYOTA, LICENSE AGREEMENT TMS1002 Courtesy of © TOYOTA, LICENSE AGREEMENT TMS1002
|
NOTE:
Securely attach SST to the generator pulley with clutch and rotor shaft.
- Loosen the generator pulley with clutch by turning SST (B) as shown in the illustration.
NOTE:
- Check that the generator drive end frame is secured in the vise tightly.
- Hold SST (A) tightly during the operation.
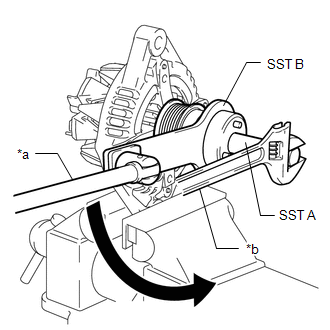 Courtesy of © TOYOTA, LICENSE AGREEMENT TMS1002 Courtesy of © TOYOTA, LICENSE AGREEMENT TMS1002
|
- Remove SST from the generator pulley with clutch.
- Remove the generator pulley with clutch from the rotor shaft.
- REMOVE GENERATOR ROTOR ASSEMBLY
- Remove the generator rotor assembly.
 Courtesy of © TOYOTA, LICENSE AGREEMENT TMS1002 Courtesy of © TOYOTA, LICENSE AGREEMENT TMS1002
|
- INSPECT GENERATOR DRIVE END FRAME BEARING
See step 4
- REMOVE GENERATOR DRIVE END FRAME BEARING
- Remove the 4 screws and retainer plate from the generator drive end frame.
 Courtesy of © TOYOTA, LICENSE AGREEMENT TMS1002 Courtesy of © TOYOTA, LICENSE AGREEMENT TMS1002
|
- Using SST and a hammer, tap out the generator drive end frame bearing.
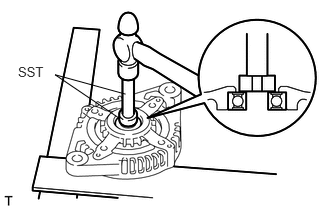 Courtesy of © TOYOTA, LICENSE AGREEMENT TMS1002 Courtesy of © TOYOTA, LICENSE AGREEMENT TMS1002
|
- SST: 09950-60010
- 09951-00250
- SST: 09950-70010
- 09951-07100