- INSTALL FRONT BUMPER STAY LH
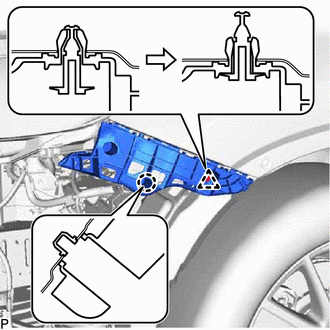
- Engage the claw.
 Courtesy of © TOYOTA, LICENSE AGREEMENT TMS1002 Courtesy of © TOYOTA, LICENSE AGREEMENT TMS1002
|
- Engage the clip as shown in the illustration.
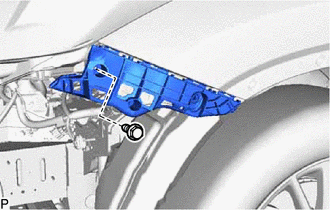
- Install the front bumper stay LH with the bolt.
 Courtesy of © TOYOTA, LICENSE AGREEMENT TMS1002 Courtesy of © TOYOTA, LICENSE AGREEMENT TMS1002
|
Torque: 5.4 N*m (55 kgf*cm, 48 in.*lbf)
- INSTALL FRONT BUMPER STAY RH
HINT:
Use the same procedure as for the LH side.
- INSTALL FRONT BUMPER REINFORCEMENT
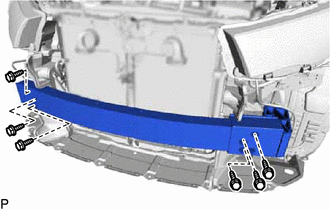
- Install the front bumper reinforcement with the 6 bolts.
 Courtesy of © TOYOTA, LICENSE AGREEMENT TMS1002 Courtesy of © TOYOTA, LICENSE AGREEMENT TMS1002
|
Torque: 69 N*m (704 kgf*cm, 51 ft.*lbf)
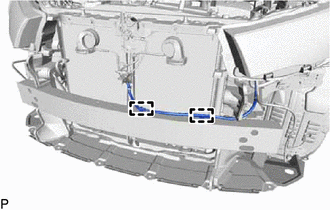
- Engage the 2 clamps.
 Courtesy of © TOYOTA, LICENSE AGREEMENT TMS1002 Courtesy of © TOYOTA, LICENSE AGREEMENT TMS1002
|
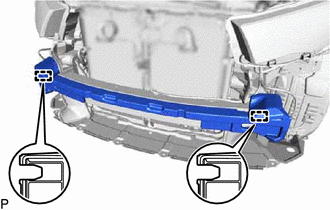
- INSTALL FRONT BUMPER ENERGY ABSORBER
 Courtesy of © TOYOTA, LICENSE AGREEMENT TMS1002 Courtesy of © TOYOTA, LICENSE AGREEMENT TMS1002
|
- Engage the 2 guides to install the front bumper energy absorber.
- INSTALL NO. 1 MOULDING TAPE
- Clean off any tape adhesive residue with cleaner.
- Using a brush or sponge, coat the application area of No. 1 moulding tape with primer.
NOTE:
- Do not apply too much primer.
- Allow the primer to dry for 3 minutes or more.
- Throw away any leftover primer.
HINT:
If an area other than specified is coated by accident, wipe off the primer with a clean piece of cloth before it dries.
- Remove the release paper from a new No. 1 moulding tape.
HINT:
After removing the release paper, keep the exposed adhesive free from foreign matter.
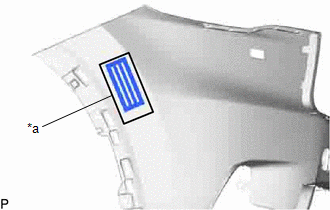
- Install the No. 1 moulding tape as shown in the illustration.
 Courtesy of © TOYOTA, LICENSE AGREEMENT TMS1002 Courtesy of © TOYOTA, LICENSE AGREEMENT TMS1002
|
HINT:
- Apply the No. 1 moulding tape along the line marked on the front bumper cover.
- Use the same procedure for the RH side and LH side.
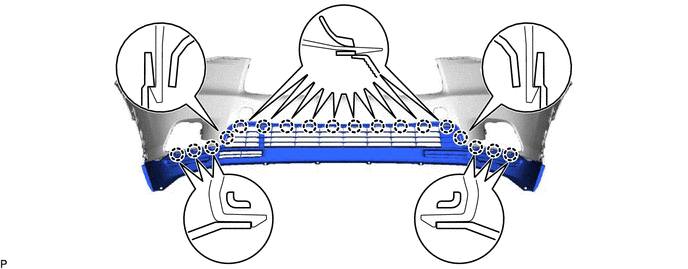
- INSTALL LOWER FRONT BUMPER COVER
- Engage the 18 claws.
 Courtesy of © TOYOTA, LICENSE AGREEMENT TMS1002 Courtesy of © TOYOTA, LICENSE AGREEMENT TMS1002
|
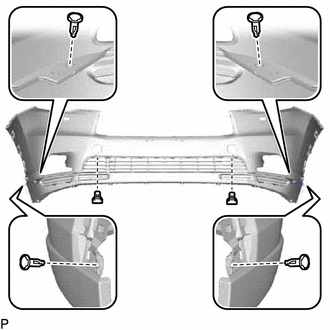
- Install the lower front bumper cover with the 6 clips.
 Courtesy of © TOYOTA, LICENSE AGREEMENT TMS1002 Courtesy of © TOYOTA, LICENSE AGREEMENT TMS1002
|
- INSTALL FRONT BUMPER EXTENSION MOUNTING BRACKET
- Install the front bumper extension mounting bracket with the 2 screws.
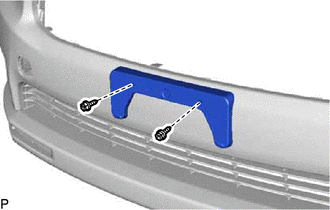 Courtesy of © TOYOTA, LICENSE AGREEMENT TMS1002 Courtesy of © TOYOTA, LICENSE AGREEMENT TMS1002
|
- INSTALL LOWER RADIATOR GRILLE SUB-ASSEMBLY
- Engage the 2 guides and 10 claws.
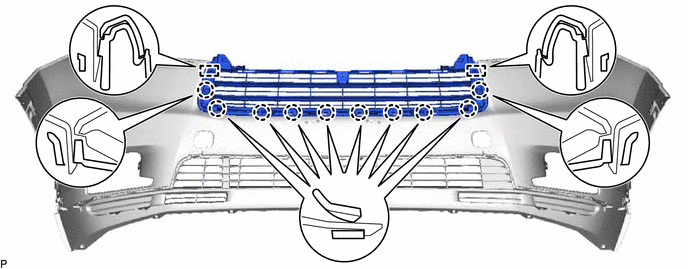 Courtesy of © TOYOTA, LICENSE AGREEMENT TMS1002 Courtesy of © TOYOTA, LICENSE AGREEMENT TMS1002
|
- Install the lower radiator grille sub-assembly with the 2 clips.
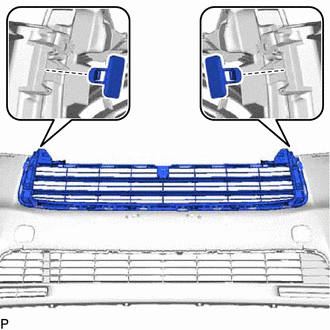 Courtesy of © TOYOTA, LICENSE AGREEMENT TMS1002 Courtesy of © TOYOTA, LICENSE AGREEMENT TMS1002
|
- INSTALL FRONT BUMPER HOLE COVER LH
- Engage the hook.
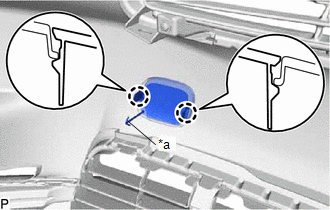 Courtesy of © TOYOTA, LICENSE AGREEMENT TMS1002 Courtesy of © TOYOTA, LICENSE AGREEMENT TMS1002
|
- Engage the 2 claws to install the front bumper hole cover LH.
- INSTALL FRONT BUMPER HOLE COVER RH
HINT:
Use the same procedure as for the LH side.
- INSTALL FRONT BUMPER SIDE RETAINER LH
- Engage the 3 claws.
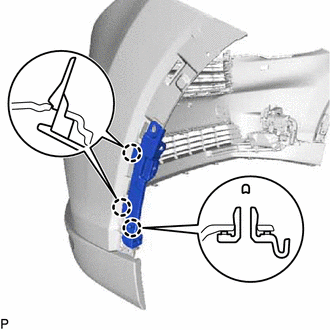 Courtesy of © TOYOTA, LICENSE AGREEMENT TMS1002 Courtesy of © TOYOTA, LICENSE AGREEMENT TMS1002
|
- Install the clip.
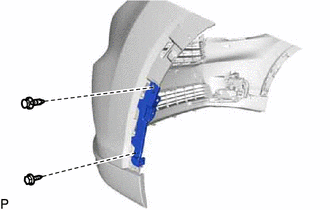 Courtesy of © TOYOTA, LICENSE AGREEMENT TMS1002 Courtesy of © TOYOTA, LICENSE AGREEMENT TMS1002
|
- Install the front bumper side retainer LH with the screw.
- INSTALL FRONT BUMPER SIDE RETAINER RH
HINT:
Use the same procedure as for the LH side.
- INSTALL FRONT FENDER LINER RETAINER
- Engage the claw to install the front fender liner retainer.
HINT:
Use the same procedure for the RH side and LH side.
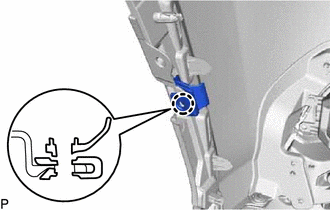 Courtesy of © TOYOTA, LICENSE AGREEMENT TMS1002 Courtesy of © TOYOTA, LICENSE AGREEMENT TMS1002
|
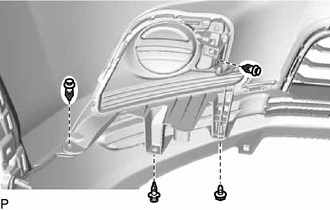
- INSTALL FOG LIGHT COVER LH (w/o Fog Light)
- Engage the guide and 2 claws.
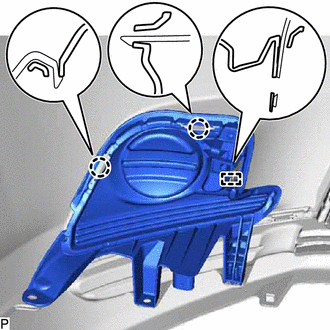 Courtesy of © TOYOTA, LICENSE AGREEMENT TMS1002 Courtesy of © TOYOTA, LICENSE AGREEMENT TMS1002
|
- Install the 3 clips.
 Courtesy of © TOYOTA, LICENSE AGREEMENT TMS1002 Courtesy of © TOYOTA, LICENSE AGREEMENT TMS1002
|
- Install the fog light cover LH with the screw.
- INSTALL FOG LIGHT COVER RH (w/o Fog Light)
HINT:
Use the same procedure as for the LH side.
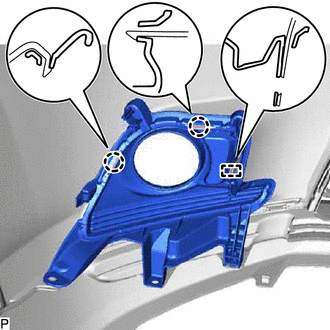
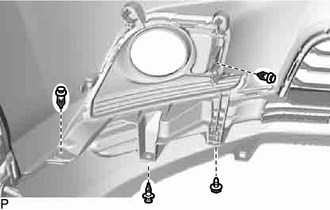
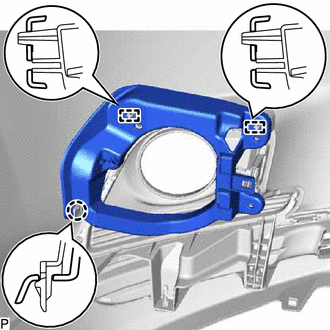
- INSTALL FOG LIGHT COVER LH (w/ Fog Light)
- w/o Daytime Running Light:
- Engage the guide and 2 claws.
 Courtesy of © TOYOTA, LICENSE AGREEMENT TMS1002 Courtesy of © TOYOTA, LICENSE AGREEMENT TMS1002
|
- Install the 3 clips.
 Courtesy of © TOYOTA, LICENSE AGREEMENT TMS1002 Courtesy of © TOYOTA, LICENSE AGREEMENT TMS1002
|
- Install the fog light cover LH with the screw.
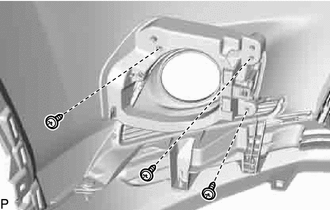
- Engage the 2 guides and claw.
 Courtesy of © TOYOTA, LICENSE AGREEMENT TMS1002 Courtesy of © TOYOTA, LICENSE AGREEMENT TMS1002
|
- Install the fog light mounting bracket LH with the 3 screws.
 Courtesy of © TOYOTA, LICENSE AGREEMENT TMS1002 Courtesy of © TOYOTA, LICENSE AGREEMENT TMS1002
|
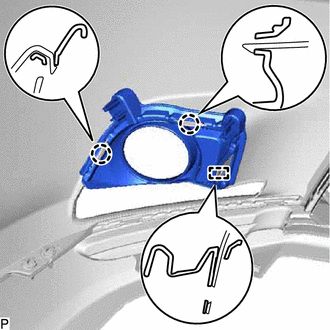
- w/ Daytime Running Light:
- Engage the guide and 2 claws.
 Courtesy of © TOYOTA, LICENSE AGREEMENT TMS1002 Courtesy of © TOYOTA, LICENSE AGREEMENT TMS1002
|
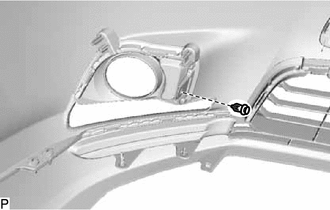
- Install the fog light cover LH with the clip.
 Courtesy of © TOYOTA, LICENSE AGREEMENT TMS1002 Courtesy of © TOYOTA, LICENSE AGREEMENT TMS1002
|
- INSTALL FOG LIGHT COVER RH (w/ Fog Light)
HINT:
Use the same procedure as for the LH side.
- INSTALL DAYTIME RUNNING LIGHT ASSEMBLY LH (w/ Daytime Running Light)
Refer to PROCEDURE - Step 1
- INSTALL DAYTIME RUNNING LIGHT ASSEMBLY RH (w/ Daytime Running Light)
HINT:
Use the same procedure as for the LH side.
- INSTALL FOG LIGHT ASSEMBLY LH (w/ Fog Light)
Refer to PROCEDURE - Step 1
- INSTALL FOG LIGHT ASSEMBLY RH (w/ Fog Light)
HINT:
Use the same procedure as for the LH side.