Removal [11/2016 - ]: Procedure
WARNING: This page is about a different variant/trim than selected.
- SECURE VEHICLE
- Fully apply the parking brake and chock a wheel.
WARNING:
- Make sure to apply the parking brake and chock a wheel before performing this procedure.
- If the vehicle is not secure and the shift lever is moved to N, the vehicle may suddenly move, possibly resulting in an accident or serious injury.
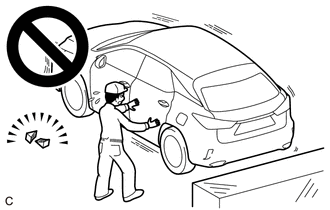 Courtesy of © TOYOTA, LICENSE AGREEMENT TMS1002 Courtesy of © TOYOTA, LICENSE AGREEMENT TMS1002
|
- REMOVE SHIFT LEVER CAP
- Using a screwdriver with its tip wrapped with protective tape, disengage the 2 claws to remove the shift lever cap from the shift position indicator.
 Courtesy of © TOYOTA, LICENSE AGREEMENT TMS1002 Courtesy of © TOYOTA, LICENSE AGREEMENT TMS1002
|
NOTE:
Be careful not to damage the shift lever cap and shift position indicator.
- REMOVE CONSOLE BOX ASSEMBLY
Refer to REMOVAL [12/2013 - ]
- REMOVE SHIFTING HOLE BEZEL
- Disconnect the shift position indicator connector.
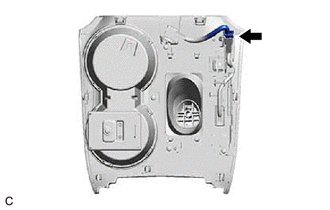 Courtesy of © TOYOTA, LICENSE AGREEMENT TMS1002 Courtesy of © TOYOTA, LICENSE AGREEMENT TMS1002
|
- Remove the 5 screws and shifting hole bezel from the upper console panel sub-assembly.
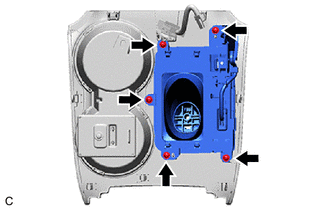 Courtesy of © TOYOTA, LICENSE AGREEMENT TMS1002 Courtesy of © TOYOTA, LICENSE AGREEMENT TMS1002
|
- REMOVE SHIFT POSITION INDICATOR
- Disengage the claw and 2 guides and remove the shift position indicator from the shifting hole bezel.
 Courtesy of © TOYOTA, LICENSE AGREEMENT TMS1002 Courtesy of © TOYOTA, LICENSE AGREEMENT TMS1002
|
- REMOVE NO. 2 SWITCH HOLE BASE
Refer to PROCEDURE - Step 31
- REMOVE FRONT NO. 2 CONSOLE BOX INSERT
Refer to PROCEDURE - Step 32
- REMOVE CONSOLE BOX INSERT
Refer to PROCEDURE - Step 33
- REMOVE NO. 2 CONSOLE BOX MOUNTING BRACKET
- Disengage the clamp from the No. 2 console box mounting bracket.
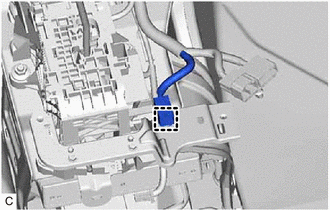 Courtesy of © TOYOTA, LICENSE AGREEMENT TMS1002 Courtesy of © TOYOTA, LICENSE AGREEMENT TMS1002
|
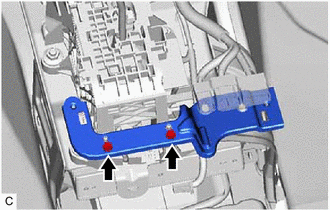
- Remove the 2 screws and No. 2 console box mounting bracket from the transmission floor shift assembly.
 Courtesy of © TOYOTA, LICENSE AGREEMENT TMS1002 Courtesy of © TOYOTA, LICENSE AGREEMENT TMS1002
|
- REMOVE TRANSMISSION FLOOR SHIFT ASSEMBLY
- Move the shift lever to N.
- Disconnect the transmission control switch connector.
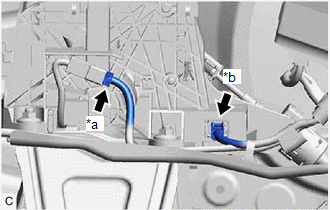 Courtesy of © TOYOTA, LICENSE AGREEMENT TMS1002 Courtesy of © TOYOTA, LICENSE AGREEMENT TMS1002
|
| *a |
Transmission Control Switch Connector |
| *b |
Shift Lock Control ECU Connector |
- Disconnect the shift lock control ECU connector.
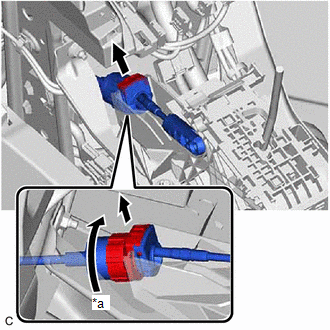
- Separate the transmission control cable assembly from the transmission floor shift assembly.
 Courtesy of © TOYOTA, LICENSE AGREEMENT TMS1002 Courtesy of © TOYOTA, LICENSE AGREEMENT TMS1002
|
- Rotate the nut counterclockwise approximately 180° and, while holding the nut in that position, separate the transmission control cable assembly from the transmission floor shift assembly.
 Courtesy of © TOYOTA, LICENSE AGREEMENT TMS1002 Courtesy of © TOYOTA, LICENSE AGREEMENT TMS1002
|
- Remove the 4 nuts and transmission floor shift assembly from the shift lever support.
 Courtesy of © TOYOTA, LICENSE AGREEMENT TMS1002 Courtesy of © TOYOTA, LICENSE AGREEMENT TMS1002
|