Removal [02/2014 - ]: Procedure
WARNING: This page is about a different variant/trim than selected.
- REMOVE FRONT FENDER WHEEL OPENING MOULDING SUB-ASSEMBLY RH
HINT:
Use the same procedure as for the LH side.
Refer to REMOVAL [02/2014 - ]
- REMOVE FRONT WHEEL RH
- REMOVE FRONT WHEEL OPENING EXTENSION PAD RH
- Remove the 3 screws and front wheel opening extension pad RH.
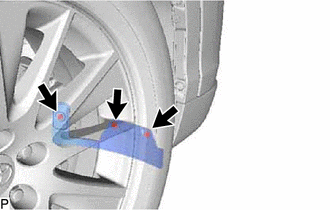 Courtesy of © TOYOTA, LICENSE AGREEMENT TMS1002 Courtesy of © TOYOTA, LICENSE AGREEMENT TMS1002
|
- REMOVE FRONT FENDER LINER RH
- Remove the clip (A).
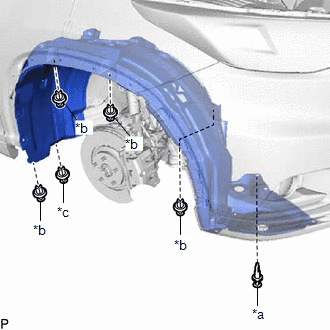 Courtesy of © TOYOTA, LICENSE AGREEMENT TMS1002 Courtesy of © TOYOTA, LICENSE AGREEMENT TMS1002
|
| *a |
Clip (A) |
| *b |
Clip (B) |
| *c |
Clip (C) |
- Remove the 4 clips (B).
- w/o Mudguard:
- Remove the clip (C).
- Remove the 2 grommets.
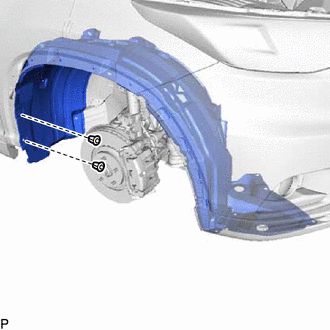 Courtesy of © TOYOTA, LICENSE AGREEMENT TMS1002 Courtesy of © TOYOTA, LICENSE AGREEMENT TMS1002
|
- Remove the bolt.
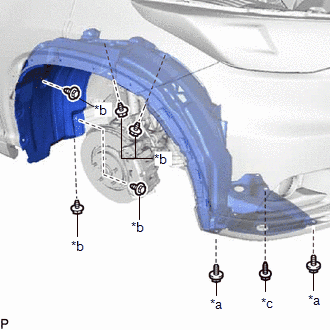 Courtesy of © TOYOTA, LICENSE AGREEMENT TMS1002 Courtesy of © TOYOTA, LICENSE AGREEMENT TMS1002
|
| *a |
Screw (A) |
| *b |
Screw (B) |
| *c |
Bolt |
- Remove the 2 screws (A).
- Remove the 5 screws (B) and front fender liner RH.
- DRAIN WASHER FLUID
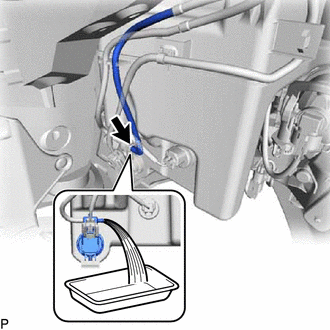
- Disconnect the washer hose from the windshield washer motor and pump assembly, and drain the washer fluid.
 Courtesy of © TOYOTA, LICENSE AGREEMENT TMS1002 Courtesy of © TOYOTA, LICENSE AGREEMENT TMS1002
|
HINT:
Use a container to collect the washer fluid.
- REMOVE WASHER MOTOR AND PUMP ASSEMBLY
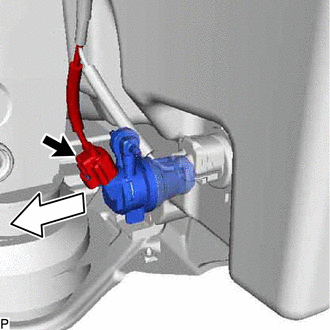
- Disconnect the connector.
 Courtesy of © TOYOTA, LICENSE AGREEMENT TMS1002 Courtesy of © TOYOTA, LICENSE AGREEMENT TMS1002
|
- Remove the washer motor and pump assembly as shown in the illustration.