- INSTALL FRONT BUMPER REINFORCEMENT
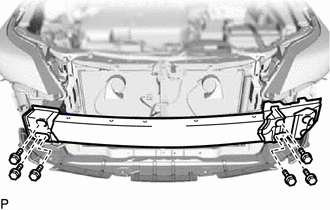
- Install the front bumper reinforcement with the 6 bolts.
 Courtesy of © TOYOTA, LICENSE AGREEMENT TMS1002 Courtesy of © TOYOTA, LICENSE AGREEMENT TMS1002
|
Torque: 35 N*m (357 kgf*cm, 26 ft.*lbf)
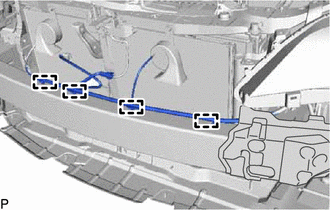
- Engage the 4 clamps.
 Courtesy of © TOYOTA, LICENSE AGREEMENT TMS1002 Courtesy of © TOYOTA, LICENSE AGREEMENT TMS1002
|
- INSTALL NO. 2 FRONT BUMPER SUPPORT SPACER SUB-ASSEMBLY
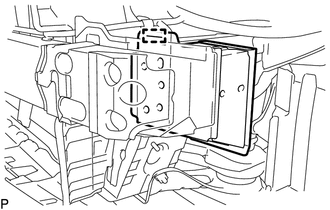
- Engage the guide.
 Courtesy of © TOYOTA, LICENSE AGREEMENT TMS1002 Courtesy of © TOYOTA, LICENSE AGREEMENT TMS1002
|
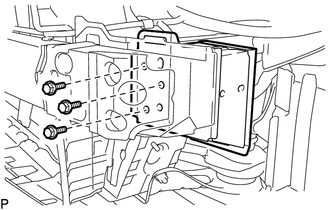
- Install the No. 2 front bumper support spacer subassembly with the 3 bolts.
 Courtesy of © TOYOTA, LICENSE AGREEMENT TMS1002 Courtesy of © TOYOTA, LICENSE AGREEMENT TMS1002
|
Torque: 35 N*m (357 kgf*cm, 26 ft.*lbf)
- Engage the clamp.
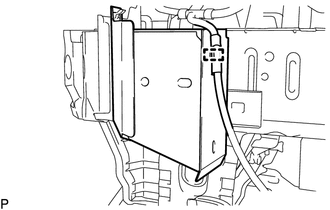 Courtesy of © TOYOTA, LICENSE AGREEMENT TMS1002 Courtesy of © TOYOTA, LICENSE AGREEMENT TMS1002
|
- INSTALL FRONT BUMPER ENERGY ABSORBER
- Engage the 2 guides to install the front bumper energy absorber.
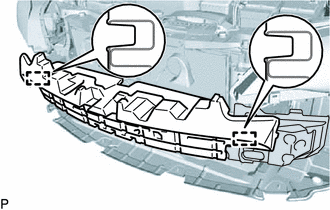 Courtesy of © TOYOTA, LICENSE AGREEMENT TMS1002 Courtesy of © TOYOTA, LICENSE AGREEMENT TMS1002
|
- INSTALL NO. 2 FRONT BUMPER STAY LH
- Engage the clip as shown in the illustration.
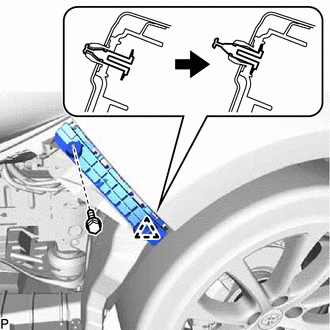 Courtesy of © TOYOTA, LICENSE AGREEMENT TMS1002 Courtesy of © TOYOTA, LICENSE AGREEMENT TMS1002
|
- Install the No. 2 front bumper stay LH with the bolt.
Torque: 5.4 N*m (55 kgf*cm, 48 in.*lbf)
- INSTALL NO. 2 FRONT BUMPER STAY RH
HINT:
Use the same procedure as for the LH side.
- INSTALL RADIATOR GRILLE
- Engage the 4 claws.
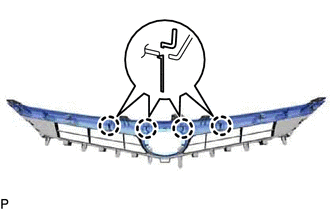 Courtesy of © TOYOTA, LICENSE AGREEMENT TMS1002 Courtesy of © TOYOTA, LICENSE AGREEMENT TMS1002
|
- Install the radiator grille to the inner radiator grille with the 8 screws.
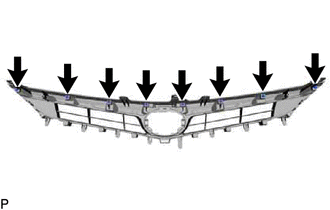 Courtesy of © TOYOTA, LICENSE AGREEMENT TMS1002 Courtesy of © TOYOTA, LICENSE AGREEMENT TMS1002
|
- INSTALL LOWER RADIATOR GRILLE GARNISH
- Engage the 2 claws.
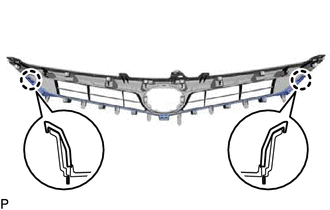 Courtesy of © TOYOTA, LICENSE AGREEMENT TMS1002 Courtesy of © TOYOTA, LICENSE AGREEMENT TMS1002
|
- Install the lower radiator grille garnish with the 9 screws.
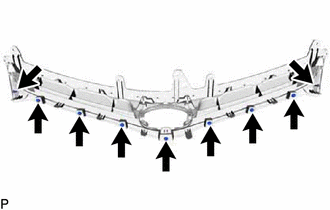 Courtesy of © TOYOTA, LICENSE AGREEMENT TMS1002 Courtesy of © TOYOTA, LICENSE AGREEMENT TMS1002
|
- INSTALL RADIATOR GRILLE (OR FRONT PANEL) EMBLEM (w/o Dynamic Radar Cruise Control System)
- Engage the 2 guides and 4 claws.
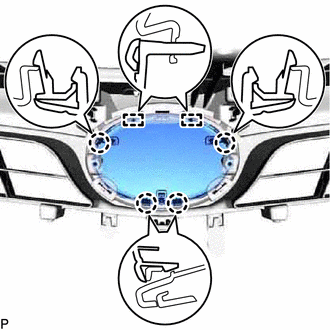 Courtesy of © TOYOTA, LICENSE AGREEMENT TMS1002 Courtesy of © TOYOTA, LICENSE AGREEMENT TMS1002
|
- Install the radiator grille (or front panel) emblem with the 2 screws.
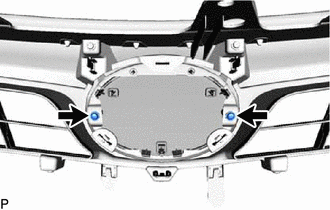 Courtesy of © TOYOTA, LICENSE AGREEMENT TMS1002 Courtesy of © TOYOTA, LICENSE AGREEMENT TMS1002
|
- INSTALL RADIATOR GRILLE (OR FRONT PANEL) EMBLEM (w/ Dynamic Radar Cruise Control System)
- Engage the 2 guides and 4 claws.
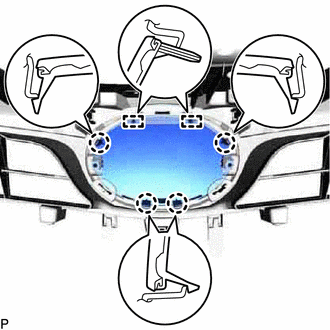 Courtesy of © TOYOTA, LICENSE AGREEMENT TMS1002 Courtesy of © TOYOTA, LICENSE AGREEMENT TMS1002
|
- Install the radiator grille (or front panel) emblem with the 2 screws.
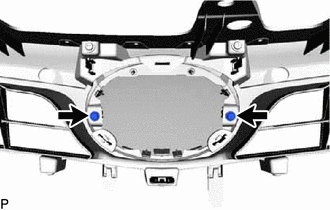 Courtesy of © TOYOTA, LICENSE AGREEMENT TMS1002 Courtesy of © TOYOTA, LICENSE AGREEMENT TMS1002
|
- INSTALL RADIATOR GRILLE SUB-ASSEMBLY
- Engage the 8 claws.
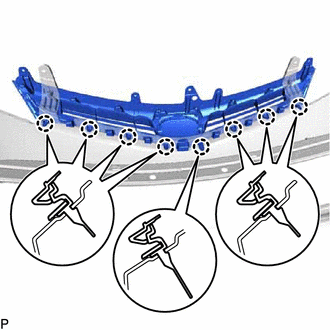 Courtesy of © TOYOTA, LICENSE AGREEMENT TMS1002 Courtesy of © TOYOTA, LICENSE AGREEMENT TMS1002
|
- Install the radiator grille sub-assembly with the 2 screws.
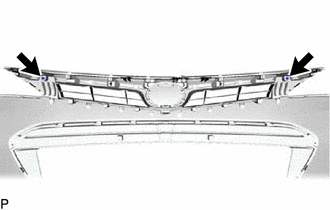 Courtesy of © TOYOTA, LICENSE AGREEMENT TMS1002 Courtesy of © TOYOTA, LICENSE AGREEMENT TMS1002
|
- INSTALL HOOD TO RADIATOR GRILLE SEAL
- Engage the 16 clips to install the hood to radiator grille seal.
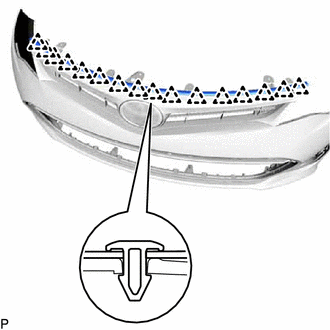 Courtesy of © TOYOTA, LICENSE AGREEMENT TMS1002 Courtesy of © TOYOTA, LICENSE AGREEMENT TMS1002
|
- INSTALL LOWER NO. 1 RADIATOR GRILLE
- Engage the 18 claws.
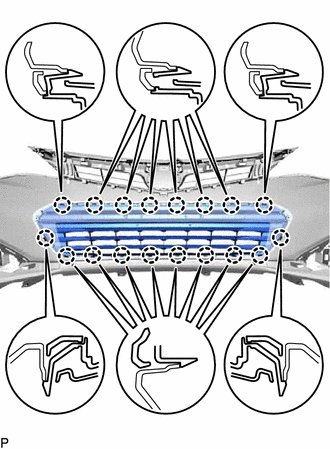 Courtesy of © TOYOTA, LICENSE AGREEMENT TMS1002 Courtesy of © TOYOTA, LICENSE AGREEMENT TMS1002
|
- Install the lower No. 1 radiator grille with the 4 screws.
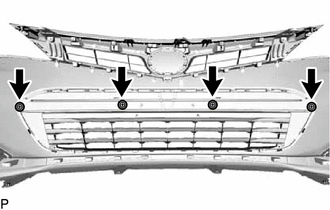 Courtesy of © TOYOTA, LICENSE AGREEMENT TMS1002 Courtesy of © TOYOTA, LICENSE AGREEMENT TMS1002
|
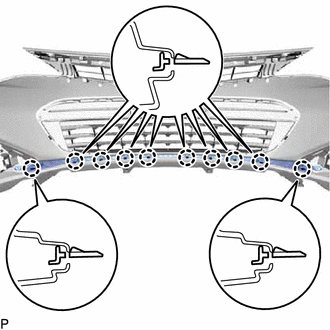
- INSTALL LOWER FRONT BUMPER COVER
- Engage the 10 claws to install the lower front bumper cover.
 Courtesy of © TOYOTA, LICENSE AGREEMENT TMS1002 Courtesy of © TOYOTA, LICENSE AGREEMENT TMS1002
|
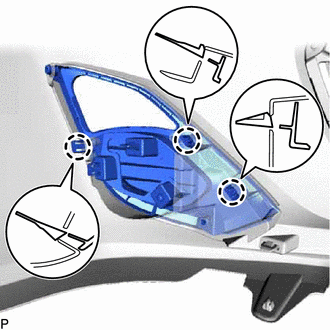
- INSTALL FRONT BUMPER HOLE COVER LH (w/o Fog Light)
- Engage the 3 claws.
 Courtesy of © TOYOTA, LICENSE AGREEMENT TMS1002 Courtesy of © TOYOTA, LICENSE AGREEMENT TMS1002
|
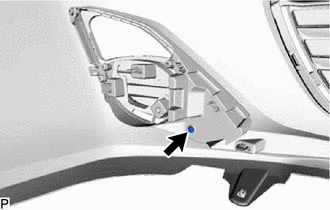
- Install the front bumper hole cover LH with the screw.
 Courtesy of © TOYOTA, LICENSE AGREEMENT TMS1002 Courtesy of © TOYOTA, LICENSE AGREEMENT TMS1002
|
- INSTALL FRONT BUMPER HOLE COVER RH (w/o Fog Light)
HINT:
Use the same procedure as for the LH side.
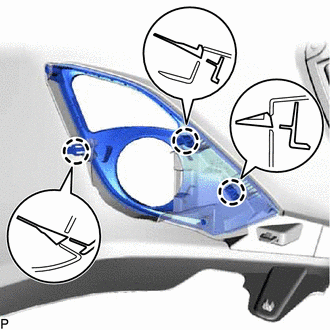
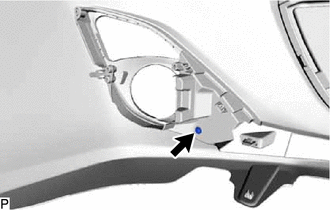
- INSTALL FOG LIGHT COVER LH (w/ Fog Light)
- Engage the 3 claws.
 Courtesy of © TOYOTA, LICENSE AGREEMENT TMS1002 Courtesy of © TOYOTA, LICENSE AGREEMENT TMS1002
|
- Install the fog light cover LH with the screw.
 Courtesy of © TOYOTA, LICENSE AGREEMENT TMS1002 Courtesy of © TOYOTA, LICENSE AGREEMENT TMS1002
|
- INSTALL FOG LIGHT COVER RH (w/ Fog Light)
HINT:
Use the same procedure as for the LH side.
- INSTALL FOG LIGHT ASSEMBLY LH (w/ Fog Light)
Refer to PROCEDURE - Step 1
- INSTALL FOG LIGHT ASSEMBLY RH (w/ Fog Light)
HINT:
Use the same procedure as for the LH side.
- INSTALL FRONT TURN SIGNAL LIGHT ASSEMBLY LH
Refer to PROCEDURE - Step 1
- INSTALL FRONT TURN SIGNAL LIGHT ASSEMBLY RH
HINT:
Use the same procedure as for the LH side.
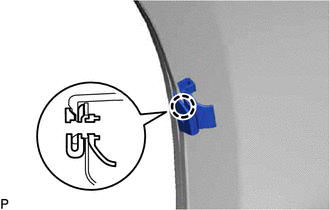
- INSTALL FRONT FENDER LINER RETAINER
- Engage the claw to install the front fender liner retainer.
 Courtesy of © TOYOTA, LICENSE AGREEMENT TMS1002 Courtesy of © TOYOTA, LICENSE AGREEMENT TMS1002
|
HINT:
Use the same procedure for the RH side and LH side.
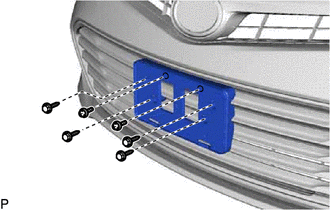
- INSTALL FRONT LICENSE PLATE BRACKET SUB-ASSEMBLY
- Install the front license plate bracket sub-assembly with the 6 screws.
 Courtesy of © TOYOTA, LICENSE AGREEMENT TMS1002 Courtesy of © TOYOTA, LICENSE AGREEMENT TMS1002
|