Removal [12/2013 - 11/2016]: Procedure
WARNING: This page is about a different variant/trim than selected.
- REMOVE NO. 1 ENGINE UNDER COVER
Refer to PROCEDURE - Step 8
- SEPARATE FRONT FENDER LINER LH
Refer to PROCEDURE - Step 11
- REMOVE FRONT FENDER APRON SEAL LH
Refer to PROCEDURE - Step 13
- DRAIN AUTOMATIC TRANSAXLE FLUID
See step 4
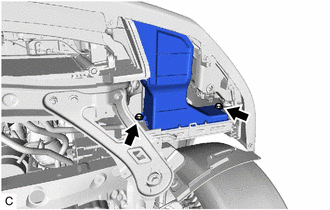
- REMOVE TRANSMISSION OIL COOLER AIR DUCT
- Remove the 2 bolts and transmission oil cooler air duct from the oil cooler assembly.
 Courtesy of © TOYOTA, LICENSE AGREEMENT TMS1002 Courtesy of © TOYOTA, LICENSE AGREEMENT TMS1002
|
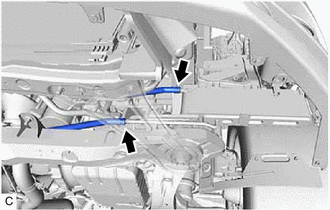
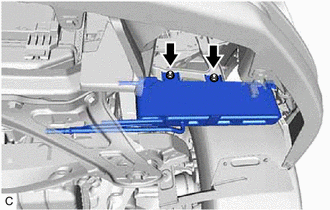
- REMOVE OIL COOLER ASSEMBLY
- Slide the 2 clips and disconnect the No. 1 oil cooler outlet hose and No. 3 transmission oil cooler hose from the oil cooler assembly.
 Courtesy of © TOYOTA, LICENSE AGREEMENT TMS1002 Courtesy of © TOYOTA, LICENSE AGREEMENT TMS1002
|
- Remove the 2 nuts and oil cooler assembly from the oil cooler bracket.
 Courtesy of © TOYOTA, LICENSE AGREEMENT TMS1002 Courtesy of © TOYOTA, LICENSE AGREEMENT TMS1002
|
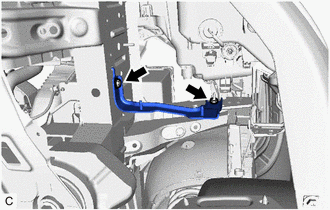
- REMOVE OIL COOLER BRACKET
HINT:
Perform this procedure only when replacement of the oil cooler bracket is necessary.
- Remove the bolt, nut and oil cooler bracket from the body.
 Courtesy of © TOYOTA, LICENSE AGREEMENT TMS1002 Courtesy of © TOYOTA, LICENSE AGREEMENT TMS1002
|