REAR NO. 1 SEAT ASSEMBLY (for RH Side): Disassembly
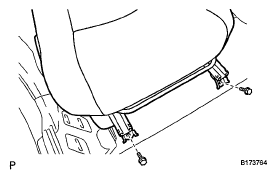
- REMOVE REAR NO. 1 SEAT INNER BELT ASSEMBLY
(See
REMOVAL
)
 Courtesy of © TOYOTA, LICENSE AGREEMENT TMS1002
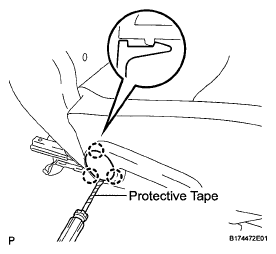
- REMOVE REAR SEAT RECLINING UPPER COVER
- Using a screwdriver wrapped with protective tape, disengage the 3 claws and remove the rear seat reclining upper cover.
 Courtesy of © TOYOTA, LICENSE AGREEMENT TMS1002
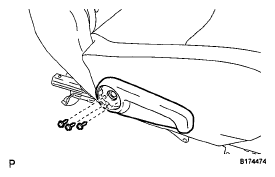
- REMOVE NO. 1 RECLINING ADJUSTER RELEASE HANDLE
- Remove the 3 screws and remove the No. 1 reclining adjuster release handle.
 Courtesy of © TOYOTA, LICENSE AGREEMENT TMS1002
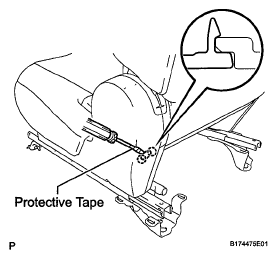
- REMOVE SEAT ADJUSTER COVER CAP
- Using a screwdriver wrapped with protective tape, disengage the 2 claws and remove the seat adjuster cover cap.
 Courtesy of © TOYOTA, LICENSE AGREEMENT TMS1002
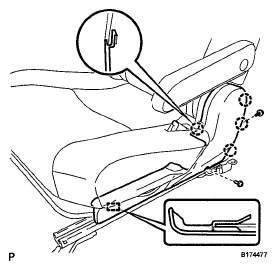
- REMOVE REAR SEAT CUSHION MOULDING LH
- Remove the 2 screws.
- Disengage the 4 claws.
- Disengage the guide and remove the rear seat cushion moulding LH.
 Courtesy of © TOYOTA, LICENSE AGREEMENT TMS1002
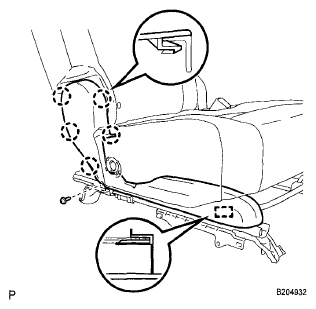
- REMOVE REAR SEAT CUSHION MOULDING RH
- Remove the screw.
- Disengage the 5 claws.
- Disengage the guide and remove the rear seat cushion moulding RH.
 Courtesy of © TOYOTA, LICENSE AGREEMENT TMS1002
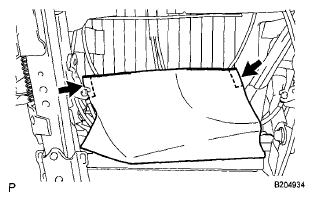
- REMOVE REAR NO. 1 SEAT CUSHION COVER WITH PAD
- Disengage the 2 hooks.
 Courtesy of © TOYOTA, LICENSE AGREEMENT TMS1002
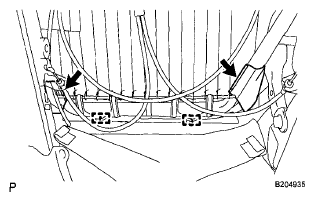
- Disengage the 2 hooks.
- Remove the 2 hog rings.
 Courtesy of © TOYOTA, LICENSE AGREEMENT TMS1002
- Separate the 3 buttons.
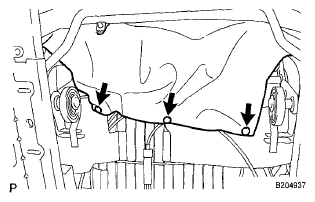 Courtesy of © TOYOTA, LICENSE AGREEMENT TMS1002
- Disengage the 12 hooks.
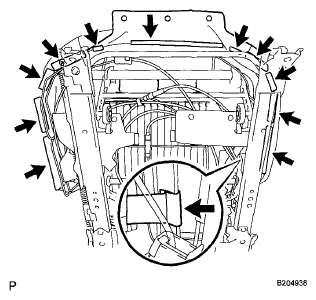 Courtesy of © TOYOTA, LICENSE AGREEMENT TMS1002
- Remove the 4 hog rings and the rear No. 1 seat cushion cover with pad.
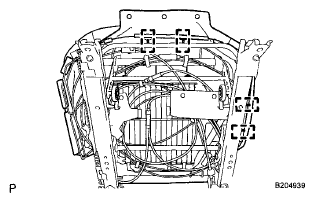 Courtesy of © TOYOTA, LICENSE AGREEMENT TMS1002
- REMOVE NO. 1 REAR SEAT COVER LH
- Disengage the 2 hooks and remove the No. 1 rear seat cover LH.
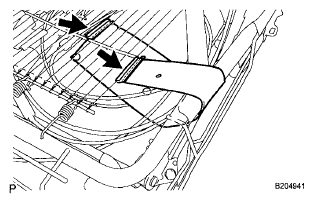 Courtesy of © TOYOTA, LICENSE AGREEMENT TMS1002
- REMOVE NO. 1 REAR SEAT COVER RH
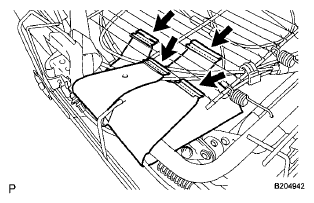
- Disengage the 4 hooks and remove the No. 1 rear seat cover RH.
 Courtesy of © TOYOTA, LICENSE AGREEMENT TMS1002
- REMOVE NO. 2 REAR SEAT COVER
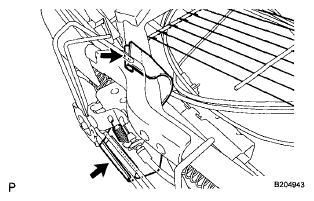
- Disengage the 2 hooks and remove the No. 2 rear seat cover.
 Courtesy of © TOYOTA, LICENSE AGREEMENT TMS1002
- REMOVE SEPARATE TYPE REAR NO. 1 SEAT CUSHION COVER
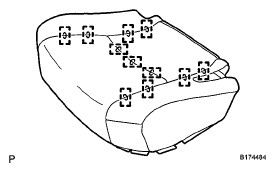
- Remove the 11 hog rings and the separate type rear No. 1 seat cushion cover.
 Courtesy of © TOYOTA, LICENSE AGREEMENT TMS1002
- REMOVE NO. 1 REAR SEAT ARMREST CAP
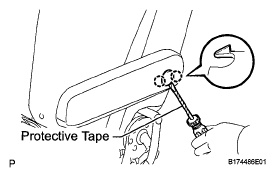
- Using a screwdriver wrapped with protective tape, disengage the 2 claws and remove the No. 1 rear seat armrest cap.
 Courtesy of © TOYOTA, LICENSE AGREEMENT TMS1002
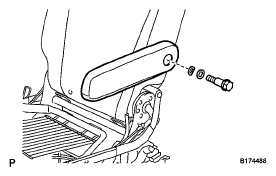
- REMOVE REAR SEAT ARMREST ASSEMBLY
- Remove the bolt, washer, wave washer and the rear seat armrest assembly.
 Courtesy of © TOYOTA, LICENSE AGREEMENT TMS1002
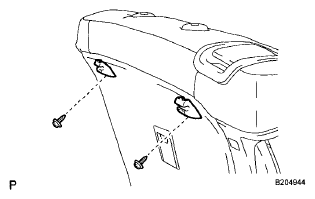
- REMOVE TONNEAU COVER HOOK HOLDER
- Remove the 2 screws and the 2 tonneau cover hook holders.
 Courtesy of © TOYOTA, LICENSE AGREEMENT TMS1002
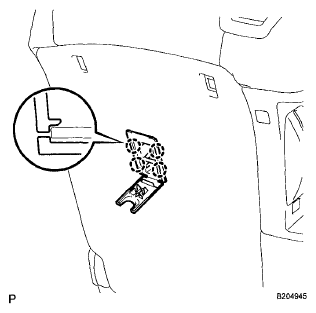
- REMOVE REAR SEATBACK COVER
- Disengage the 4 claws and remove the rear seatback cover.
 Courtesy of © TOYOTA, LICENSE AGREEMENT TMS1002
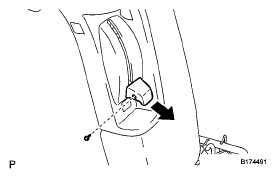
- REMOVE RECLINING REMOTE CONTROL LEVER KNOB (w/ Rear No. 2 Seat)
- Remove the screw and the reclining remote control lever knob as shown in the illustration.
 Courtesy of © TOYOTA, LICENSE AGREEMENT TMS1002
- REMOVE REAR SEAT LOCK STRIKER COVER CAP (w/ Rear No. 2 Seat)
- Using a screwdriver wrapped with protective tape, disengage the 4 claws and remove the 2 rear seat lock striker cover caps.
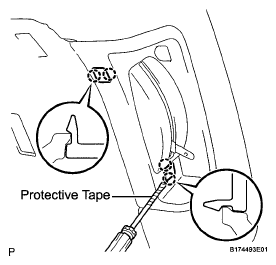 Courtesy of © TOYOTA, LICENSE AGREEMENT TMS1002
- REMOVE NO. 1 REAR SEATBACK LOCK STRIKER COVER (w/ Rear No. 2 Seat)
- Using a screwdriver wrapped with protective tape, disengage the 2 claws and remove the No. 1 rear seatback lock striker cover.
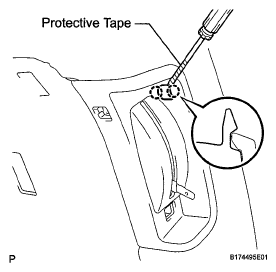 Courtesy of © TOYOTA, LICENSE AGREEMENT TMS1002
- REMOVE NO. 1 REAR SEAT BEZEL COVER (w/ Rear No. 2 Seat)
- Remove the 3 screws and the No. 1 rear seat bezel cover.
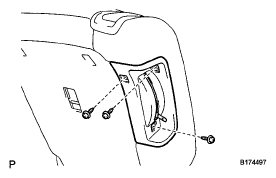 Courtesy of © TOYOTA, LICENSE AGREEMENT TMS1002
- REMOVE REAR SEAT LOCK STRIKER COVER
- Using a screwdriver wrapped with protective tape, disengage the claw.
- Disengage the guide and remove the rear seat lock striker cover.
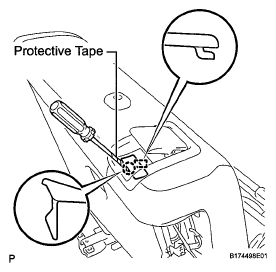 Courtesy of © TOYOTA, LICENSE AGREEMENT TMS1002
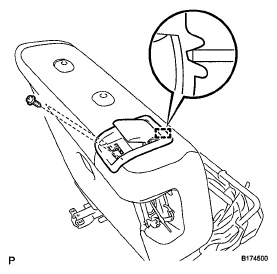
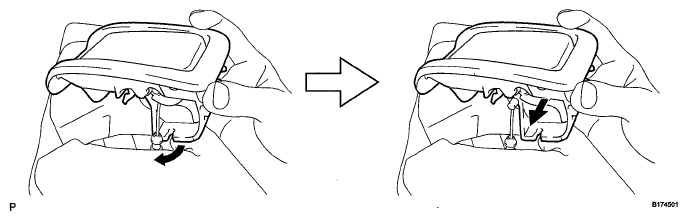
- REMOVE REAR SEAT LOCK CONTROL LEVER SUB-ASSEMBLY
- Remove the 2 screws.
- Disengage the guide.
- Disconnect the rear seat lock control cable and remove the rear seat lock control lever sub-assembly as shown in the illustration.
 Courtesy of © TOYOTA, LICENSE AGREEMENT TMS1002
 Courtesy of © TOYOTA, LICENSE AGREEMENT TMS1002
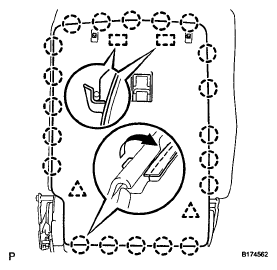
- REMOVE REAR SEATBACK BOARD CARPET ASSEMBLY (w/o Rear No. 2 Seat)
- Disengage the 20 claws as shown in the illustration.
- Disengage the 2 clips.
- Disengage the 2 guides and remove the rear seatback board carpet assembly.
 Courtesy of © TOYOTA, LICENSE AGREEMENT TMS1002
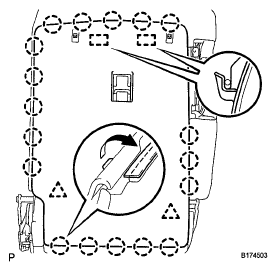
- REMOVE REAR SEATBACK BOARD CARPET ASSEMBLY (w/ Rear No. 2 Seat)
- Disengage the 18 claws as shown in the illustration.
- Disengage the 2 clips.
- Disengage the 2 guides and remove the rear seatback board carpet assembly.
 Courtesy of © TOYOTA, LICENSE AGREEMENT TMS1002
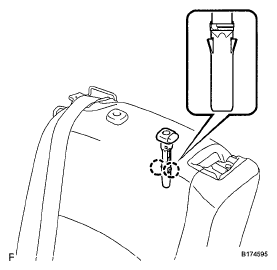
- REMOVE REAR NO. 1 SEAT HEADREST SUPPORT ASSEMBLY LH
- Disengage the 2 claws and remove the rear No. 1 seat headrest support assembly LH.
 Courtesy of © TOYOTA, LICENSE AGREEMENT TMS1002
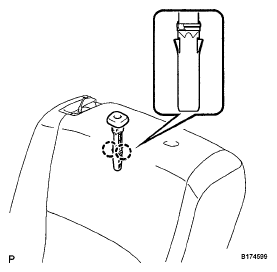
- REMOVE REAR NO. 1 SEAT HEADREST SUPPORT ASSEMBLY RH
- Disengage the 2 claws and remove the rear No. 1 seat headrest support assembly RH.
 Courtesy of © TOYOTA, LICENSE AGREEMENT TMS1002
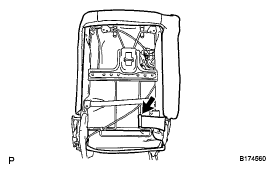
- REMOVE REAR NO. 1 SEATBACK COVER WITH PAD (w/o Rear No. 2 Seat)
- Disengage the hook and remove the rear No. 1 seatback cover with pad.
 Courtesy of © TOYOTA, LICENSE AGREEMENT TMS1002
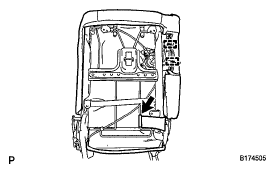
- REMOVE REAR NO. 1 SEATBACK COVER WITH PAD (w/ Rear No. 2 Seat)
- Disengage the hook.
- Remove the 2 hog rings and the rear No. 1 seatback cover with pad.
 Courtesy of © TOYOTA, LICENSE AGREEMENT TMS1002
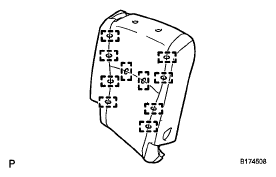
- REMOVE SEPARATE TYPE REAR NO. 1 SEATBACK COVER
- Remove the 10 hog rings and the separate type rear No. 1 seatback cover.
 Courtesy of © TOYOTA, LICENSE AGREEMENT TMS1002
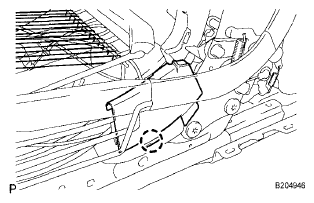
- REMOVE REAR SEAT RECLINING INNER PROTECTOR
- Disengage the claw and remove the rear seat reclining inner protector.
 Courtesy of © TOYOTA, LICENSE AGREEMENT TMS1002
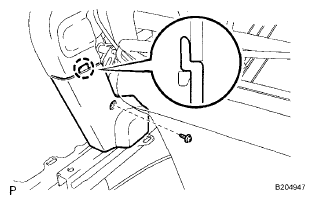
- REMOVE REAR SEAT RECLINING INNER REAR COVER
- Remove the screw.
- Disengage the claw and remove the rear seat reclining inner rear cover.
 Courtesy of © TOYOTA, LICENSE AGREEMENT TMS1002
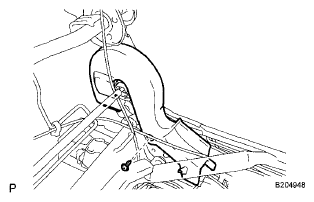
- REMOVE REAR SEAT RECLINING INNER FRONT COVER
- Remove the screw and the rear seat reclining inner front cover.
 Courtesy of © TOYOTA, LICENSE AGREEMENT TMS1002
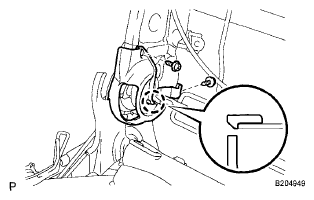
- REMOVE REAR SEATBACK INNER COVER
- Remove the 2 screws.
- Disengage the claw and remove the rear seatback inner cover.
 Courtesy of © TOYOTA, LICENSE AGREEMENT TMS1002
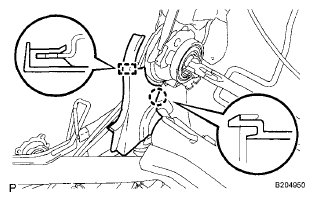
- REMOVE RECLINING ADJUSTER INSIDE COVER RH
- Disengage the claw.
- Disengage the guide and remove the reclining adjuster inside cover RH.
 Courtesy of © TOYOTA, LICENSE AGREEMENT TMS1002
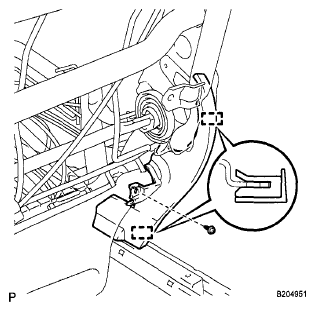
- REMOVE NO. 1 REAR SEAT RECLINING COVER
- Remove the screw.
- Disengage the 2 guides and remove the No. 1 rear seat reclining cover.
 Courtesy of © TOYOTA, LICENSE AGREEMENT TMS1002
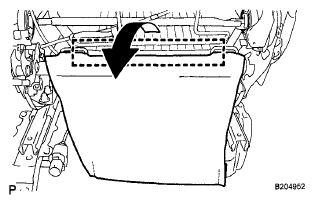
- REMOVE NO. 1 REAR SEAT COVER
- Disengage the hook and remove the No. 1 rear seat cover.
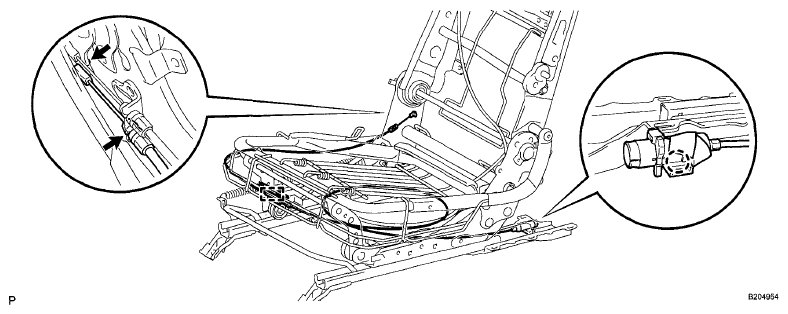
- REMOVE SEAT ADJUSTER CONTROL CABLE ASSEMBLY
- Disengage the hook and separate the seat adjuster control cable assembly with the rear seat hook.
 Courtesy of © TOYOTA, LICENSE AGREEMENT TMS1002
 Courtesy of © TOYOTA, LICENSE AGREEMENT TMS1002
- Disconnect the 2 cable clamps.
- Disengage the claw and remove the seat adjuster control cable assembly.
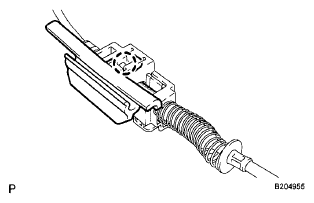
- REMOVE REAR SEAT HOOK
- Disengage the claw and remove the rear seat hook.
 Courtesy of © TOYOTA, LICENSE AGREEMENT TMS1002
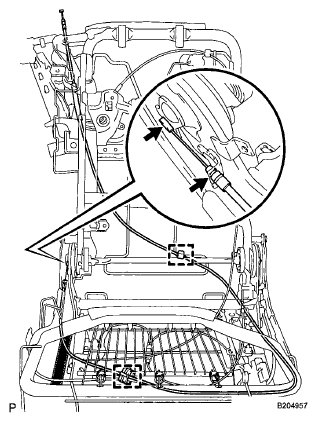
- REMOVE SEAT TRACK CONTROL CABLE ASSEMBLY
- Remove the 2 clamps.
- Disconnect the 2 cable clamps and remove the seat track control cable assembly.
 Courtesy of © TOYOTA, LICENSE AGREEMENT TMS1002
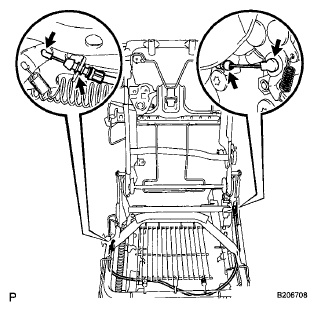
- REMOVE REAR SEAT RECLINING CONTROL CABLE SUB-ASSEMBLY (w/o Rear No. 2 Seat)
- Disconnect the 4 cable clamps and remove the rear seat reclining control cable sub-assembly.
 Courtesy of © TOYOTA, LICENSE AGREEMENT TMS1002
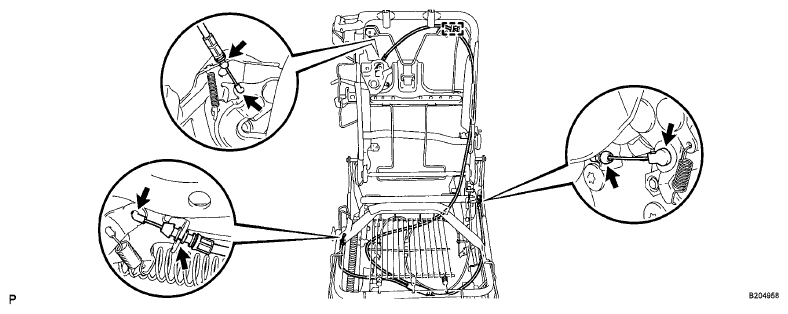
- REMOVE REAR SEAT RECLINING CONTROL CABLE SUB-ASSEMBLY (w/ Rear No. 2 Seat)
- Remove the clamp.
 Courtesy of © TOYOTA, LICENSE AGREEMENT TMS1002
- Disconnect the 6 cable clamps and remove the rear seat reclining control cable sub-assembly.
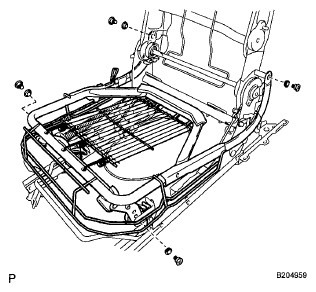
- REMOVE REAR SEAT CUSHION SPRING ASSEMBLY
- Using a T45 "TORX" socket, remove the 4 "TORX" bolts, bushes, and the rear seat cushion spring assembly.
 Courtesy of © TOYOTA, LICENSE AGREEMENT TMS1002
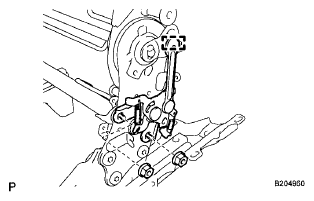
- REMOVE REAR SEATBACK LOCK CONTROL LEVER SUB-ASSEMBLY
- Remove the 2 nuts.
- Disengage the guide and remove the rear seatback lock control lever sub-assembly.
 Courtesy of © TOYOTA, LICENSE AGREEMENT TMS1002
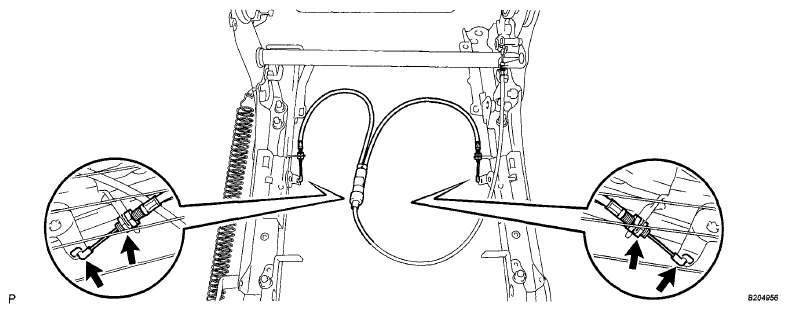
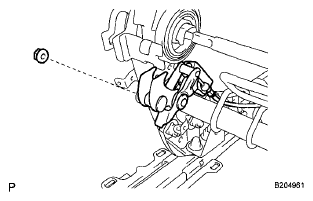
- REMOVE REAR SEATBACK STOPPER SUB-ASSEMBLY
- Disconnect the 4 cable clamps.
 Courtesy of © TOYOTA, LICENSE AGREEMENT TMS1002
- Remove the nut and the rear seatback stopper sub-assembly.
 Courtesy of © TOYOTA, LICENSE AGREEMENT TMS1002