Removal (Camry & Camry Solara)
- Mark location of hood bracket and bolts for installation reference. Remove hood. Disconnect negative battery cable. Disconnect negative battery cable and wait at least 90 seconds before working on vehicle. Remove battery. Remove air cleaner case with air intake hose. If equipped with cruise control, disconnect cruise control connector. Remove 3 bolts, cruise control bracket and actuator. Remove starter wire connectors. Remove 2 bolts and starter.
- On V6 models, remove 2 bolts, clutch release cylinder with hoses attached and secure aside. Remove 2 bolts and nut and remove clutch accumulator. Remove 2 bolts and clutch hydraulic line bracket. On all models, disconnect ground straps from transmission. Remove 2 bolts and exhaust manifold stay. On V6 models, disconnect engine wire harness from clamp. On all models, disconnect vehicle speed sensor and back-up light switch connectors. Remove 2 clips, washers and control cables from transaxle. Remove upper transaxle mounting bolts.
- Raise and support vehicle. Remove front wheels. Remove rear engine dust shield. Drain transaxle fluid. Remove axle shafts from transaxle. See appropriate article in DRIVE AXLES. Remove 2 bolts, nut and exhaust pipe bracket. Remove front exhaust pipe and catalytic converter. Discard exhaust pipe gaskets and exhaust pipe-to-exhaust manifold flange nuts.
- Disconnect stabilizer bar link and bracket. Remove fuel line cover. Disconnect outer tie rod ends from steering knuckle. Support steering gear so steering gear remains in place. Remove steering gear-to-crossmember bolts/nuts. If vehicle is equipped with power steering, DO NOT remove power steering lines.
- On V6 models, remove 2 bolts and front engine mount-to-transaxle damper. Remove right side exhaust manifold support. On all models, remove 3 engine front side mount Silver or Green mounting bolts. Remove 2 hole plugs, nut, 3 bolts and engine left mounting insulator and bracket.
- Remove hole plug and engine rear side mounting nuts. Install engine support brace. Secure engine to support brace. Remove front subframe suspension member-to-body bolts. Using a hoist, slightly raise engine to remove weight from engine mounts.
- Remove hole plug and rear engine mount-to-subframe suspension member nuts. See Fig 1. Disconnect power steering return pipe clamps from subframe. Remove fender liners. Remove bolts/nuts and subframe suspension member located below engine and transaxle.
- Using a transmission jack, support transaxle. On 4-cylinder models, remove left stiffener plate. Remove right stiffener plate and intake manifold brace. On all models, remove lower cover plate. Remove remaining transaxle-to-engine bolts. Slightly lower left side of engine and remove transaxle.
- Place reference mark on clutch cover and flywheel for reassembly reference. Alternately loosen clutch cover bolts until spring tension is released.
- Remove clutch cover and clutch disc. Remove clutch release fork and clutch release bearing as an assembly from transaxle (if necessary). See Fig 2. Disassemble clutch release fork and clutch release bearing (if necessary).
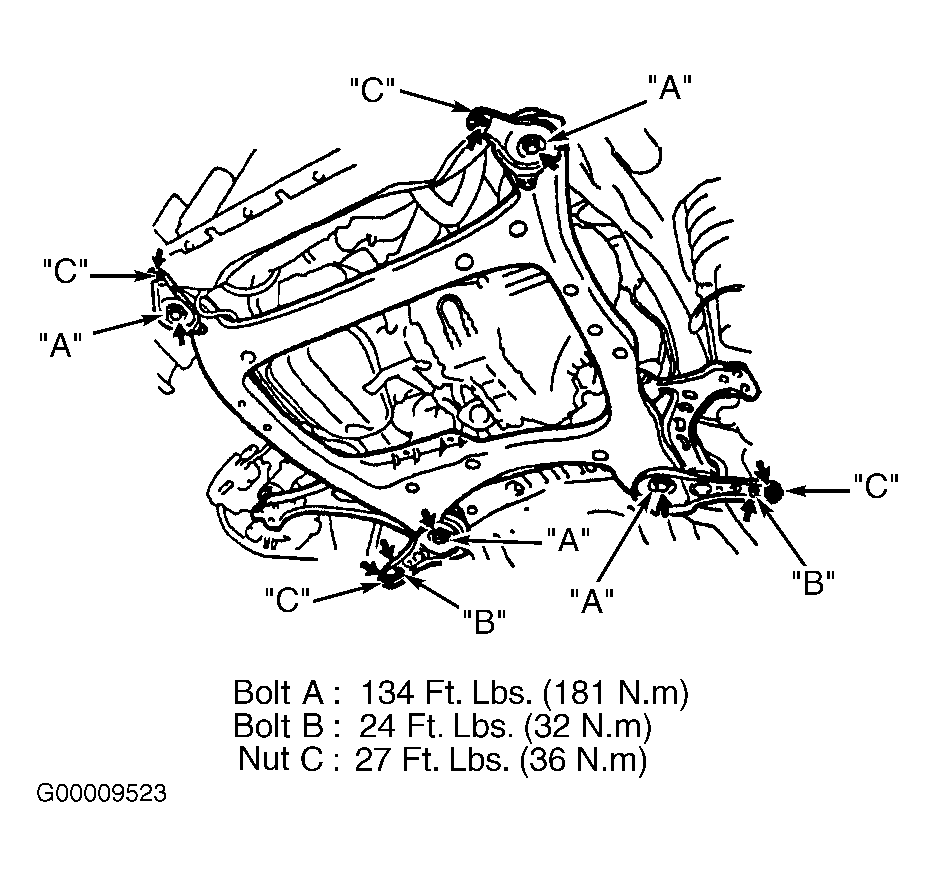 Courtesy of © TOYOTA, LICENSE AGREEMENT TMS1002
 Courtesy of © TOYOTA, LICENSE AGREEMENT TMS1002