- Release fuel pressure. See FUEL PRESSURE RELEASE . Disconnect negative battery cable. Drain cooling system.
- Disconnect control cables from throttle body (if necessary). Remove battery and battery tray (if necessary). Drain cooling system.
- Remove air cleaner cap and airflow meter with air cleaner hose. Remove cruise control actuator and bracket. Disconnect necessary electrical connections, ground straps, coolant hoses, fuel lines and vacuum hoses for removal of air intake chamber and cylinder head.
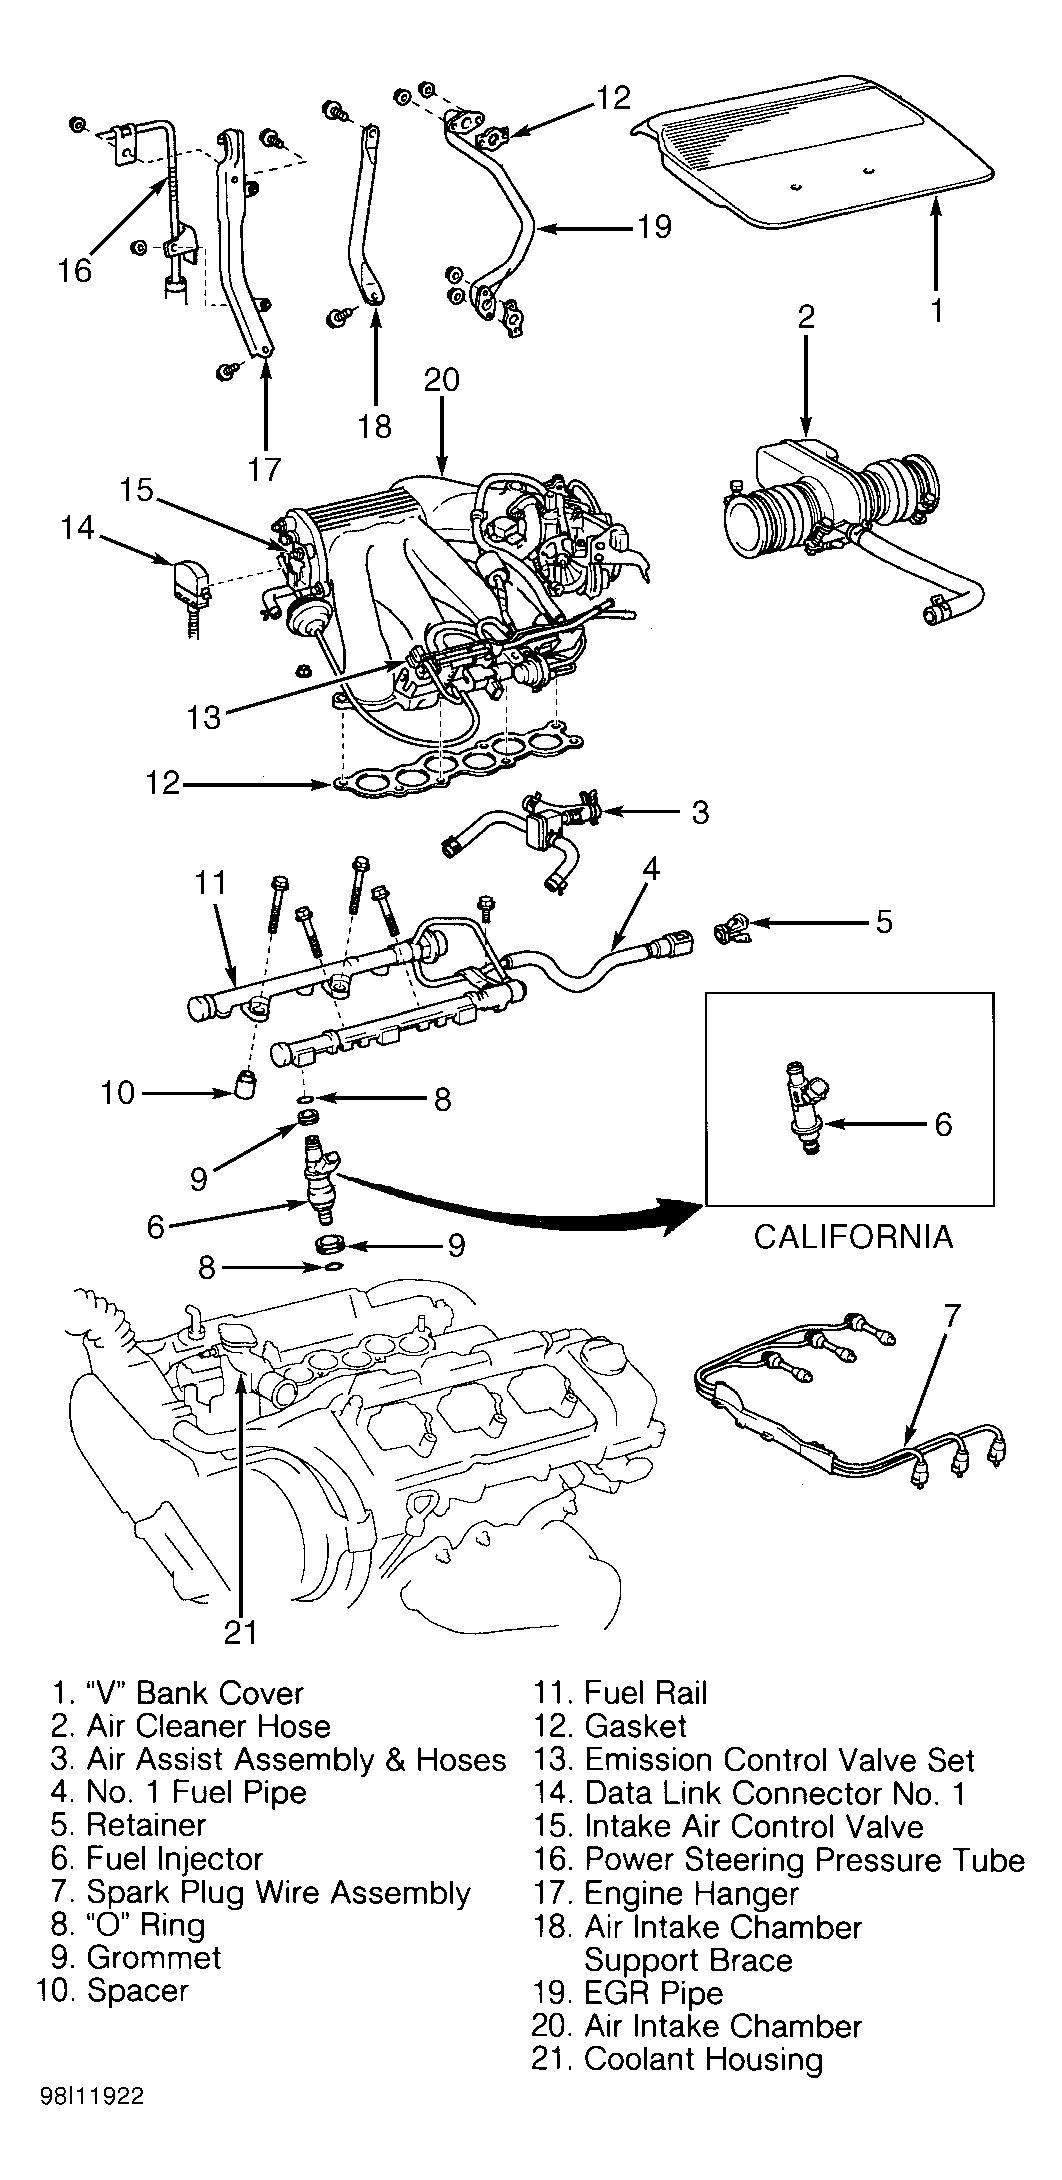
- Remove right engine mount brace, located near timing belt cover. Remove nuts and "V" bank cover, located above intake manifold. See Fig 1. Disconnect necessary electrical connectors and vacuum hoses from vacuum switching valve assembly located above intake manifold. Remove vacuum switching valve assembly.
- Disconnect brackets and hoses from air intake chamber. Remove No. 1 engine hanger and air intake chamber support. See Fig 1. Remove EGR pipe and gaskets (if necessary).
- Remove bolts/nuts, air intake chamber and gasket. Disconnect electrical connectors for removal of engine wiring located above valve covers. Remove nuts and engine wiring.
- Remove ignition coils and spark plugs. Mark ignition coil installation location for reassembly reference. Raise and support vehicle. Remove front exhaust pipe that fits between exhaust manifolds and catalytic converter.
- Remove timing belt, camshaft sprockets and No. 2 idler pulley. See TIMING BELT . Remove No. 3 timing belt cover from front of cylinder heads. See Figure.
- Remove cylinder head rear plate, coolant inlet pipe and air assist hose. See Fig 1. Remove intake manifold bolts/nuts, washers and intake manifold along with delivery pipes and injectors.
- If removing delivery pipe and injectors from intake manifold, remove No. 2 fuel pipe from delivery pipe. See Fig 1. Remove pressure regulator and pulsation damper (if necessary).
CAUTION:
DO NOT allow injectors to fall from delivery pipe when removing from intake manifold.
- To disassemble quick disconnect fuel fittings, remove fuel line-to-intake manifold clamp bolt at rear of intake manifold. Remove fuel pipe clamp from No. 1 fuel pipe at fuel filter. Perform STEP 1. See Figure. Ensure area around No. 1 fuel pipe and fuel filter is clean. Depress both sides of retainer and pull No. 1 fuel pipe with disconnect fitting from fuel filter. Perform STEP 2. See Figure.
CAUTION:
Use care when disconnecting No. 1 fuel pipe from fuel filter, as some residual fuel pressure may still exist in the fuel system.
 Courtesy of © TOYOTA, LICENSE AGREEMENT TMS1002
- Remove coolant outlet housing from front of cylinder heads. See Fig 1. Remove exhaust manifold support brackets and exhaust manifolds and gaskets from cylinder heads.
- Remove power steering pump bracket from front of cylinder head (if necessary). Remove oil dipstick, dipstick tube and "O" ring. Remove bolts, valve covers and gaskets.
- Remove bolts, camshaft position sensor and gasket from cylinder head. See Figure. Remove camshafts. See CAMSHAFTS .
CAUTION:
Cylinder head bolts must be loosened in proper sequence to prevent cylinder head warpage.
- Using an 8-mm hexagon wrench, remove recessed cylinder head bolts. Loosen 12-point cylinder head bolts in sequence using several steps. See Figure. Remove 12-point cylinder head bolts, cylinder head and cylinder head gasket.
- Note location of adjusting shims and valve lifters for reassembly reference. Components must be installed in original location. Remove adjusting shims and valve lifters (if necessary).