Valve Guides
- Ensure valve guide inside diameter is within specification. See CYLINDER HEAD table under ENGINE SPECIFICATIONS. Replace valve guide if inside diameter exceeds specification.
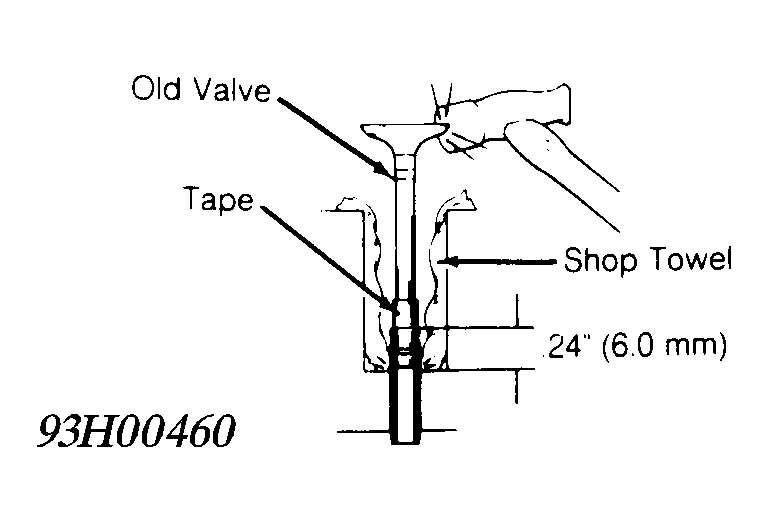
- To replace valve guide, wrap tape around old valve stem. Ensure tape is .24" (6.0 mm) from end of valve stem. From top of cylinder head, install old valve in valve guide with tape area resting on valve guide. See Fig 1.
- Hit old valve using hammer to break off valve guide. Remove snap ring. Heat cylinder head to 194°F (90°C). Using hammer and Valve Guide Remover/Installer (SST 09201-70010), drive valve guide out from camshaft side of cylinder head.
- Measure cylinder head valve guide bore inside diameter. If bore inside diameter is .4331-.4341" (11.000-11.026 mm), use standard valve guide.
- If bore inside diameter exceeds .4341" (11.026 mm), machine valve guide bore to .4350-.4361" (11.050-11.077 mm) for oversize valve guide. If bore inside diameter exceeds .4361" (11.077 mm), replace cylinder head.
- To install valve guide, heat cylinder head to 194°F (90°C). Using hammer and valve guide remover/installer, drive valve guide in from camshaft side of cylinder head until snap ring contacts cylinder head surface.
- Using .24" (6.0 mm) reamer, ream valve guide to obtain specified valve stem-to-guide oil clearance. See CYLINDER HEAD table.
 Courtesy of © TOYOTA, LICENSE AGREEMENT TMS1002