Removal (Celica GTS)
- Remove negative battery cable. Drain coolant. Remove ignition coil connector and high tension cord. Remove suspension upper brace. On automatic transaxle models, remove throttle cable and bracket from throttle body. On all models, remove accelerator cable from throttle body. Remove radiator reservoir tank.
- Remove airflow meter connector. Remove air clearer cap clips. Remove air cleaner hose, airflow meter with cap, and air cleaner. Remove oxygen sensor connector. Remove exhaust manifold upper heat insulator. Remove alternator.
- Remove No. 1 alternator bracket. Raise and support vehicle. Remove right front wheel. Remove cover under engine. Remove suspension lower crossmember. Remove exhaust pipe from exhaust manifold. Remove exhaust pipe.
- Remove exhaust manifold with lower heat insulator attached. Remove distributor. Disconnect oil pressure switch. Disconnect coolant temperature and cold start injector switches. Remove radiator, by-pass, heater and emission control hoses.
- Remove coolant outlet bolts and coolant outlet. Remove coolant by-pass pipe, gasket and "O" ring. Remove throttle position sensor connector, ventilation, emission and air valve hoses from throttle body. Remove 4 throttle body bolts and throttle body. Remove No. 2 engine hanger and intake manifold stay.
- Remove cold start injector connector and pipe. Remove EGR vacuum modulator. Remove brake booster, cruise control, A/C idle-up and Vacuum Switching Valve (VSV) vacuum hoses. Remove fuel injector connectors and fuel hoses. Remove Nos. 1 and 3 intake manifold stays. Remove ground strap, 2 VSV connectors, and power steering hoses.
- Remove intake manifold and air control valve. Remove fuel delivery pipe and injectors. Use care not to drop injectors. Remove cylinder head covers with gaskets. Remove spark plugs, No. 1 engine hanger, power steering fluid reservoir, and camshaft pulleys. Remove No. 1 idler pulley and tension spring. Remove No. 3 timing belt cover.
- Using dial gauge, check camshaft end play. Standard end play is .0039-.0094" (.10-.24 mm). Maximum end play is .0118" (.30 mm). If end play is greater than specification, camshaft and/or cylinder head must be replaced.
- Loosen and remove camshaft bearing cap bolts in sequence. See Fig 1. Remove camshaft bearing caps, oil seal and camshafts. Keep intake and exhaust camshafts arranged for installation reference. Using Socket (SST 09043-88010), loosen and remove cylinder head bolts in sequence. See Fig 2. Remove cylinder head from dowels and place on wooden blocks.
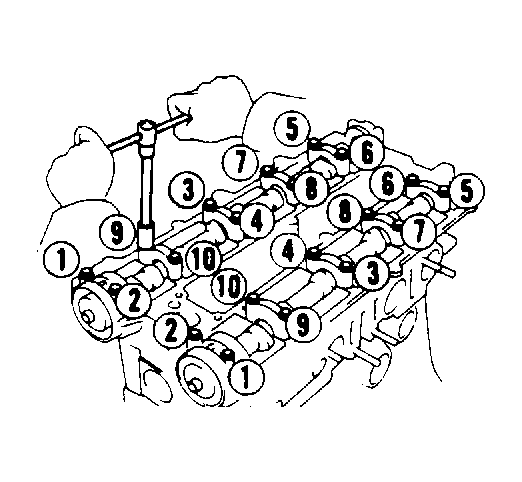 Courtesy of © TOYOTA, LICENSE AGREEMENT TMS1002
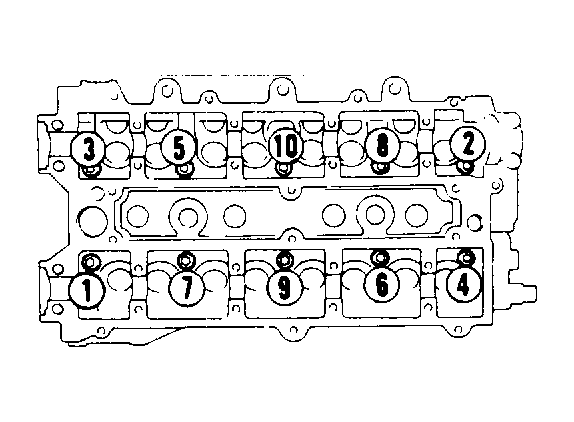 Courtesy of © TOYOTA, LICENSE AGREEMENT TMS1002