- Raise and support the vehicle. See RAISE VEHICLE - 2 STANDS
.
- Open all doors and lower all windows.
- Move the LH and RH front seats forward.
- Locally connect a laptop with Toolbox 3 to the vehicle. See TOOLBOX 3 - CONNECT AND DISCONNECT
.
- Upon successful connection, Service Mode Plus will be enabled, and the "Service Mode Plus" watermark will appear on the touchscreen.
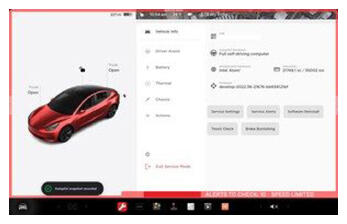 Courtesy of TESLA, INC. Courtesy of TESLA, INC.
|
- Access High Voltage System routines using the UI.
NOTE:
Select Service mode plus > High Voltage.
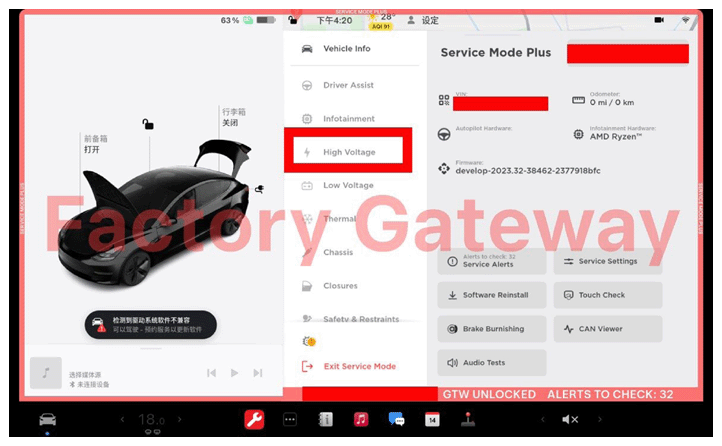 Courtesy of TESLA, INC. Courtesy of TESLA, INC.
|
- Select "Procedures" through UI.
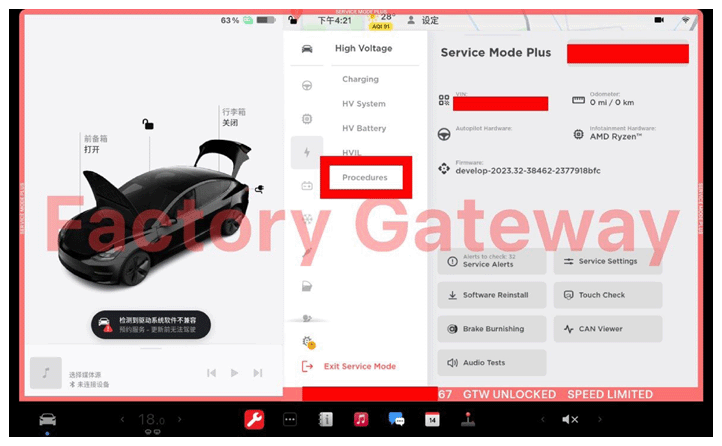 Courtesy of TESLA, INC. Courtesy of TESLA, INC.
|
- Select "REAR Drive INVERTER Replacement" through UI.
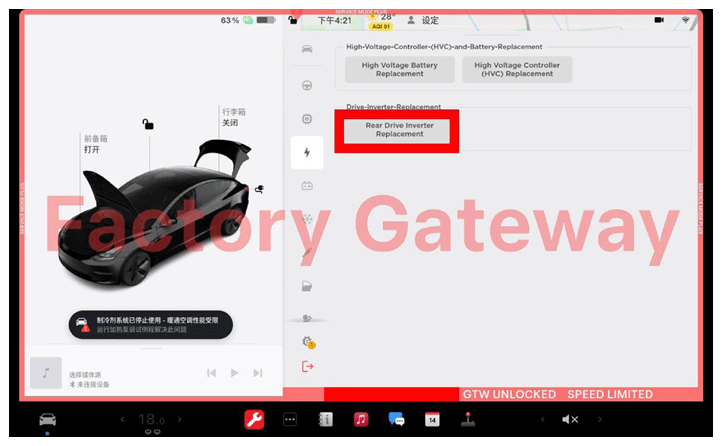 Courtesy of TESLA, INC. Courtesy of TESLA, INC.
|
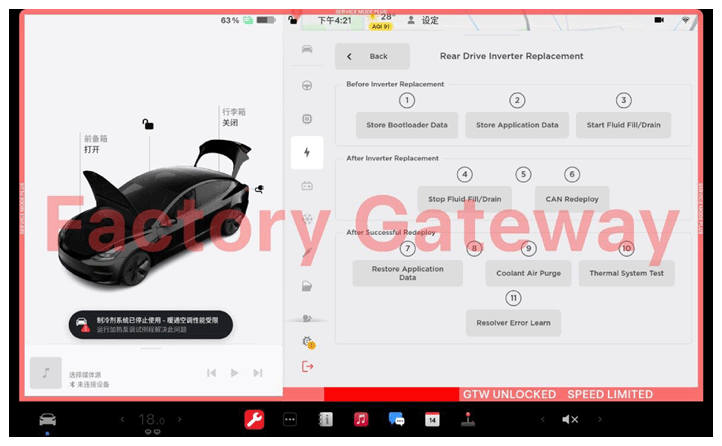 Courtesy of TESLA, INC. Courtesy of TESLA, INC.
|
- Select "Store Bootloader Data" through UI.
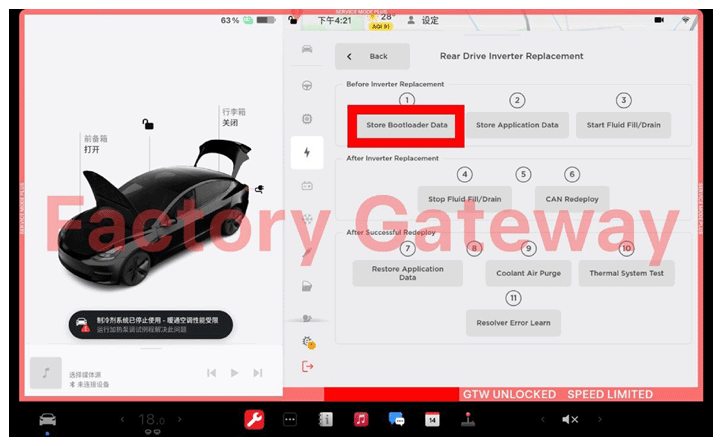 Courtesy of TESLA, INC. Courtesy of TESLA, INC.
|
- Select "Run" through UI to Store Bootloader Data.
NOTE:
Allow routine to complete, ensure routine is successful, then select "close" through UI.
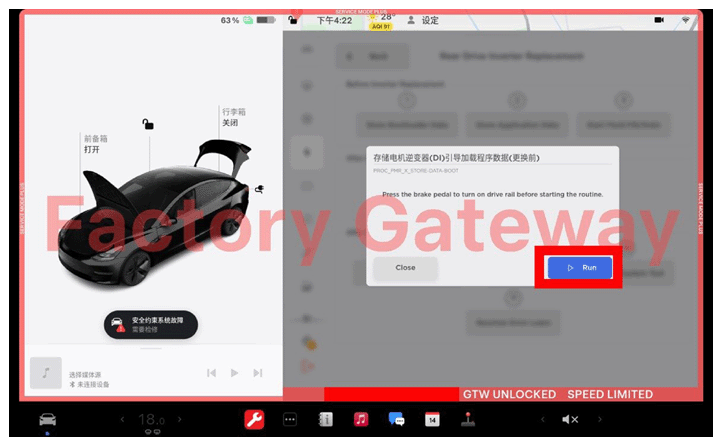 Courtesy of TESLA, INC. Courtesy of TESLA, INC.
|
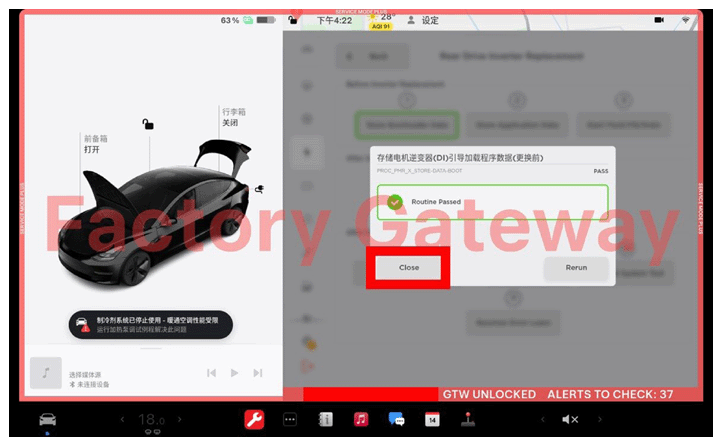 Courtesy of TESLA, INC. Courtesy of TESLA, INC.
|
- Select "Store Application Data" through UI.
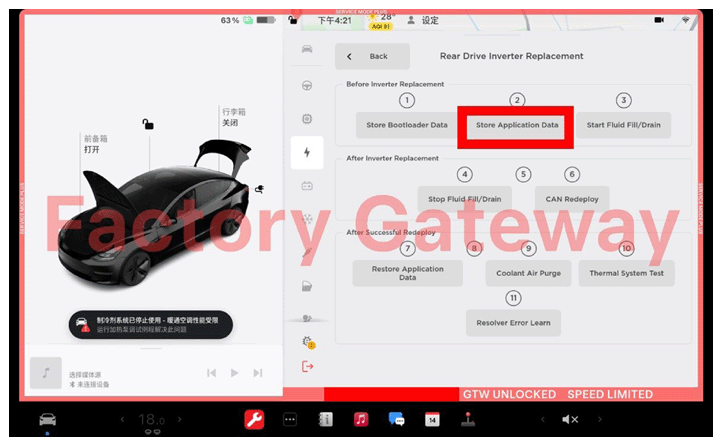 Courtesy of TESLA, INC. Courtesy of TESLA, INC.
|
- Select "Run" through UI to Store Application Data.
NOTE:
Allow routine to complete, ensure routine is successful, then select "close" through UI.
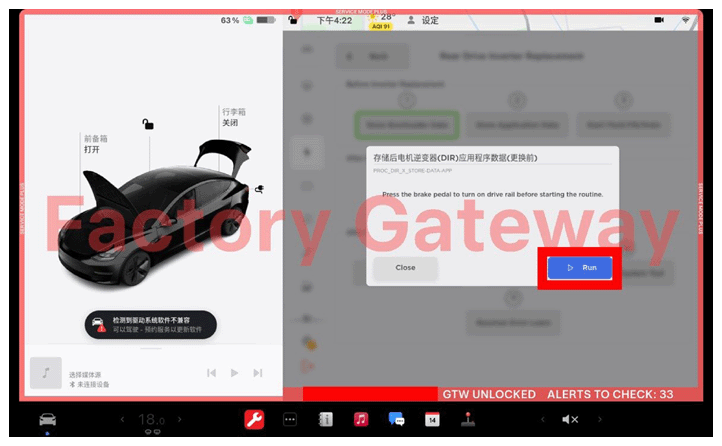 Courtesy of TESLA, INC. Courtesy of TESLA, INC.
|
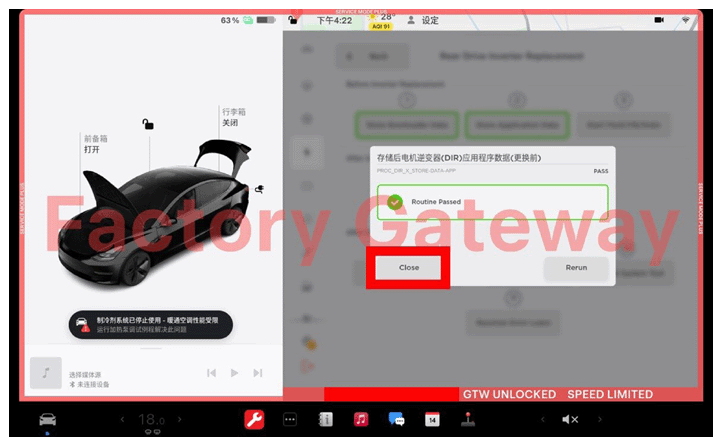 Courtesy of TESLA, INC. Courtesy of TESLA, INC.
|
- Select "Start Fluid Fill/Drain" through UI.
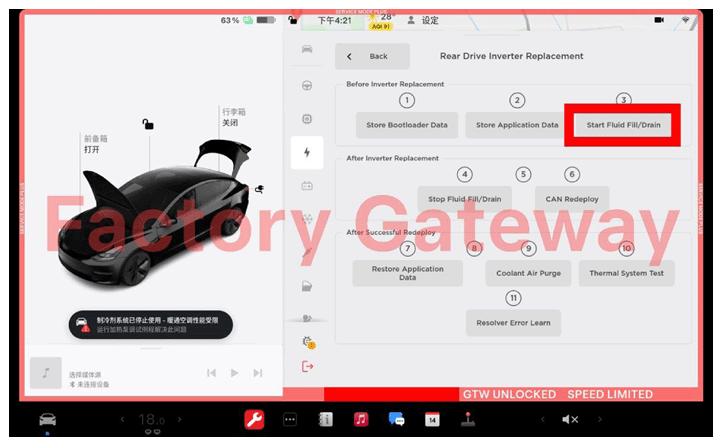 Courtesy of TESLA, INC. Courtesy of TESLA, INC.
|
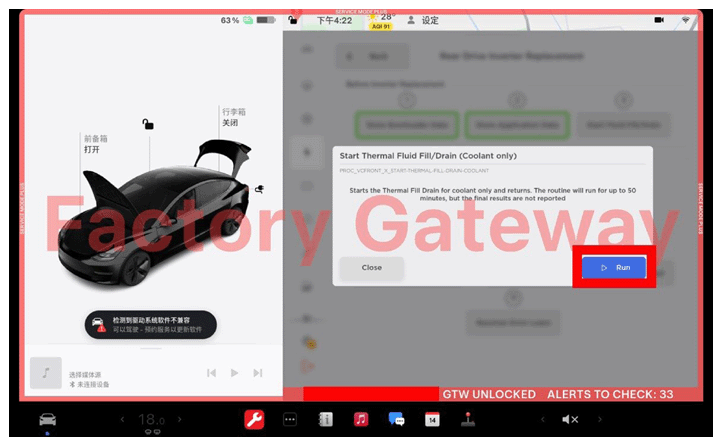
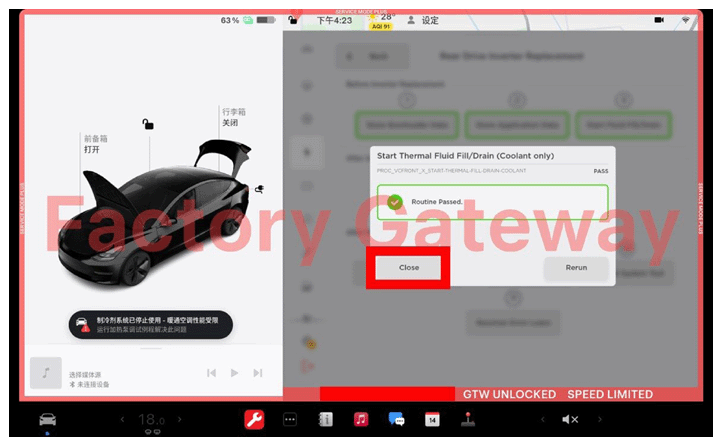
- Select "Run" through UI to Start Fluid Fill/Drain.
NOTE:
Allow routine to complete, ensure routine is successful, then select "close" through UI.
 Courtesy of TESLA, INC. Courtesy of TESLA, INC.
|
 Courtesy of TESLA, INC. Courtesy of TESLA, INC.
|
- Perform Vehicle HV Disablement Procedure. See VEHICLE HV DISABLEMENT PROCEDURE
.
- Remove both rear wheels. See WHEEL ASSEMBLY - REMOVE AND INSTALL
.
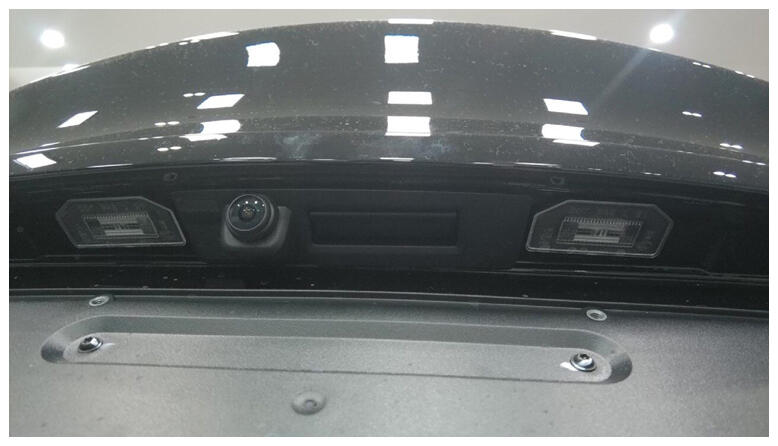
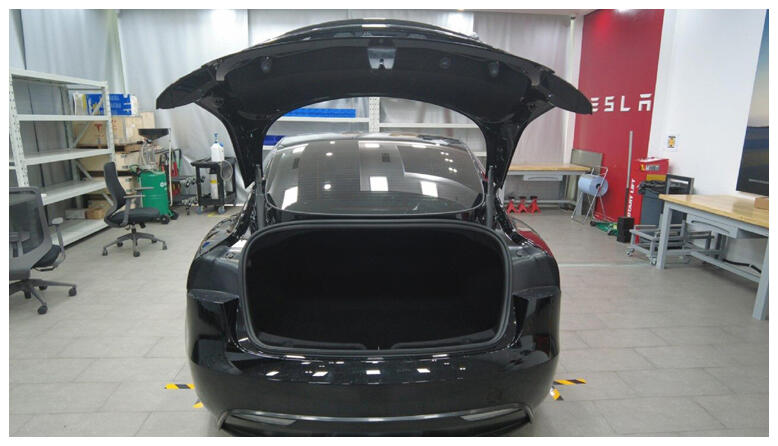
- Open trunk from exterior switch.
 Courtesy of TESLA, INC. Courtesy of TESLA, INC.
|
 Courtesy of TESLA, INC. Courtesy of TESLA, INC.
|
- Remove LH trough trim.
NOTE:
3x clips, 1x bolt, T20, 1.2 N.m.
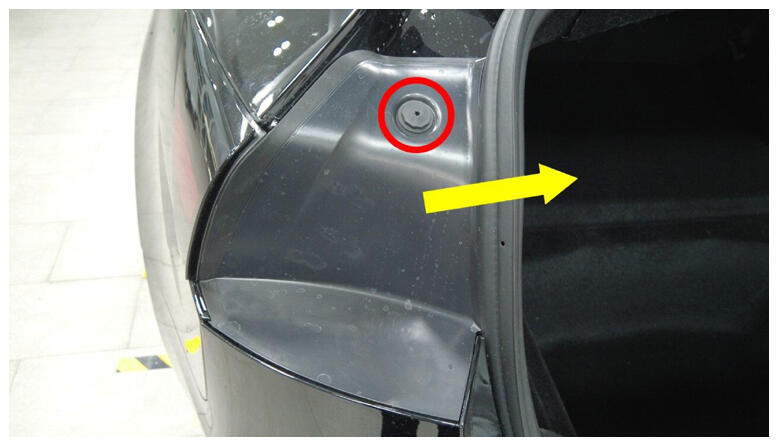 Courtesy of TESLA, INC. Courtesy of TESLA, INC.
|
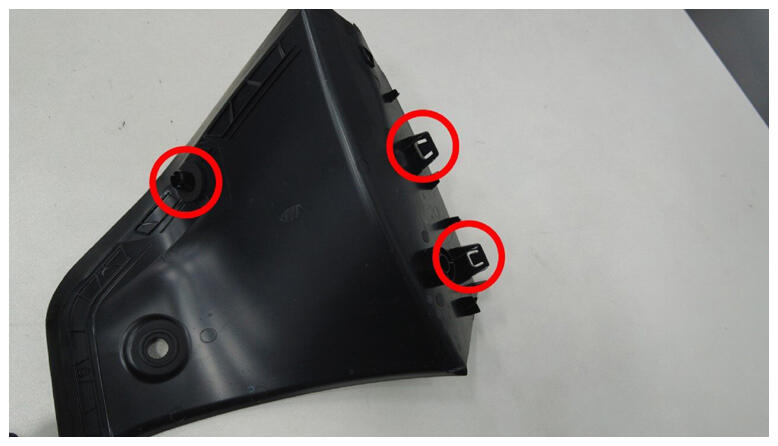 Courtesy of TESLA, INC. Courtesy of TESLA, INC.
|
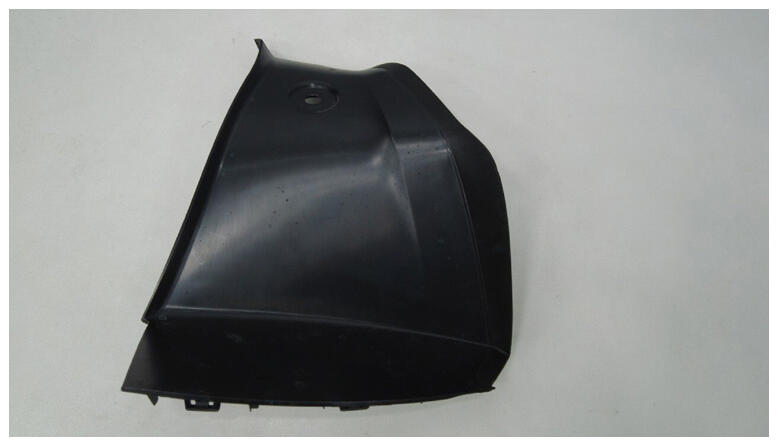 Courtesy of TESLA, INC. Courtesy of TESLA, INC.
|
- Remove RH trough trim.
NOTE:
3x clips, 1x bolt, T20, 1.2 N.m.
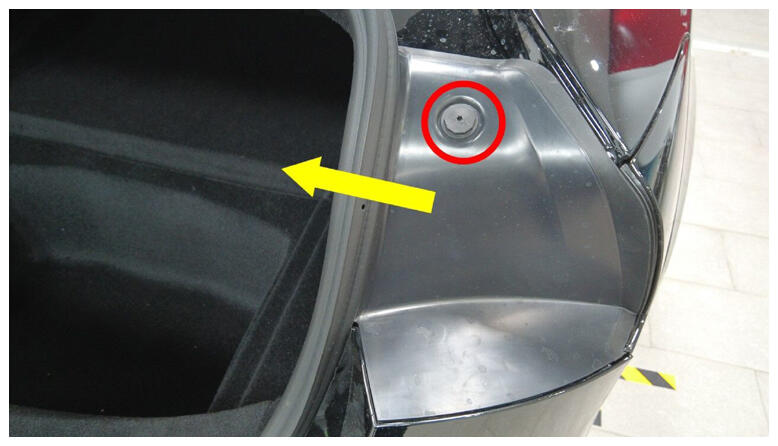 Courtesy of TESLA, INC. Courtesy of TESLA, INC.
|
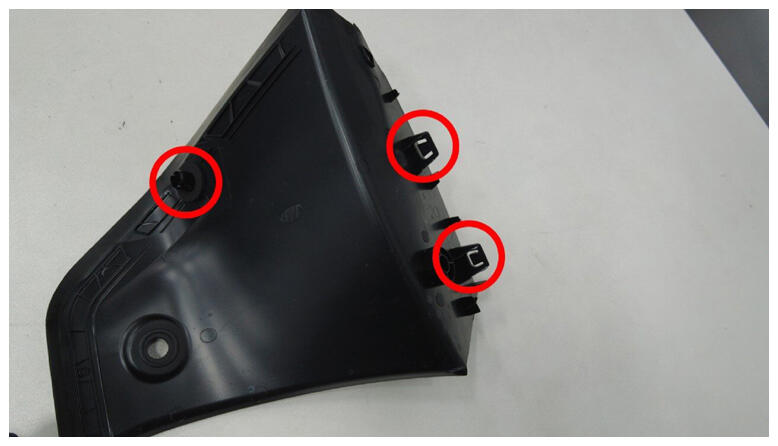 Courtesy of TESLA, INC. Courtesy of TESLA, INC.
|
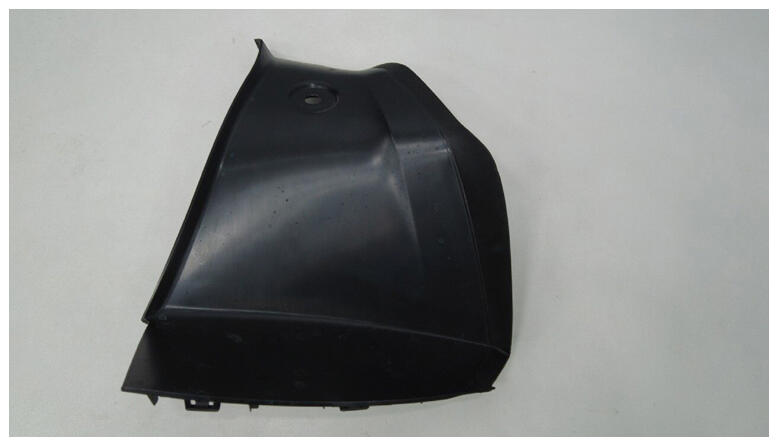 Courtesy of TESLA, INC. Courtesy of TESLA, INC.
|
- Remove bolt securing LH corner of rear fascia to body.
NOTE:
1x bolt, 10 mm, 4 N.m.
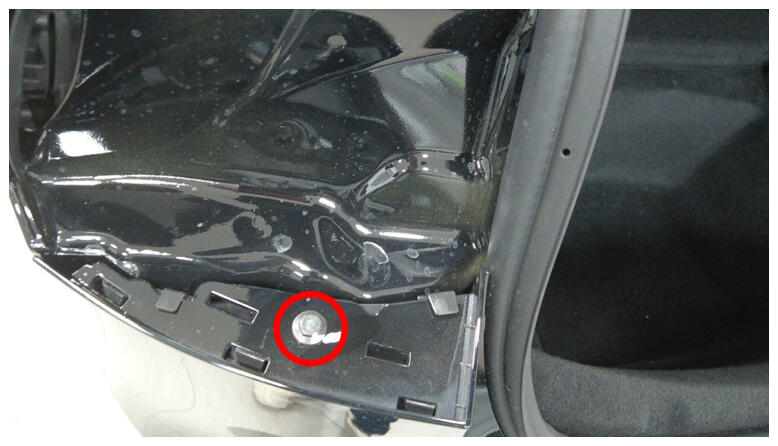 Courtesy of TESLA, INC. Courtesy of TESLA, INC.
|
- Remove bolt securing RH corner of rear fascia to body.
NOTE:
1x bolt, 10 mm, 4 N.m.
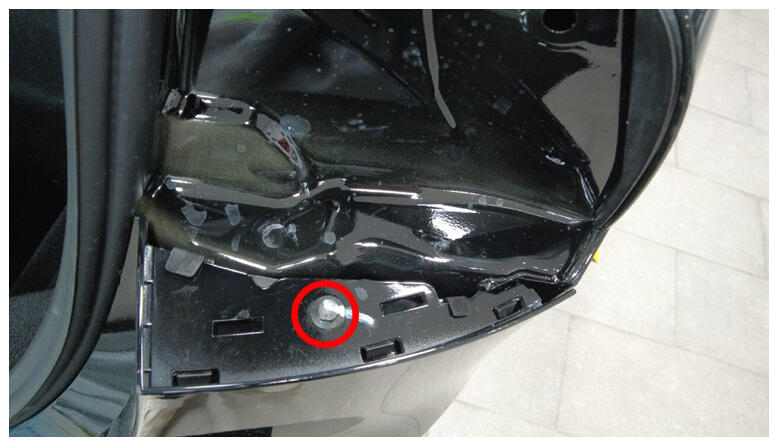 Courtesy of TESLA, INC. Courtesy of TESLA, INC.
|
- Raise vehicle fully and lower lift onto locks.
NOTE:
Set vehicle to comfortable working height, Make sure there's an audible click of the locks on both sides before lowering, otherwise vehicle may tilt to the side, Verify doors are clear of surrounding objects.
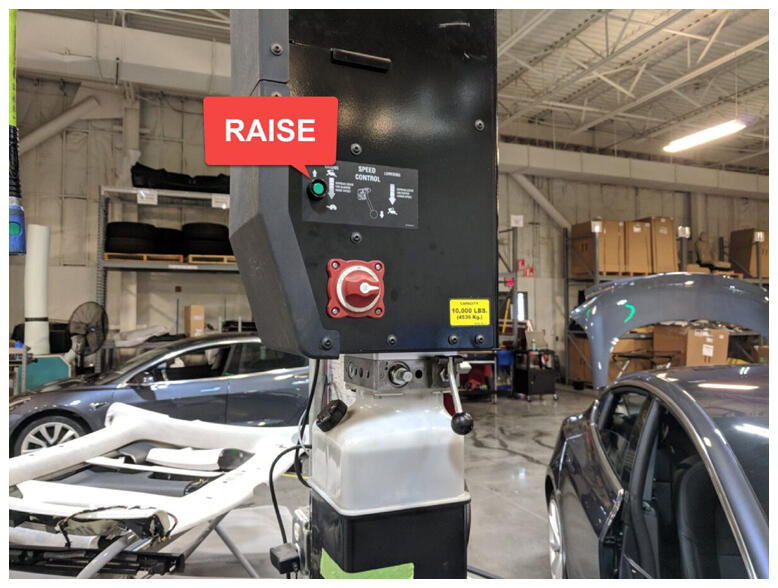 Courtesy of TESLA, INC. Courtesy of TESLA, INC.
|
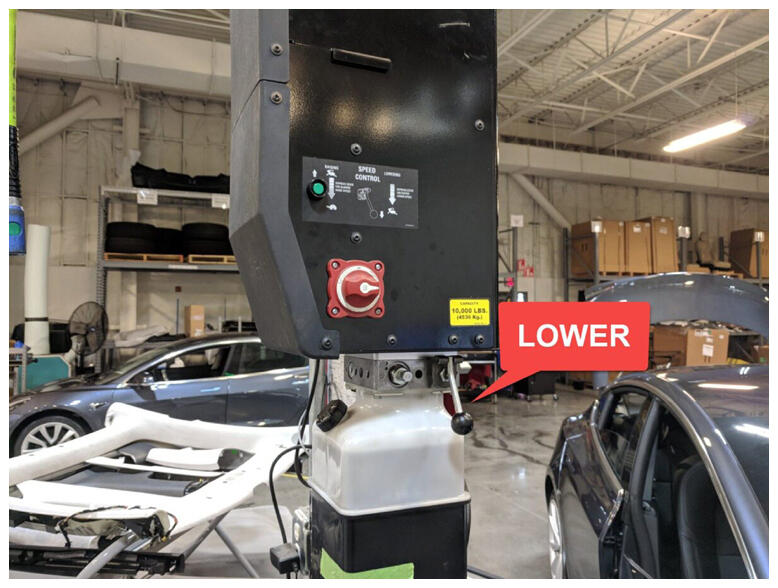 Courtesy of TESLA, INC. Courtesy of TESLA, INC.
|
- Remove LH and RH clips securing rear aero shield to wheel house liner.
NOTE:
2x clips.
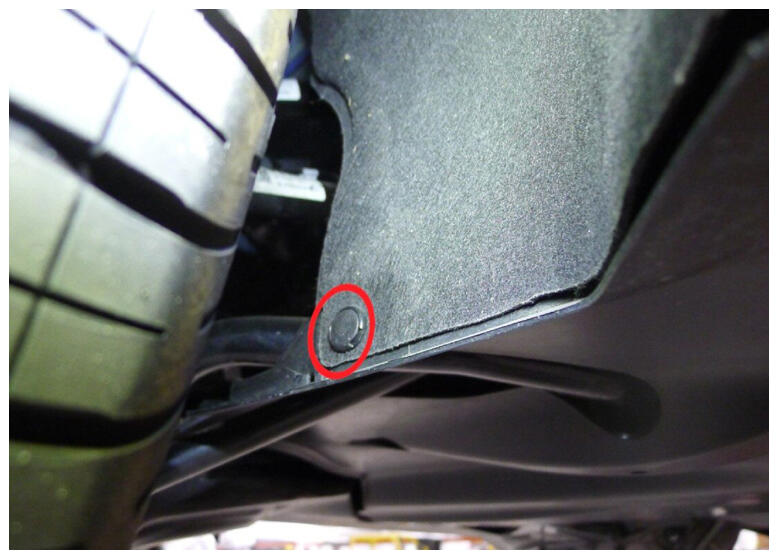 Courtesy of TESLA, INC. Courtesy of TESLA, INC.
|
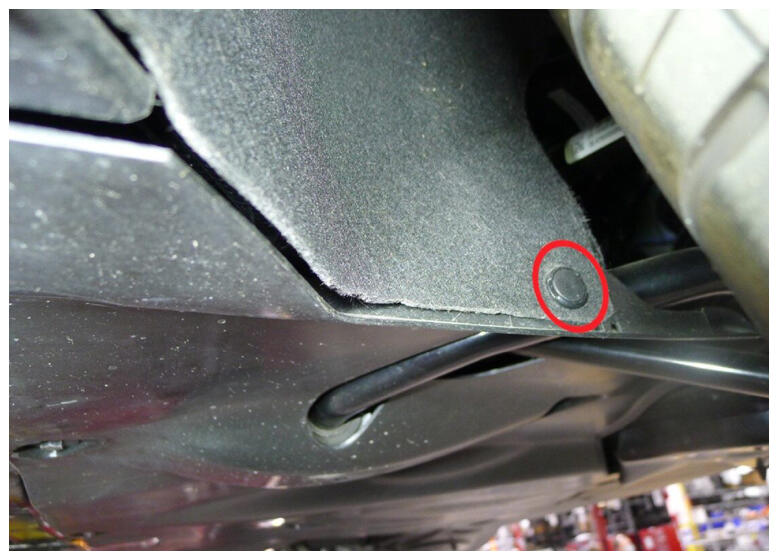 Courtesy of TESLA, INC. Courtesy of TESLA, INC.
|
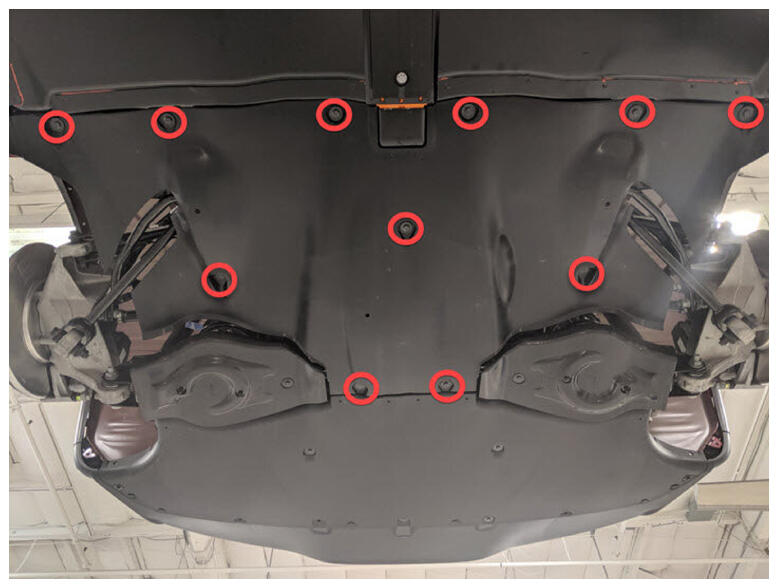
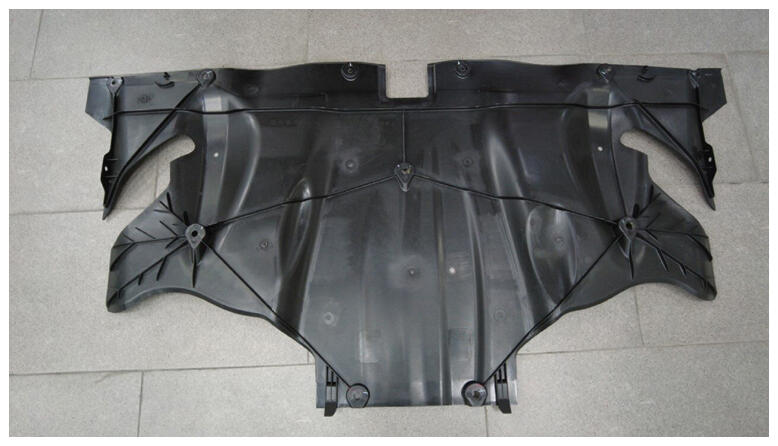
- Remove rear aero shield.
NOTE:
11x bolts, 10 mm, 5 N.m.
 Courtesy of TESLA, INC. Courtesy of TESLA, INC.
|
 Courtesy of TESLA, INC. Courtesy of TESLA, INC.
|
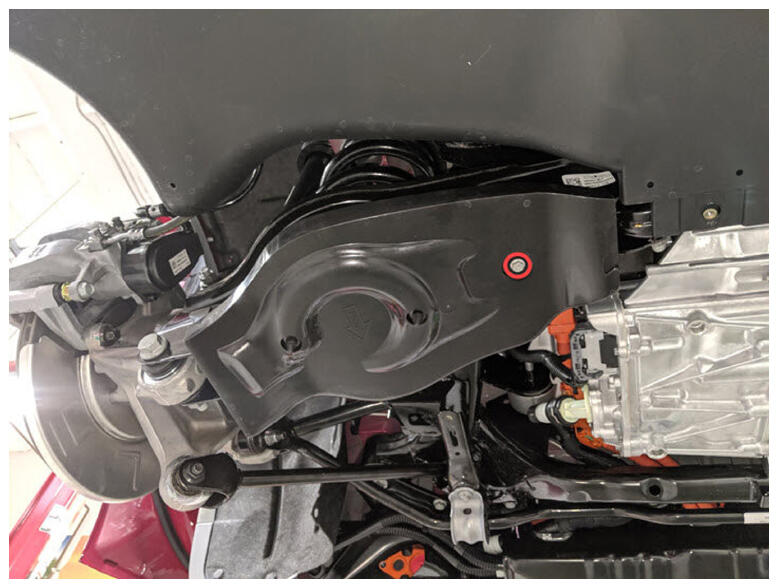
- Remove LH rear suspension cover.
NOTE:
1x bolt, 10 mm, 6 N.m, 2x tabs.
 Courtesy of TESLA, INC. Courtesy of TESLA, INC.
|
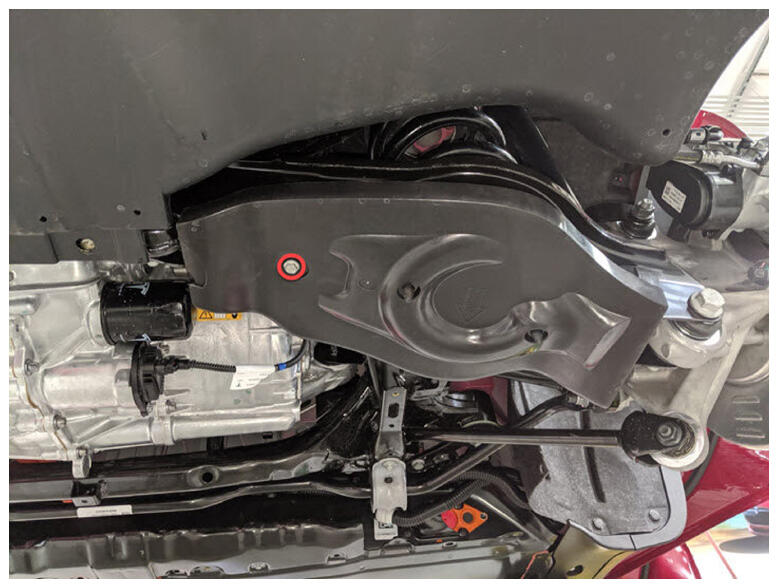
- Remove RH rear suspension cover.
NOTE:
1x bolt, 10 mm, 6 N.m, 2x tabs.
 Courtesy of TESLA, INC. Courtesy of TESLA, INC.
|
- Remove lower clips securing LH rear wheel liner.
NOTE:
3x push clips.
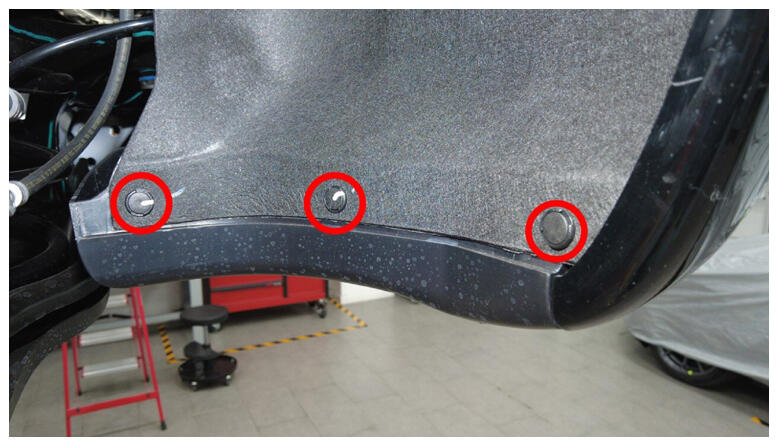 Courtesy of TESLA, INC. Courtesy of TESLA, INC.
|
- Remove lower clips securing RH rear wheel liner.
NOTE:
3x push clips.
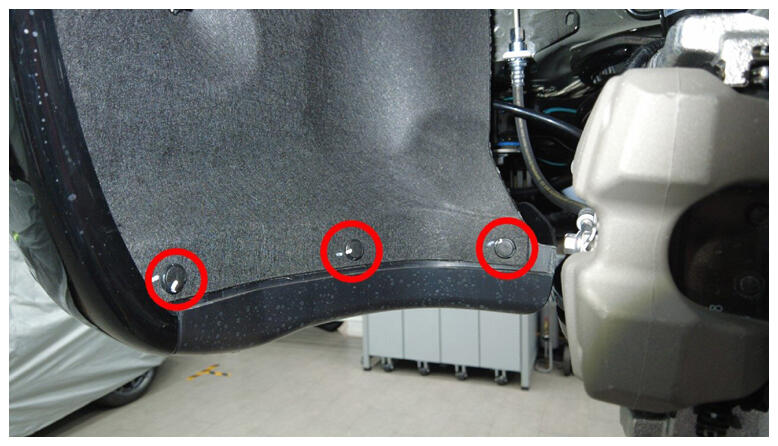 Courtesy of TESLA, INC. Courtesy of TESLA, INC.
|
- Remove bolts securing the rear diffuser to body.
NOTE:
4x bolts, 10 mm, 4 N.m, 2x fastener covers.
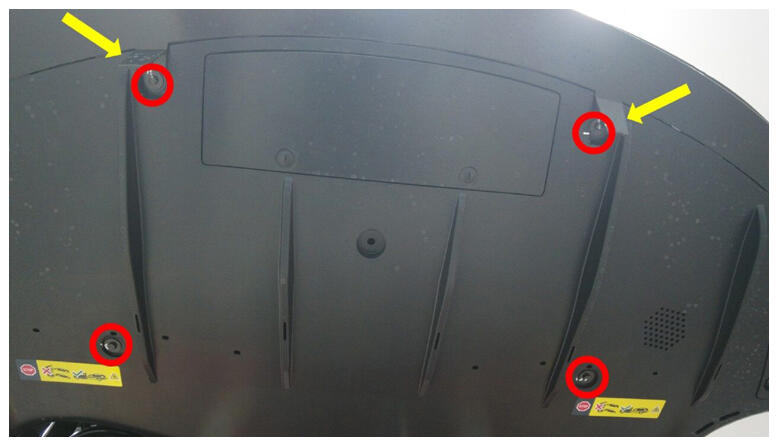 Courtesy of TESLA, INC. Courtesy of TESLA, INC.
|
- Lower vehicle partially and set lift onto locks.
NOTE:
Raise lift off locks, then hold lock release lever to keep locks free while vehicle is lowered, Set vehicle to comfortable working height.
- Remove screw securing rear fascia to LH quarter panel.
NOTE:
1x screw, T25, 2 N.m.
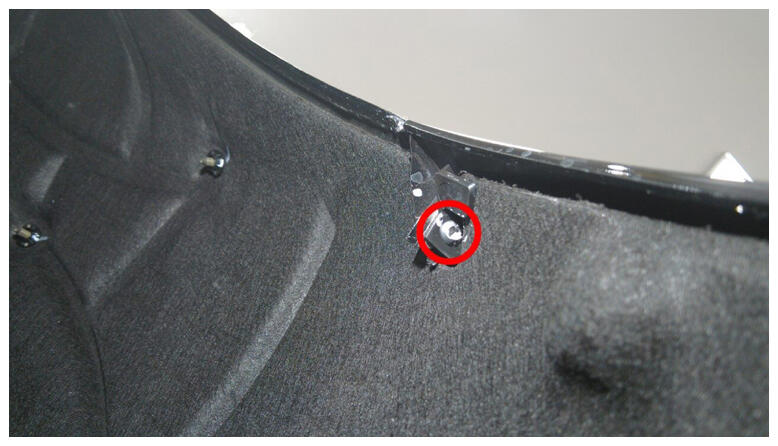 Courtesy of TESLA, INC. Courtesy of TESLA, INC.
|
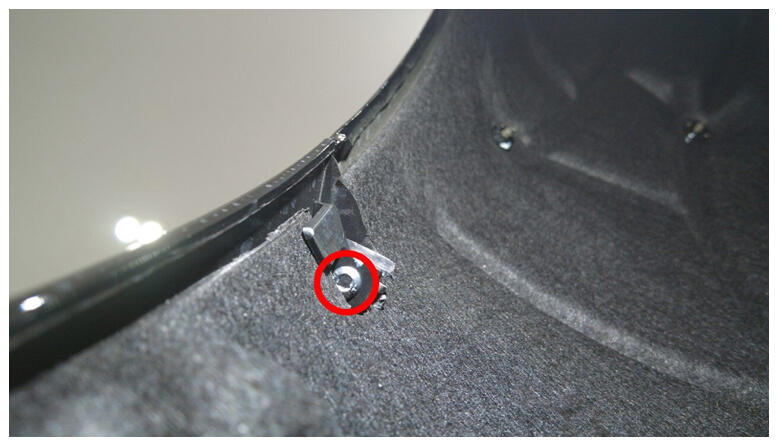
- Remove screw securing rear fascia to RH quarter panel.
NOTE:
1x screw, T25, 2 N.m.
 Courtesy of TESLA, INC. Courtesy of TESLA, INC.
|
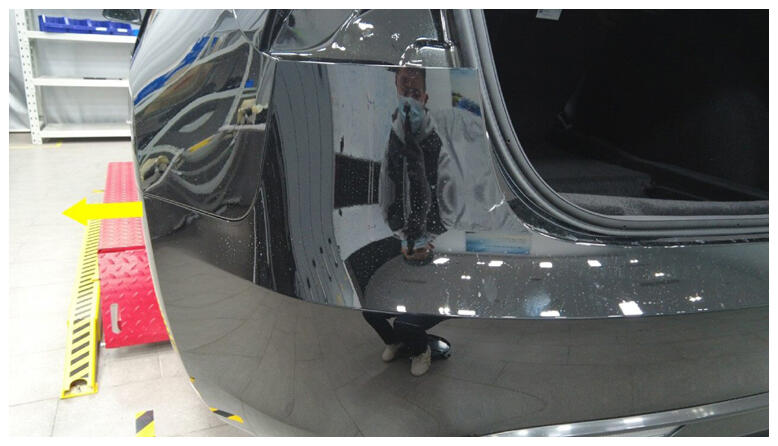
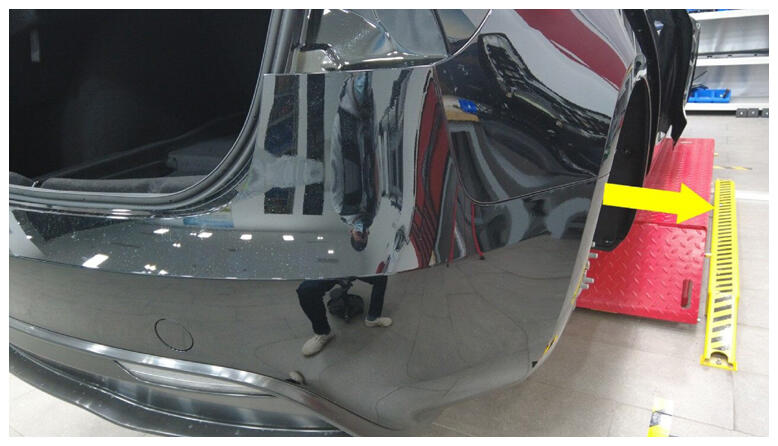
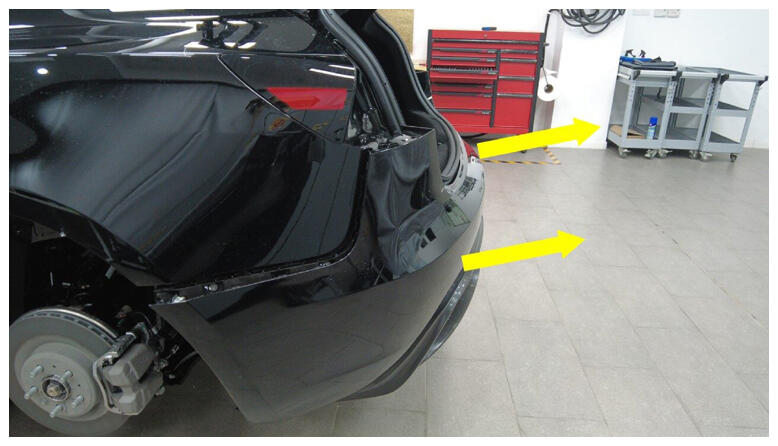
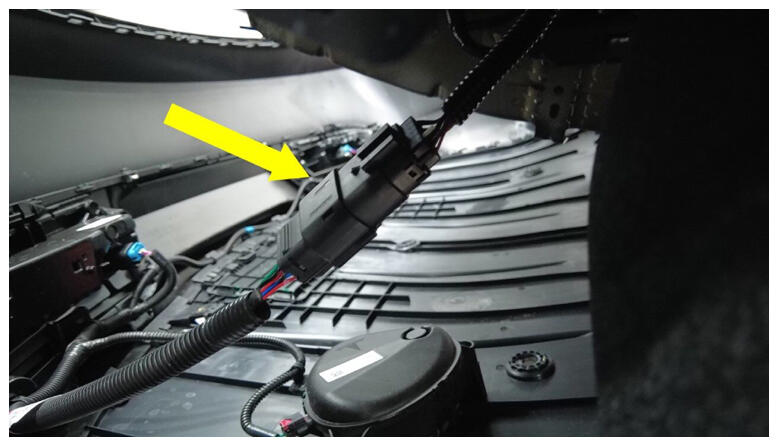
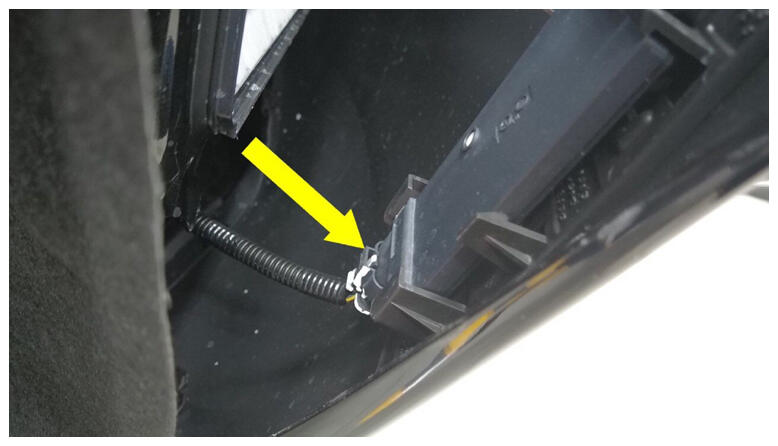
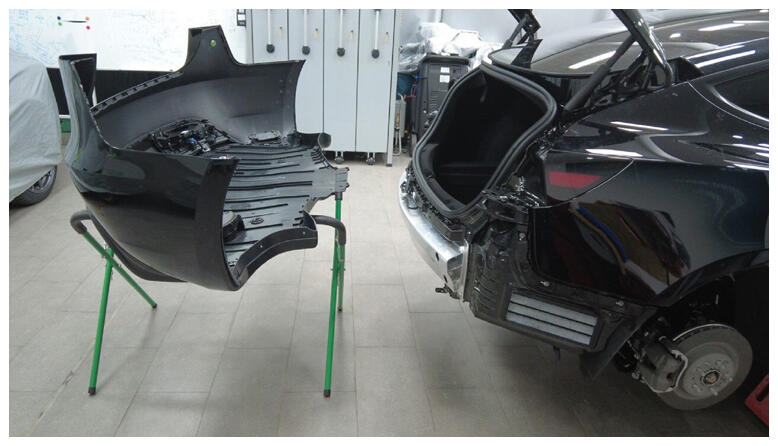
- Remove rear fascia and place on padded surface.
NOTE:
2x connector, Recommend assistance.
 Courtesy of TESLA, INC. Courtesy of TESLA, INC.
|
 Courtesy of TESLA, INC. Courtesy of TESLA, INC.
|
 Courtesy of TESLA, INC. Courtesy of TESLA, INC.
|
 Courtesy of TESLA, INC. Courtesy of TESLA, INC.
|
 Courtesy of TESLA, INC. Courtesy of TESLA, INC.
|
 Courtesy of TESLA, INC. Courtesy of TESLA, INC.
|
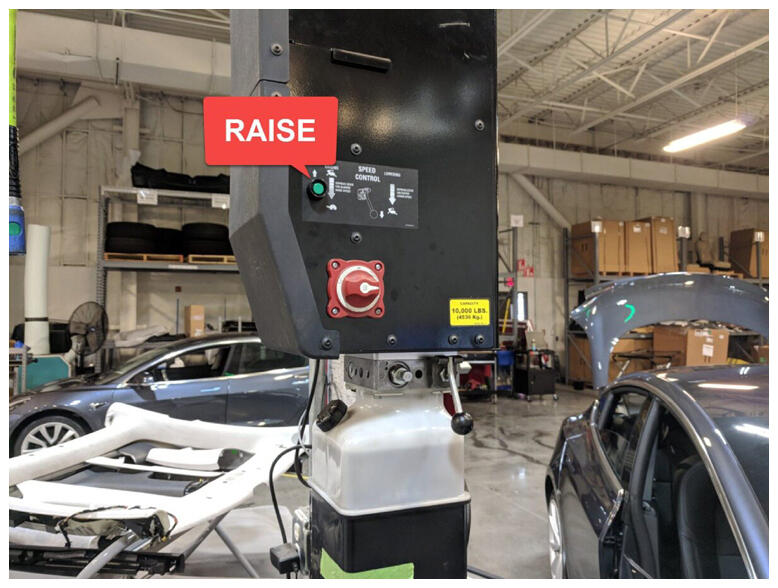
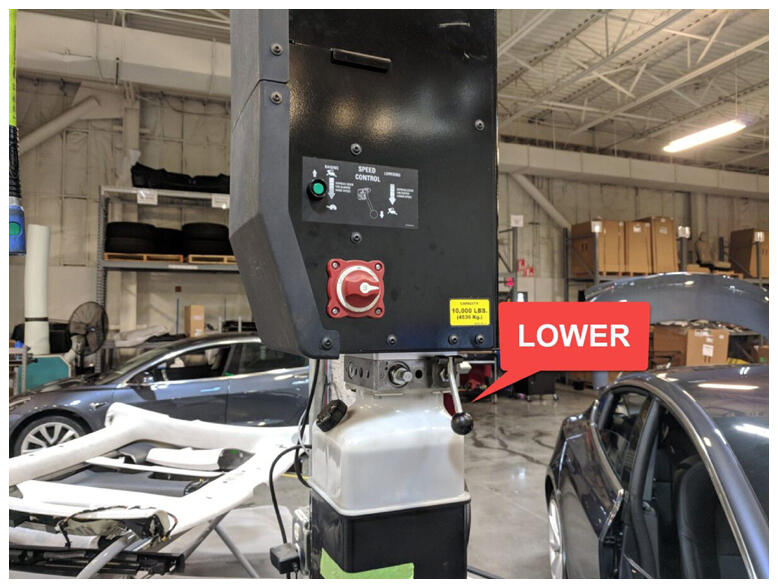
- Raise vehicle fully and lower lift onto locks.
NOTE:
Set vehicle to comfortable working height, Make sure there's an audible click of the locks on both sides before lowering, otherwise vehicle may tilt to the side, Verify doors are clear of surrounding objects.
 Courtesy of TESLA, INC. Courtesy of TESLA, INC.
|
 Courtesy of TESLA, INC. Courtesy of TESLA, INC.
|
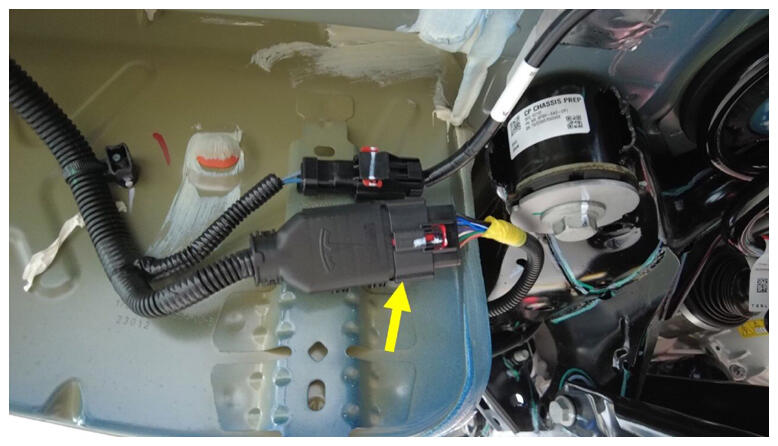
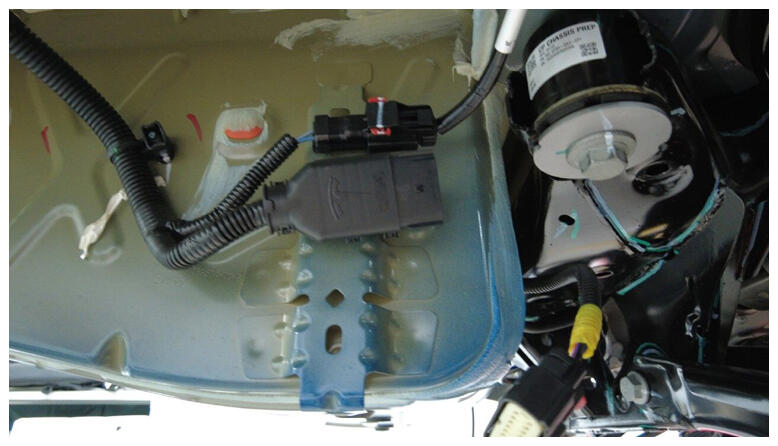
- Disconnect RH side subframe harness connector.
NOTE:
1x connector, Release locking tab.
 Courtesy of TESLA, INC. Courtesy of TESLA, INC.
|
 Courtesy of TESLA, INC. Courtesy of TESLA, INC.
|
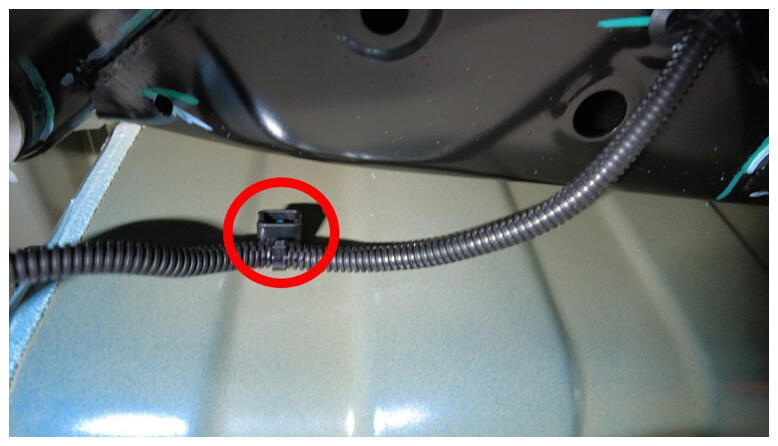
- Remove RH side subframe harness clip from body.
NOTE:
1x barrel clip.
 Courtesy of TESLA, INC. Courtesy of TESLA, INC.
|
- Remove nut securing RDU ground strap to vehicle.
NOTE:
1x nut, 10 mm, 10 N.m, Located at LH rear wheel well area.
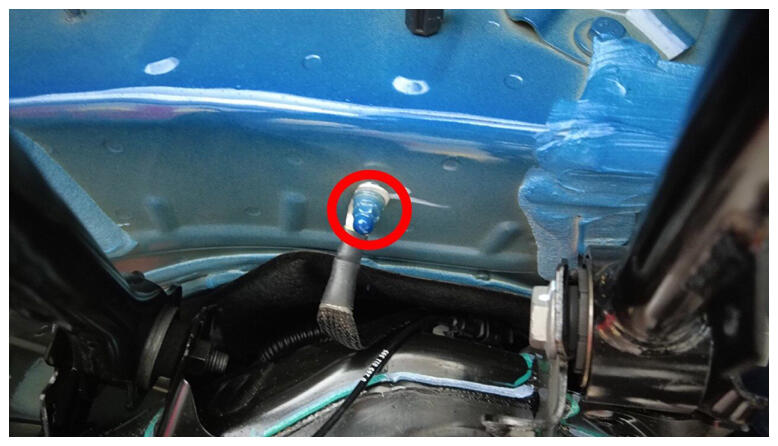 Courtesy of TESLA, INC. Courtesy of TESLA, INC.
|
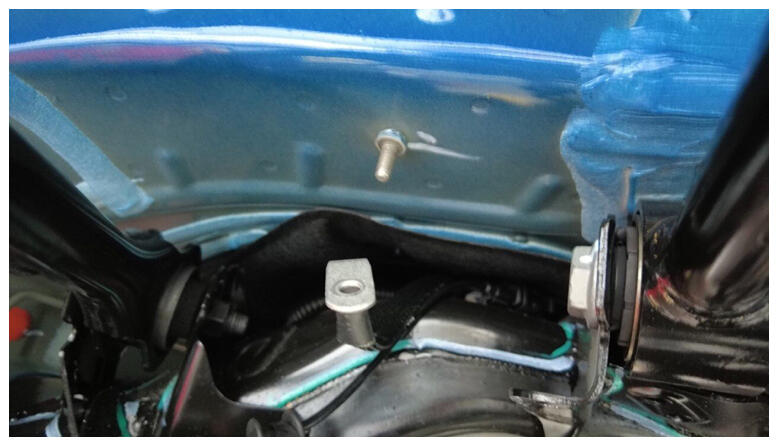 Courtesy of TESLA, INC. Courtesy of TESLA, INC.
|
- Remove nut securing LH rear stabilizer bar end link to stabilizer bar.
NOTE:
1x nyloc nut, 15 mm, 55 N.m, Break nut loose then counter-hold ball joint with 5 mm hex, Discard after removal.
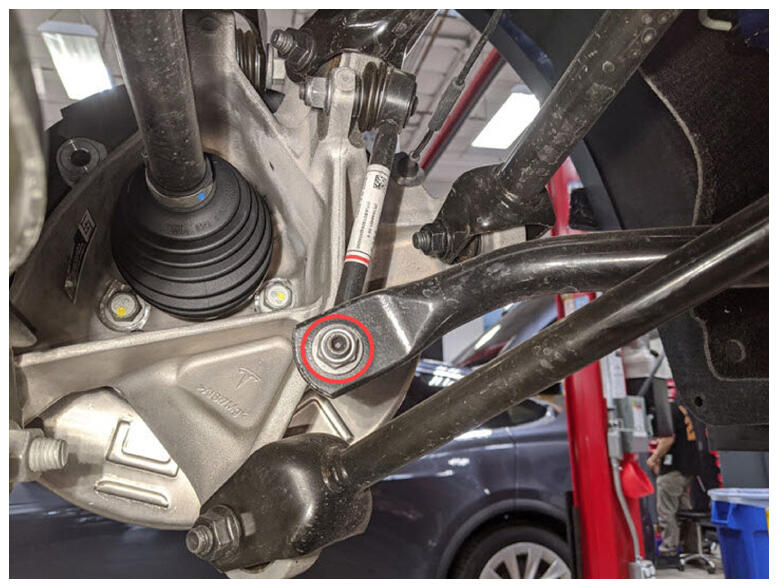 Courtesy of TESLA, INC. Courtesy of TESLA, INC.
|
- Remove stabilizer bar from LH rear end link.
NOTE:
May need to move the stabilizer bar up/down to get the correct angle to remove end link.
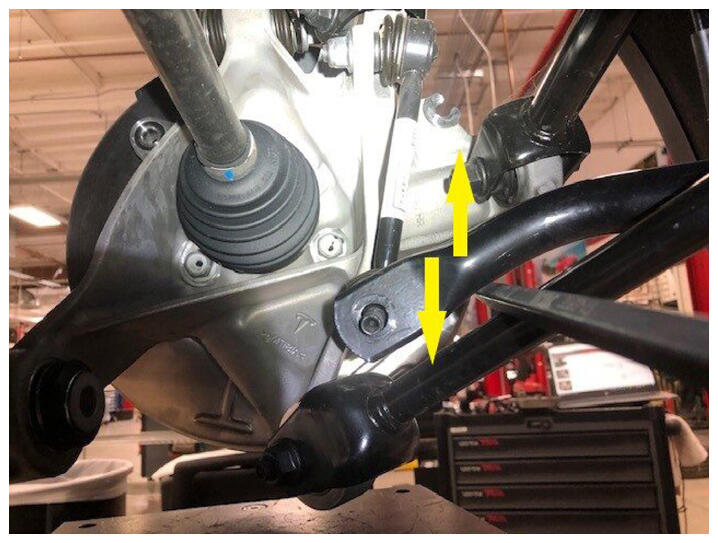 Courtesy of TESLA, INC. Courtesy of TESLA, INC.
|
- Remove nut securing RH rear stabilizer bar end link to stabilizer bar.
NOTE:
1x nyloc nut, 15 mm, 55 N.m, Break nut loose then counter-hold ball joint with 5 mm hex, Discard after removal.
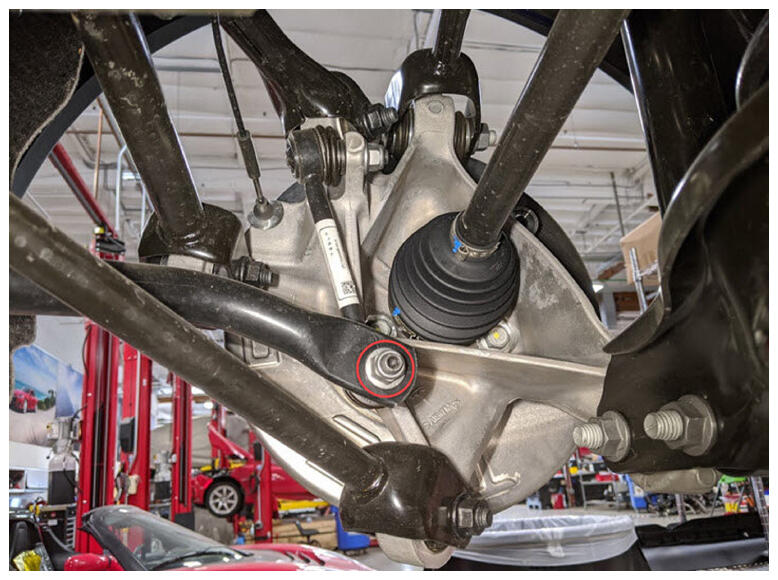 Courtesy of TESLA, INC. Courtesy of TESLA, INC.
|
- Remove stabilizer bar from RH rear end link.
NOTE:
May need to move the stabilizer bar up/down to get the correct angle to remove end link.
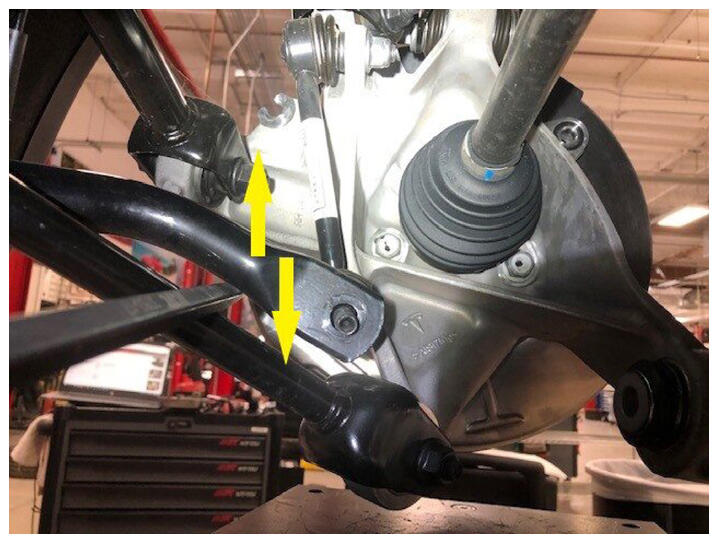 Courtesy of TESLA, INC. Courtesy of TESLA, INC.
|
- Remove bolts securing rear stabilizer bar to subframe and remove assembly.
NOTE:
4x patch bolts, 11 mm, 30 N.m, Discard after removal.
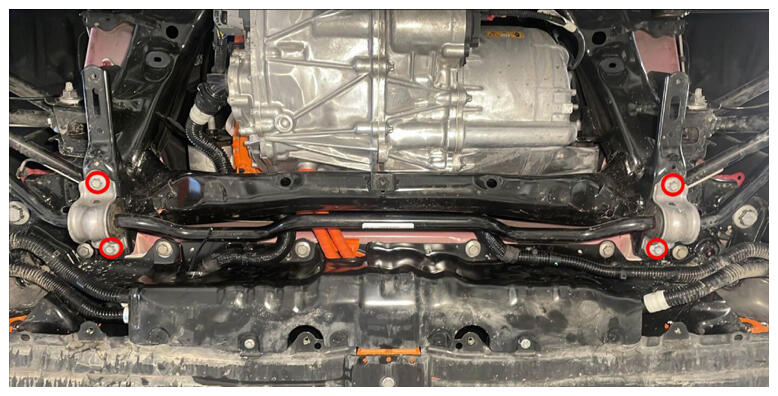 Courtesy of TESLA, INC. Courtesy of TESLA, INC.
|
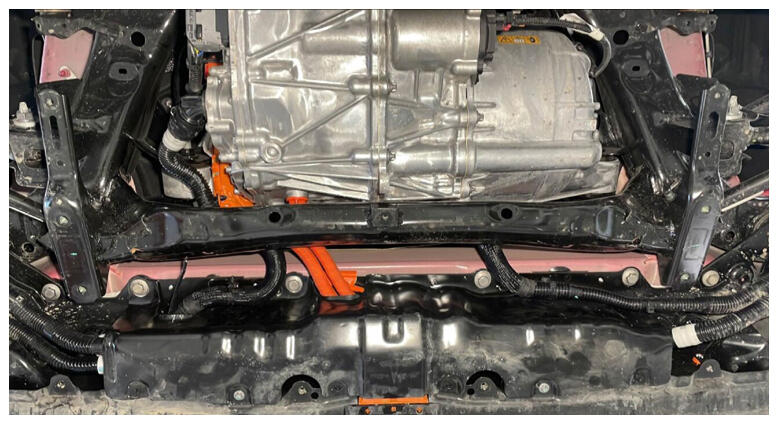 Courtesy of TESLA, INC. Courtesy of TESLA, INC.
|
- Release clips securing coolant hoses to LH shear plate.
NOTE:
2x fir tree clips.
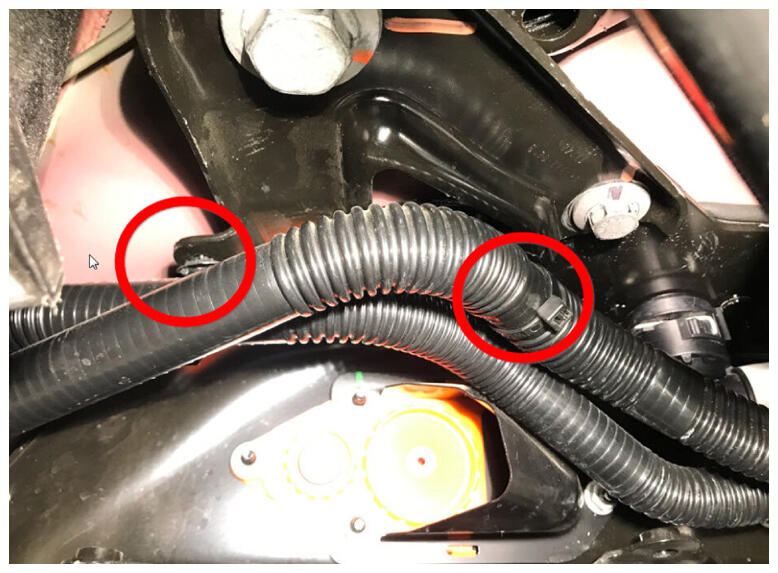 Courtesy of TESLA, INC. Courtesy of TESLA, INC.
|
- Release LH side hose clip from rear battery skid plate enclosure.
NOTE:
1x fir tree clip.
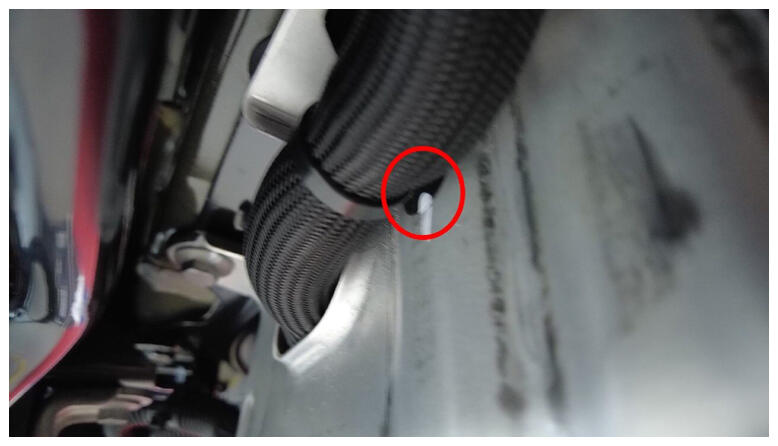 Courtesy of TESLA, INC. Courtesy of TESLA, INC.
|
- Release RH side hose clips from rear battery skid plate enclosure.
NOTE:
2x fir tree clips.
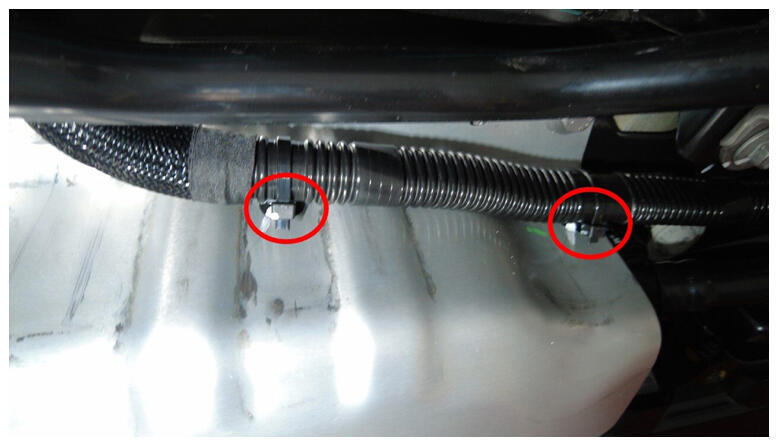 Courtesy of TESLA, INC. Courtesy of TESLA, INC.
|
- Release clips securing coolant hoses to RH shear plate.
NOTE:
2x fir tree clips.
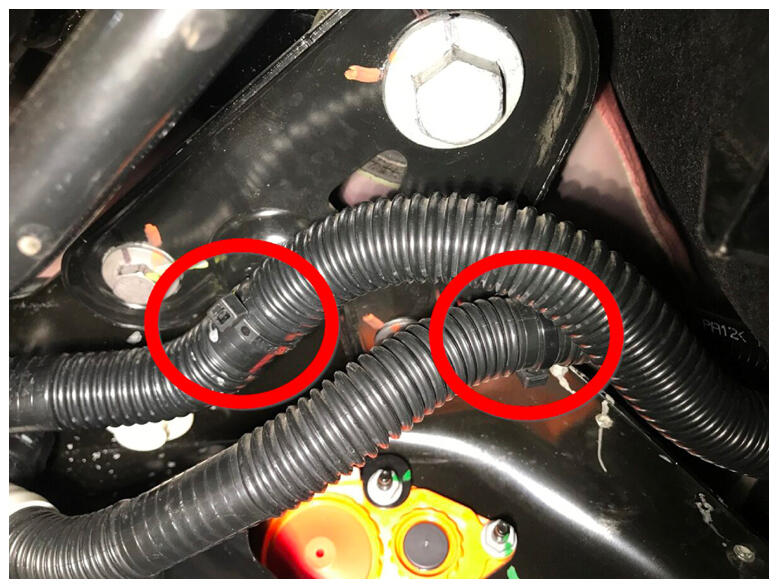 Courtesy of TESLA, INC. Courtesy of TESLA, INC.
|
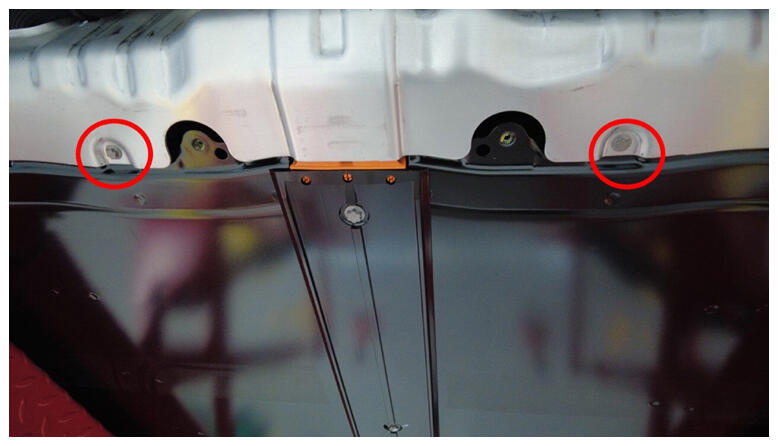
- Remove lower bolts securing HV battery rear skid plate enclosure.
NOTE:
2x bolts, EP10, 13 N.m, Older vins may be equipped with additional fastener count.
 Courtesy of TESLA, INC. Courtesy of TESLA, INC.
|
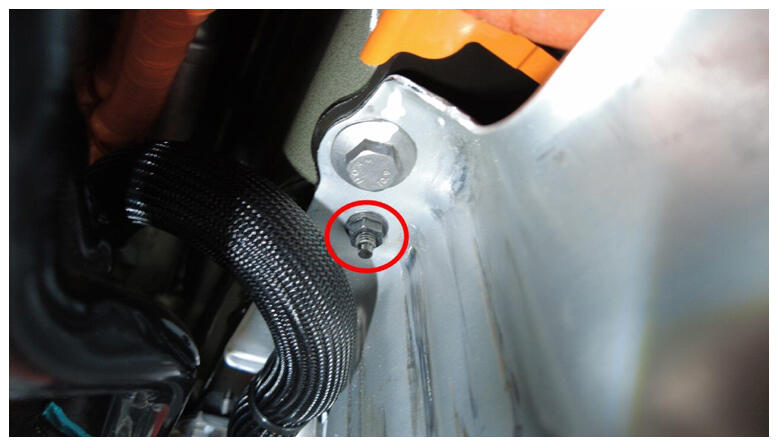
- Remove upper nut securing HV battery rear skid plate enclosure.
NOTE:
1x nut, 10 mm, 13 N.m, Fastener count may vary on older built vehicles.
 Courtesy of TESLA, INC. Courtesy of TESLA, INC.
|
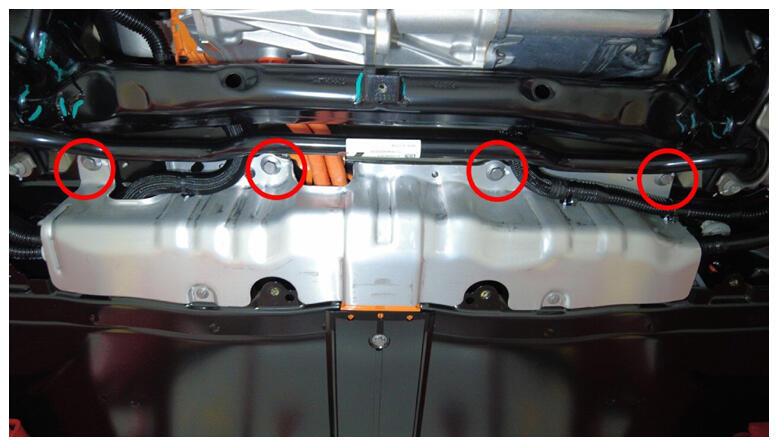
- Remove upper bolts securing HV battery rear skid plate enclosure.
NOTE:
4x bolts, 13 mm, 35 N.m.
 Courtesy of TESLA, INC. Courtesy of TESLA, INC.
|
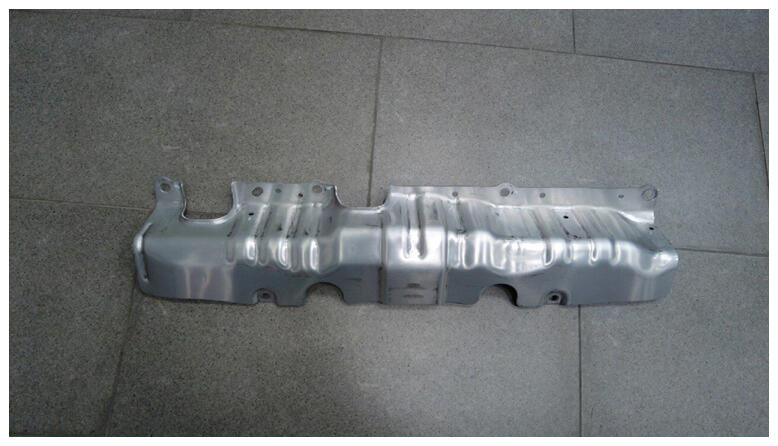
- Remove HV battery rear skid plate enclosure.
 Courtesy of TESLA, INC. Courtesy of TESLA, INC.
|
- Position coolant drain container underneath LH rear of HV battery.
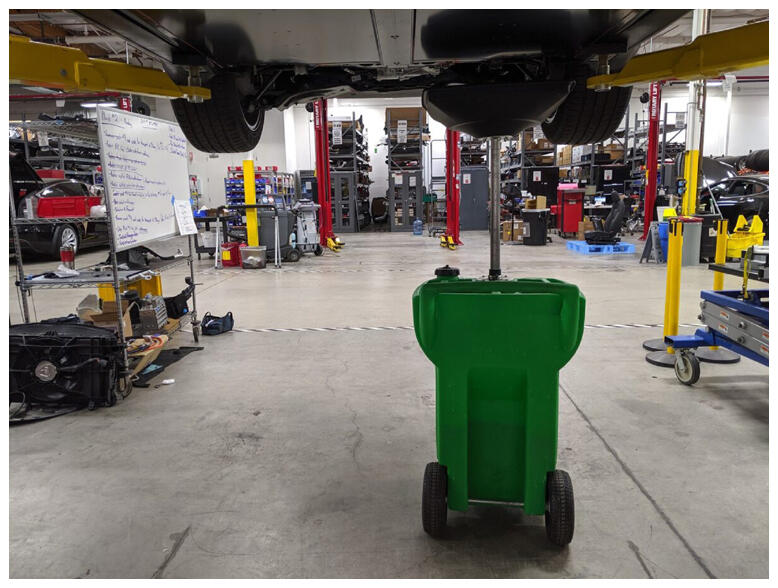 Courtesy of TESLA, INC. Courtesy of TESLA, INC.
|
- Disconnect RDU inverter inlet tube from LH rear of HV battery.
NOTE:
1x spring clip, Plug hose connections as needed, Coolant loss greater than 1 L will require vacuum fill.
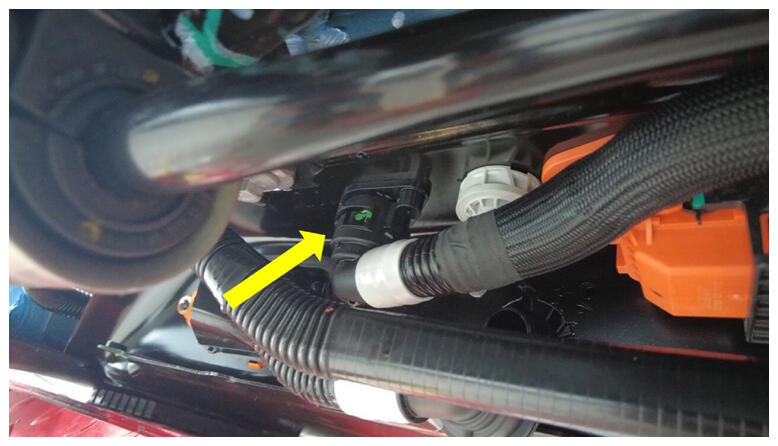 Courtesy of TESLA, INC. Courtesy of TESLA, INC.
|
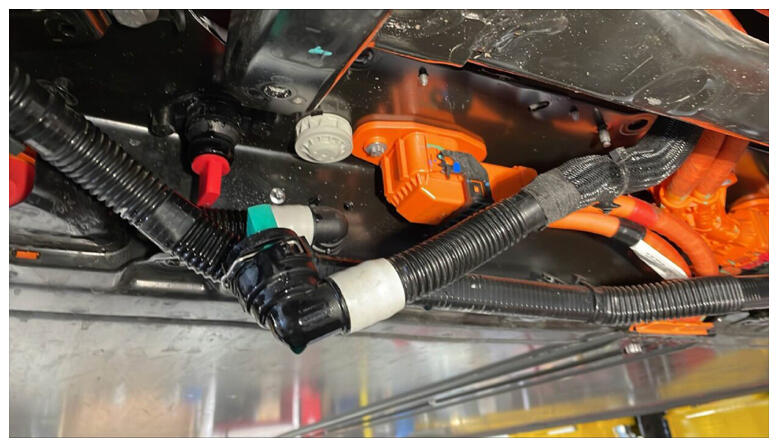 Courtesy of TESLA, INC. Courtesy of TESLA, INC.
|
- Position coolant drain container underneath LH RDU area.
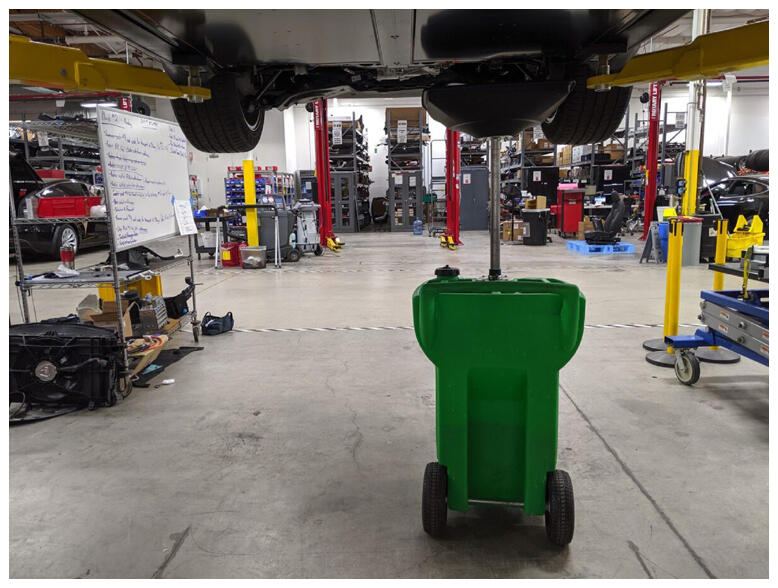 Courtesy of TESLA, INC. Courtesy of TESLA, INC.
|
- Disconnect RDU inverter inlet tube from fluid coupling.
NOTE:
1x spring clip, 2x plugs, Plug the hose end and the fluid coupling.
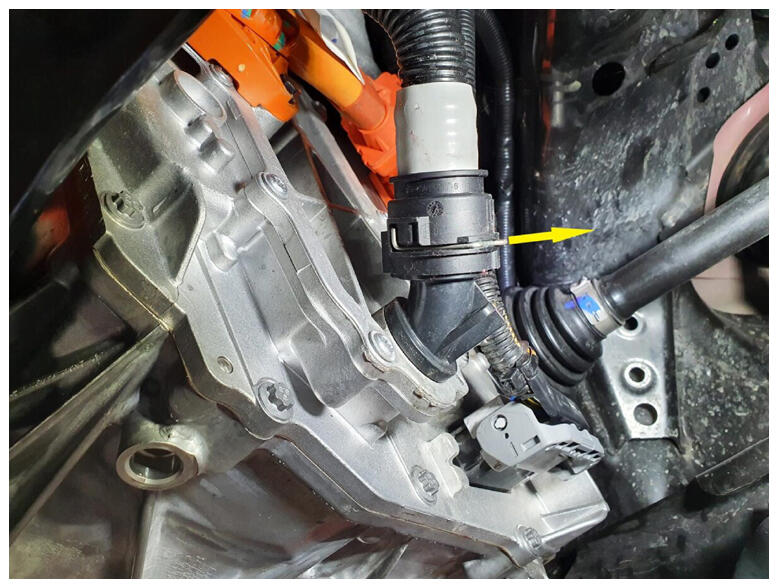 Courtesy of TESLA, INC. Courtesy of TESLA, INC.
|
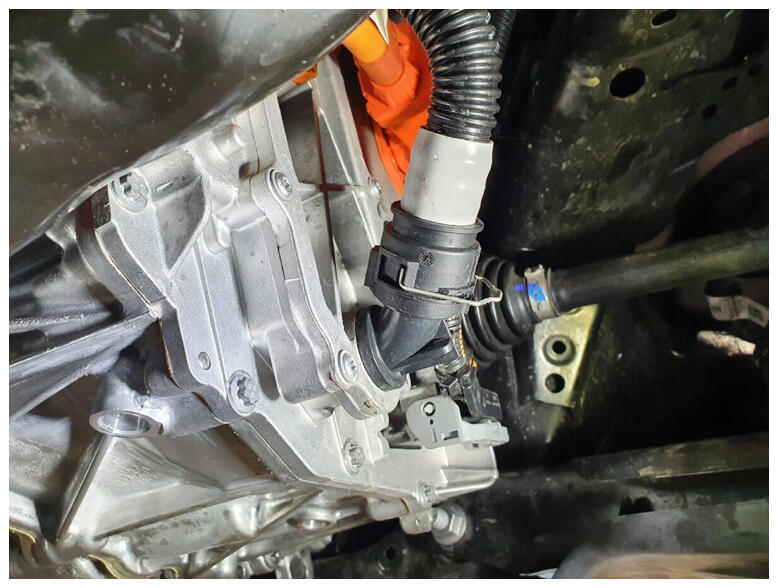 Courtesy of TESLA, INC. Courtesy of TESLA, INC.
|
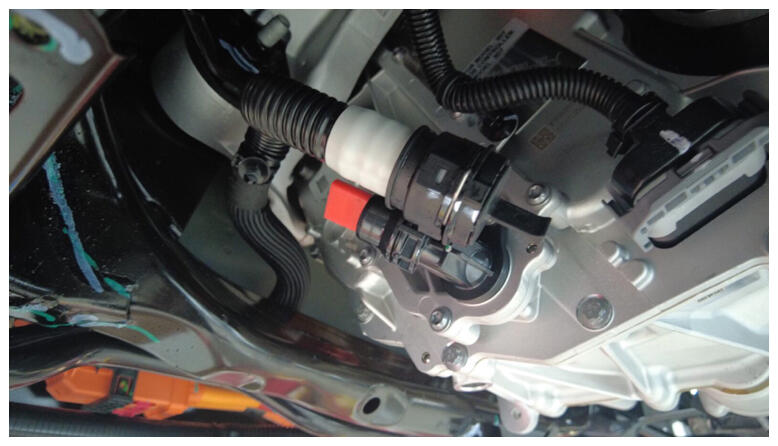 Courtesy of TESLA, INC. Courtesy of TESLA, INC.
|
- Release RDU inverter inlet tube from RDU HV cable harness.
NOTE:
1x fir tree clip.
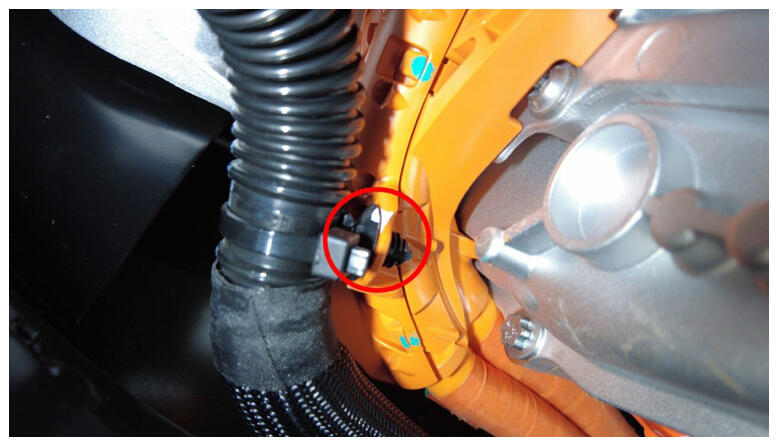 Courtesy of TESLA, INC. Courtesy of TESLA, INC.
|
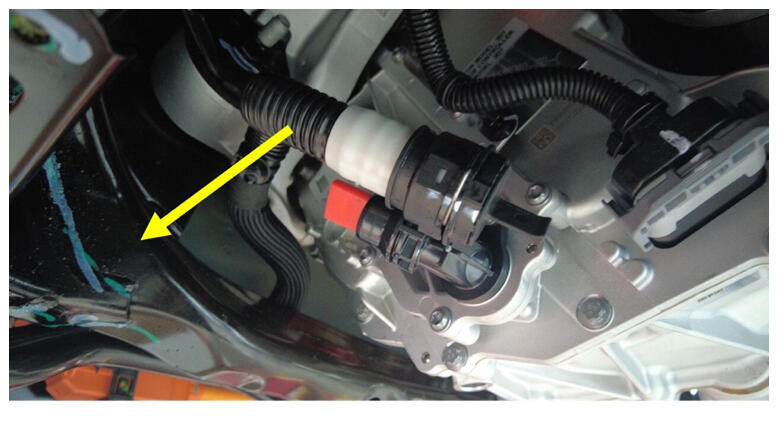
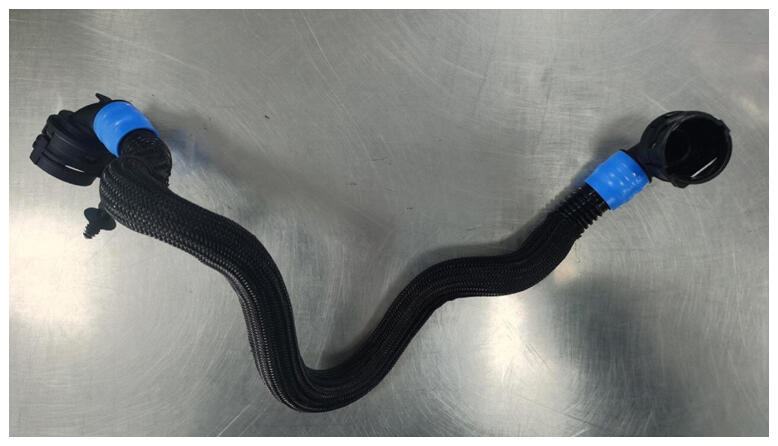
- Remove RDU inverter inlet hose from subframe.
NOTE:
Maneuver hose as needed to remove from between rear subframe and RDU HV cable harness, Remove plugs from both ends and allow coolant to fully drain if discarding.
 Courtesy of TESLA, INC. Courtesy of TESLA, INC.
|
 Courtesy of TESLA, INC. Courtesy of TESLA, INC.
|
- Remove coolant drain container from underneath vehicle.
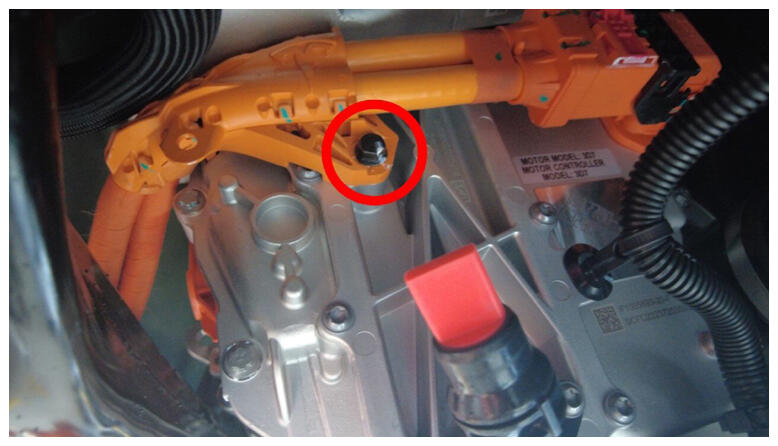
- Remove bolt securing RDU HV cable bracket to RDU.
NOTE:
1x bolt, 10 mm, 6 N.m.
 Courtesy of TESLA, INC. Courtesy of TESLA, INC.
|
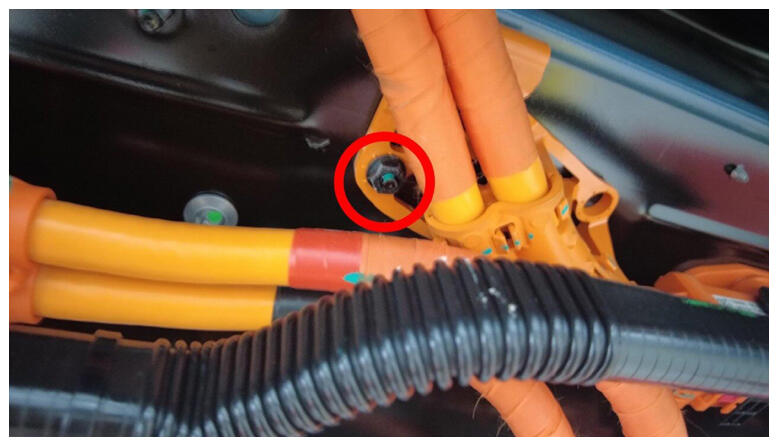
- Remove nut securing RDU HV cable bracket to HV battery.
NOTE:
1x nut, 10 mm, 10 N.m.
 Courtesy of TESLA, INC. Courtesy of TESLA, INC.
|
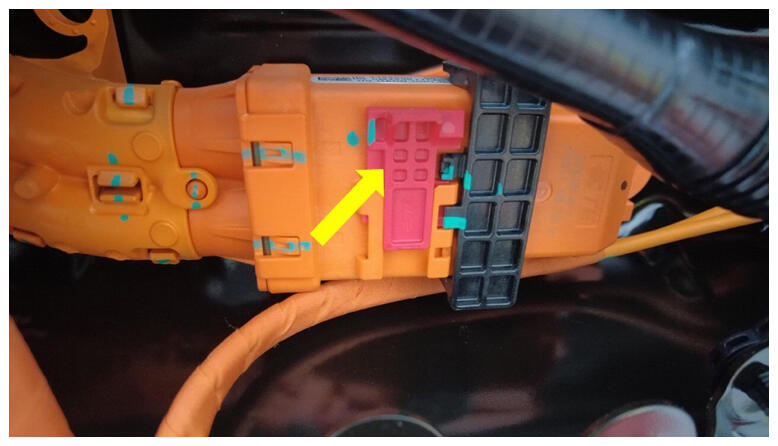
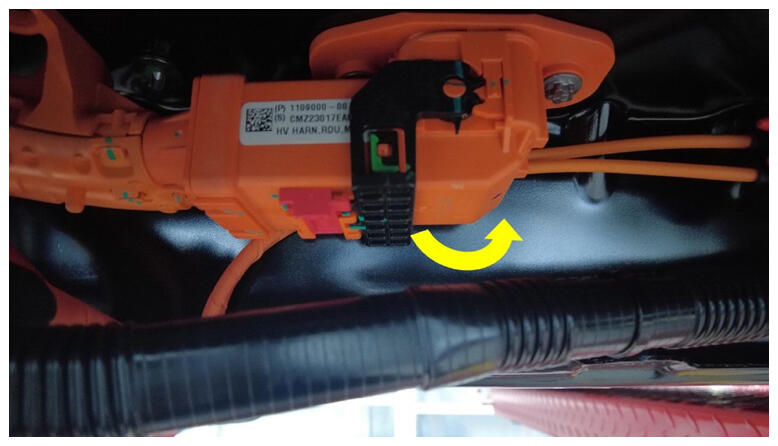
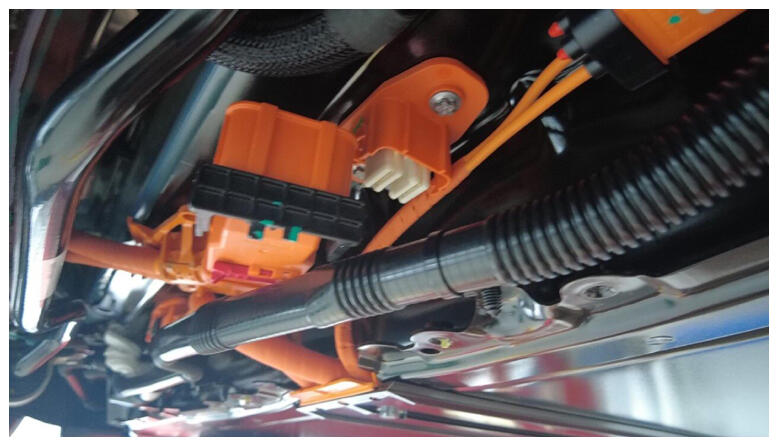
- Disconnect RDU HV cable from HV battery.
NOTE:
1x connector, Release locking tab and rotate the release lever up to disengage the connector, Do not force the release lever up, Ensure the alignment tabs on the RDU header are not damaged.
 Courtesy of TESLA, INC. Courtesy of TESLA, INC.
|
 Courtesy of TESLA, INC. Courtesy of TESLA, INC.
|
 Courtesy of TESLA, INC. Courtesy of TESLA, INC.
|
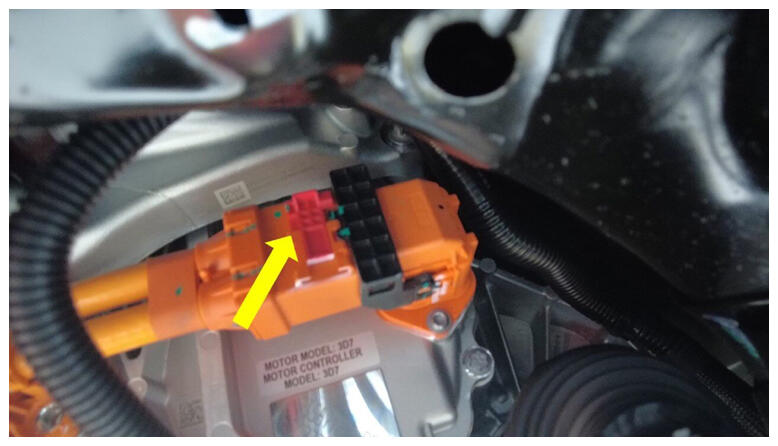
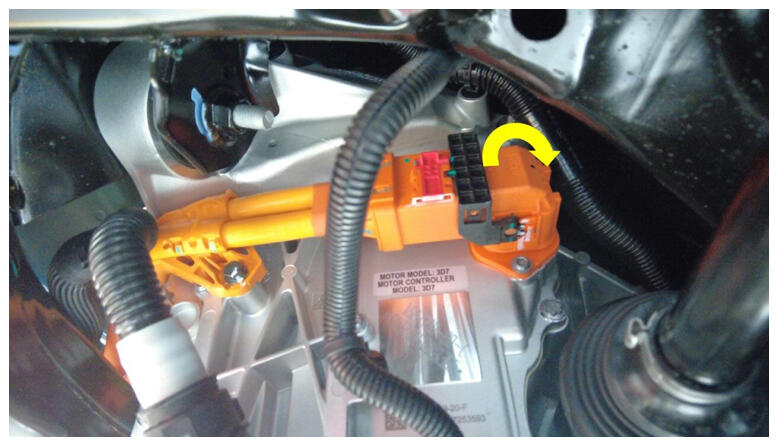
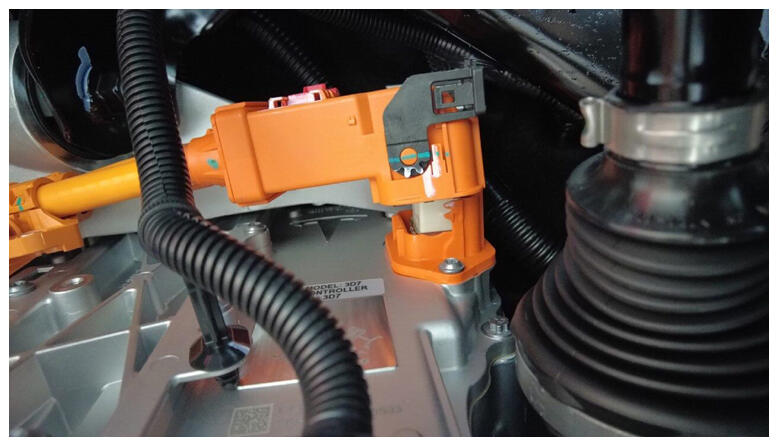
- Release RDU HV harness connection.
NOTE:
1x connector, Release locking tab and rotate the release lever up to disengage the connector, Do not force the release lever up, Ensure the alignment tabs on the RDU header are not damaged.
 Courtesy of TESLA, INC. Courtesy of TESLA, INC.
|
 Courtesy of TESLA, INC. Courtesy of TESLA, INC.
|
 Courtesy of TESLA, INC. Courtesy of TESLA, INC.
|
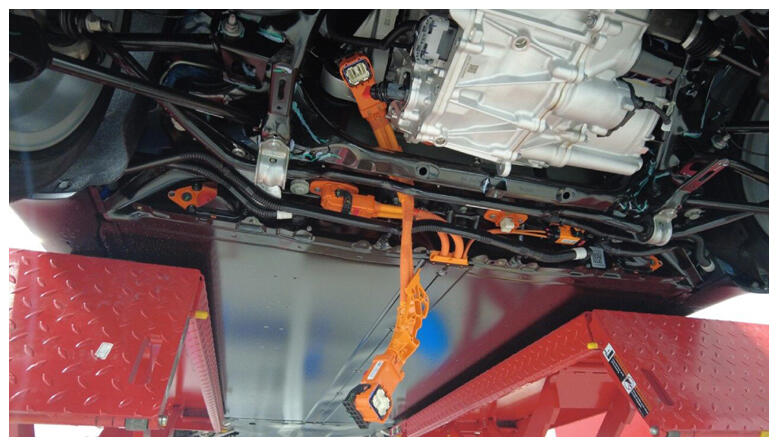
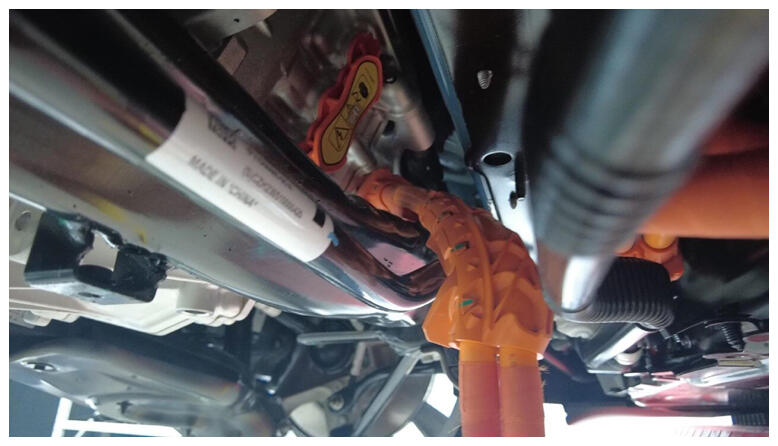
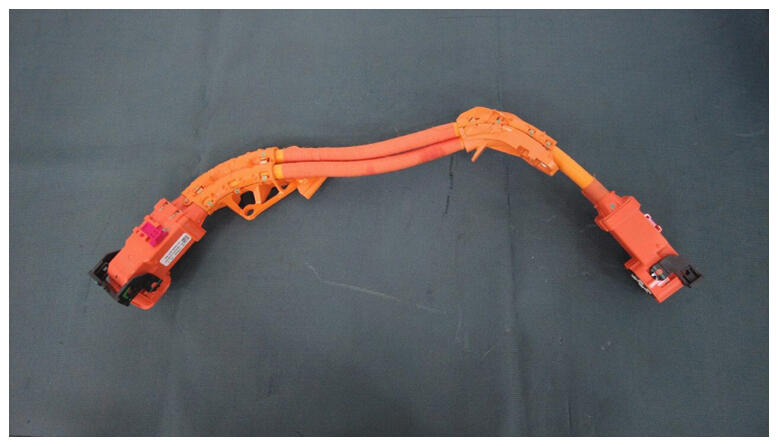
- Remove RDU HV harness.
NOTE:
Rotate and route cable between subframe, rear drive unit and battery.
 Courtesy of TESLA, INC. Courtesy of TESLA, INC.
|
 Courtesy of TESLA, INC. Courtesy of TESLA, INC.
|
 Courtesy of TESLA, INC. Courtesy of TESLA, INC.
|
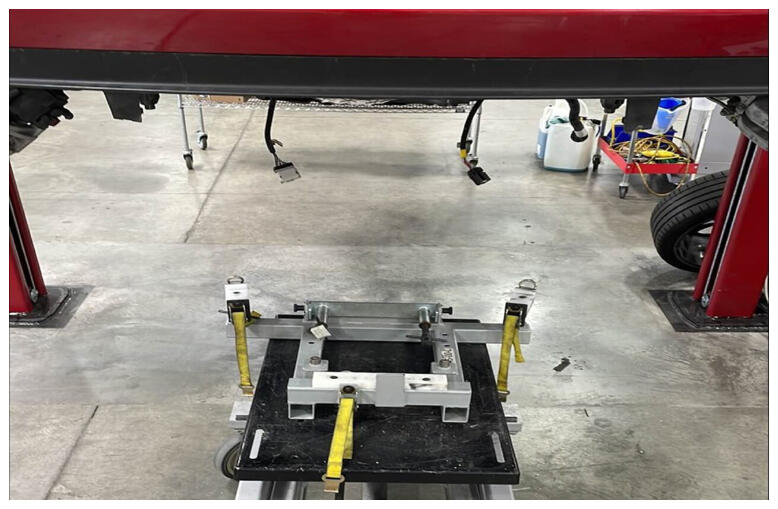
- Place subframe lifting tool into position underneath rear subframe.
 Courtesy of TESLA, INC. Courtesy of TESLA, INC.
|
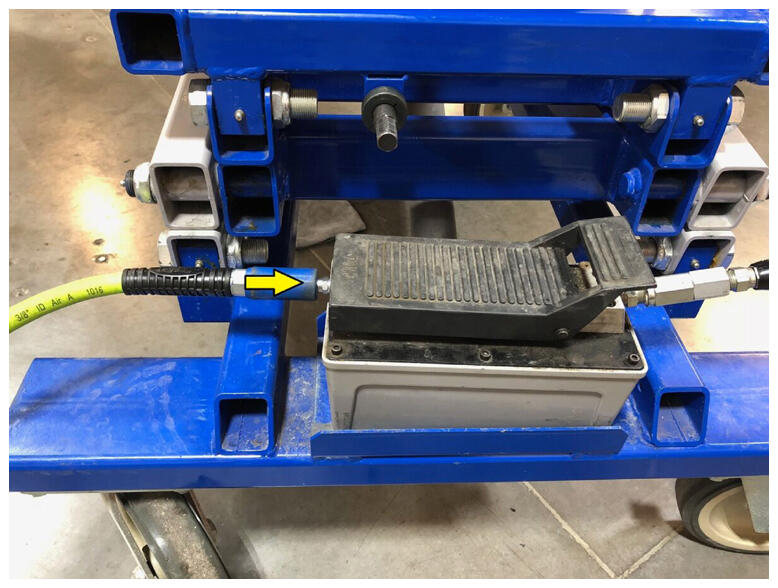
- Connect air supply to subframe lifting tool.
 Courtesy of TESLA, INC. Courtesy of TESLA, INC.
|
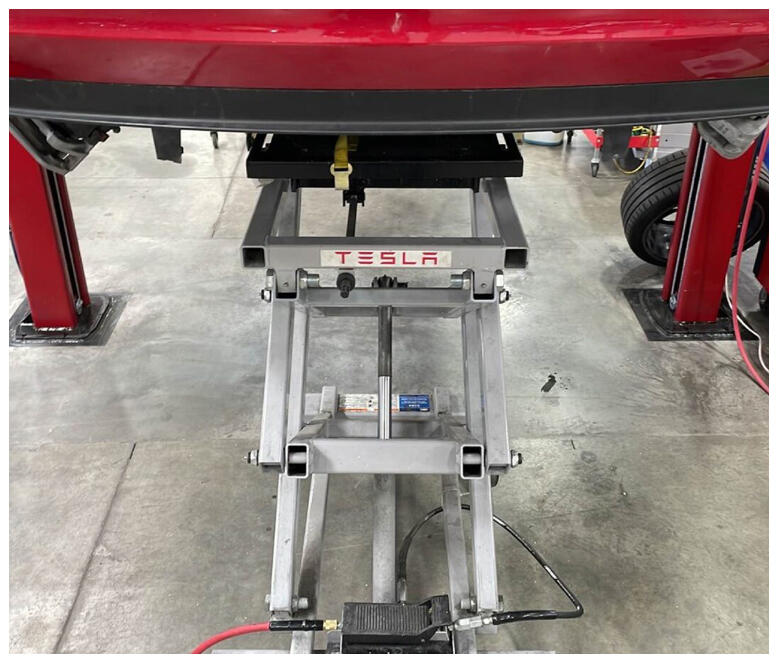
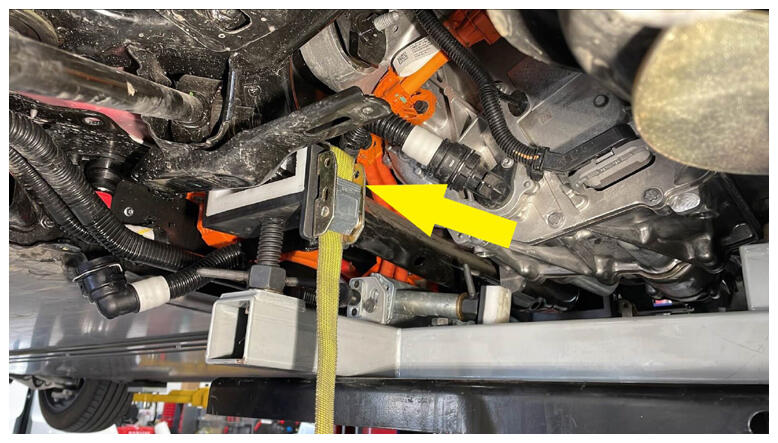
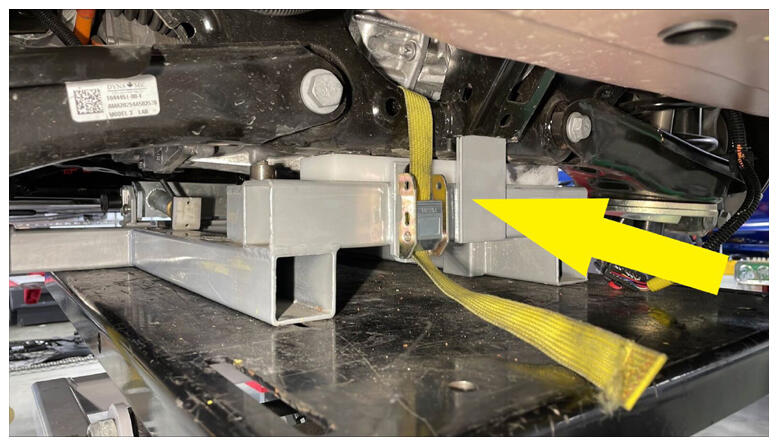
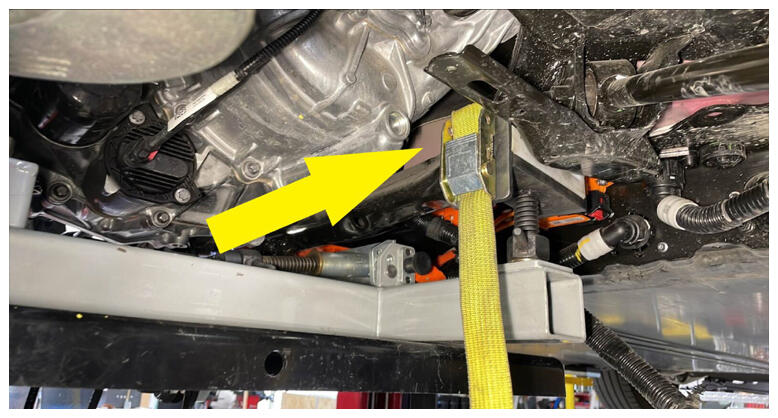
- Raise subframe lifting tool to support rear subframe.
NOTE:
3x straps, Attach metal hooks at the end of straps to rings on subframe lifting tool and pull straps until secure, Lower the vehicle if necessary, Recommend assistance.
 Courtesy of TESLA, INC. Courtesy of TESLA, INC.
|
 Courtesy of TESLA, INC. Courtesy of TESLA, INC.
|
 Courtesy of TESLA, INC. Courtesy of TESLA, INC.
|
 Courtesy of TESLA, INC. Courtesy of TESLA, INC.
|
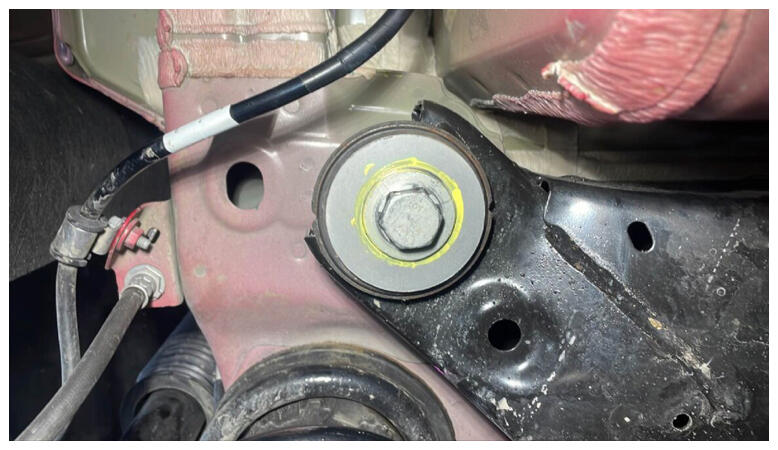
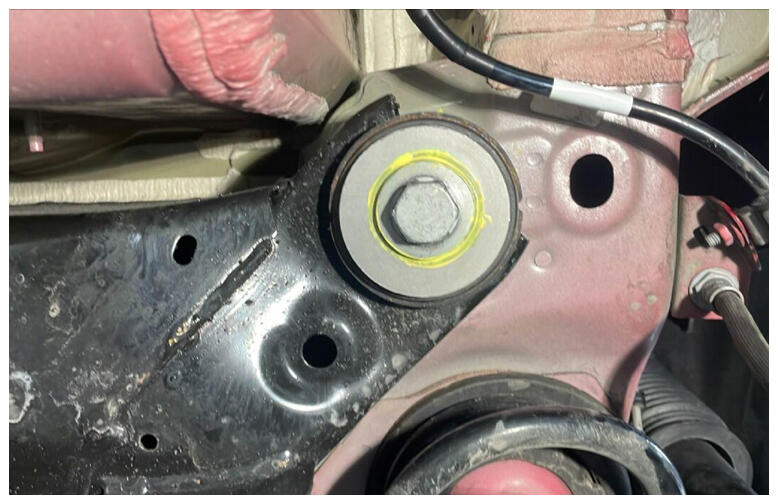
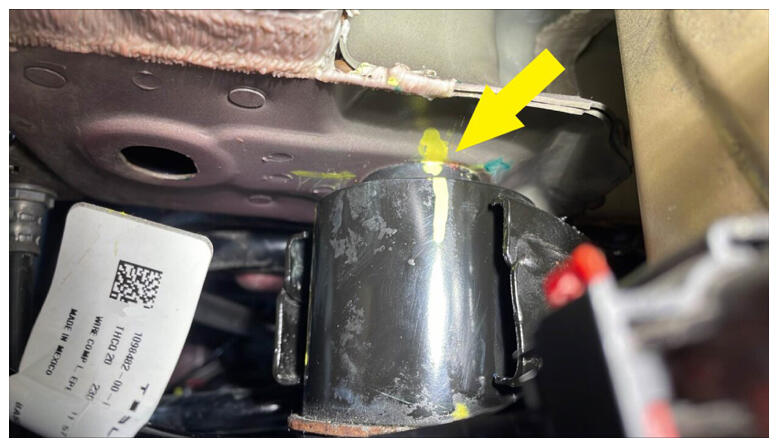
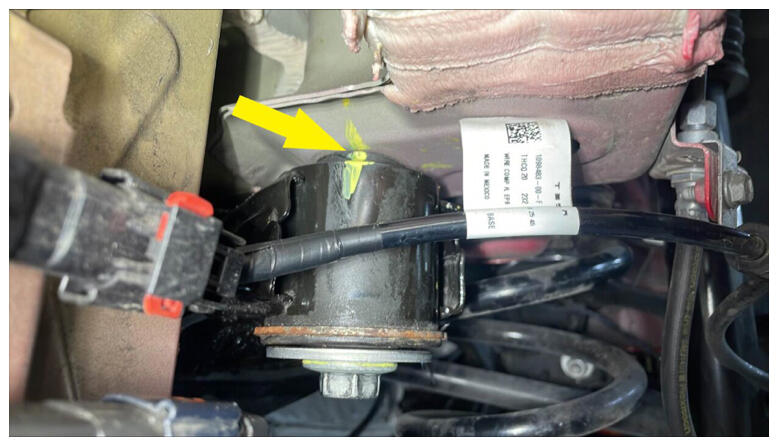
- Mark LH rear and RH rear subframe bolts.
NOTE:
2x bolts, Mark original location of subframe, Re-align during install, Can also mark subframe casting and subframe bushing to body if needed.
 Courtesy of TESLA, INC. Courtesy of TESLA, INC.
|
 Courtesy of TESLA, INC. Courtesy of TESLA, INC.
|
 Courtesy of TESLA, INC. Courtesy of TESLA, INC.
|
 Courtesy of TESLA, INC. Courtesy of TESLA, INC.
|
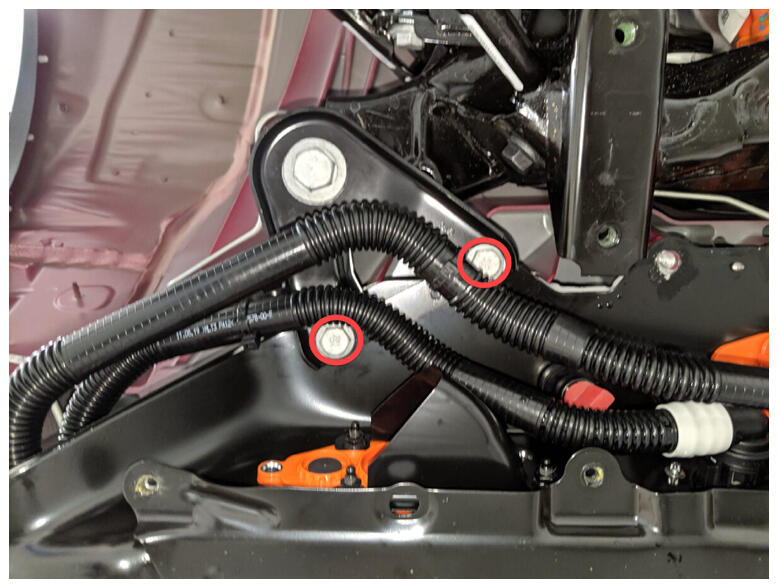
- Remove smaller fasteners securing LH shear plate.
NOTE:
2x bolts, 13 mm, 35 N.m.
 Courtesy of TESLA, INC. Courtesy of TESLA, INC.
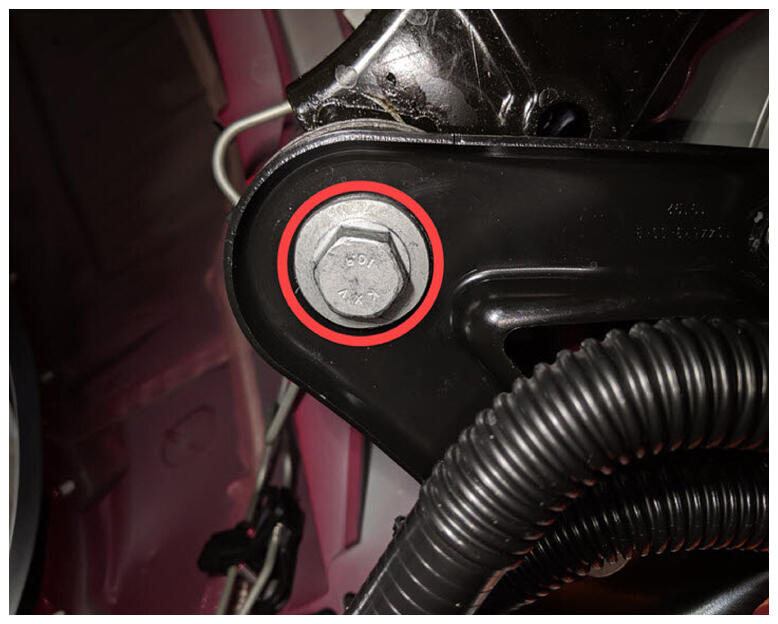
|
- Remove large bolt securing LH shear plate and subframe to body and remove shear plate.
NOTE:
1x bolt, 21 mm, 130 N.m, Discard after removal.
 Courtesy of TESLA, INC. Courtesy of TESLA, INC.
|
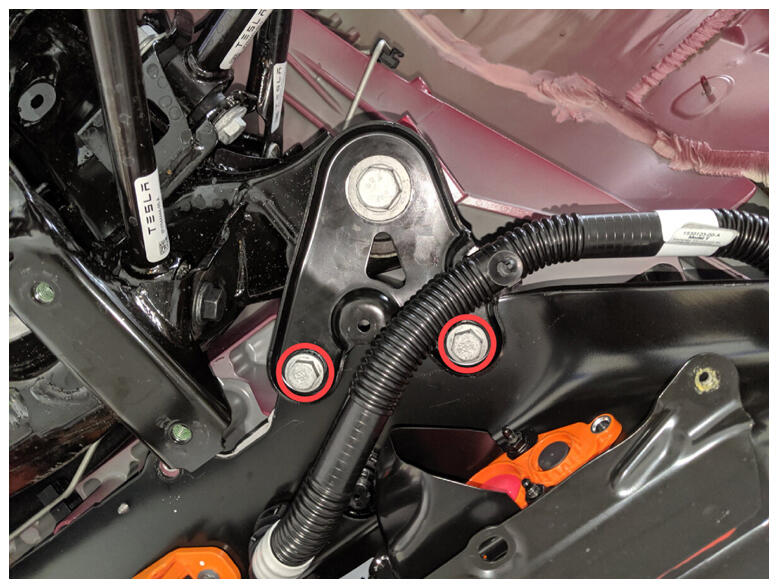
- Remove smaller fasteners for RH shear plate.
NOTE:
2x bolts, 13 mm, 35 N.m.
 Courtesy of TESLA, INC. Courtesy of TESLA, INC.
|
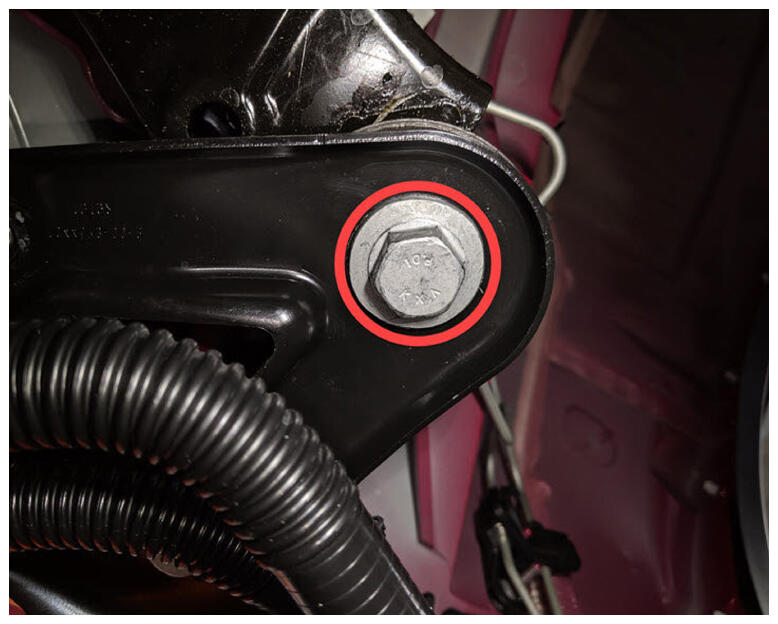
- Remove large bolt securing RH shear plate and subframe to body and remove shear plate.
NOTE:
1x bolt, 21 mm, 130 N.m, Discard after removal.
 Courtesy of TESLA, INC. Courtesy of TESLA, INC.
|
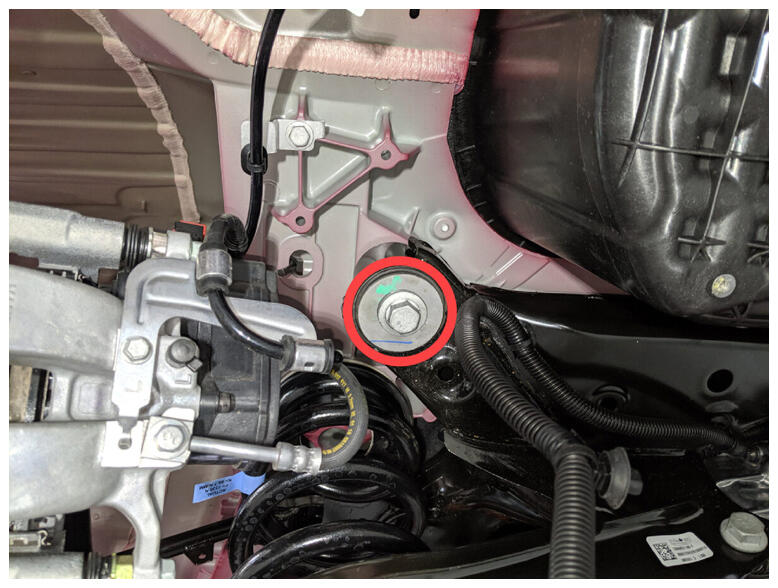
- Remove LH rear bolt securing subframe to body.
NOTE:
1x bolt, 21 mm, 165 N.m, Discard after removal.
 Courtesy of TESLA, INC. Courtesy of TESLA, INC.
|
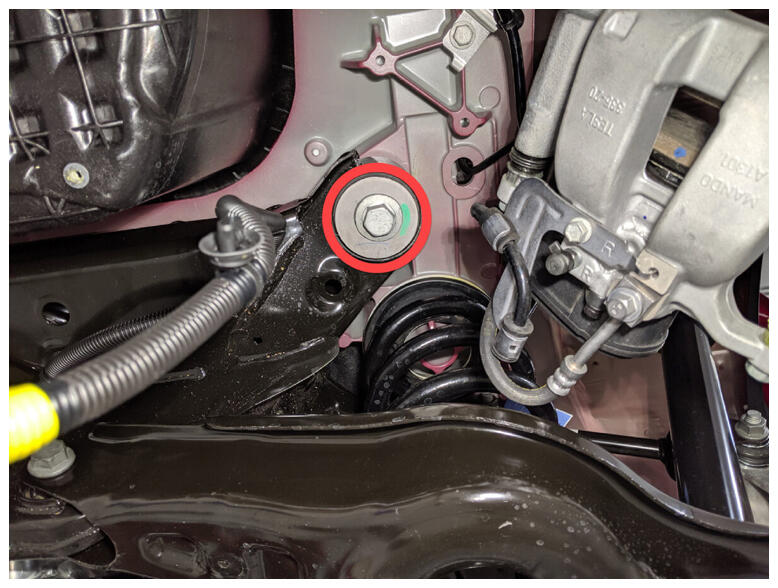
- Remove RH rear bolt securing subframe to body.
NOTE:
1x bolt, 21 mm, 165 N.m, Discard after removal.
 Courtesy of TESLA, INC. Courtesy of TESLA, INC.
|
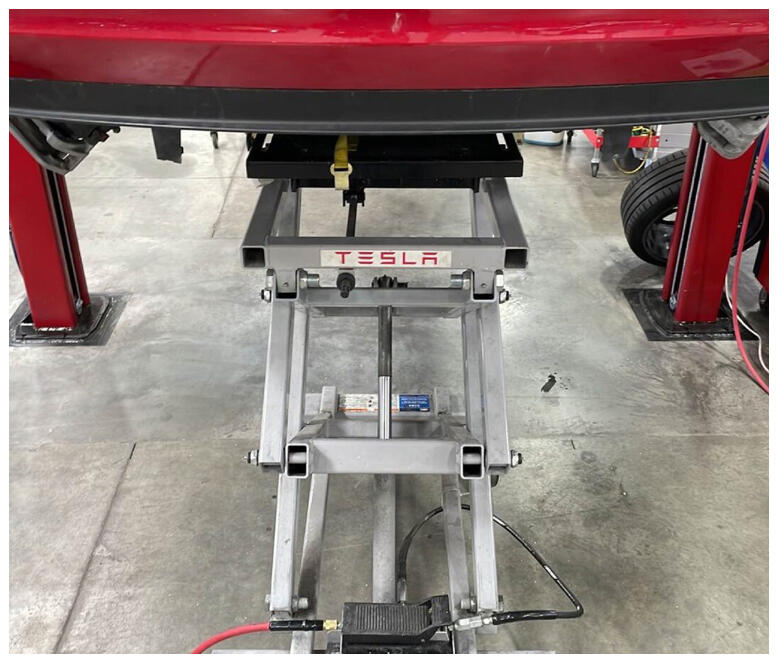
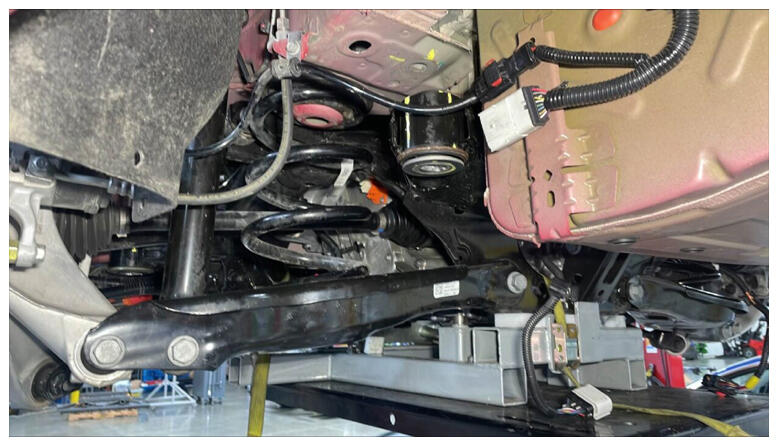
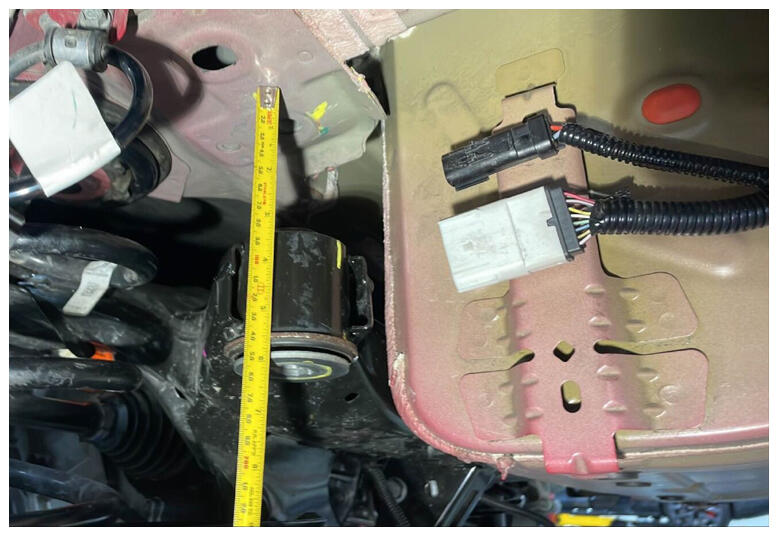
- Partially lower the rear subframe and drive unit assembly.
NOTE:
Lower the subframe partially, Use caution while lowering subframe as multiple components are still attached, Do not overstrain these components, The dampers and brake calipers are still connected, Recommend lowering about 3.25 in or 8.25 cm.
 Courtesy of TESLA, INC. Courtesy of TESLA, INC.
|
 Courtesy of TESLA, INC. Courtesy of TESLA, INC.
|
 Courtesy of TESLA, INC. Courtesy of TESLA, INC.
|
- Tilt subframe fixture forward.
NOTE:
Adjust the powertrain lift and tilt it forward in order to access motor mount fasteners.
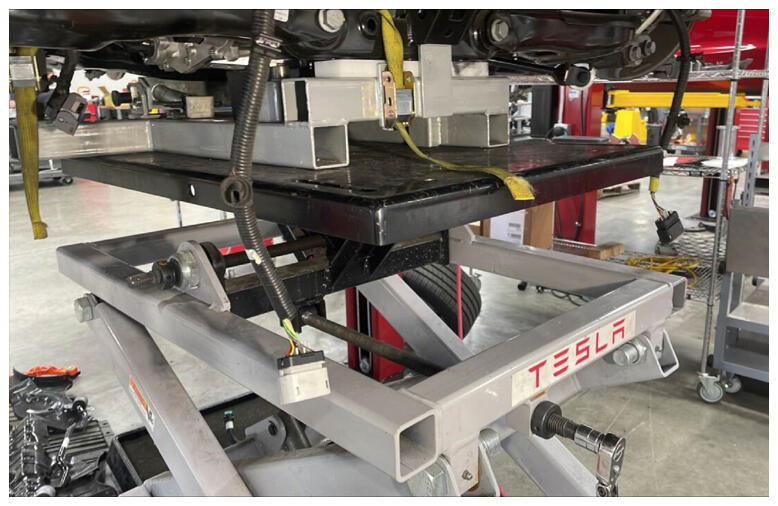 Courtesy of TESLA, INC. Courtesy of TESLA, INC.
|
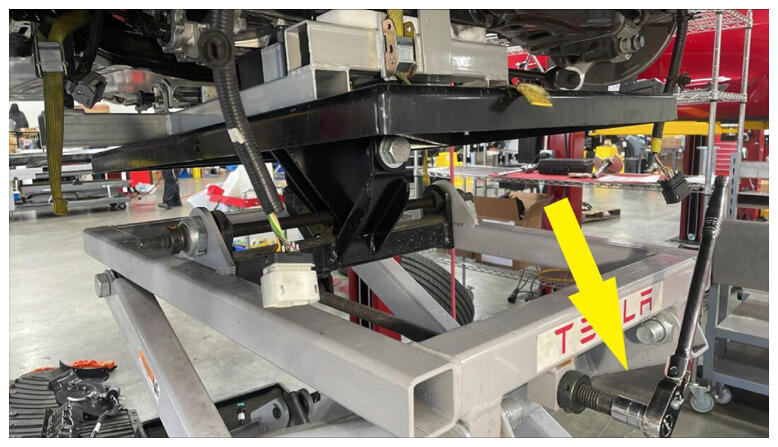 Courtesy of TESLA, INC. Courtesy of TESLA, INC.
|
- Support center of the RDU with protective block.
NOTE:
Using a rubber or wood block, support the center of the RDU while mount is disconnected, Do not damage drive unit.
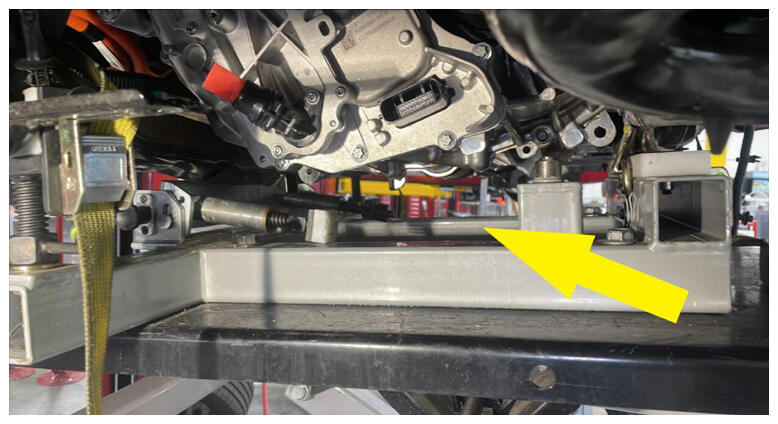 Courtesy of TESLA, INC. Courtesy of TESLA, INC.
|
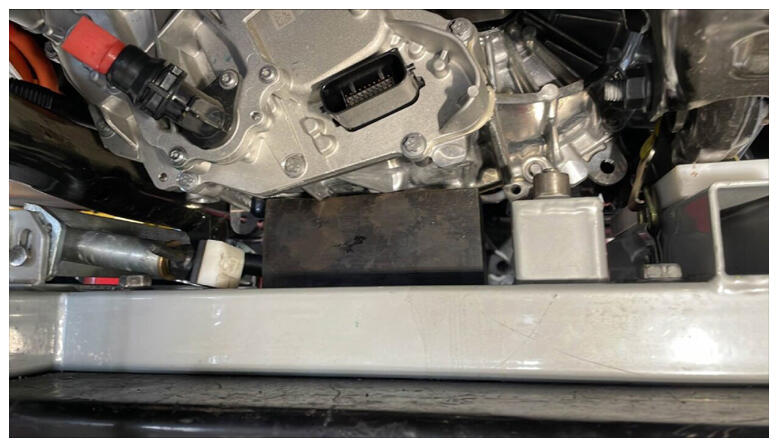 Courtesy of TESLA, INC. Courtesy of TESLA, INC.
|
- Release RDU ground strap clip from subframe.
NOTE:
1x clip
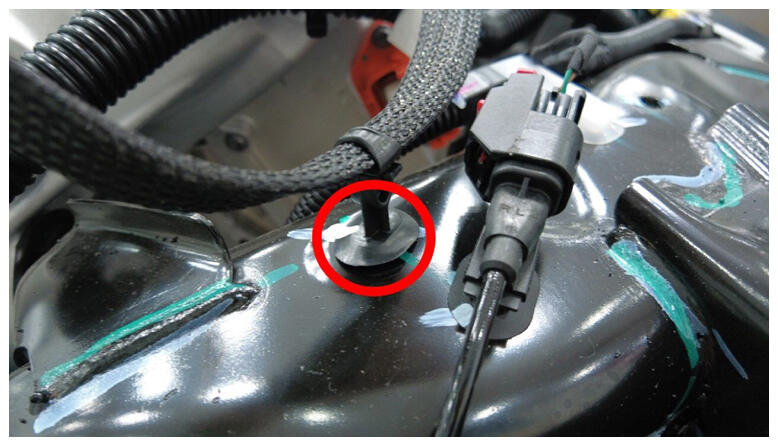 Courtesy of TESLA, INC. Courtesy of TESLA, INC.
|
- Release inverter to cooler hose clip.
NOTE:
1x clip
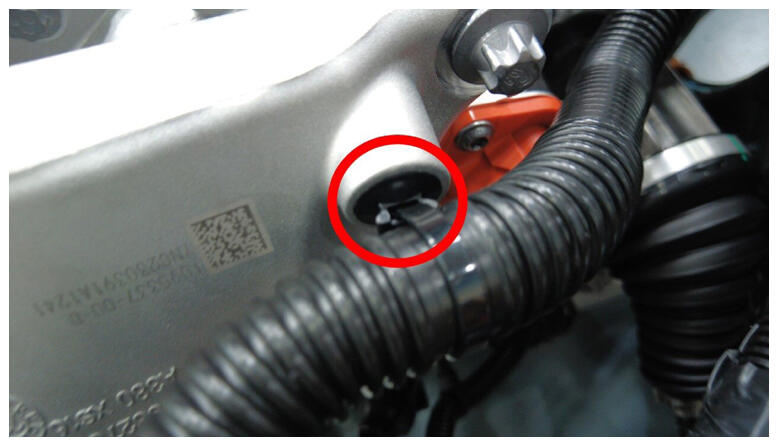 Courtesy of TESLA, INC. Courtesy of TESLA, INC.
|
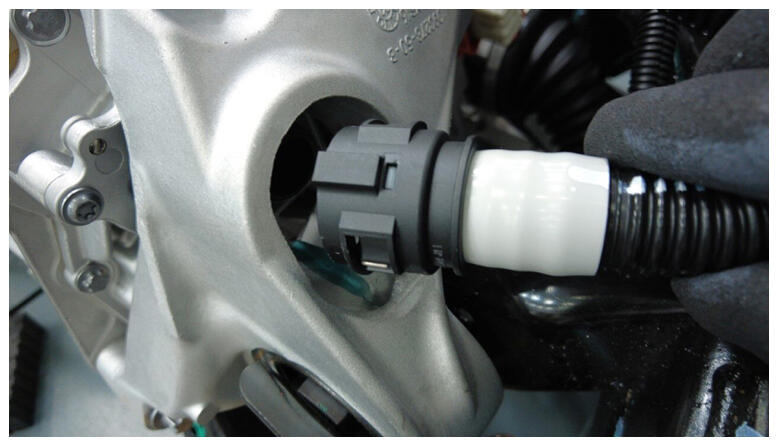
- Release RDU inverter to oil cooler hose.
NOTE:
1x hose clip, Image zoomed in for clarity.
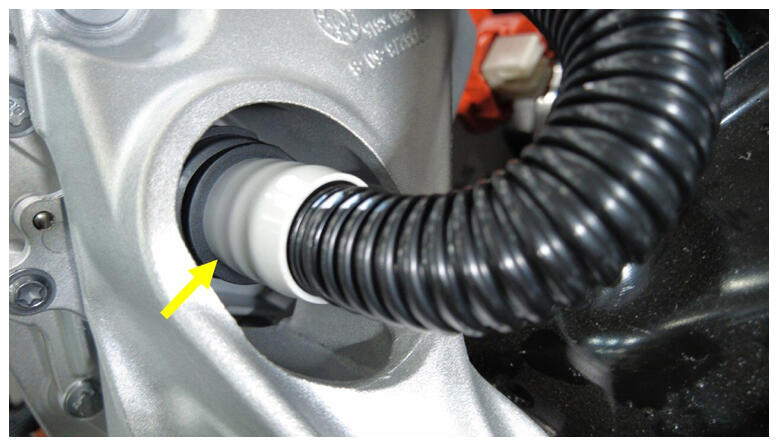 Courtesy of TESLA, INC. Courtesy of TESLA, INC.
|
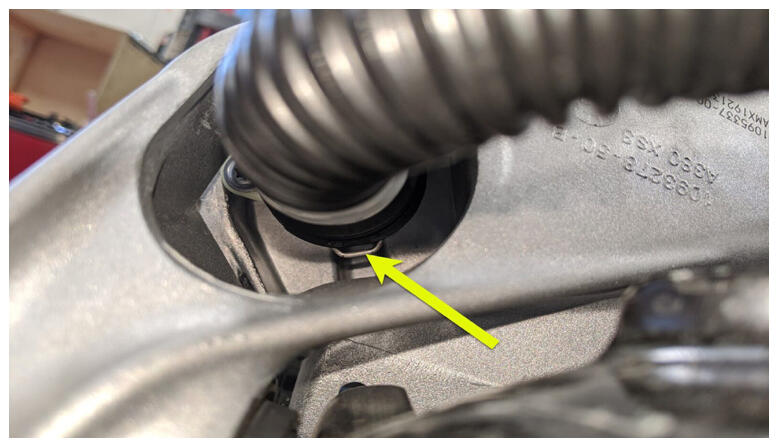 Courtesy of TESLA, INC. Courtesy of TESLA, INC.
|
 Courtesy of TESLA, INC. Courtesy of TESLA, INC.
|
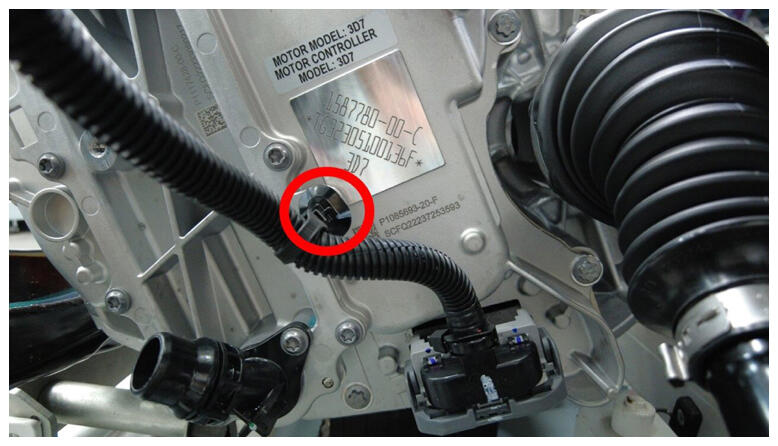
- Release RDU logic connection clip.
NOTE:
1x clip.
 Courtesy of TESLA, INC. Courtesy of TESLA, INC.
|
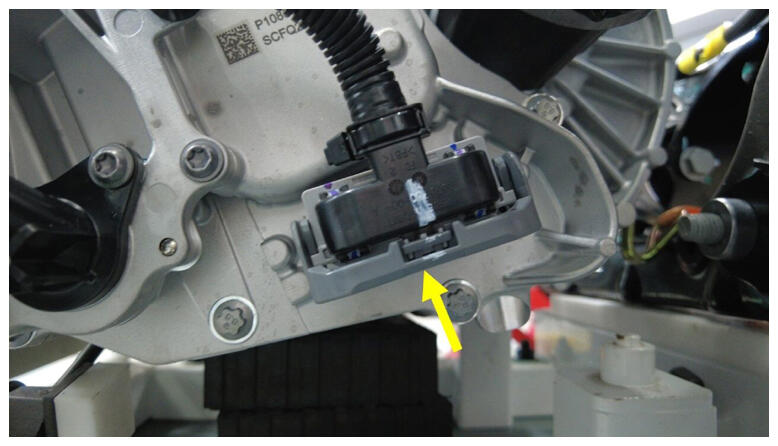
- Release RDU logic connection.
NOTE:
1x connector, Release locking tab then push the handle downward to release connector.
 Courtesy of TESLA, INC. Courtesy of TESLA, INC.
|
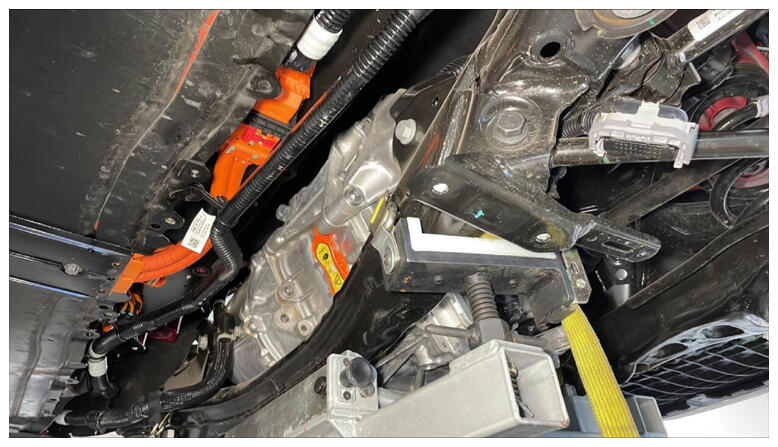
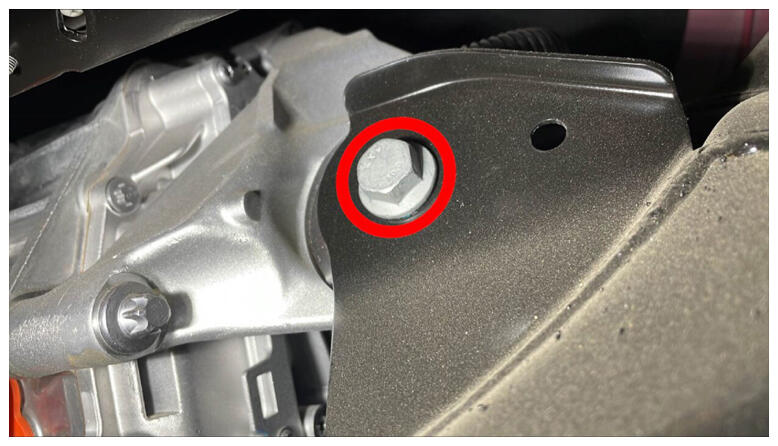
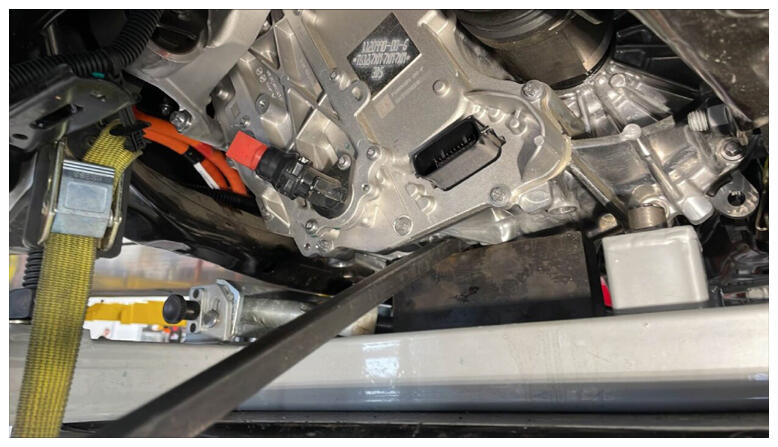
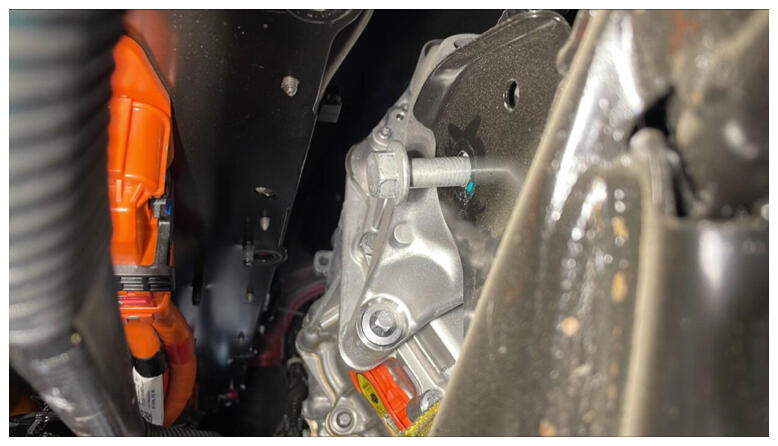
- Remove LH mount bolt securing drive unit to subframe.
NOTE:
1x bolt, 18 mm, 80 N.m, Remove fastener, Use a pry to aid as needed, Do not damage drive unit casting.
 Courtesy of TESLA, INC. Courtesy of TESLA, INC.
|
 Courtesy of TESLA, INC. Courtesy of TESLA, INC.
|
 Courtesy of TESLA, INC. Courtesy of TESLA, INC.
|
 Courtesy of TESLA, INC. Courtesy of TESLA, INC.
|
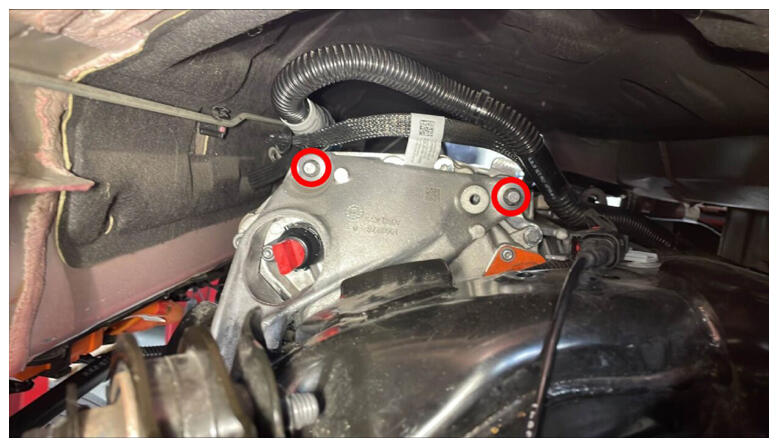
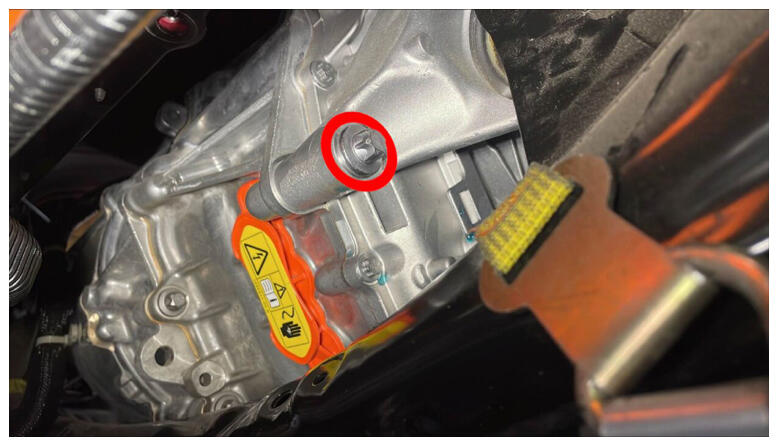
- Remove the bolts for RDU LH mount assembly.
NOTE:
3x bolts, E14, 35 N.m and 55 degrees, Break loose and remove fasteners.
 Courtesy of TESLA, INC. Courtesy of TESLA, INC.
|
 Courtesy of TESLA, INC. Courtesy of TESLA, INC.
|
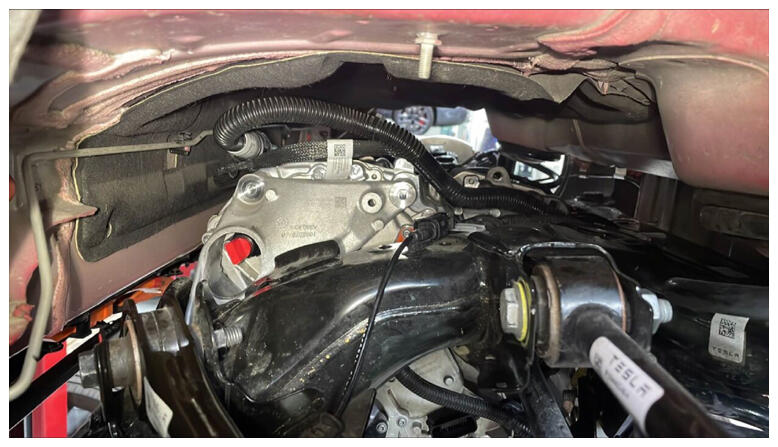
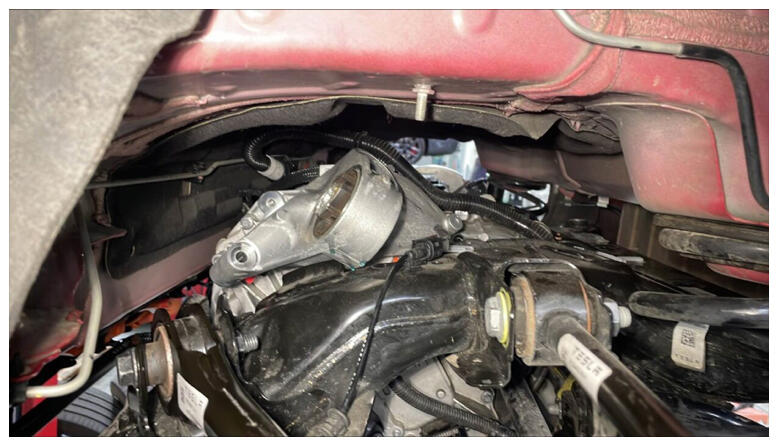
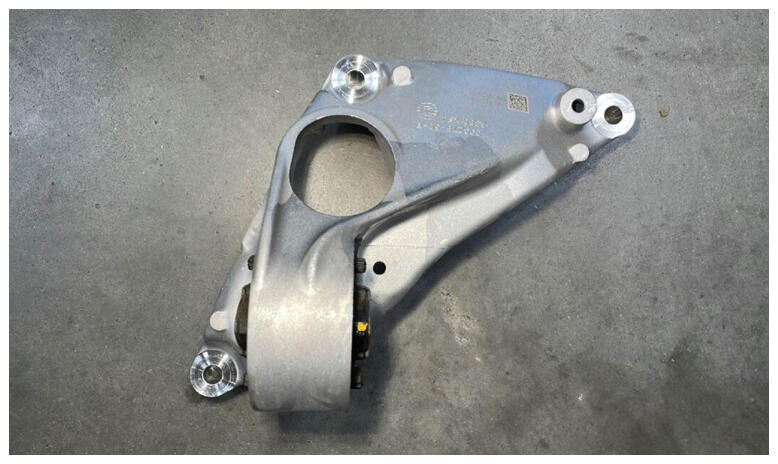
- Remove LH mount assembly from between rear drive unit and subframe.
NOTE:
Maneuver upwards and remove.
 Courtesy of TESLA, INC. Courtesy of TESLA, INC.
|
 Courtesy of TESLA, INC. Courtesy of TESLA, INC.
|
 Courtesy of TESLA, INC. Courtesy of TESLA, INC.
|
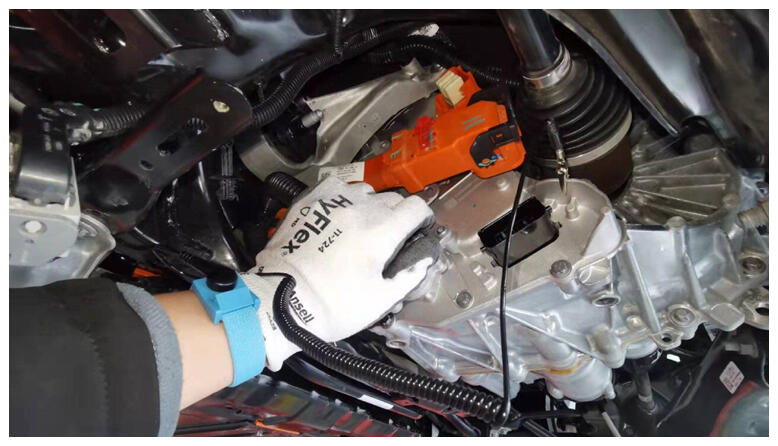
- Put on ESD wrist strap and secure it to inverter housing.
 Courtesy of TESLA, INC. Courtesy of TESLA, INC.
|
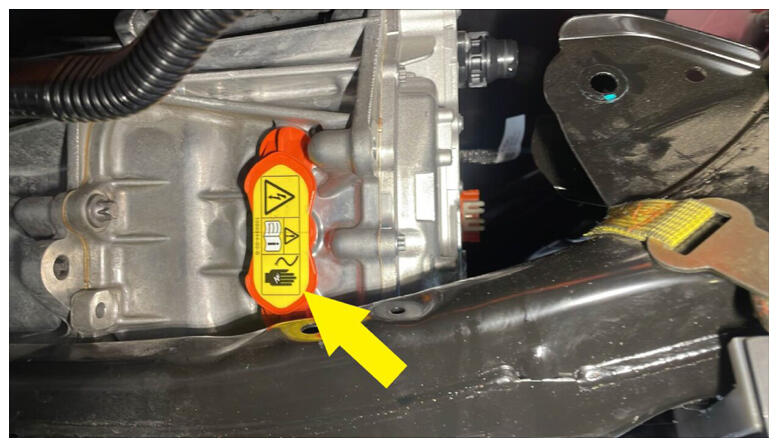
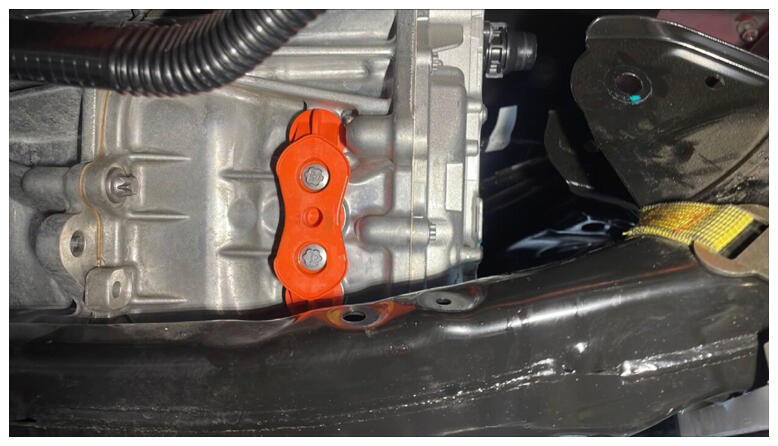
- Remove label from phase cover.
NOTE:
Discard label after removal.
 Courtesy of TESLA, INC. Courtesy of TESLA, INC.
|
 Courtesy of TESLA, INC. Courtesy of TESLA, INC.
|
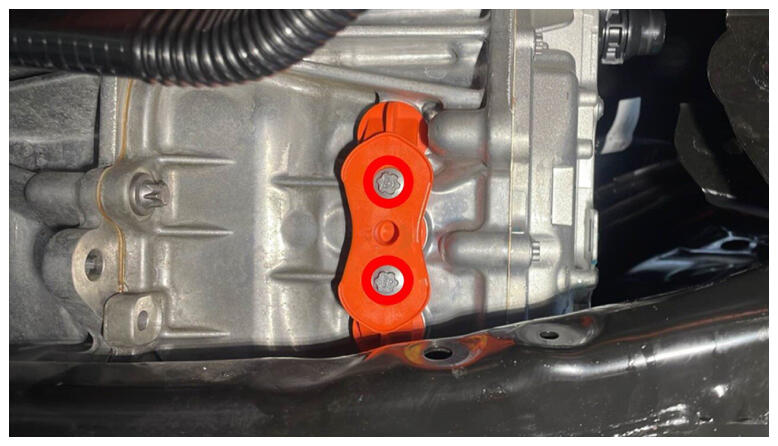
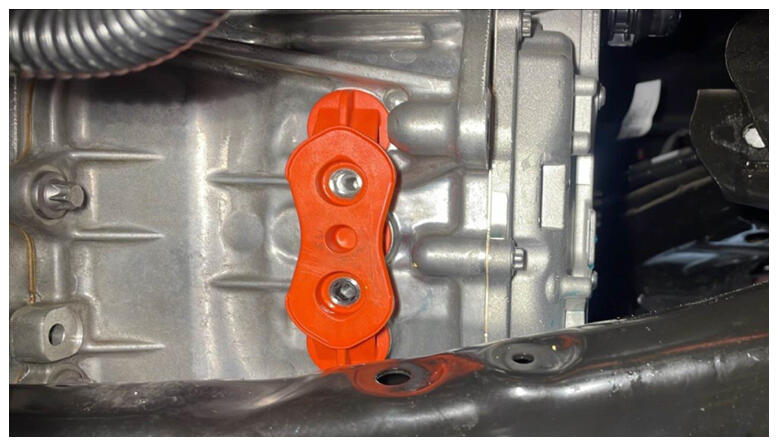
- Remove the bolts securing the RDU phase out cover.
NOTE:
2x bolts, EP10, 14 N.m.
 Courtesy of TESLA, INC. Courtesy of TESLA, INC.
|
 Courtesy of TESLA, INC. Courtesy of TESLA, INC.
|
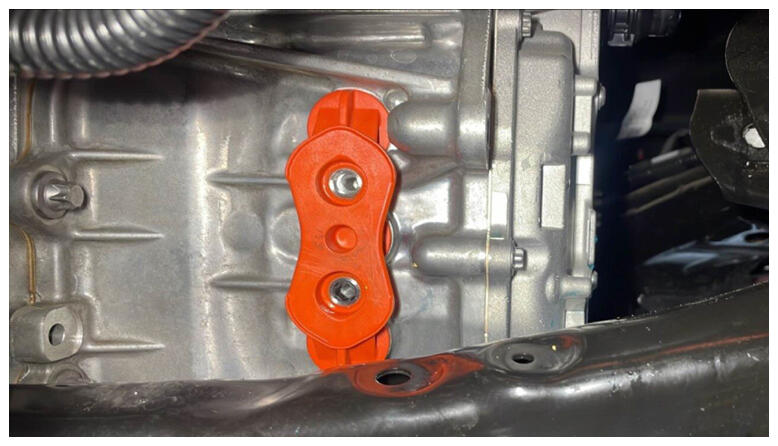
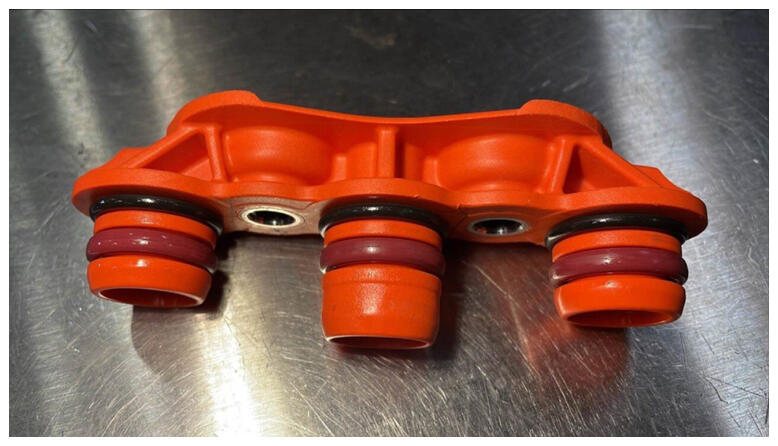
- Remove the phase out cover from RDU.
NOTE:
Use a plastic trim tool to aid in removal, If phase out cover or O-rings are damaged then replace with a new unit.
 Courtesy of TESLA, INC. Courtesy of TESLA, INC.
|
 Courtesy of TESLA, INC. Courtesy of TESLA, INC.
|
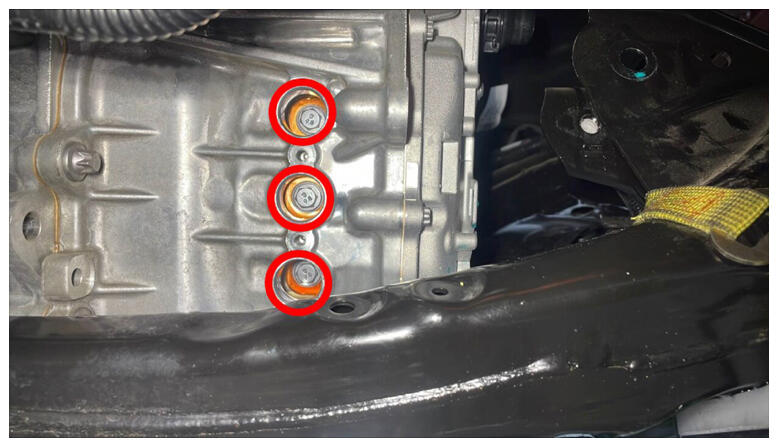
- Remove bolts securing the RDU 3 phase cable for inverter and motor.
NOTE:
3x bolts, 10 mm, 11.5 N.m, Do not drop fasteners, Fasteners can be re-used.
 Courtesy of TESLA, INC. Courtesy of TESLA, INC.
|
- Remove bolts securing the RDU inverter to gearbox assembly.
NOTE:
12x bolts, EP10, 12.5 N.m, Fasteners can be re-used.
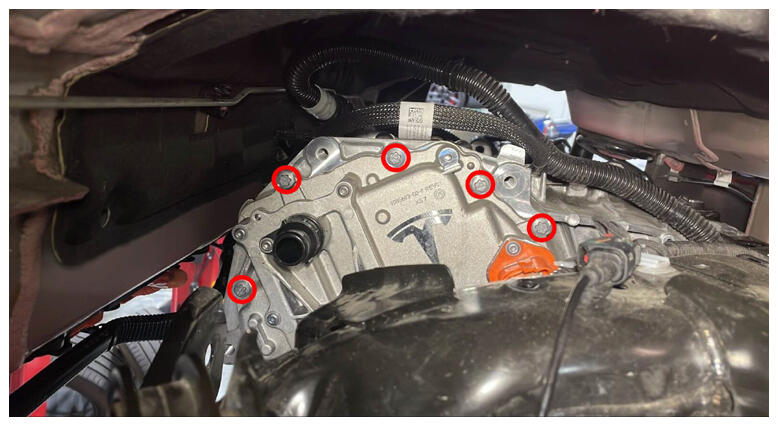 Courtesy of TESLA, INC. Courtesy of TESLA, INC.
|
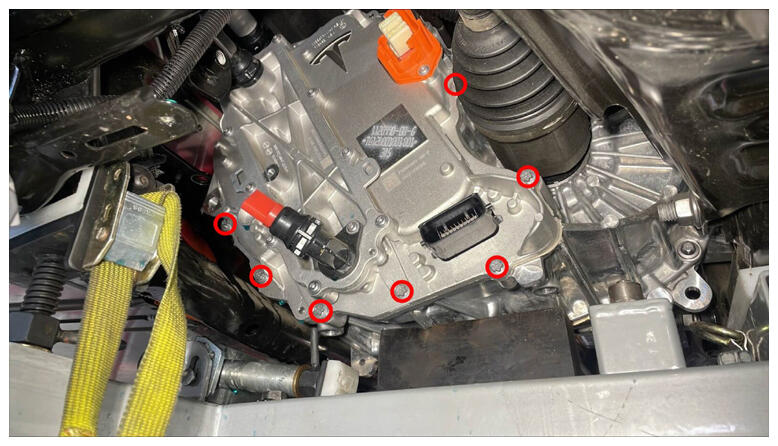 Courtesy of TESLA, INC. Courtesy of TESLA, INC.
|
 Courtesy of TESLA, INC. Courtesy of TESLA, INC.
|
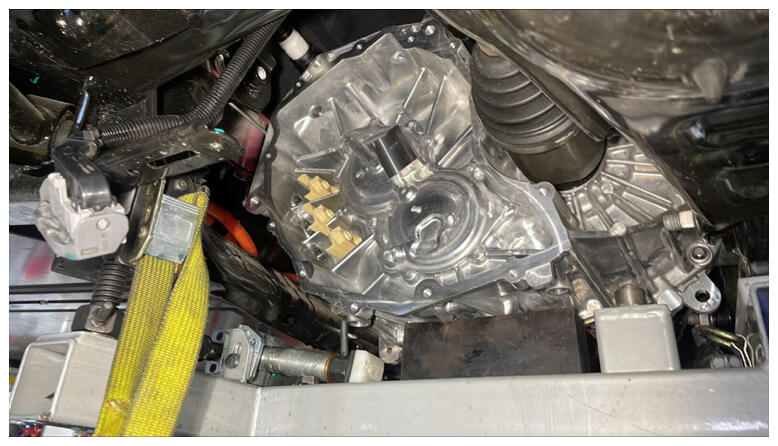
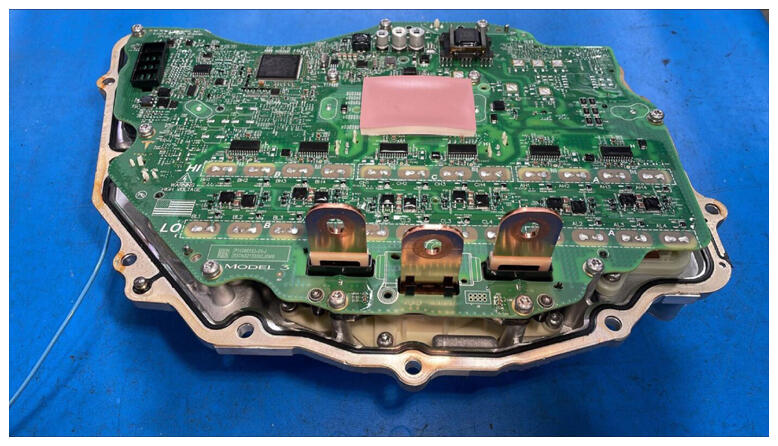
- Remove the inverter from drive unit and drain coolant.
NOTE:
Inverter to be removed down between the drive unit and subframe, Gasket is one time use, Careful not to damage the PCBA during removal.
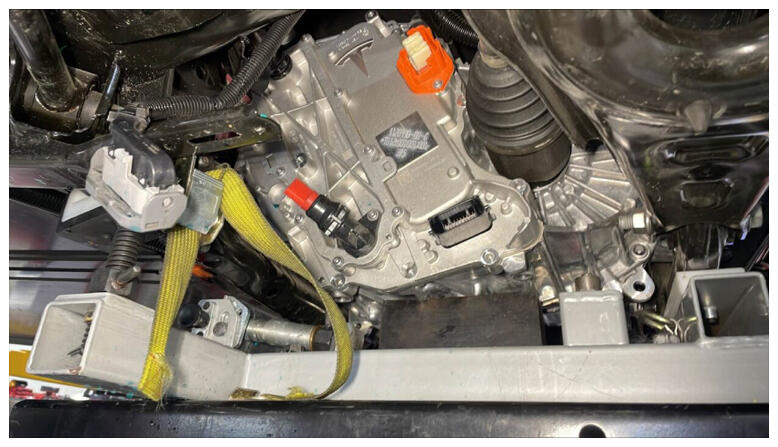 Courtesy of TESLA, INC. Courtesy of TESLA, INC.
|
 Courtesy of TESLA, INC. Courtesy of TESLA, INC.
|
 Courtesy of TESLA, INC. Courtesy of TESLA, INC.
|
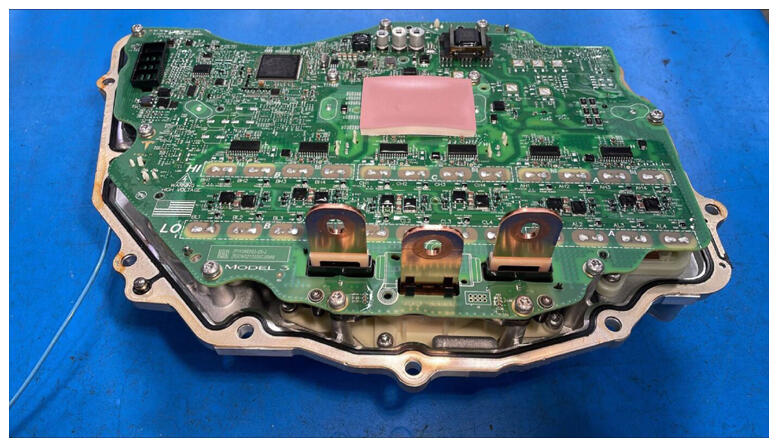
- Place drive inverter on ESD mat.
NOTE:
Carefully place inverter on ESD safe mat, Do not place inverter facing downwards on the circuit board as it is fragile.
 Courtesy of TESLA, INC. Courtesy of TESLA, INC.
|
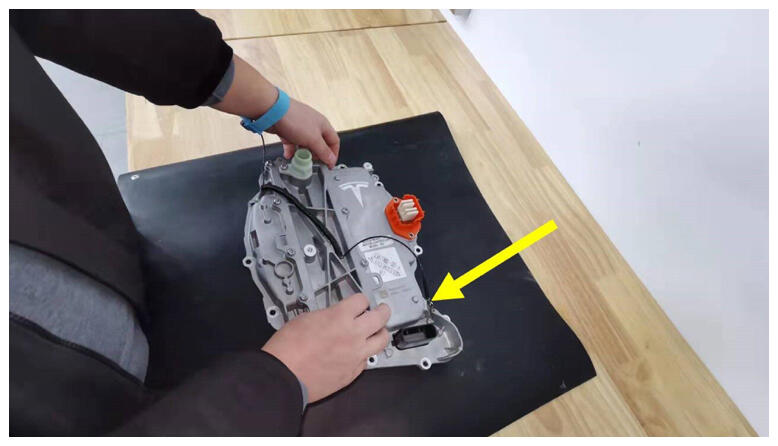
- Remove ESD wrist strap from old inverter housing.
NOTE:
ESD Wrist Strap - 1080292-00-A.
 Courtesy of TESLA, INC. Courtesy of TESLA, INC.
|