- Open all four doors
- Lower all four windows
- Remove LH mid A-pillar assembly
NOTE:
1x clip, 1x tab, Release the upper clip then pull mid A-pillar upward to remove
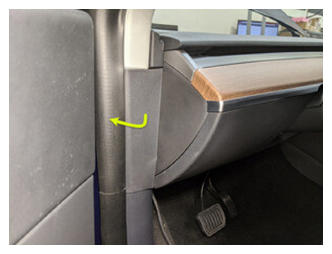 Courtesy of TESLA, INC. Courtesy of TESLA, INC.
|
- Remove clip securing LH lower A-pillar trim
NOTE:
1x push clip
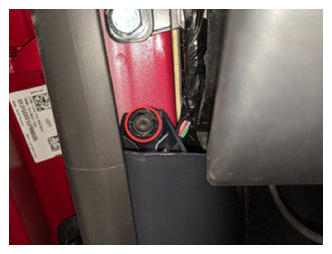 Courtesy of TESLA, INC. Courtesy of TESLA, INC.
|
- Remove LH lower A-pillar trim
NOTE:
6x clips, 2 guide tabs, Pull rear of lower A-pillar upward to release clip then pull rearward to release trim panel
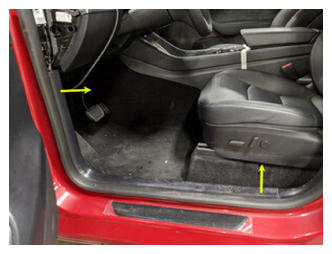 Courtesy of TESLA, INC. Courtesy of TESLA, INC.
|
- Release LH front door seal from body
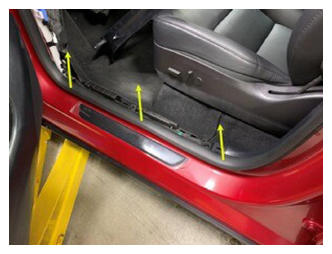 Courtesy of TESLA, INC. Courtesy of TESLA, INC.
|
- Remove clip securing LH front cabin carpet to body
NOTE:
1x clip
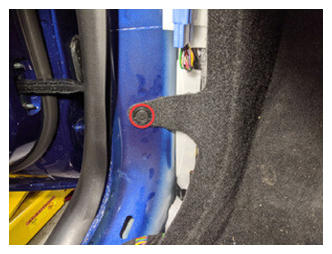 Courtesy of TESLA, INC. Courtesy of TESLA, INC.
|
- Pull LH front cabin carpet away from A-pillar to access LH front seat connector
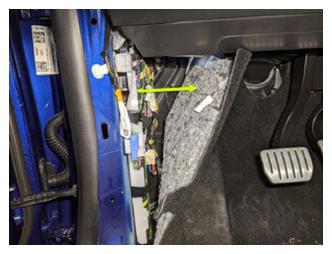 Courtesy of TESLA, INC. Courtesy of TESLA, INC.
|
- Move LH front seat forward
- Remove RH mid A-pillar assembly
NOTE:
1x clip, 1x tab, Release the upper clip then pull mid A-pillar upward to remove
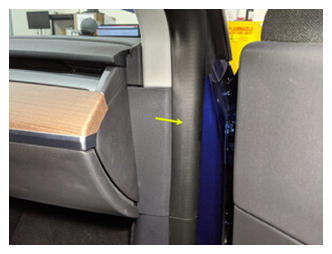 Courtesy of TESLA, INC. Courtesy of TESLA, INC.
|
- Remove clip securing RH lower A-pillar trim
NOTE:
1x push clip
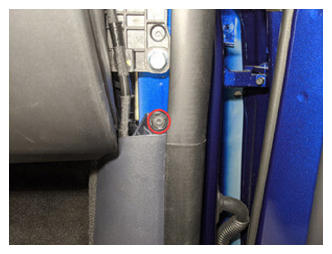 Courtesy of TESLA, INC. Courtesy of TESLA, INC.
|
- Remove RH lower A-pillar trim
NOTE:
6x clips, 2 guide tabs, Pull rear of lower A-pillar upward to release clip then pull rearward to release trim panel
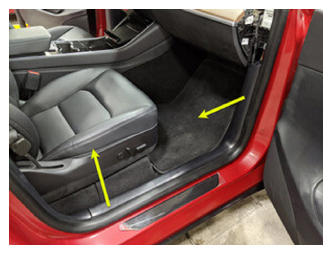 Courtesy of TESLA, INC. Courtesy of TESLA, INC.
|
- Release RH front door seal from body
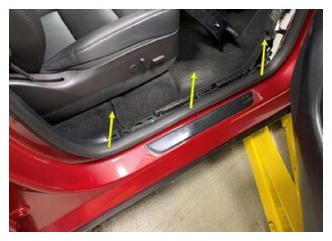 Courtesy of TESLA, INC. Courtesy of TESLA, INC.
|
- Remove clip securing RH front cabin carpet to body
NOTE:
1x clip
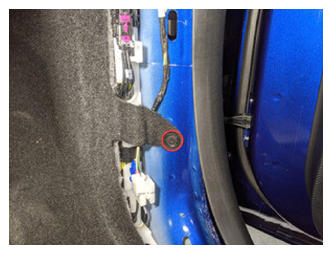 Courtesy of TESLA, INC. Courtesy of TESLA, INC.
|
- Pull RH front cabin carpet away from A-pillar to access RH front seat connector
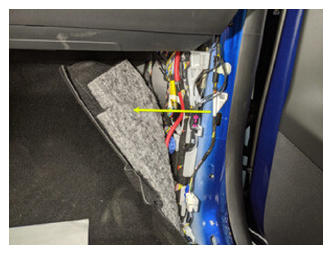 Courtesy of TESLA, INC. Courtesy of TESLA, INC.
|
- Move RH front seat forward
- Release seat belt retractor from RH front seat
NOTE:
Insert special removal tool into the bottom of the retractor to release
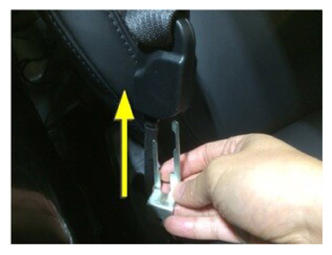 Courtesy of TESLA, INC. Courtesy of TESLA, INC.
|
- Release seat belt retractor from LH front seat
NOTE:
Insert special removal tool into the bottom of the retractor to release
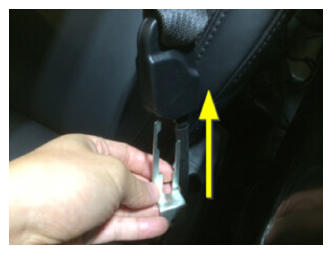 Courtesy of TESLA, INC. Courtesy of TESLA, INC.
|
- Remove LH front seat rear fasteners
NOTE:
2x patch bolts, T45P, 33.5 N.m, Discard after removal
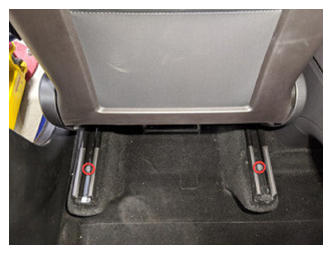 Courtesy of TESLA, INC. Courtesy of TESLA, INC.
|
- Move LH front seat backward
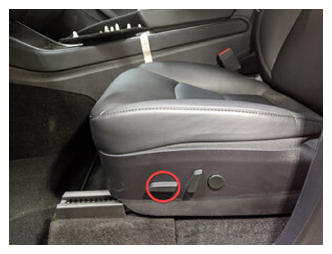 Courtesy of TESLA, INC. Courtesy of TESLA, INC.
|
- Remove LH front seat front fasteners
NOTE:
2x patch bolts, T45P, 33.5 N.m, Discard after removal
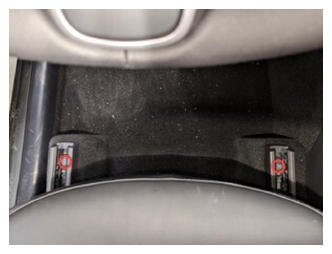 Courtesy of TESLA, INC. Courtesy of TESLA, INC.
|
- Adjust position of LH front seat for easy removal
NOTE:
Move seat to middle of track at most upright position
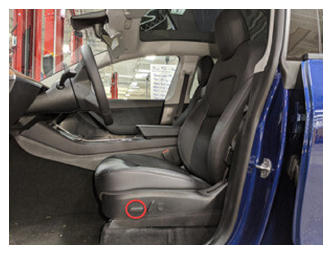 Courtesy of TESLA, INC. Courtesy of TESLA, INC.
|
- Remove RH front seat rear fasteners
NOTE:
2x patch bolts, T45P, 33.5 N.m, Discard after removal
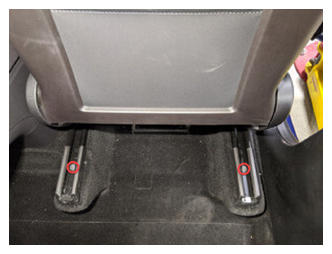 Courtesy of TESLA, INC. Courtesy of TESLA, INC.
|
- Move RH front seat backward
- Remove RH front seat front fasteners
NOTE:
2x patch bolts, T45P, 33.5 N.m, Discard after removal
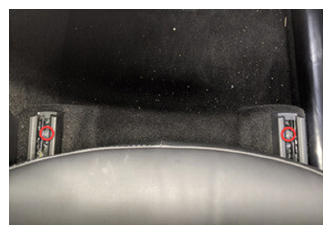 Courtesy of TESLA, INC. Courtesy of TESLA, INC.
|
- Adjust position of RH front seat for easy removal
NOTE:
Move seat to middle of track at most upright position
- Open hood
- Power off vehicle from center display
NOTE:
Via Controls > Safety > Power Off, Select Power Off button at warning dialogue box
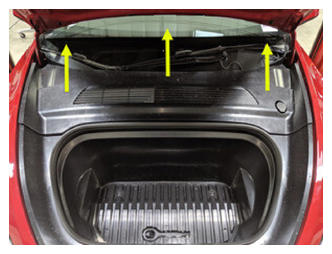
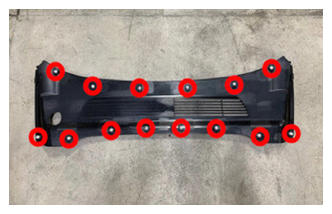
- Remove rear apron
NOTE:
14x clips
 Courtesy of TESLA, INC. Courtesy of TESLA, INC.
|
 Courtesy of TESLA, INC. Courtesy of TESLA, INC.
|
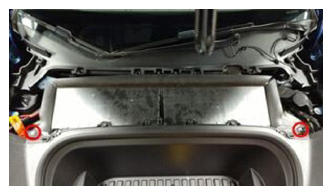
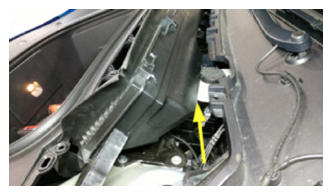
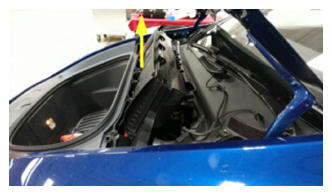
- Remove HEPA filter assembly
NOTE:
2x bolts, 10 mm, 5 N.m, Pivot rearward edge up and past brake reservoir, then lift up to clear frunk assembly
 Courtesy of TESLA, INC. Courtesy of TESLA, INC.
|
 Courtesy of TESLA, INC. Courtesy of TESLA, INC.
|
 Courtesy of TESLA, INC. Courtesy of TESLA, INC.
|
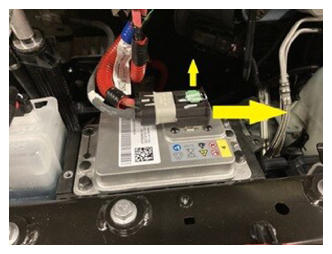
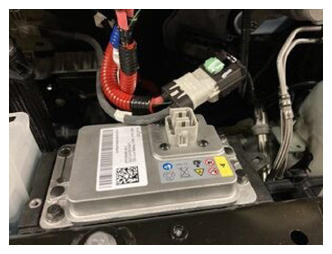
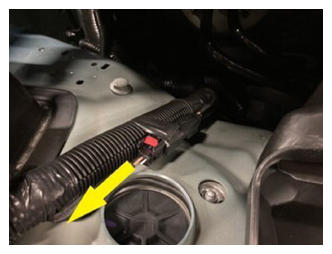
- Disconnect LV battery connector and First Responder Loop
NOTE:
2x connectors, Lift up and release green locking tab, Pull black connector lock outwards to release connection, Release red lock tab on FRL, Allow 2 minutes for all electrical circuits to fully discharge
 Courtesy of TESLA, INC. Courtesy of TESLA, INC.
|
 Courtesy of TESLA, INC. Courtesy of TESLA, INC.
|
 Courtesy of TESLA, INC. Courtesy of TESLA, INC.
|
- Disconnect LH front seat harness from VC left
NOTE:
1x electrical connector, Release the lock by squeezing the release tab, Then fully disengage the lock by moving it away from the VC left, Do not force the connector, If the connector does not easily release from the VC the lock is still engaged
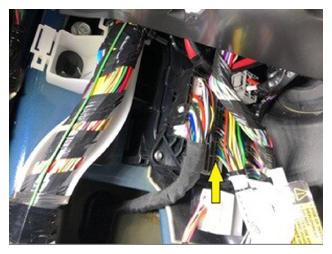 Courtesy of TESLA, INC. Courtesy of TESLA, INC.
|
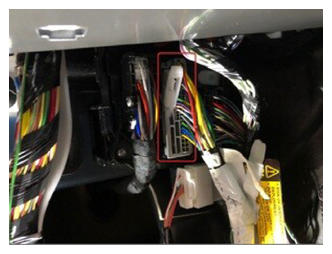 Courtesy of TESLA, INC. Courtesy of TESLA, INC.
|
- Remove LH front seat harness from LH footwell support bracket
NOTE:
2x retaining clips
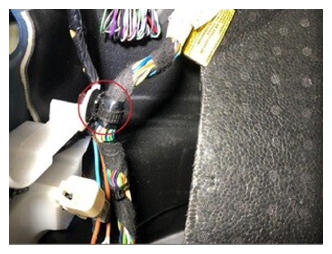 Courtesy of TESLA, INC. Courtesy of TESLA, INC.
|
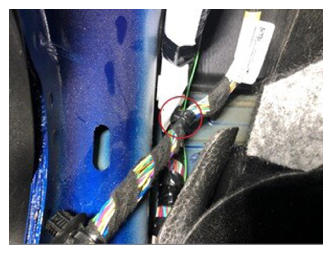 Courtesy of TESLA, INC. Courtesy of TESLA, INC.
|
- Release LH front seat harness from LH front sill panel harness bracket
NOTE:
5x clips
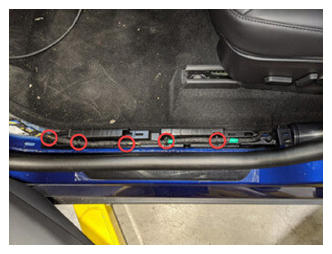 Courtesy of TESLA, INC. Courtesy of TESLA, INC.
|
- Pull LH front seat harness from under LH front cabin carpet
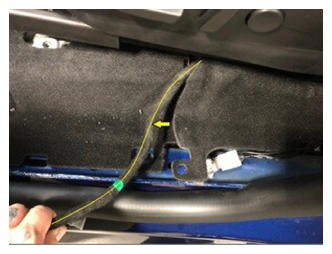 Courtesy of TESLA, INC. Courtesy of TESLA, INC.
|
- Remove LH front seat from vehicle
NOTE:
Recommend assistance, Assistant should be ready to support seat back, Caution not to damage any trim
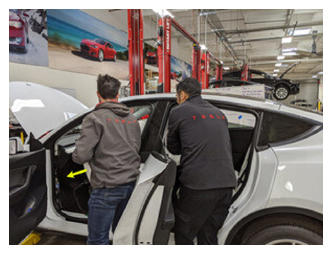 Courtesy of TESLA, INC. Courtesy of TESLA, INC.
|
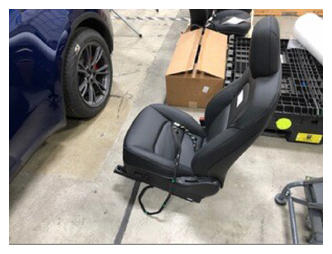 Courtesy of TESLA, INC. Courtesy of TESLA, INC.
|
- Disconnect RH front seat harness from VC right
NOTE:
1x electrical connector, Release the lock by squeezing the release tab, Then fully disengage the lock by moving it away from the VC right, Do not force the connector, If the connector does not easily release from the VC the lock is still engaged
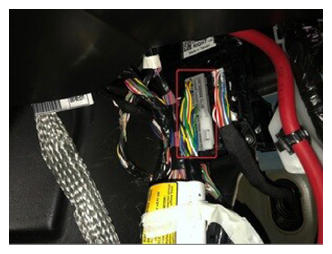 Courtesy of TESLA, INC. Courtesy of TESLA, INC.
|
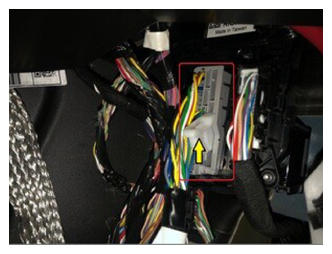 Courtesy of TESLA, INC. Courtesy of TESLA, INC.
|
- Remove RH front seat harness from RH footwell support bracket
NOTE:
2x retaining clips
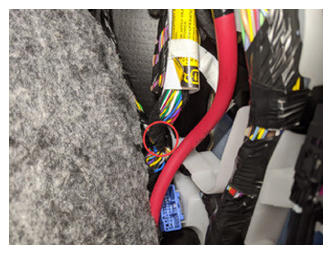 Courtesy of TESLA, INC. Courtesy of TESLA, INC.
|
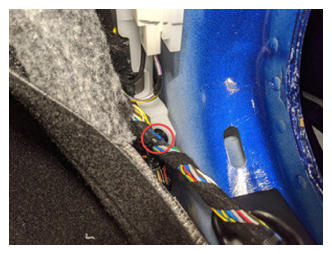 Courtesy of TESLA, INC. Courtesy of TESLA, INC.
|
- Release RH front seat harness from lower A 12V bracket
NOTE:
5x clips
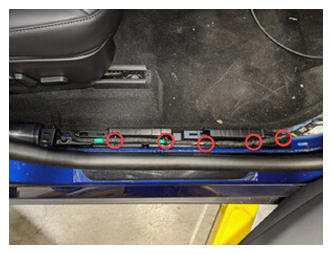 Courtesy of TESLA, INC. Courtesy of TESLA, INC.
|
- Pull RH front seat harness from under RH front cabin carpet
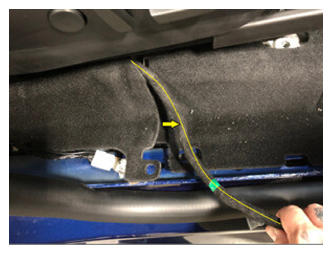 Courtesy of TESLA, INC. Courtesy of TESLA, INC.
|
- Remove RH front seat from vehicle
NOTE:
Recommend assistance, Assistant should be ready to support seat back, Caution not to damage any trim
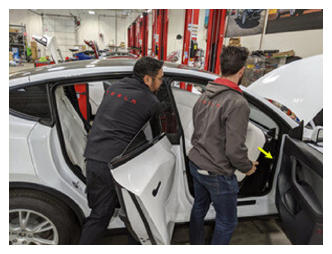 Courtesy of TESLA, INC. Courtesy of TESLA, INC.
|
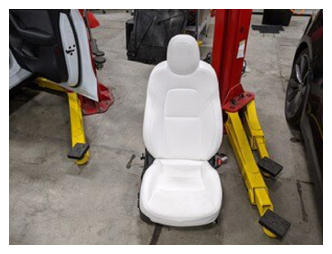 Courtesy of TESLA, INC. Courtesy of TESLA, INC.
|
- Remove LH front floormat
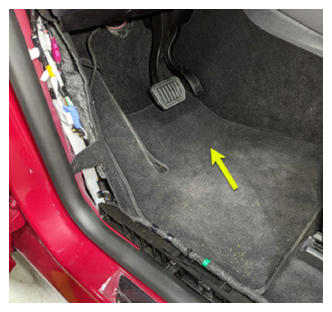 Courtesy of TESLA, INC. Courtesy of TESLA, INC.
|
- Remove LH console side panel carpet
NOTE:
11x clips, 2x guide pins, Use trim tool starting at top edge to release upper clips, then pull bottom to release remaining clips, Use caution and pull panel straight away from console, if panel is peeled off it could be damaged
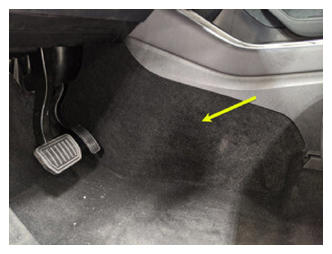 Courtesy of TESLA, INC. Courtesy of TESLA, INC.
|
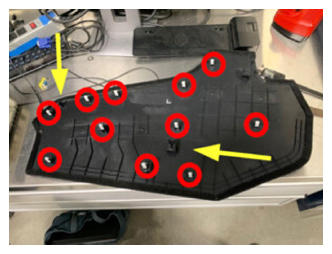 Courtesy of TESLA, INC. Courtesy of TESLA, INC.
|
- Remove LH front exterior hardware from center console
NOTE:
2x bolts, 10 mm, 7 N.m
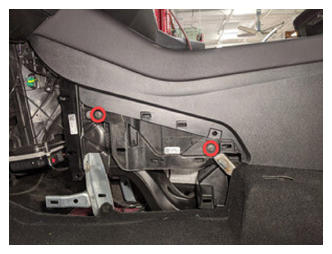 Courtesy of TESLA, INC. Courtesy of TESLA, INC.
|
- Remove console lower rear panel
NOTE:
5x clips
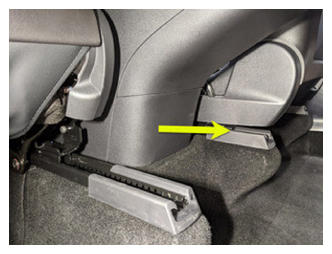 Courtesy of TESLA, INC. Courtesy of TESLA, INC.
|
- Remove LH rear exterior hardware from center console
NOTE:
1x bolt, 10 mm, 7 N.m
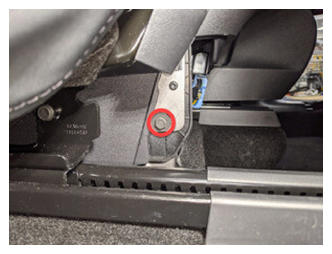 Courtesy of TESLA, INC. Courtesy of TESLA, INC.
|
- Remove RH rear exterior hardware from center console
NOTE:
1x bolt, 10 mm, 7 N.m
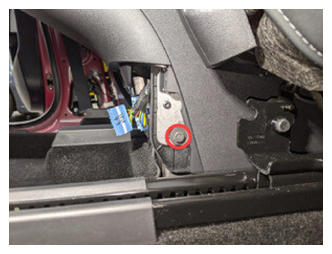 Courtesy of TESLA, INC. Courtesy of TESLA, INC.
|
- Remove RH front floormat
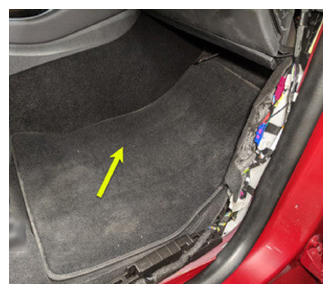 Courtesy of TESLA, INC. Courtesy of TESLA, INC.
|
- Remove RH console side panel carpet
NOTE:
12x clips, 2x locating pins, Use trim tool starting at top edge to release upper clips, Pull bottom to release remaining clips, Use caution and pull panel straight away from console, if panel is peeled off it could be damaged
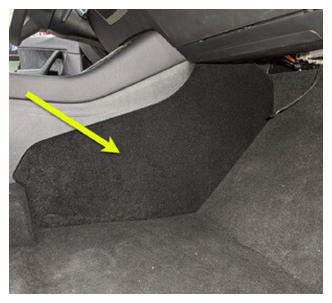 Courtesy of TESLA, INC. Courtesy of TESLA, INC.
|
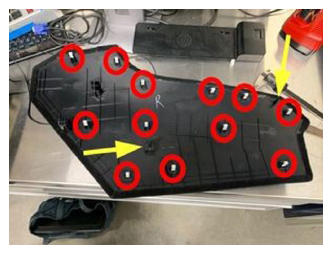 Courtesy of TESLA, INC. Courtesy of TESLA, INC.
|
- Remove RH front exterior hardware from center console
NOTE:
2x bolts, 10 mm, 7 N.m
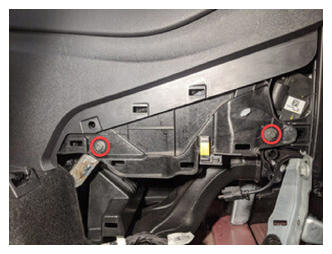 Courtesy of TESLA, INC. Courtesy of TESLA, INC.
|
- Disconnect harness from rear of center console
NOTE:
1x connector
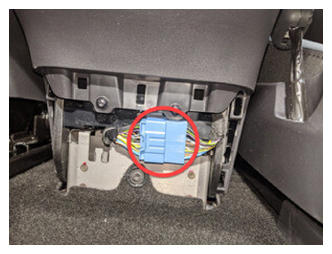 Courtesy of TESLA, INC. Courtesy of TESLA, INC.
|
- Disconnect USB harness at right front of center console
NOTE:
1x USB connector
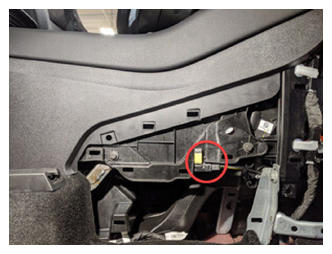 Courtesy of TESLA, INC. Courtesy of TESLA, INC.
|
- Remove center console from vehicle
NOTE:
Verify rotating lids are in closed position, Recommend assistance, Tilt rear of console upward, Pull assembly towards rear of vehicle
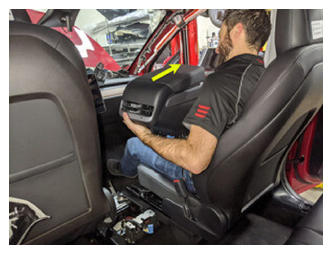 Courtesy of TESLA, INC. Courtesy of TESLA, INC.
|
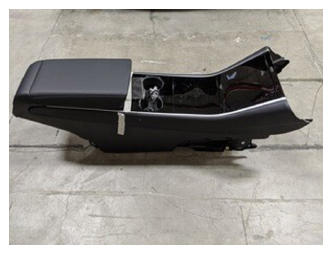 Courtesy of TESLA, INC. Courtesy of TESLA, INC.
|
- Release LH front seat harness and guide from body
NOTE:
3x clips, 1 datum, Datum goes through access hole on LH lower B-pillar
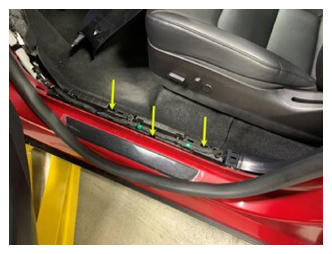 Courtesy of TESLA, INC. Courtesy of TESLA, INC.
|
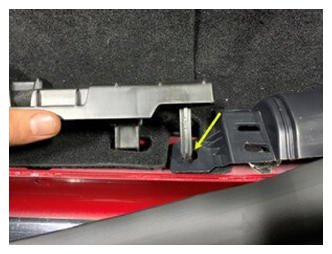 Courtesy of TESLA, INC. Courtesy of TESLA, INC.
|
- Release LH upper B-pillar assembly and move aside
NOTE:
4x clips, Pull the bottom of the upper B-pillar toward inside of the vehicle then pull the top to release the remaining clips
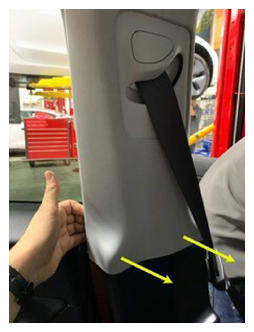 Courtesy of TESLA, INC. Courtesy of TESLA, INC.
|
- Partially remove LH rear door seal
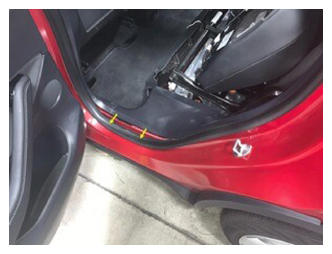 Courtesy of TESLA, INC. Courtesy of TESLA, INC.
|
- Remove LH 7s Lower C-Pillar Trim
NOTE:
8x clips, Rear edge is mated with groove in trunk side trim, Release clips at the front of LH rear sill trim working your way back towards rear of sill trim
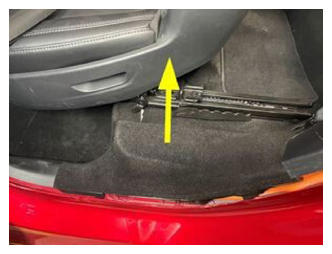 Courtesy of TESLA, INC. Courtesy of TESLA, INC.
|
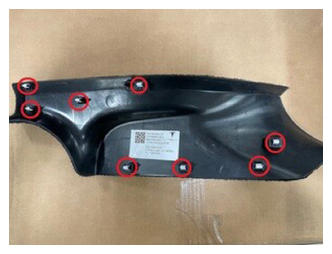 Courtesy of TESLA, INC. Courtesy of TESLA, INC.
|
- Remove clip securing LH lower B-pillar to body
NOTE:
1x push clip, Clip secures lower B-pillar and rear cabin carpet to body
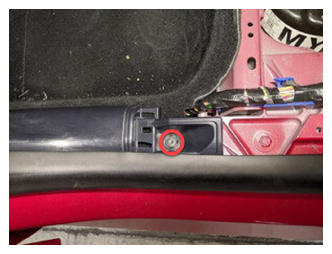 Courtesy of TESLA, INC. Courtesy of TESLA, INC.
|
- Remove the LH lower B-pillar assembly
NOTE:
6x clips, Pull the top of B-pillar to release top clips then work your way to bottom clips
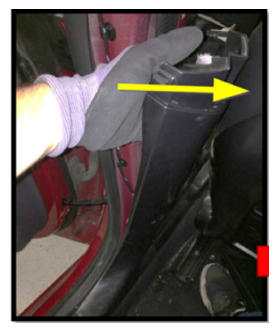 Courtesy of TESLA, INC. Courtesy of TESLA, INC.
|
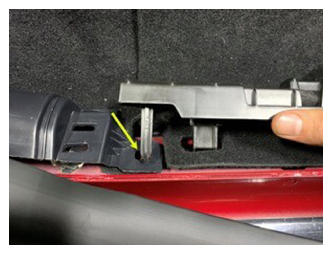
- Release RH front seat harness and guide from body
NOTE:
3x clips, 1 datum, Datum goes through access hole on RH lower B-pillar
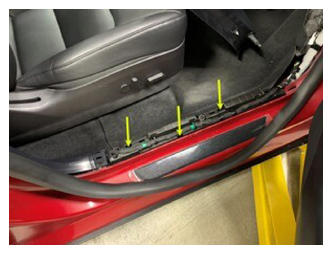 Courtesy of TESLA, INC. Courtesy of TESLA, INC.
|
 Courtesy of TESLA, INC. Courtesy of TESLA, INC.
|
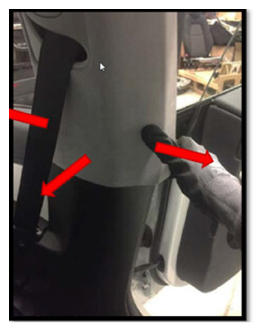
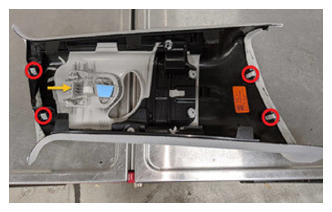
- Release clips securing the RH upper B-pillar assembly and move aside
NOTE:
4x clips, Pull the bottom of the upper B-pillar toward inside of the car, then pull the top to release the remaining clips
 Courtesy of TESLA, INC. Courtesy of TESLA, INC.
|
 Courtesy of TESLA, INC. Courtesy of TESLA, INC.
|
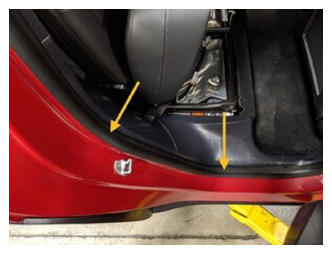
- Partially remove RH rear door seal
NOTE:
Pillar and sill trim have tabs seated underneath seal
 Courtesy of TESLA, INC. Courtesy of TESLA, INC.
|
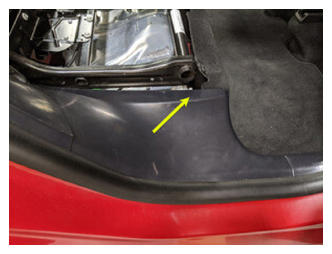
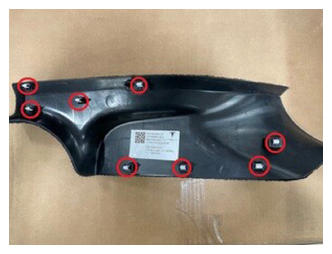
- Remove RH rear sill trim
NOTE:
8x clips, Rear edge is mated with groove in trunk side trim, Release clips at the front of LH rear sill trim working your way back towards rear of sill trim
 Courtesy of TESLA, INC. Courtesy of TESLA, INC.
|
 Courtesy of TESLA, INC. Courtesy of TESLA, INC.
|
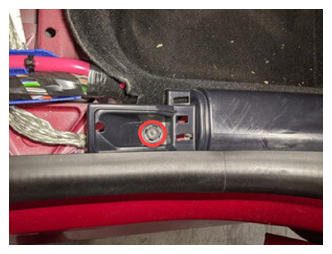
- Remove clip securing RH lower B-pillar to body
NOTE:
1x push clip, Clip secures lower B-pillar and rear cabin carpet to body
 Courtesy of TESLA, INC. Courtesy of TESLA, INC.
|
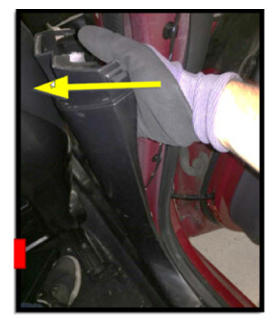
- Remove the RH lower B-pillar assembly
NOTE:
6x clips, Pull the top of B-pillar to release top clips then work your way to bottom clips
 Courtesy of TESLA, INC. Courtesy of TESLA, INC.
|
- Move 40 seat fully rearward using towel bar
NOTE:
With one hand on towel bar pull up and slide the seat rearward with your other hand
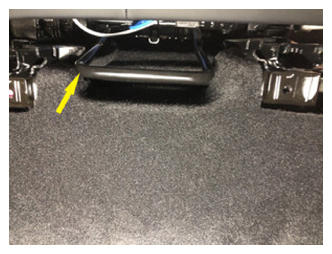 Courtesy of TESLA, INC. Courtesy of TESLA, INC.
|
- Move 60 seat fully rearward using towel bar
NOTE:
With one hand on towel bar pull up and slide the seat forward with your other hand
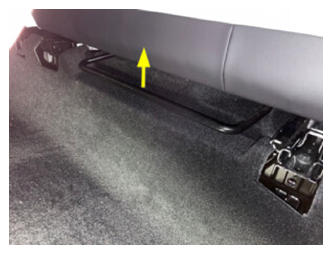 Courtesy of TESLA, INC. Courtesy of TESLA, INC.
|
- Remove rear floormat
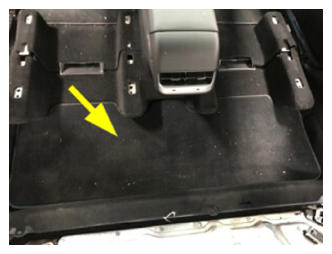 Courtesy of TESLA, INC. Courtesy of TESLA, INC.
|
- Remove 40 seat outboard track cover
NOTE:
1x clip, Slide cover forward to release from 40 seat track
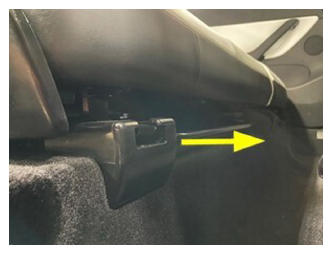 Courtesy of TESLA, INC. Courtesy of TESLA, INC.
|
- Remove center track cover from 2nd row seats
NOTE:
2x clips, Slide covers forward to release from 2nd row seat tracks
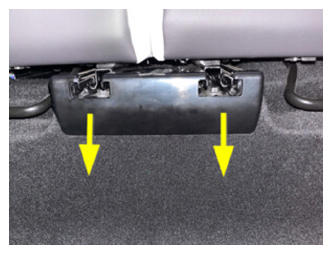 Courtesy of TESLA, INC. Courtesy of TESLA, INC.
|
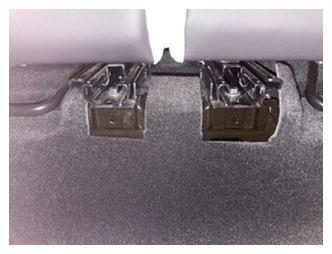 Courtesy of TESLA, INC. Courtesy of TESLA, INC.
|
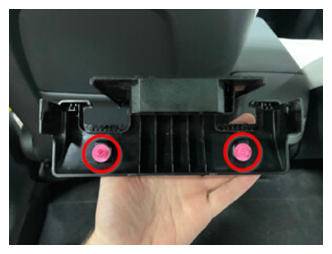 Courtesy of TESLA, INC. Courtesy of TESLA, INC.
|
- Remove 60 seat outboard track cover
NOTE:
1x clip, Slide covers forward to release from 60 seat tracks
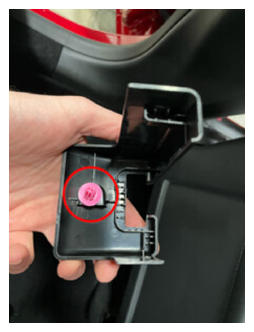 Courtesy of TESLA, INC. Courtesy of TESLA, INC.
|
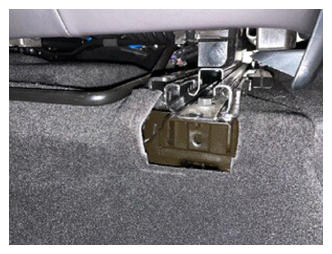 Courtesy of TESLA, INC. Courtesy of TESLA, INC.
|
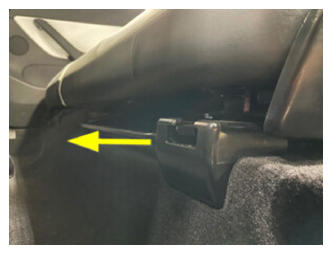 Courtesy of TESLA, INC. Courtesy of TESLA, INC.
|
- Release cabin carpet from 40 seat
NOTE:
Pull cabin carpet towards front of vehicle
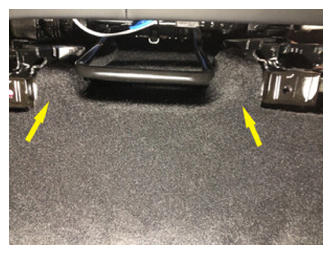 Courtesy of TESLA, INC. Courtesy of TESLA, INC.
|
- Release cabin carpet from 60 seat
NOTE:
Pull cabin carpet towards front of vehicle
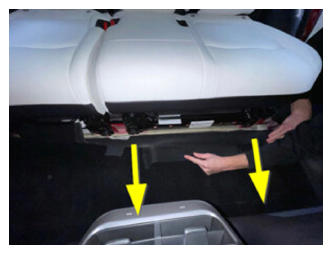 Courtesy of TESLA, INC. Courtesy of TESLA, INC.
|
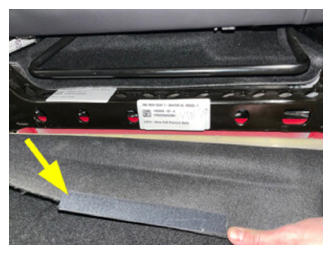 Courtesy of TESLA, INC. Courtesy of TESLA, INC.
|
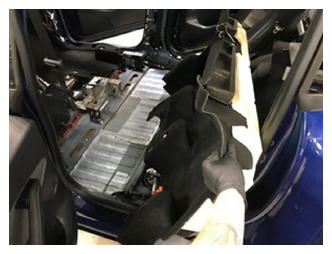
- Remove rear main cabin carpet from vehicle
NOTE:
Pull up at the rear of rear main carpet and slide back, Remove from LH rear door
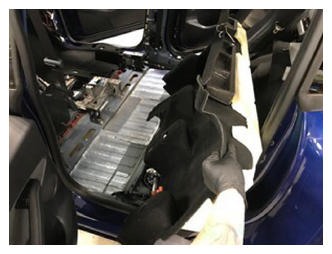 Courtesy of TESLA, INC. Courtesy of TESLA, INC.
|
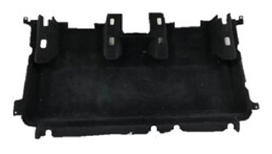 Courtesy of TESLA, INC. Courtesy of TESLA, INC.
|
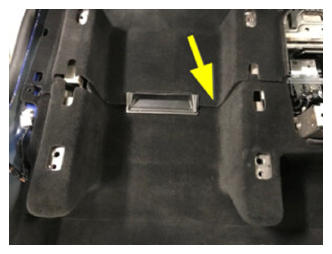
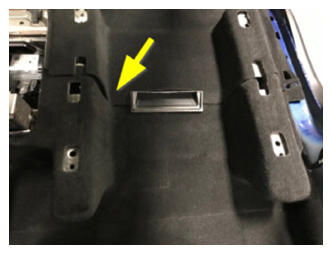
- Install rear main cabin carpet to vehicle
NOTE:
Position rear main carpet to floorboard and slide forward, Ensure rear main carpet tucks beneath front main carpet and air duct
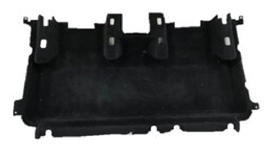 Courtesy of TESLA, INC. Courtesy of TESLA, INC.
|
 Courtesy of TESLA, INC. Courtesy of TESLA, INC.
|
 Courtesy of TESLA, INC. Courtesy of TESLA, INC.
|
 Courtesy of TESLA, INC. Courtesy of TESLA, INC.
|
- Install cabin carpet to 40 seat
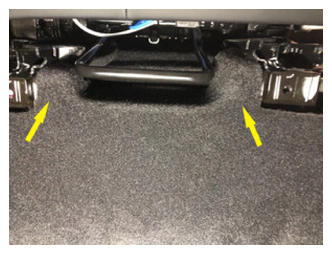 Courtesy of TESLA, INC. Courtesy of TESLA, INC.
|
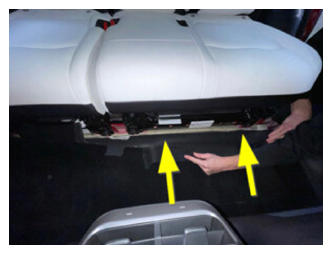
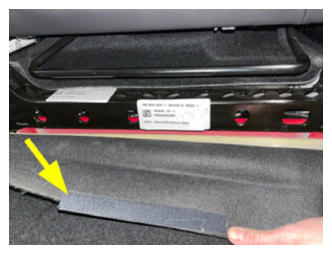
- Secure cabin carpet to 60 seat
NOTE:
Strap velcro on
 Courtesy of TESLA, INC. Courtesy of TESLA, INC.
|
 Courtesy of TESLA, INC. Courtesy of TESLA, INC.
|
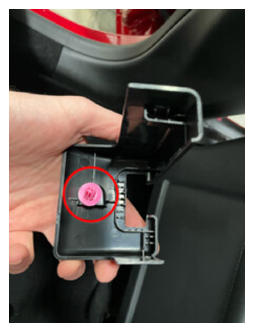
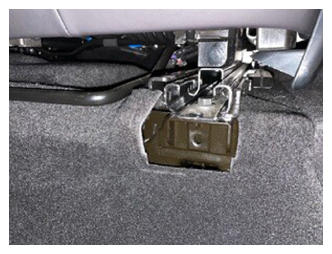
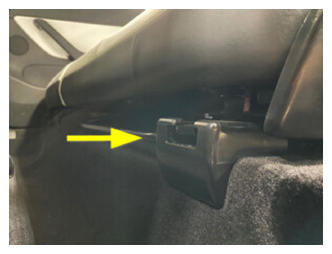
- Install 60 seat outboard track cover
NOTE:
1x clip
 Courtesy of TESLA, INC. Courtesy of TESLA, INC.
|
 Courtesy of TESLA, INC. Courtesy of TESLA, INC.
|
 Courtesy of TESLA, INC. Courtesy of TESLA, INC.
|
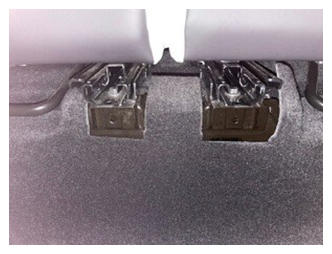
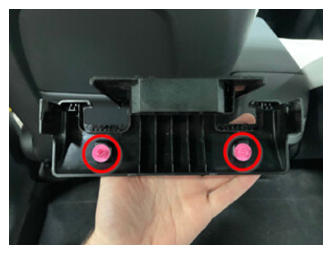
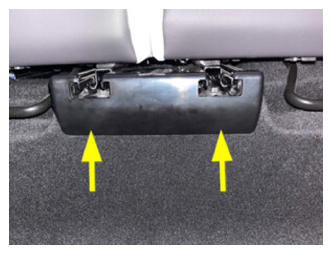
- Install center track cover to 2nd row seats
NOTE:
2x clip, Slide cover straight on to clip to 2nd row seat tracks
 Courtesy of TESLA, INC. Courtesy of TESLA, INC.
|
 Courtesy of TESLA, INC. Courtesy of TESLA, INC.
|
 Courtesy of TESLA, INC. Courtesy of TESLA, INC.
|
- Install 40 seat outboard track cover
NOTE:
1x clip
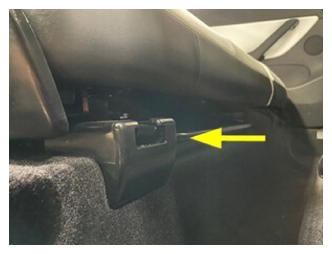 Courtesy of TESLA, INC. Courtesy of TESLA, INC.
|
- Install rear floormat
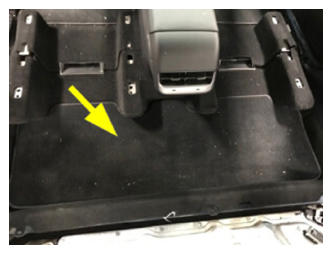 Courtesy of TESLA, INC. Courtesy of TESLA, INC.
|
- Install the RH lower B-pillar assembly
NOTE:
6x clips, Align the bottom guide tab to its slot then press the bottom clips, Work your way to top clips
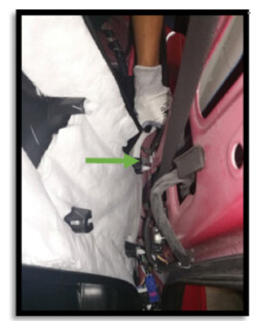 Courtesy of TESLA, INC. Courtesy of TESLA, INC.
|
- Install clip securing RH lower B-pillar to body
NOTE:
1x push clip, Clip goes through B-pillar and rear cabin carpet
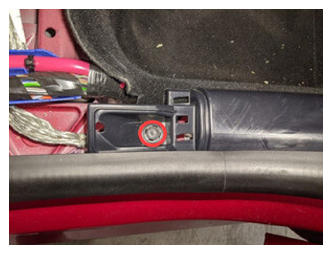 Courtesy of TESLA, INC. Courtesy of TESLA, INC.
|
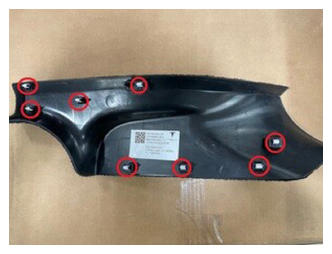
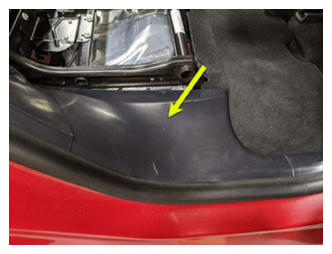
- Install RH rear sill trim
NOTE:
8x clips, Rear edge is mated with groove in trunk side trim, Install rear edge of RH rear sill trim into trunk side trim and work your way forward securing clips
 Courtesy of TESLA, INC. Courtesy of TESLA, INC.
|
 Courtesy of TESLA, INC. Courtesy of TESLA, INC.
|
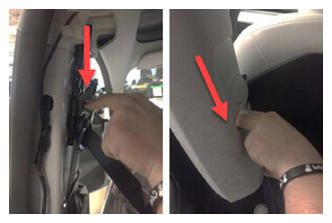
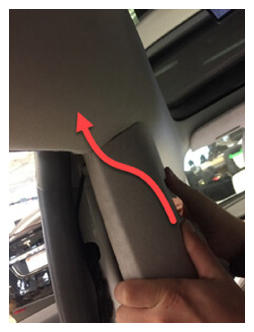
- Install the RH upper B-pillar assembly
NOTE:
4x clips, Lower the seat belt slider to align it with the B-pillar panel, Insert top portion of upper B-pillar under the headliner to align the clips, Press the bottom to fully seat upper B-pillar to lower B-pillar, Make sure the seal correctly overlaps the trim
 Courtesy of TESLA, INC. Courtesy of TESLA, INC.
|
 Courtesy of TESLA, INC. Courtesy of TESLA, INC.
|
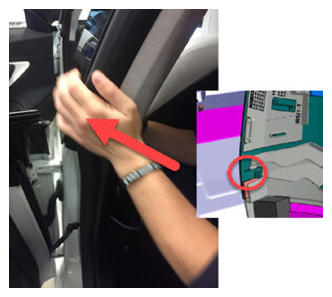 Courtesy of TESLA, INC. Courtesy of TESLA, INC.
|
- Reseat RH rear door seal
NOTE:
Seat pillar and sill trim tabs underneath seal
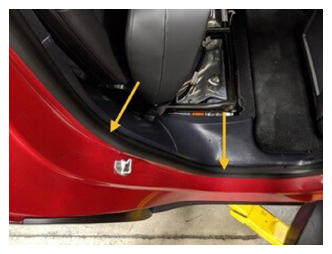 Courtesy of TESLA, INC. Courtesy of TESLA, INC.
|
- Install the LH lower B-pillar assembly
NOTE:
6x clips, Align the bottom guide tab to its slot then press the bottom clips, Work your way to top clips
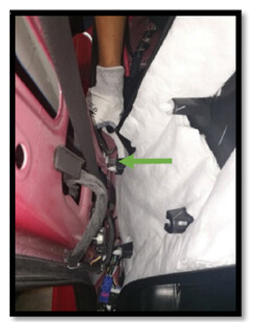 Courtesy of TESLA, INC. Courtesy of TESLA, INC.
|
- Install clip securing LH lower B-pillar to body
NOTE:
1x push clip, Clip secures lower B-pillar and rear cabin carpet to body
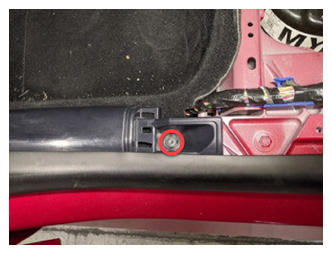 Courtesy of TESLA, INC. Courtesy of TESLA, INC.
|
- Install LH 7s Lower C-Pillar Trim
NOTE:
8x clips, Rear edge is mated with groove in trunk side trim, Release clips at the front of LH rear sill trim working your way back towards rear of sill trim
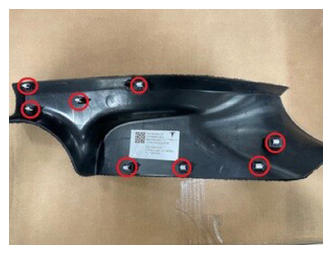 Courtesy of TESLA, INC. Courtesy of TESLA, INC.
|
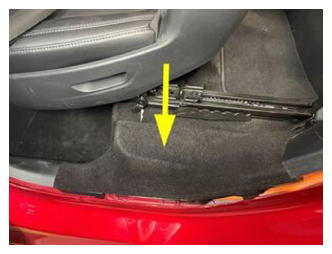 Courtesy of TESLA, INC. Courtesy of TESLA, INC.
|
- Reseat LH rear door seal
NOTE:
Seat pillar and sill trim tabs underneath seal
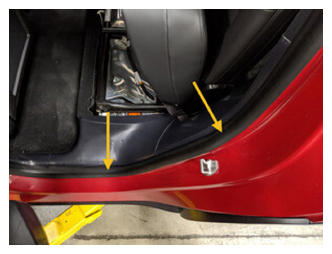 Courtesy of TESLA, INC. Courtesy of TESLA, INC.
|
- Install the LH upper B-pillar assembly
NOTE:
4x clips, Lower the seat belt slider to align it with the B-pillar panel, Insert top portion of upper B-pillar under the headliner to align the clips, Press the bottom to fully seat upper B-pillar to lower B-pillar, Make sure the seal correctly overlaps the trim
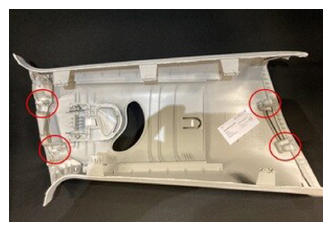 Courtesy of TESLA, INC. Courtesy of TESLA, INC.
|
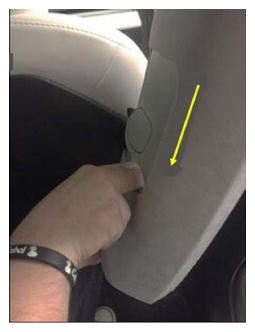 Courtesy of TESLA, INC. Courtesy of TESLA, INC.
|
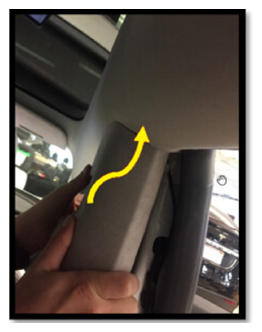 Courtesy of TESLA, INC. Courtesy of TESLA, INC.
|
- Install center console onto vehicle
NOTE:
Recommend assistance, Tilt front of console downward, Slide assembly towards front of vehicle and tilt rear of console down into place
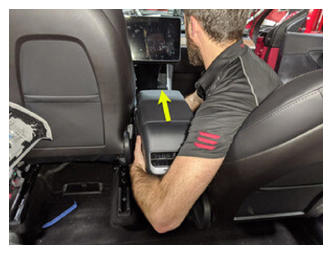 Courtesy of TESLA, INC. Courtesy of TESLA, INC.
|
- Connect harness at right front of center console
NOTE:
1x USB connector
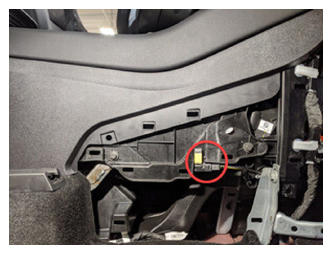 Courtesy of TESLA, INC. Courtesy of TESLA, INC.
|
- Connect harness to rear of center console
NOTE:
1x connector
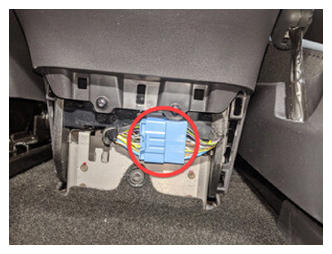 Courtesy of TESLA, INC. Courtesy of TESLA, INC.
|
- Install RH front exterior hardware to center console
NOTE:
2x bolts, 10 mm, 7 N.m
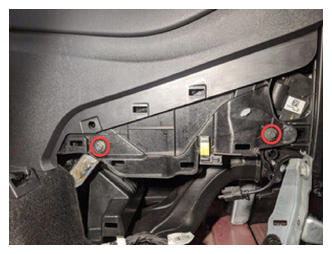 Courtesy of TESLA, INC. Courtesy of TESLA, INC.
|
- Install RH console side panel carpet
NOTE:
12x clips, 2x locating pins, Position side panel and align the front locator, then the rear locator, Push side panel towards console to install
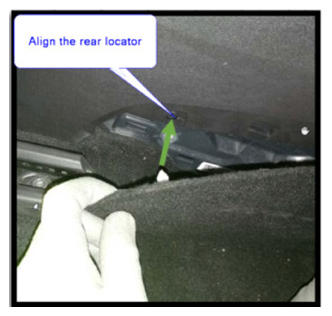 Courtesy of TESLA, INC. Courtesy of TESLA, INC.
|
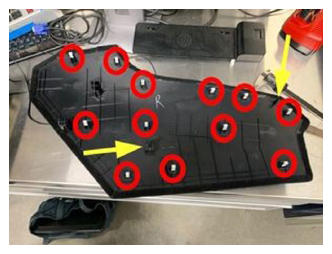 Courtesy of TESLA, INC. Courtesy of TESLA, INC.
|
- Install RH front floor mat
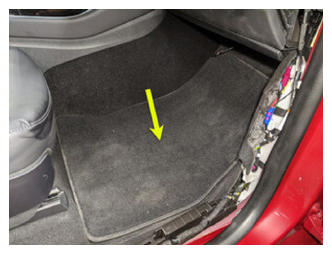 Courtesy of TESLA, INC. Courtesy of TESLA, INC.
|
- Install RH rear exterior hardware to center console
NOTE:
1x bolt, 10 mm, 7 N.m
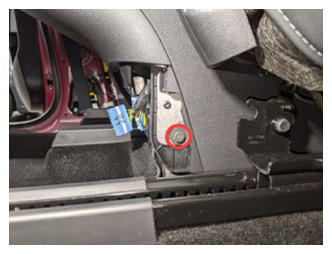 Courtesy of TESLA, INC. Courtesy of TESLA, INC.
|
- Install LH rear exterior hardware to center console
NOTE:
1x bolt, 10 mm, 7 N.m
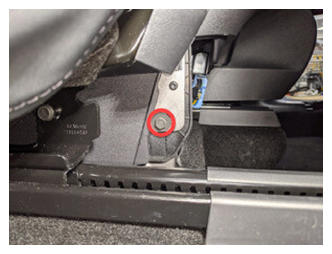 Courtesy of TESLA, INC. Courtesy of TESLA, INC.
|
- Install console lower rear panel
NOTE:
5x clips
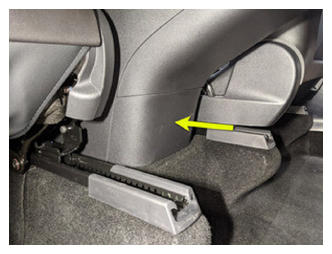 Courtesy of TESLA, INC. Courtesy of TESLA, INC.
|
- Install LH front exterior hardware to center console
NOTE:
2x bolts, 10 mm, 7 N.m
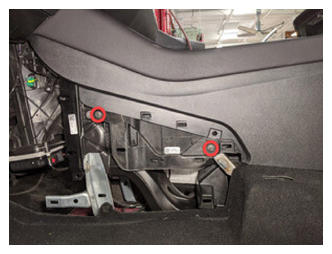 Courtesy of TESLA, INC. Courtesy of TESLA, INC.
|
- Install LH console side panel carpet
NOTE:
11x clips, 2x locating pins, Position side panel and align the front into front locator, then the rear locator, Push side panel towards console to install
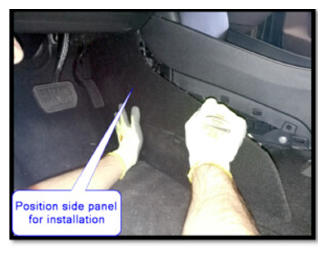 Courtesy of TESLA, INC. Courtesy of TESLA, INC.
|
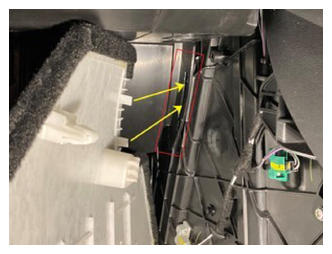 Courtesy of TESLA, INC. Courtesy of TESLA, INC.
|
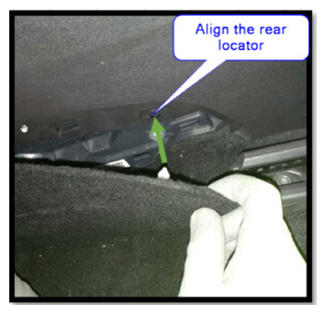 Courtesy of TESLA, INC. Courtesy of TESLA, INC.
|
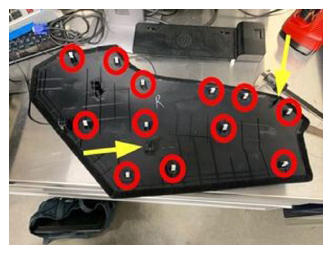 Courtesy of TESLA, INC. Courtesy of TESLA, INC.
|
- Install LH front floor mat
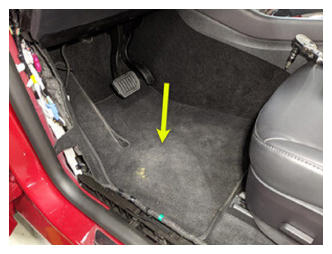 Courtesy of TESLA, INC. Courtesy of TESLA, INC.
|
- Install LH front seat into vehicle
NOTE:
Recommend assistance, Assistant should be ready to support seat back, Caution not to damage any trim
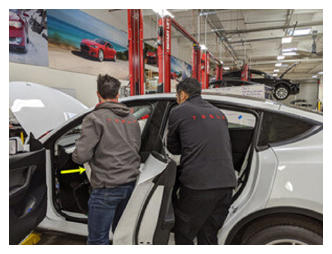 Courtesy of TESLA, INC. Courtesy of TESLA, INC.
|
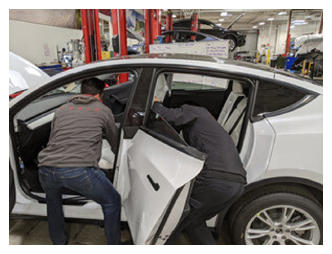 Courtesy of TESLA, INC. Courtesy of TESLA, INC.
|
- Secure LH front seat harness under LH front cabin carpet
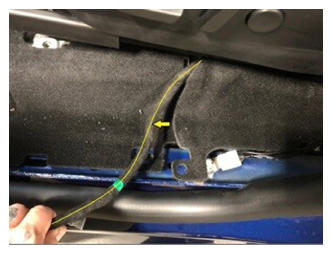 Courtesy of TESLA, INC. Courtesy of TESLA, INC.
|
- Install LH front seat harness along LH front sill panel harness bracket
NOTE:
5x clips
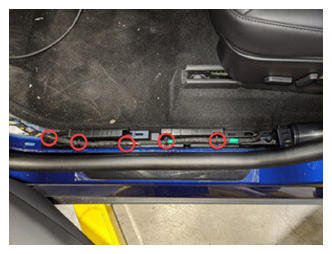 Courtesy of TESLA, INC. Courtesy of TESLA, INC.
|
- Install LH front seat harness onto LH footwell support bracket
NOTE:
2x clips
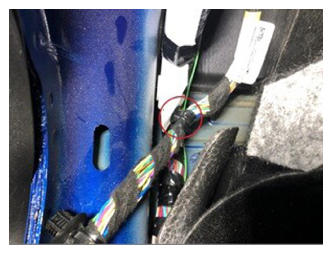 Courtesy of TESLA, INC. Courtesy of TESLA, INC.
|
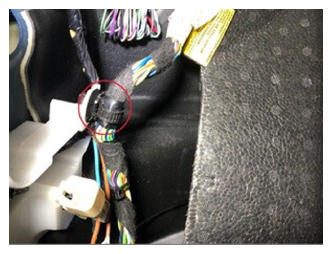 Courtesy of TESLA, INC. Courtesy of TESLA, INC.
|
- Connect LH front seat harness to VC left
NOTE:
1x electrical connector, Ensure the connector and lock are fully engaged, Perform pull push pull test to ensure the connector and connector lock are seated
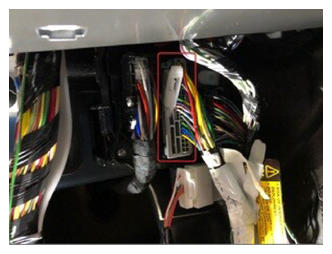 Courtesy of TESLA, INC. Courtesy of TESLA, INC.
|
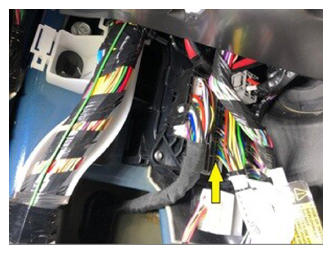 Courtesy of TESLA, INC. Courtesy of TESLA, INC.
|
- Fully seat LH front cabin carpet
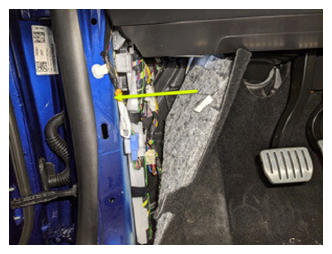 Courtesy of TESLA, INC. Courtesy of TESLA, INC.
|
- Install clip securing LH front cabin carpet to body
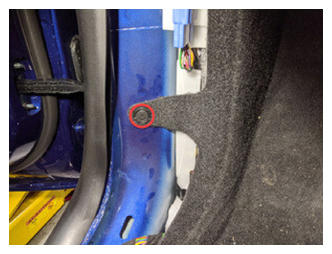 Courtesy of TESLA, INC. Courtesy of TESLA, INC.
|
- Install LH lower A-pillar trim
NOTE:
6x clips, 2 locating pins, Align front locating pin first
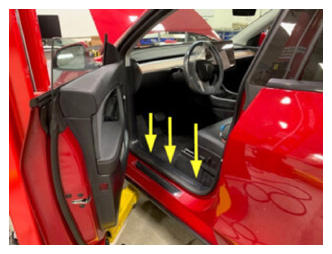 Courtesy of TESLA, INC. Courtesy of TESLA, INC.
|
- Install clip securing LH lower A-pillar trim
NOTE:
1x push clip
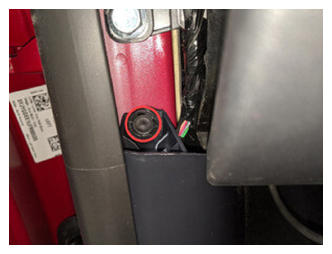 Courtesy of TESLA, INC. Courtesy of TESLA, INC.
|
- Install LH mid A-pillar assembly
NOTE:
1x clip, 1x tab, Align the bottom tab then push the top clip to fully seat mid A-pillar, Pull seal over trim
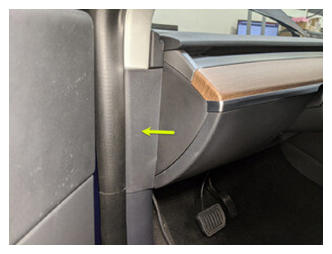 Courtesy of TESLA, INC. Courtesy of TESLA, INC.
|
- Reseat LH front door seal along lower A-pillar trim
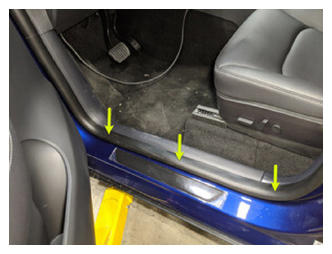 Courtesy of TESLA, INC. Courtesy of TESLA, INC.
|
- Install RH front seat into vehicle
NOTE:
Recommend assistance, Assistant should be ready to support seat back, Caution not to damage any trim
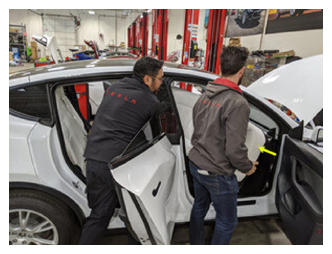 Courtesy of TESLA, INC. Courtesy of TESLA, INC.
|
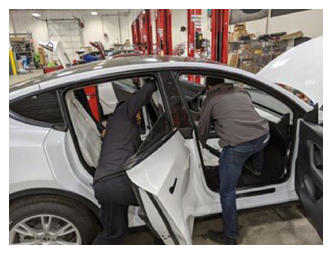 Courtesy of TESLA, INC. Courtesy of TESLA, INC.
|
- Secure RH front seat harness under RH front cabin carpet
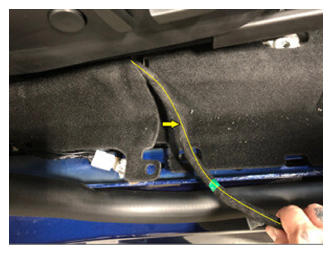 Courtesy of TESLA, INC. Courtesy of TESLA, INC.
|
- Install RH front seat harness along plastic guide
NOTE:
5x clips
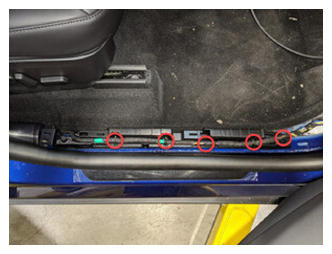 Courtesy of TESLA, INC. Courtesy of TESLA, INC.
|
- Install RH front seat harness onto RH footwell support bracket
NOTE:
2x retaining clips
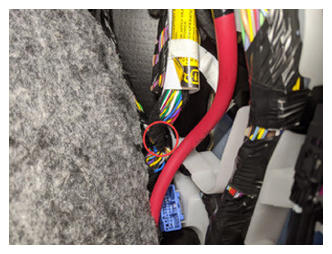 Courtesy of TESLA, INC. Courtesy of TESLA, INC.
|
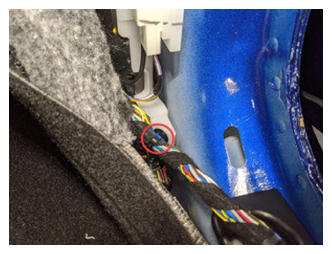 Courtesy of TESLA, INC. Courtesy of TESLA, INC.
|
- Connect RH front seat harness to VC right
NOTE:
1x electrical connector, Ensure the connector and lock are fully engaged, Perform pull push pull test to ensure the connector and connector lock are seated
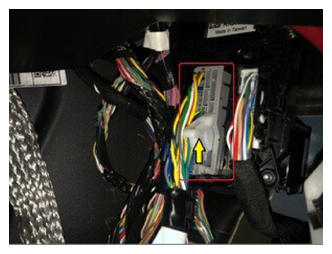 Courtesy of TESLA, INC. Courtesy of TESLA, INC.
|
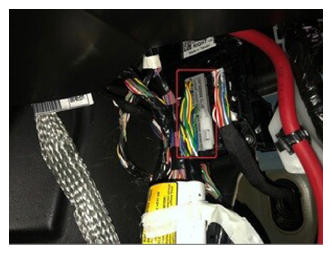 Courtesy of TESLA, INC. Courtesy of TESLA, INC.
|
- Fully seat RH front cabin carpet
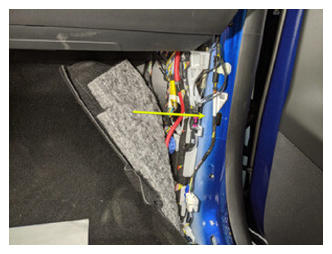 Courtesy of TESLA, INC. Courtesy of TESLA, INC.
|
- Install clip securing RH front cabin carpet to body
NOTE:
1x clip
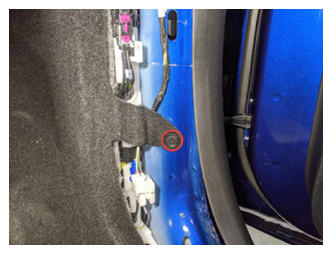 Courtesy of TESLA, INC. Courtesy of TESLA, INC.
|
- Install RH lower A-pillar trim
NOTE:
6x clips, 2x locating pins, Align front locating pin first
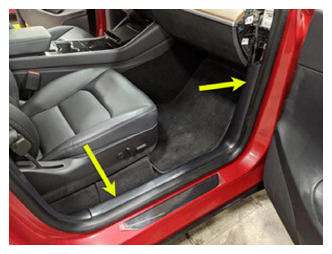 Courtesy of TESLA, INC. Courtesy of TESLA, INC.
|
- Install clip securing RH lower A-pillar trim
NOTE:
1x clip
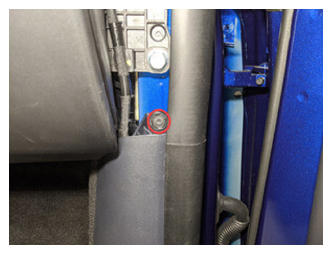 Courtesy of TESLA, INC. Courtesy of TESLA, INC.
|
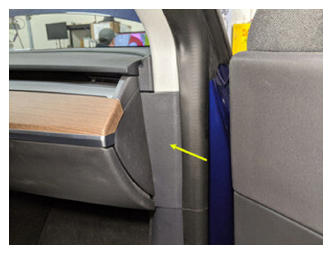
- Install RH mid A-pillar assembly
NOTE:
1x clip, 1x tab, Align the bottom tab then push the top clip to fully seat mid A-pillar, Make sure the seal seat on top of the trim
 Courtesy of TESLA, INC. Courtesy of TESLA, INC.
|
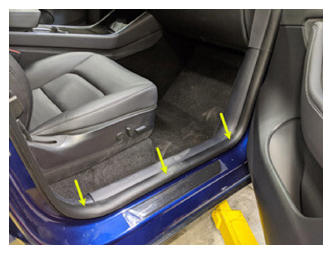
- Reseat RH front door seal along lower A-pillar trim
 Courtesy of TESLA, INC. Courtesy of TESLA, INC.
|
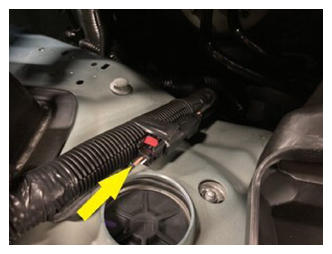
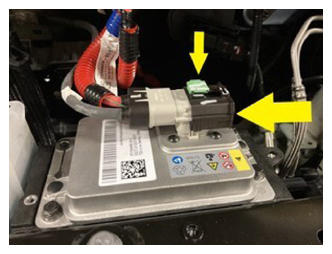
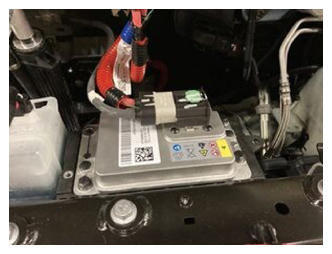
- Connect first responder loop and LV battery
NOTE:
2x connectors, Secure FRL first, Seat LV battery connection and push black connector lock inwards to secure, Engage green locking tab when fully seated
 Courtesy of TESLA, INC. Courtesy of TESLA, INC.
|
 Courtesy of TESLA, INC. Courtesy of TESLA, INC.
|
 Courtesy of TESLA, INC. Courtesy of TESLA, INC.
|
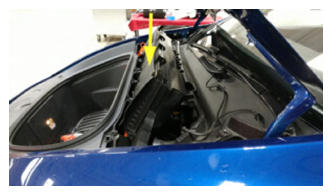
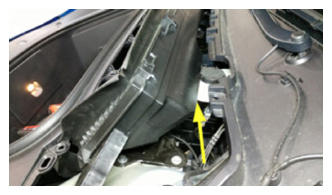
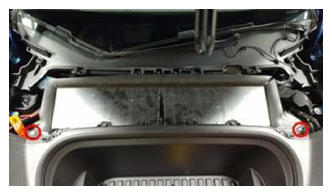
- Install HEPA filter assembly
NOTE:
2x bolts, 10 mm, 5 N.m, Pivot forward edge down past frunk assembly, then carefully move rear edge past brake reservoir and into position
 Courtesy of TESLA, INC. Courtesy of TESLA, INC.
|
 Courtesy of TESLA, INC. Courtesy of TESLA, INC.
|
 Courtesy of TESLA, INC. Courtesy of TESLA, INC.
|
- Install rear apron
NOTE:
14x clips, Hold rear wall of frunk to keep from flexing while engaging front clips
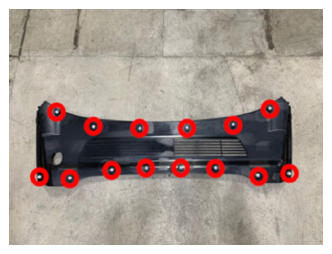 Courtesy of TESLA, INC. Courtesy of TESLA, INC.
|
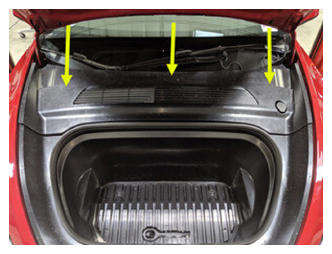 Courtesy of TESLA, INC. Courtesy of TESLA, INC.
|
- Close hood
- Move LH front seat backward
- Install LH front seat front fasteners
NOTE:
2x patch bolts, T45P, 33.5 N.m, Install new patch bolts
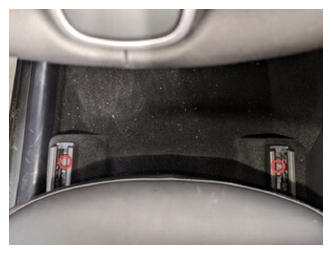 Courtesy of TESLA, INC. Courtesy of TESLA, INC.
|
- Move LH front seat forward
- Install LH front seat belt retractor to seat
NOTE:
Insert retractor into seat pre tensioner, Make sure it locks into position with push-pull-push test
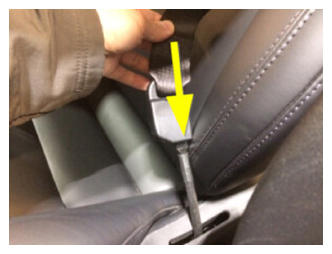 Courtesy of TESLA, INC. Courtesy of TESLA, INC.
|
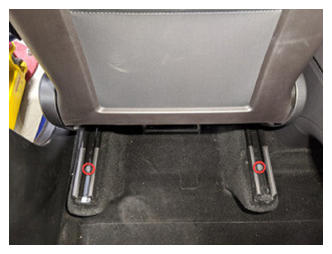
- Install LH front seat rear fasteners
NOTE:
2x patch bolts, T45P, 33.5 N.m, Install new patch bolts
 Courtesy of TESLA, INC. Courtesy of TESLA, INC.
|
- Move LH front seat to original position
- Move RH front seat backward
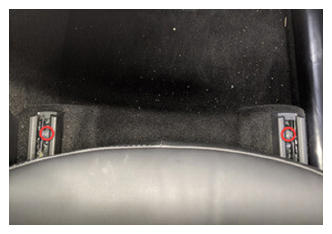
- Install RH front seat front fasteners
NOTE:
2x patch bolts, T45P, 33.5 N.m, Install new patch bolts
 Courtesy of TESLA, INC. Courtesy of TESLA, INC.
|
- Move RH front seat forward
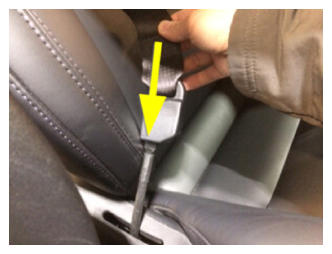
- Install RH front seat belt retractor to seat
NOTE:
Insert retractor into seat pre tensioner, Make sure it locks into position with push-pull-push test
 Courtesy of TESLA, INC. Courtesy of TESLA, INC.
|
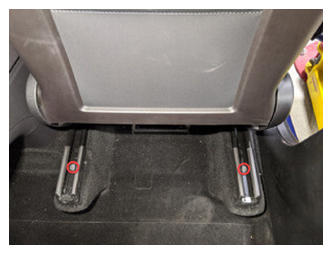
- Install RH front seat rear fasteners
NOTE:
2x patch bolts, T45P, 33.5 N.m, Install new patch bolts
 Courtesy of TESLA, INC. Courtesy of TESLA, INC.
|
- Move RH front seat to original position
- Raise all four windows
- Close all four doors
NOTE:
If 12V is powered up, Unlatch rear doors before closing