- Remove the instrument panel carrier from the cross car beam. See IP CARRIER (REMOVE AND INSTALL)
- Remove screws securing the drivers air duct to cross car beam
NOTE:
2x screws, T20, 2.3 N.m
 Courtesy of TESLA, INC. Courtesy of TESLA, INC.
|
- Remove drivers air duct from the HVAC assembly
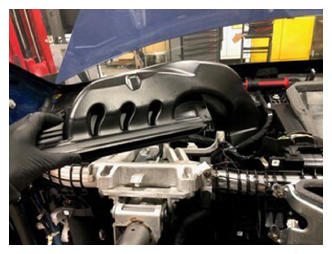 Courtesy of TESLA, INC. Courtesy of TESLA, INC.
|
- Partially remove LH cabin carpet
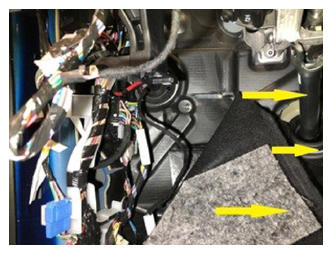 Courtesy of TESLA, INC. Courtesy of TESLA, INC.
|
- Disconnect the dash connector from the left body controller
NOTE:
1x connector, Release locking tab and gently pull down to release connector
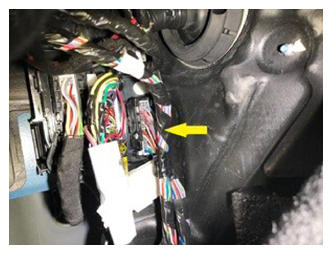 Courtesy of TESLA, INC. Courtesy of TESLA, INC.
|
- Disconnect the HVAC connector from the left body controller
NOTE:
1x connector
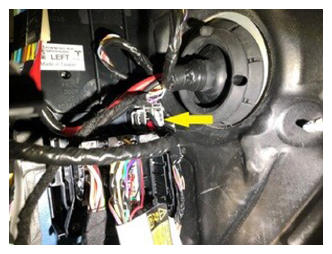 Courtesy of TESLA, INC. Courtesy of TESLA, INC.
|
- Disconnect connector from the electric steering column
NOTE:
1x connector
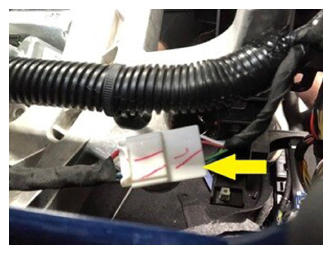 Courtesy of TESLA, INC. Courtesy of TESLA, INC.
|
- Release the IP harness clip located on the blower motor assembly
NOTE:
1x harness clip
 Courtesy of TESLA, INC. Courtesy of TESLA, INC.
|
- Disconnect connector on the blower motor assembly
NOTE:
1x connector
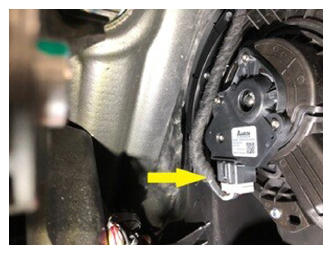 Courtesy of TESLA, INC. Courtesy of TESLA, INC.
|
- Remove center console support bracket
NOTE:
1x clip, 4x tabs, Once tabs are free from riser carefully slide towards front of vehicle
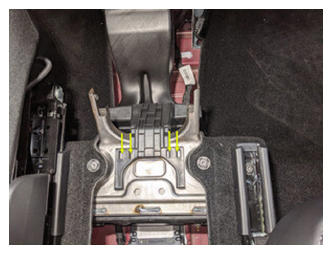 Courtesy of TESLA, INC. Courtesy of TESLA, INC.
|
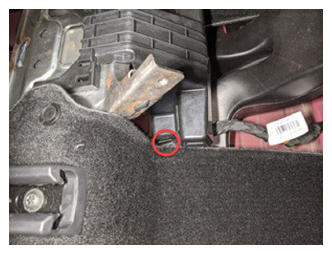 Courtesy of TESLA, INC. Courtesy of TESLA, INC.
|
- Release the clip located next to the RCM
NOTE:
1x harness clip
 Courtesy of TESLA, INC. Courtesy of TESLA, INC.
|
- Disconnect connector located on RCM
NOTE:
1x connector, Push down on locking tab and release connector
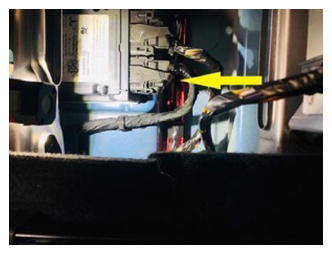 Courtesy of TESLA, INC. Courtesy of TESLA, INC.
|
- Release the IP harness clip located next to the RCM
NOTE:
1x harness clip, Release inner tabs on clip then lift from body
 Courtesy of TESLA, INC. Courtesy of TESLA, INC.
|
- Release the IP harness clip from the body of the vehicle by RH cross car beam bracket
NOTE:
1x harness clip
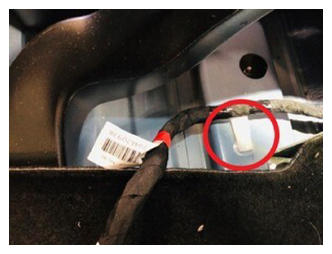 Courtesy of TESLA, INC. Courtesy of TESLA, INC.
|
- Release the IP harness clip from the cross car beam
NOTE:
1x harness clip
 Courtesy of TESLA, INC. Courtesy of TESLA, INC.
|
- Release the IP harness clip next to the RH lower duct thermistor
NOTE:
1x harness clip
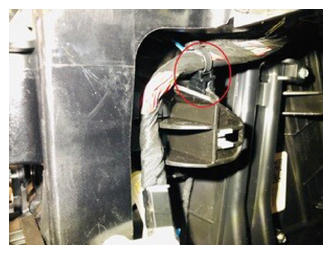 Courtesy of TESLA, INC. Courtesy of TESLA, INC.
|
- Release the IP harness clip next to the RH upper mode actuator
NOTE:
1x harness clip
 Courtesy of TESLA, INC. Courtesy of TESLA, INC.
|
- Release HVAC harness from the IP harness holding mount on RH side of the IP harness.
NOTE:
2x holding mount, 1st holding mount is located on the RH side of the HVAC assembly, 2nd holding mount is located next to the right body controller
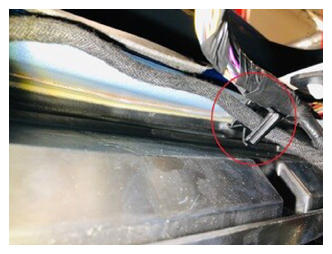 Courtesy of TESLA, INC. Courtesy of TESLA, INC.
|
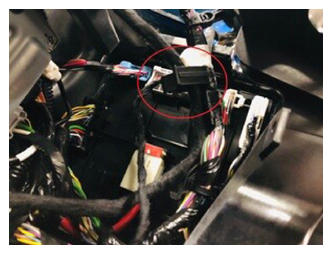 Courtesy of TESLA, INC. Courtesy of TESLA, INC.
|
- Disconnect connectors from car computer
NOTE:
2x connectors
 Courtesy of TESLA, INC. Courtesy of TESLA, INC.
|
- Partially remove RH carpet
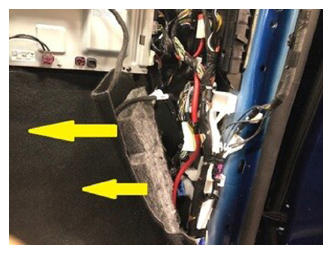 Courtesy of TESLA, INC. Courtesy of TESLA, INC.
|
- Disconnect dash harness connector from right body controller
NOTE:
1x connector
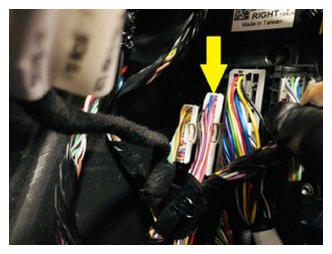 Courtesy of TESLA, INC. Courtesy of TESLA, INC.
|
- Release clip from RH side of cross car beam
NOTE:
1x harness clip
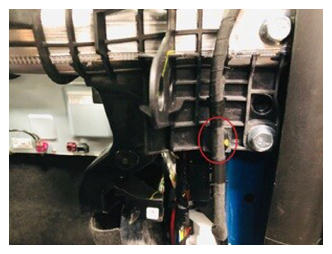 Courtesy of TESLA, INC. Courtesy of TESLA, INC.
|
- Release clip from body of vehicle on RH lower A-pillar
NOTE:
1x harness clip
 Courtesy of TESLA, INC. Courtesy of TESLA, INC.
|
- Release headliner harness clip from body of vehicle located on LH upper A-pillar
NOTE:
1x harness clip
 Courtesy of TESLA, INC. Courtesy of TESLA, INC.
|
- Release headliner harness clips located on LH lower A-pillar
NOTE:
2x clips
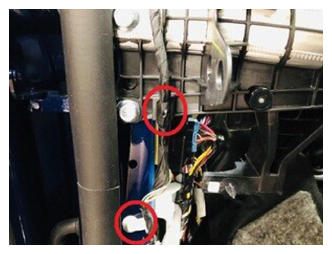 Courtesy of TESLA, INC. Courtesy of TESLA, INC.
|
- Disconnect headliner harness connector located on LH lower A-pillar
NOTE:
1x connector
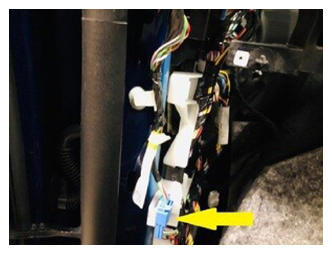 Courtesy of TESLA, INC. Courtesy of TESLA, INC.
|
- Remove LH touchscreen bracket
NOTE:
2x bolts, T30, 12 N.m
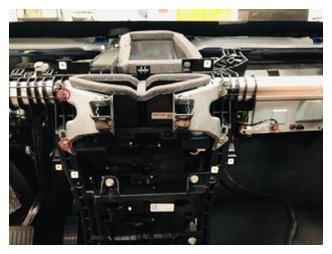 Courtesy of TESLA, INC. Courtesy of TESLA, INC.
|
- Remove RH touchscreen bracket
NOTE:
2x bolts, T30, 12 N.m
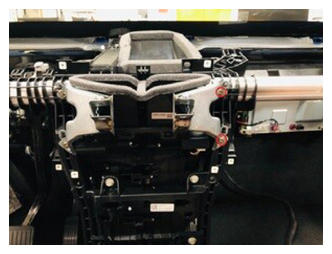 Courtesy of TESLA, INC. Courtesy of TESLA, INC.
|
- Remove bleeder duct adapter from HVAC assembly
NOTE:
4x clips
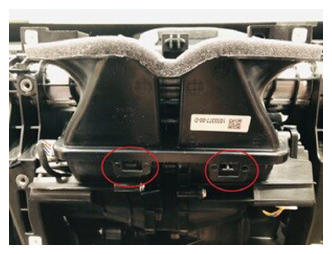 Courtesy of TESLA, INC. Courtesy of TESLA, INC.
|
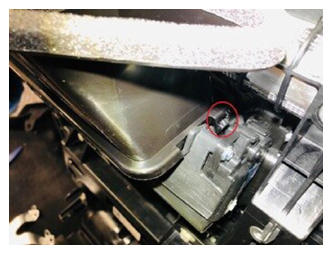 Courtesy of TESLA, INC. Courtesy of TESLA, INC.
|
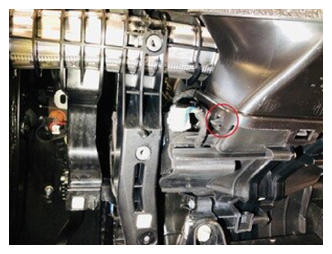 Courtesy of TESLA, INC. Courtesy of TESLA, INC.
|
- Remove nuts securing upper steering column to cross car beam
NOTE:
2x nuts, 13 mm, 15 N.m
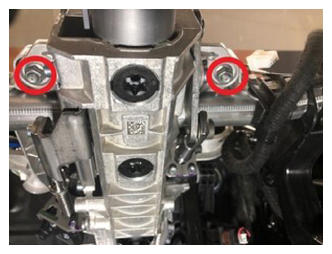 Courtesy of TESLA, INC. Courtesy of TESLA, INC.
|
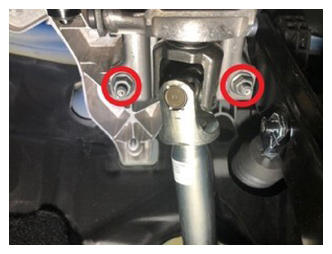
- Remove nuts securing lower steering column to cross car beam and carefully lower steering column
NOTE:
2x nuts, 13 mm, 15 N.m
 Courtesy of TESLA, INC. Courtesy of TESLA, INC.
|
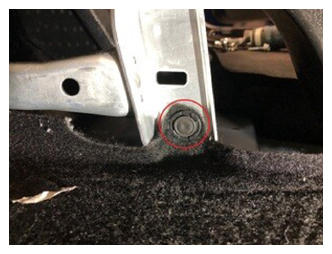
- Remove clip securing the carpet to LH cross car beam bracket
NOTE:
1x clip
 Courtesy of TESLA, INC. Courtesy of TESLA, INC.
|
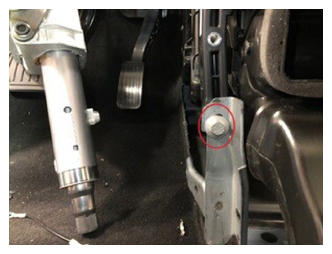
- Remove the bolt that secures the LH cross car beam bracket to the cross car beam
NOTE:
1x bolts, 13 mm, 25 N.m
 Courtesy of TESLA, INC. Courtesy of TESLA, INC.
|
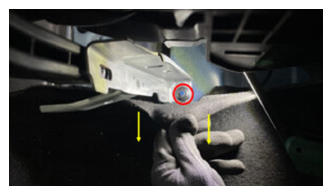
- Remove nut securing the LH cross car beam bracket to the body and remove LH cross car beam bracket
NOTE:
1x nut, 13 mm, 25 N.m, Slightly pull LH carpet towards LH side of vehicle, Take note of direction of cross car beam bracket during removal
 Courtesy of TESLA, INC. Courtesy of TESLA, INC.
|
- Remove clip securing the carpet to RH cross car beam bracket
NOTE:
1x clip
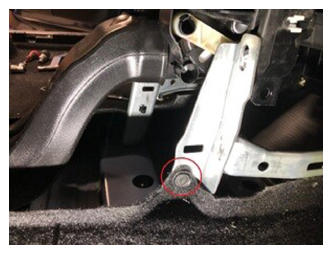 Courtesy of TESLA, INC. Courtesy of TESLA, INC.
|
- Remove bolt securing RH cross car beam bracket to cross car beam
NOTE:
1x bolts, 13 mm, 25 N.m
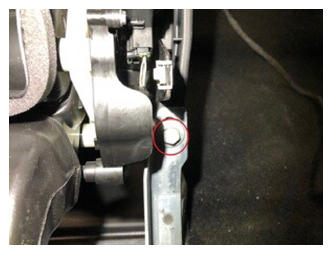 Courtesy of TESLA, INC. Courtesy of TESLA, INC.
|
- Remove nut securing the RH cross car beam bracket to body and remove the RH cross car beam bracket
NOTE:
1x nut, 13 mm, 25 N.m, Slightly pull the RH carpet towards RH side of vehicle, Take note of direction of cross car beam bracket during removal
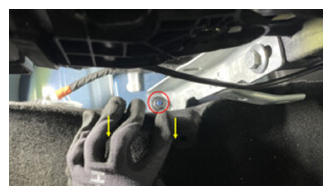 Courtesy of TESLA, INC. Courtesy of TESLA, INC.
|
- Remove bolts securing cross car beam to the HVAC assembly
NOTE:
4x bolts, 10 mm, 5.5 N.m
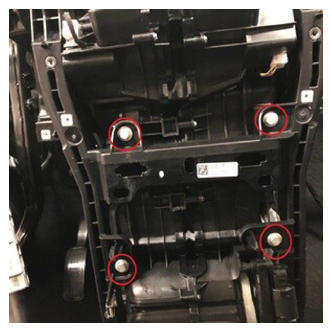 Courtesy of TESLA, INC. Courtesy of TESLA, INC.
|
- Remove bolt securing the cross car beam to HVAC assembly on upper LH side of HVAC assembly
NOTE:
1x bolt. 10 mm, 5.5 N.m
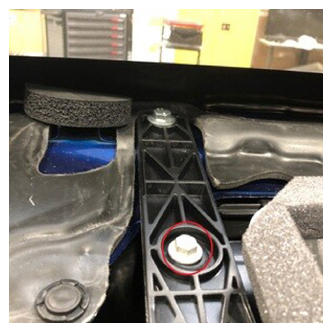 Courtesy of TESLA, INC. Courtesy of TESLA, INC.
|
- Remove bolt that secures the cross car beam to the upper cowl
NOTE:
1x bolt, 13 mm, 25 N.m
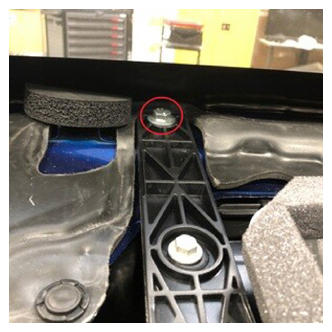 Courtesy of TESLA, INC. Courtesy of TESLA, INC.
|
- Remove bolts securing cross car beam to LH side of body
NOTE:
2x bolts, 15 mm, 29 N.m
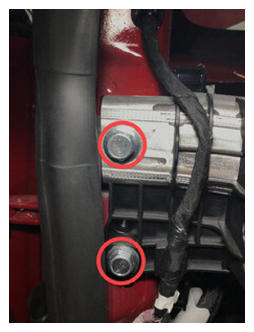 Courtesy of TESLA, INC. Courtesy of TESLA, INC.
|
- Remove bolts securing cross car beam to RH side of body
NOTE:
2x bolts, 15 mm, 29 N.m
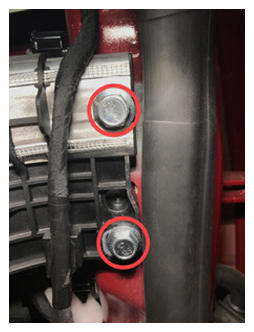 Courtesy of TESLA, INC. Courtesy of TESLA, INC.
|
- Remove bolts securing cross car beam to LH side of bulkhead
NOTE:
2x bolts, 13 mm, 25 N.m
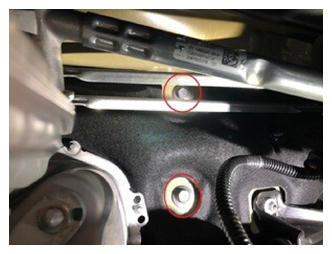 Courtesy of TESLA, INC. Courtesy of TESLA, INC.
|
- Remove the cross car beam from the vehicle
NOTE:
Recommend assistance
 Courtesy of TESLA, INC. Courtesy of TESLA, INC.
|
- Remove the IP harness from the cross car beam
NOTE:
15x clips
 Courtesy of TESLA, INC. Courtesy of TESLA, INC.
|
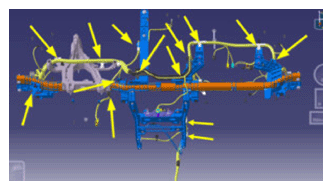 Courtesy of TESLA, INC. Courtesy of TESLA, INC.
|
- Install the IP harness to the cross car beam
NOTE:
15x clips
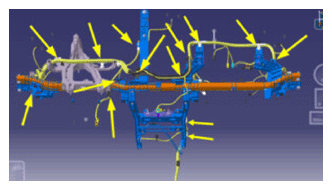 Courtesy of TESLA, INC. Courtesy of TESLA, INC.
|
 Courtesy of TESLA, INC. Courtesy of TESLA, INC.
|
- Install the cross car beam into the vehicle
NOTE:
recommend assistance
 Courtesy of TESLA, INC. Courtesy of TESLA, INC.
|
- Loosely install bolts securing cross car beam to RH side of body
NOTE:
2x bolts, 15 mm, 29 N.m, Torque at later step
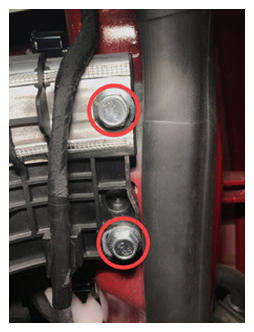 Courtesy of TESLA, INC. Courtesy of TESLA, INC.
|
- Loosely install bolts securing cross car beam to LH side of body
NOTE:
2x bolts, 15 mm, 29 N.m, Torque at later step
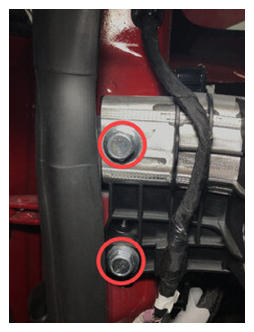 Courtesy of TESLA, INC. Courtesy of TESLA, INC.
|
- Loosely install bolt securing cross car beam to upper cowl
NOTE:
1x bolt, 13 mm, 25 N.m
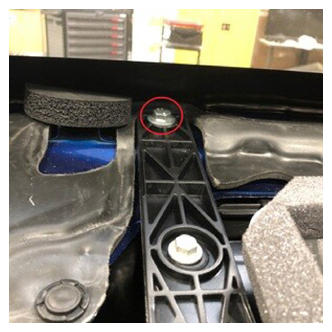 Courtesy of TESLA, INC. Courtesy of TESLA, INC.
|
- Loosely install bolt securing cross car beam to the HVAC assembly on upper LH side of HVAC assembly
NOTE:
1x bolt, 10 mm, 5.5 N.m
 Courtesy of TESLA, INC. Courtesy of TESLA, INC.
|
- Loosely install bolts securing the cross car beam to HVAC assembly in front of the HVAC assembly
NOTE:
4x bolts, 10 mm, 5.5 N.m
 Courtesy of TESLA, INC. Courtesy of TESLA, INC.
|
- Install RH cross car beam bracket and loosely install nut that secures the RH cross car beam bracket to body
NOTE:
1x nut, 13 mm, 25 N.m
 Courtesy of TESLA, INC. Courtesy of TESLA, INC.
|
- Loosely install bolt securing RH cross car beam bracket to the cross car beam
NOTE:
1x bolts, 13 mm, 25 N.m
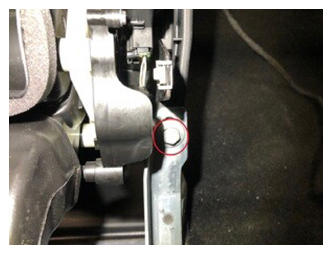 Courtesy of TESLA, INC. Courtesy of TESLA, INC.
|
- Install LH cross car beam bracket and loosely install nut that secures LH cross beam bracket to body
NOTE:
1x nut, 13 mm, 25 N.m
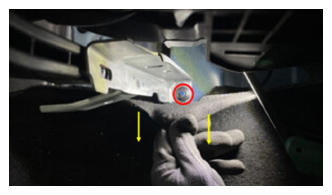 Courtesy of TESLA, INC. Courtesy of TESLA, INC.
|
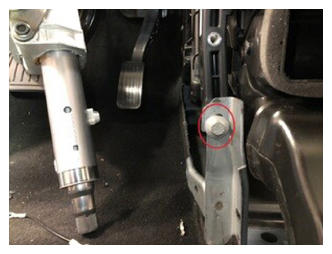
- Loosely install bolt to secure LH cross car beam bracket to cross car beam
NOTE:
1x bolts, 13 mm, 25 N.m
 Courtesy of TESLA, INC. Courtesy of TESLA, INC.
|
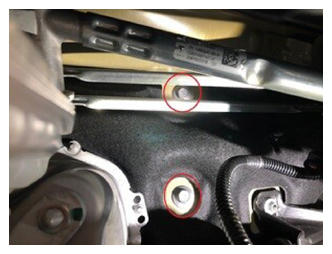
- Install bolts securing cross car beam to LH side of bulkhead
NOTE:
2x bolts, 13 mm, 25 N.m
 Courtesy of TESLA, INC. Courtesy of TESLA, INC.
|
- Torque the bolt that secures the LH cross car beam bracket to the cross car beam
NOTE:
1x bolts, 13 mm, 25 N.m
 Courtesy of TESLA, INC. Courtesy of TESLA, INC.
|
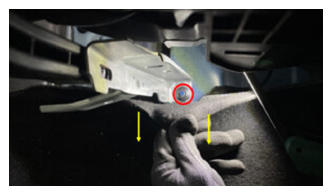
- Torque nut securing LH cross car beam bracket to body
NOTE:
1x nut, 13 mm, 25 N.m, Slightly pull LH carpet towards LH side of vehicle
 Courtesy of TESLA, INC. Courtesy of TESLA, INC.
|
- Install clip that secures the carpet to LH cross car beam bracket
NOTE:
1x clip
 Courtesy of TESLA, INC. Courtesy of TESLA, INC.
|
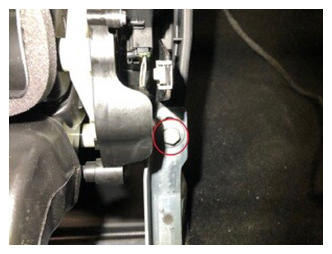
- Torque bolt securing the RH cross car beam bracket to cross car beam
NOTE:
1x bolt, 13 mm, 25 N.m
 Courtesy of TESLA, INC. Courtesy of TESLA, INC.
|
- Torque nut securing RH cross car beam bracket to body
NOTE:
1x nut, 13 mm, 25 N.m
 Courtesy of TESLA, INC. Courtesy of TESLA, INC.
|
- Install clip securing the carpet to RH cross car beam bracket
NOTE:
1x clip
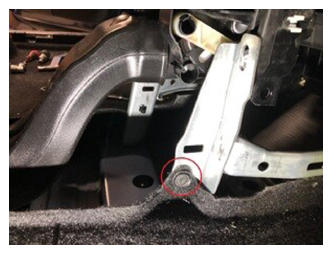 Courtesy of TESLA, INC. Courtesy of TESLA, INC.
|
- Torque the bolts securing the cross car beam to the HVAC assembly
NOTE:
4x bolts, 10 mm, 5.5 N.m
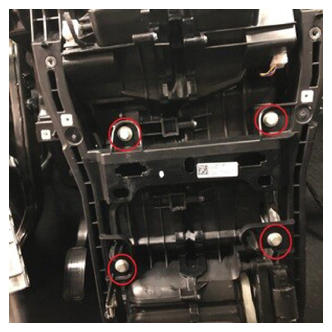 Courtesy of TESLA, INC. Courtesy of TESLA, INC.
|
- Torque the bolt that secures the cross car beam to the HVAC assembly
NOTE:
1x bolt, 10 mm, 5.5 N.m
 Courtesy of TESLA, INC. Courtesy of TESLA, INC.
|
- Torque the bolt that secures the cross car beam to the upper cowl
NOTE:
1x bolt, 13 mm, 25 N.m
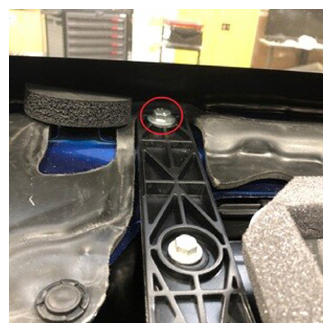 Courtesy of TESLA, INC. Courtesy of TESLA, INC.
|
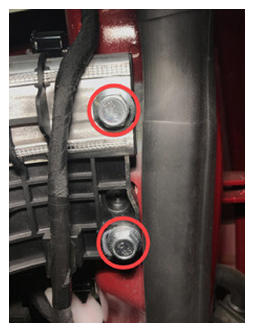
- Torque bolts securing cross car beam to LH side of body
NOTE:
2x bolts, 15 mm, 29 N.m
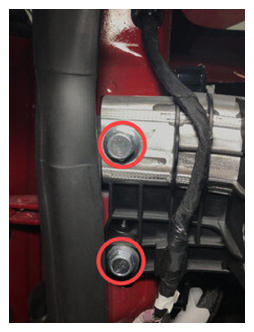 Courtesy of TESLA, INC. Courtesy of TESLA, INC.
|
- Torque bolts securing cross car beam to RH side of body
NOTE:
2x bolts, 15 mm, 29 N.m
 Courtesy of TESLA, INC. Courtesy of TESLA, INC.
|
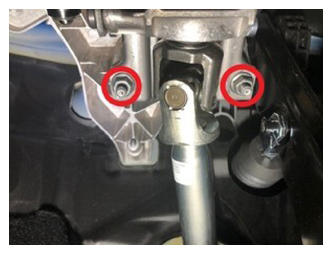
- Install the nuts securing the lower steering column to the cross car beam
NOTE:
2x nuts, 13 mm, 15 N.m
 Courtesy of TESLA, INC. Courtesy of TESLA, INC.
|
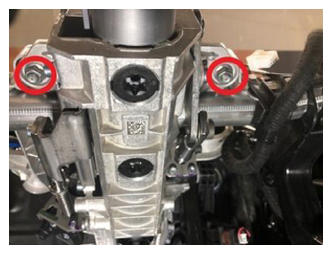
- Install nuts securing upper steering column to cross car beam
NOTE:
2x nuts, 13 mm, 15 N.m
 Courtesy of TESLA, INC. Courtesy of TESLA, INC.
|
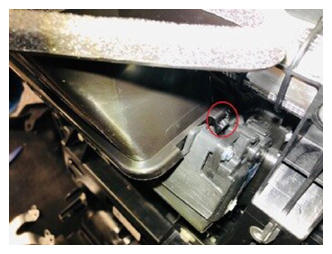
- Install the bleeder duct adapter to the HVAC assembly
NOTE:
4x clips
 Courtesy of TESLA, INC. Courtesy of TESLA, INC.
|
 Courtesy of TESLA, INC. Courtesy of TESLA, INC.
|
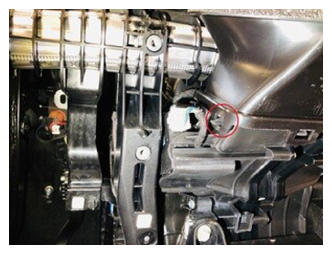 Courtesy of TESLA, INC. Courtesy of TESLA, INC.
|
- Install RH touchscreen bracket
NOTE:
2x bolts, T30, 12 N.m
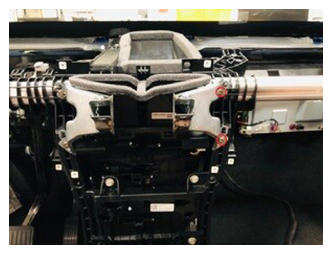 Courtesy of TESLA, INC. Courtesy of TESLA, INC.
|
- Install LH touchscreen bracket
NOTE:
2x bolts, T30, 12 N.m
 Courtesy of TESLA, INC. Courtesy of TESLA, INC.
|
- Install the headliner harness clip located on the LH upper A pillar
NOTE:
1x clip
 Courtesy of TESLA, INC. Courtesy of TESLA, INC.
|
- Install headliner harness clips to LH lower A-Pillar
NOTE:
2x clips
 Courtesy of TESLA, INC. Courtesy of TESLA, INC.
|
- Install headliner harness connector on LH lower A-Pillar
NOTE:
1x connector
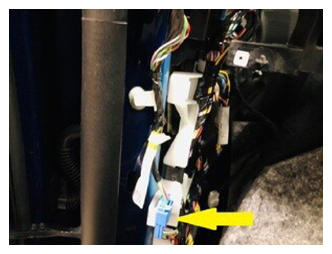 Courtesy of TESLA, INC. Courtesy of TESLA, INC.
|
- Install clip located on the RH lower A-pillar
NOTE:
1x clip
 Courtesy of TESLA, INC. Courtesy of TESLA, INC.
|
- Install the clip located on the RH side of cross car beam
NOTE:
1x clip
 Courtesy of TESLA, INC. Courtesy of TESLA, INC.
|
- Install dash harness connector to right body controller
NOTE:
1x connector
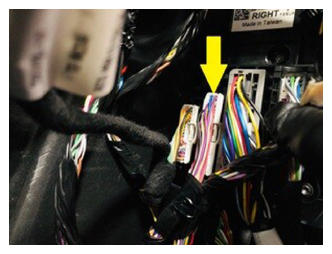 Courtesy of TESLA, INC. Courtesy of TESLA, INC.
|
- Position RH carpet back to the original position
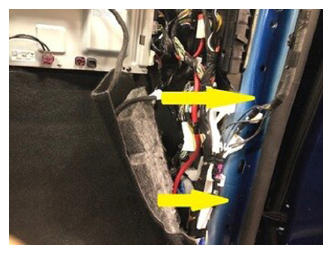 Courtesy of TESLA, INC. Courtesy of TESLA, INC.
|
- Install connectors to the car computer
NOTE:
2x connectors
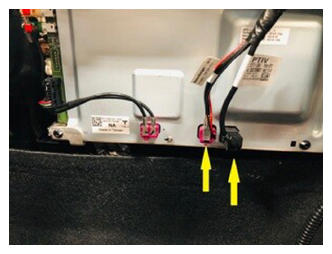 Courtesy of TESLA, INC. Courtesy of TESLA, INC.
|
- Install HVAC harness to the IP harness holding mount on RH side of the IP harness
NOTE:
2x holding mount, 1st holding mount is located on the RH side of the HVAC assembly, 2nd holding mount is located next to the right body controller
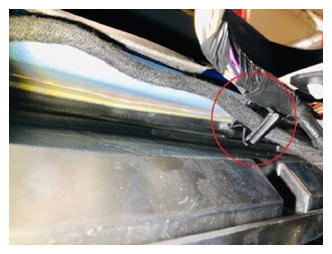 Courtesy of TESLA, INC. Courtesy of TESLA, INC.
|
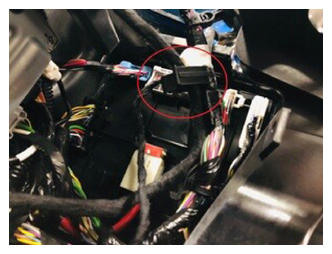 Courtesy of TESLA, INC. Courtesy of TESLA, INC.
|
- Install IP harness clip to HVAC assembly next to the RH upper mode actuator
NOTE:
1x clip
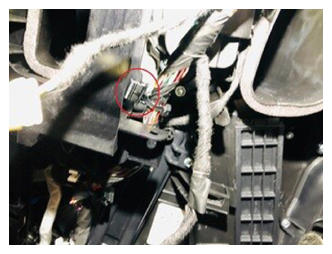 Courtesy of TESLA, INC. Courtesy of TESLA, INC.
|
- Install IP harness clip to HVAC assembly next to the RH lower duct thermistor
NOTE:
1x clip
 Courtesy of TESLA, INC. Courtesy of TESLA, INC.
|
- Install the IP harness clip to the cross car beam
NOTE:
1x clip
 Courtesy of TESLA, INC. Courtesy of TESLA, INC.
|
- Install IP harness clip to the body of the vehicle next to RH cross car beam bracket
NOTE:
1x clip
 Courtesy of TESLA, INC. Courtesy of TESLA, INC.
|
- Install center console support bracket
NOTE:
1x clip, 4x tabs, Slide towards rear of vehicle then engage tabs
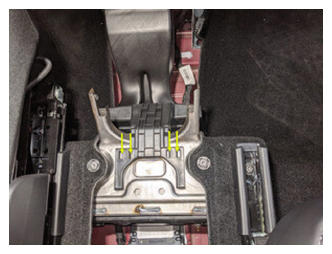 Courtesy of TESLA, INC. Courtesy of TESLA, INC.
|
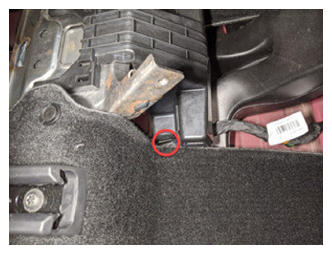 Courtesy of TESLA, INC. Courtesy of TESLA, INC.
|
- Install the IP harness clip to the body located next to the RCM
NOTE:
1x clip
 Courtesy of TESLA, INC. Courtesy of TESLA, INC.
|
- Connect the connector located on the RCM
NOTE:
1x connector, Fully install connector and pull release tab into locking position
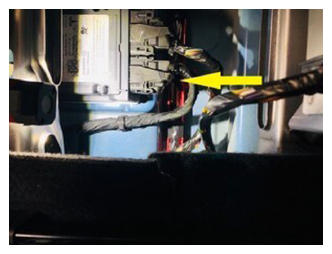 Courtesy of TESLA, INC. Courtesy of TESLA, INC.
|
- Install the clip located next to the RCM
NOTE:
1x clip
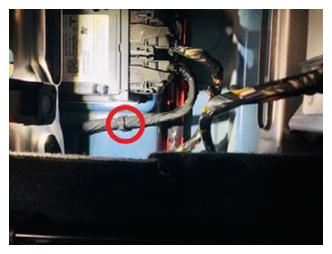 Courtesy of TESLA, INC. Courtesy of TESLA, INC.
|
- Connect connector to blower motor assembly
NOTE:
1x connector
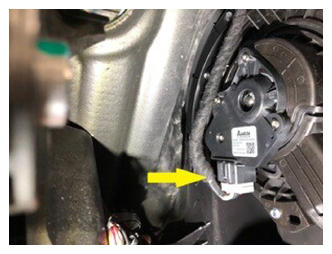 Courtesy of TESLA, INC. Courtesy of TESLA, INC.
|
- Install the IP harness clip located on the blower motor assembly
NOTE:
1x clip
 Courtesy of TESLA, INC. Courtesy of TESLA, INC.
|
- Connect the connector to the electric steering column
NOTE:
1x connector
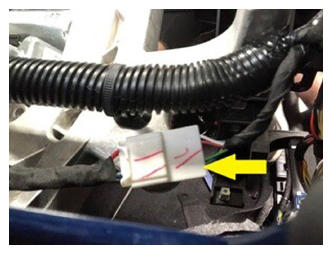 Courtesy of TESLA, INC. Courtesy of TESLA, INC.
|
- Connect the HVAC connector to the left body controller
NOTE:
1x connector
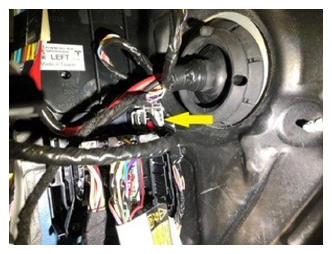 Courtesy of TESLA, INC. Courtesy of TESLA, INC.
|
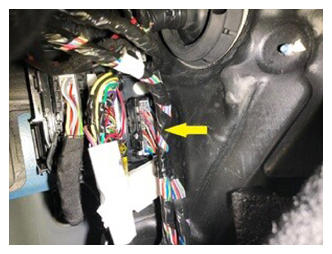
- Connect the dash connector to the left body controller
NOTE:
1x connector, Fully seat connector and pull release tab into locking position
 Courtesy of TESLA, INC. Courtesy of TESLA, INC.
|
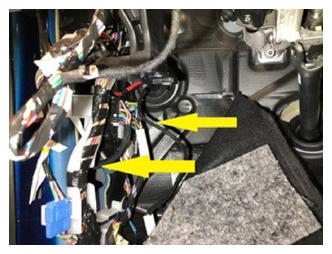
- Position the LH cabin carpet back to the original position
 Courtesy of TESLA, INC. Courtesy of TESLA, INC.
|
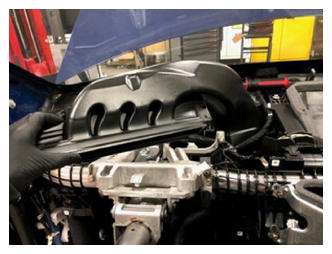
- Install the drivers air duct to the HVAC assembly
 Courtesy of TESLA, INC. Courtesy of TESLA, INC.
|
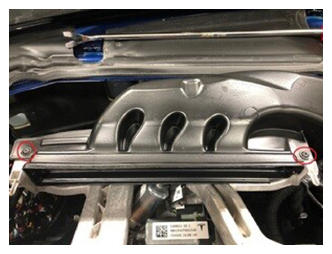
- Install the screws securing the drivers air duct to the cross car beam
NOTE:
2x screws, T20, 2.3 N.m
 Courtesy of TESLA, INC. Courtesy of TESLA, INC.
|
- Install the instrument panel carrier. See IP CARRIER (REMOVE AND INSTALL)