- Measure the gap and flush of LH falcon door according to specification
NOTE:
Record that data and use it as a base line when installing the new door
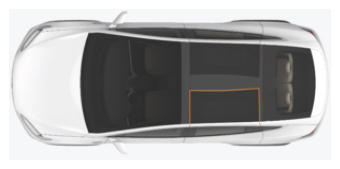 Courtesy of TESLA, INC. Courtesy of TESLA, INC.
|
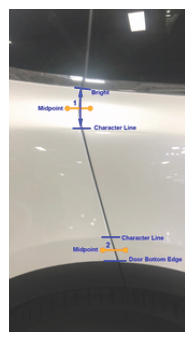 Courtesy of TESLA, INC. Courtesy of TESLA, INC.
|
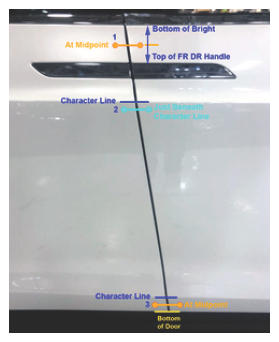 Courtesy of TESLA, INC. Courtesy of TESLA, INC.
|
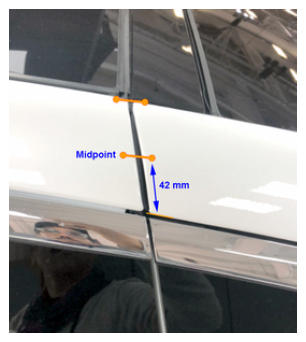 Courtesy of TESLA, INC. Courtesy of TESLA, INC.
|
- Open LH front door
- Lower LH front window
- Partially lower LH rear window
- Move LH front seat forward
- Open LH rear falcon door partially
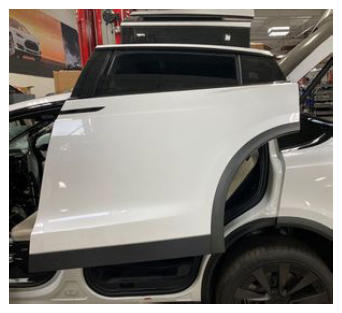 Courtesy of TESLA, INC. Courtesy of TESLA, INC.
|
- Remove LH wheel arch cladding
NOTE:
4x clips, Carefully release clips and double-sided tape that secure rear wheel arch to rear door assembly
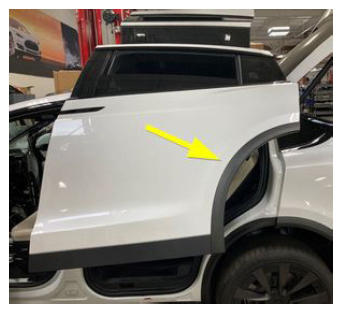 Courtesy of TESLA, INC. Courtesy of TESLA, INC.
|
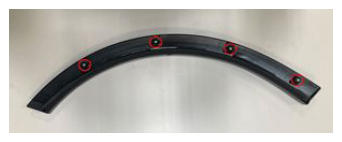 Courtesy of TESLA, INC. Courtesy of TESLA, INC.
|
- Remove LH rear door cladding
NOTE:
4x clips, 1x double sided tape strip, Take care not to damage painted surfaces, Starting at the front of the LH falcon door, release the clips and double sided tape
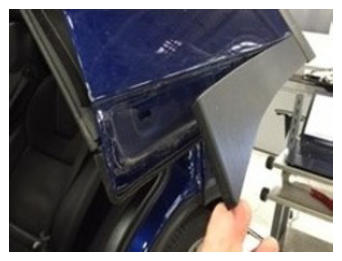 Courtesy of TESLA, INC. Courtesy of TESLA, INC.
|
 Courtesy of TESLA, INC. Courtesy of TESLA, INC.
|
- Remove LH rear outer belt trim
NOTE:
Lift and roll outward slowly and evenly starting from front edge, Take care not to bend or damage components
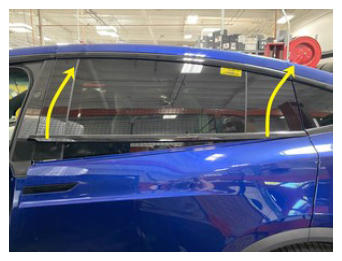 Courtesy of TESLA, INC. Courtesy of TESLA, INC.
|
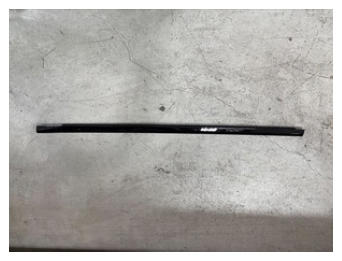 Courtesy of TESLA, INC. Courtesy of TESLA, INC.
|
- Open LH falcon wing door
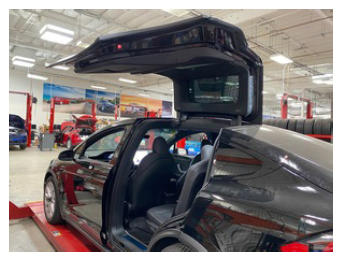 Courtesy of TESLA, INC. Courtesy of TESLA, INC.
|
- Remove LH falcon door lower garnish
NOTE:
9x V-clips, Replace any damaged or missing clips, Take care not to damage door trim panel during removal
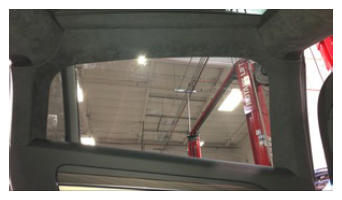 Courtesy of TESLA, INC. Courtesy of TESLA, INC.
|
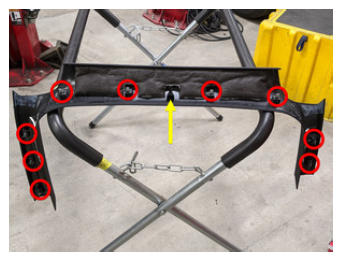 Courtesy of TESLA, INC. Courtesy of TESLA, INC.
|
- Remove LH upper falcon door trim
NOTE:
17x clips, 1x connector may be present on early production vehicles
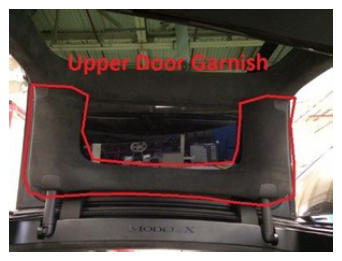 Courtesy of TESLA, INC. Courtesy of TESLA, INC.
|
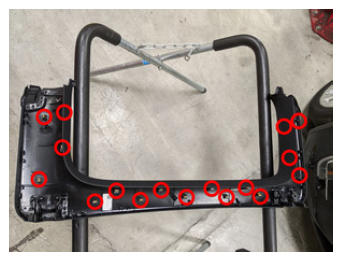 Courtesy of TESLA, INC. Courtesy of TESLA, INC.
|
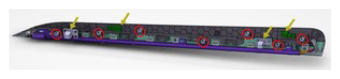
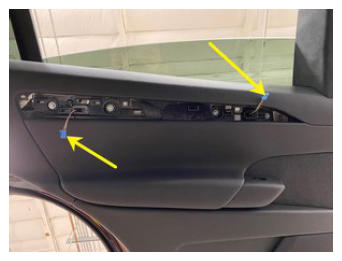
- Remove LH rear decor trim panel
NOTE:
7x clips, 2x connectors
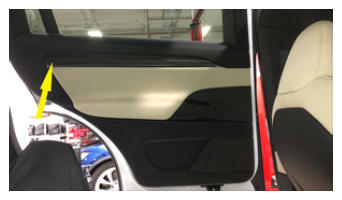 Courtesy of TESLA, INC. Courtesy of TESLA, INC.
|
 Courtesy of TESLA, INC. Courtesy of TESLA, INC.
|
 Courtesy of TESLA, INC. Courtesy of TESLA, INC.
|
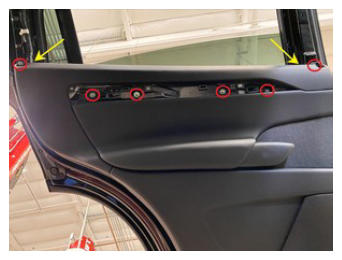
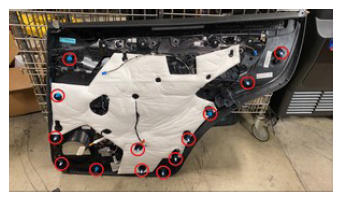
- Remove bolts securing LH rear door panel to door
NOTE:
8x bolts, 10 mm, 6 N.m
 Courtesy of TESLA, INC. Courtesy of TESLA, INC.
|
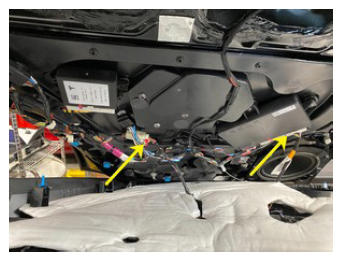
- Remove LH rear door trim panel
NOTE:
13x clips, 2x connectors
 Courtesy of TESLA, INC. Courtesy of TESLA, INC.
|
 Courtesy of TESLA, INC. Courtesy of TESLA, INC.
|
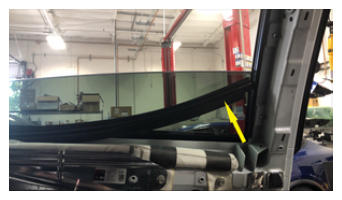
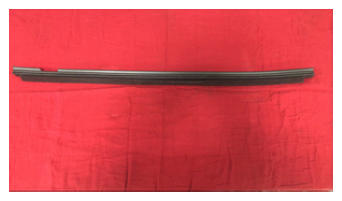
- Remove LH rear inner belt seal
 Courtesy of TESLA, INC. Courtesy of TESLA, INC.
|
 Courtesy of TESLA, INC. Courtesy of TESLA, INC.
|
- Open hood
NOTE:
Via center display > Controls > Frunk Open
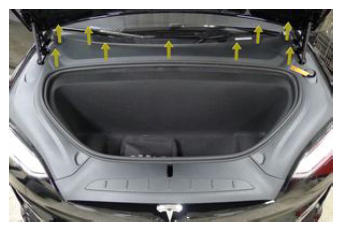
- Remove rear underhood apron
NOTE:
11x clips, 2x datums
 Courtesy of TESLA, INC. Courtesy of TESLA, INC.
|
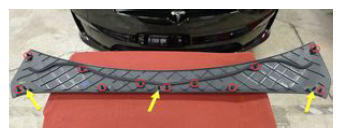 Courtesy of TESLA, INC. Courtesy of TESLA, INC.
|
- Power off vehicle via center display
NOTE:
Controls > Safety & Security > Power Off
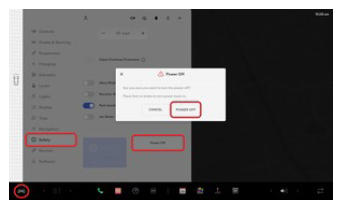 Courtesy of TESLA, INC. Courtesy of TESLA, INC.
|
- Disconnect LV battery connector and First Responder Loop
NOTE:
2x connectors, Lift up and release green locking tab, Pull black connector lock outwards to release connection, Release red lock tab on FRL
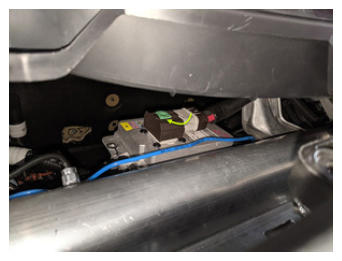 Courtesy of TESLA, INC. Courtesy of TESLA, INC.
|
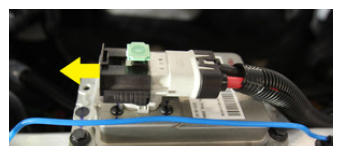 Courtesy of TESLA, INC. Courtesy of TESLA, INC.
|
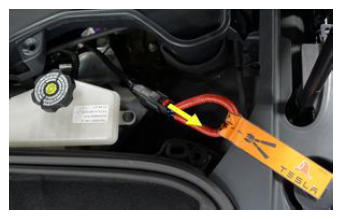 Courtesy of TESLA, INC. Courtesy of TESLA, INC.
|
- Disconnect 2nd row head air bag connector
NOTE:
1x connector, Release orange lock and then disconnect
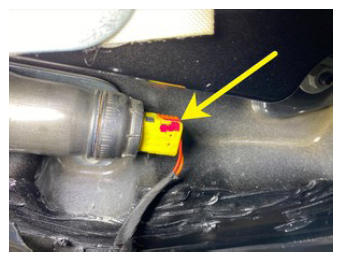 Courtesy of TESLA, INC. Courtesy of TESLA, INC.
|
- Remove bolts securing 2nd row head air bag to LH rear door assembly
NOTE:
6x bolts, 10 mm, 7 N.m
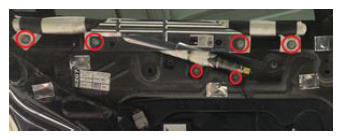 Courtesy of TESLA, INC. Courtesy of TESLA, INC.
|
- Remove LH 2nd row head air bag
NOTE:
4x clips, Lift air bag flaps to access clips
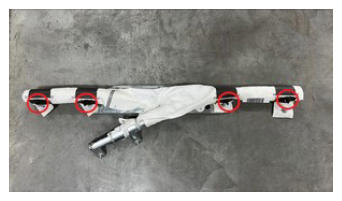 Courtesy of TESLA, INC. Courtesy of TESLA, INC.
|
- Disconnect LH falcon door protection ECU
NOTE:
1x connector, Release black locking tab
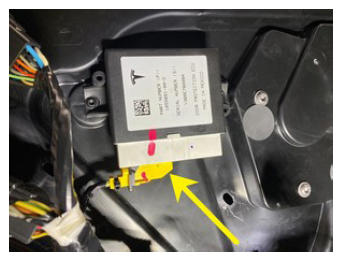 Courtesy of TESLA, INC. Courtesy of TESLA, INC.
|
- Disconnect connectors from LH falcon door module
NOTE:
2x connectors
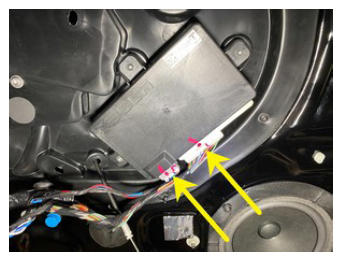 Courtesy of TESLA, INC. Courtesy of TESLA, INC.
|
- Remove bolts securing LH closeout panel to falcon door
NOTE:
10x bolts, T25, 1.8 N.m
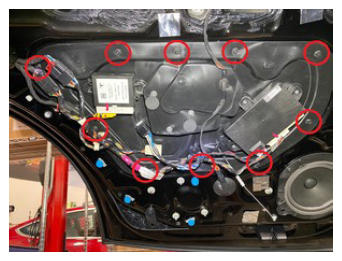 Courtesy of TESLA, INC. Courtesy of TESLA, INC.
|
- Remove screws securing window motor to LH closeout panel
NOTE:
3x screws, T30, 1.8 N.m
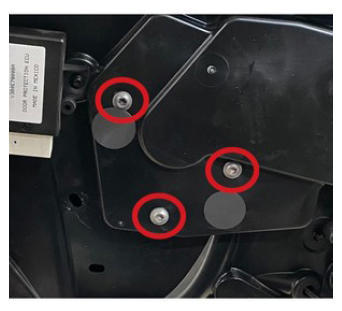 Courtesy of TESLA, INC. Courtesy of TESLA, INC.
|
- Pull LH closeout panel away from door and lift window motor up to release
NOTE:
2x tabs
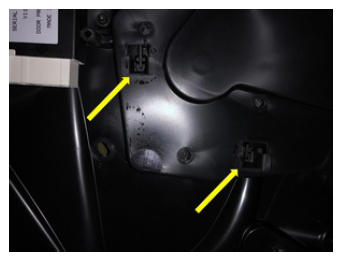 Courtesy of TESLA, INC. Courtesy of TESLA, INC.
|
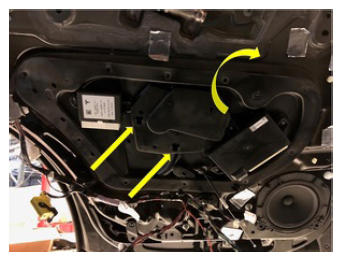 Courtesy of TESLA, INC. Courtesy of TESLA, INC.
|
- Unclip and feed door release cable through LH closeout panel
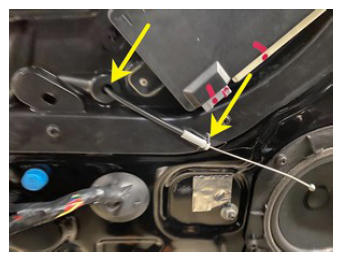 Courtesy of TESLA, INC. Courtesy of TESLA, INC.
|
- Remove clip securing window regulator harness to LH closeout panel
NOTE:
1x clip
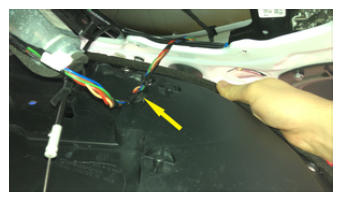 Courtesy of TESLA, INC. Courtesy of TESLA, INC.
|
- Release clips securing lower falcon door harnesses and connectors to LH closeout panel
NOTE:
7x clips
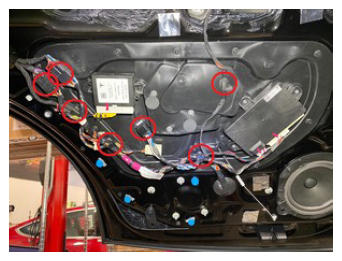 Courtesy of TESLA, INC. Courtesy of TESLA, INC.
|
- Remove bolt securing ground to LH lower falcon door
NOTE:
1x bolt, 10 mm, 10 N.m
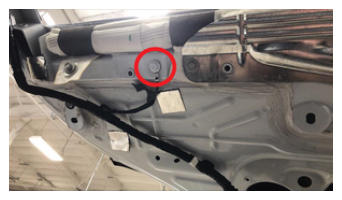 Courtesy of TESLA, INC. Courtesy of TESLA, INC.
|
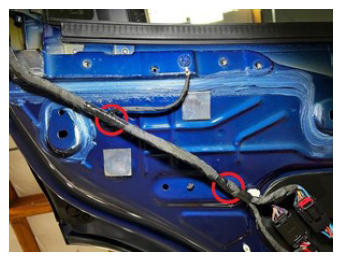
- Remove clips securing harness to LH lower falcon door
NOTE:
5x clips
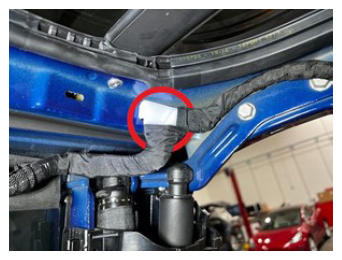 Courtesy of TESLA, INC. Courtesy of TESLA, INC.
|
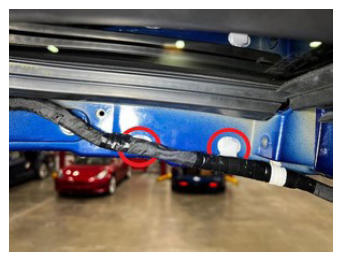 Courtesy of TESLA, INC. Courtesy of TESLA, INC.
|
 Courtesy of TESLA, INC. Courtesy of TESLA, INC.
|
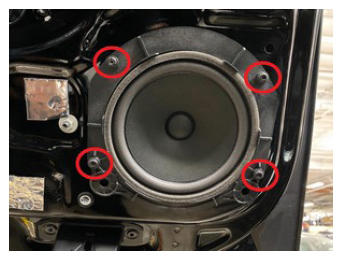
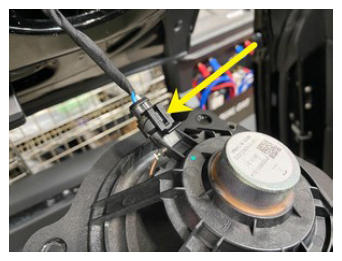
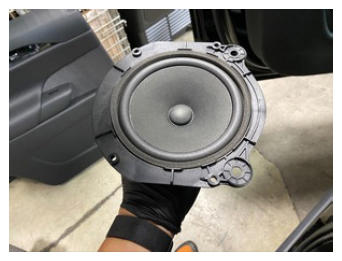
- Remove speaker from LH rear door
NOTE:
4x bolts, T25, 4 N.m, 2x datums, 1x connector
 Courtesy of TESLA, INC. Courtesy of TESLA, INC.
|
 Courtesy of TESLA, INC. Courtesy of TESLA, INC.
|
 Courtesy of TESLA, INC. Courtesy of TESLA, INC.
|
- Loosen nut securing the front of the window to the regulator
NOTE:
1x nut, 10 mm, 9 N.m, Nut does not need to be fully removed, If required power the vehicle back on and use the window switch tool to move regulator for nut access
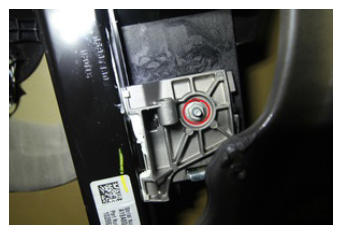 Courtesy of TESLA, INC. Courtesy of TESLA, INC.
|
- Partially close LH rear door
NOTE:
Do not engage latch
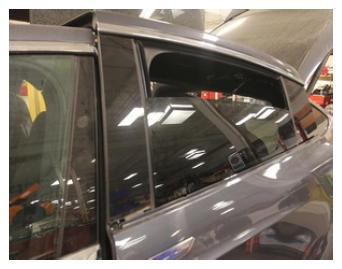 Courtesy of TESLA, INC. Courtesy of TESLA, INC.
|
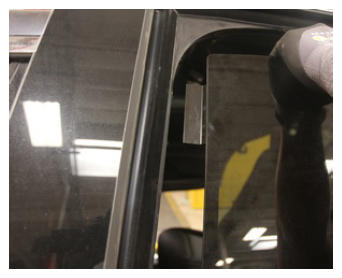
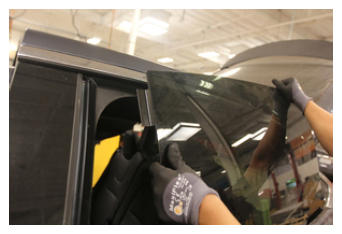
- Release clip securing rear of window to regulator and remove glass from vehicle
NOTE:
1x clip, Recommend assistance, Working from the outside of the vehicle, Pull the front of the window towards the rear of the vehicle and then lift the window out from the door, Take caution do not damage any components
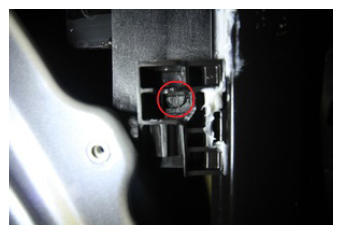 Courtesy of TESLA, INC. Courtesy of TESLA, INC.
|
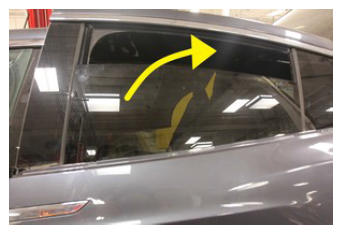 Courtesy of TESLA, INC. Courtesy of TESLA, INC.
|
 Courtesy of TESLA, INC. Courtesy of TESLA, INC.
|
 Courtesy of TESLA, INC. Courtesy of TESLA, INC.
|
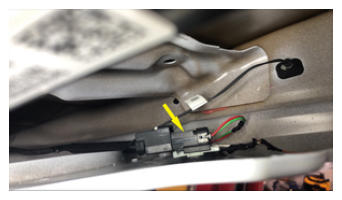
- Disconnect LH falcon door rear pinch sensor connector
NOTE:
1x connector
 Courtesy of TESLA, INC. Courtesy of TESLA, INC.
|
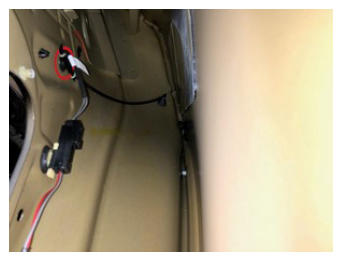
- Remove clip securing LH falcon door rear pinch sensor harness to door
NOTE:
1x clip
 Courtesy of TESLA, INC. Courtesy of TESLA, INC.
|
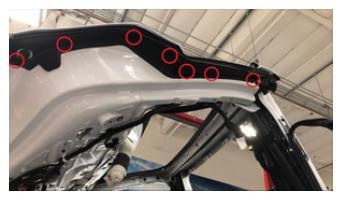
- Remove LH falcon door rear pinch sensor fasteners
NOTE:
7x push clips
 Courtesy of TESLA, INC. Courtesy of TESLA, INC.
|
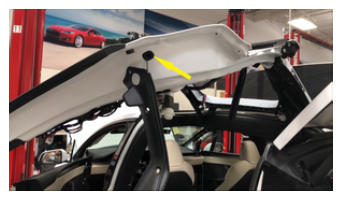
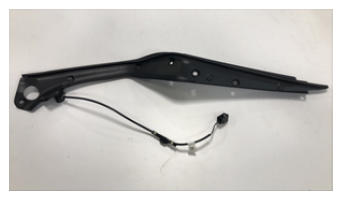
- Remove LH falcon door rear pinch sensor
NOTE:
1x grommet
 Courtesy of TESLA, INC. Courtesy of TESLA, INC.
|
 Courtesy of TESLA, INC. Courtesy of TESLA, INC.
|
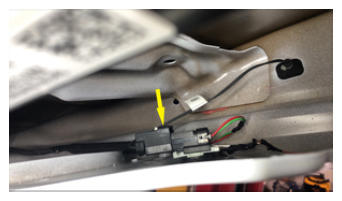
- Disconnect LH falcon door front pinch sensor
NOTE:
1x connector
 Courtesy of TESLA, INC. Courtesy of TESLA, INC.
|
- Remove LH falcon wing door front pinch sensor fasteners
NOTE:
7x push clips
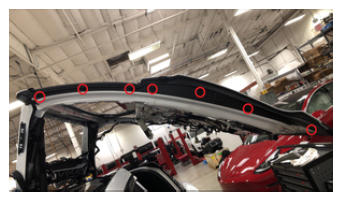 Courtesy of TESLA, INC. Courtesy of TESLA, INC.
|
- Remove LH falcon door front pinch sensor
NOTE:
1x grommet
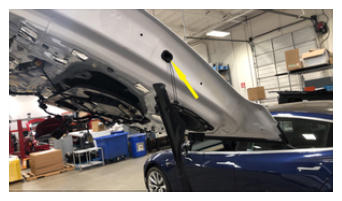 Courtesy of TESLA, INC. Courtesy of TESLA, INC.
|
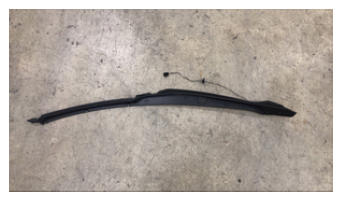 Courtesy of TESLA, INC. Courtesy of TESLA, INC.
|
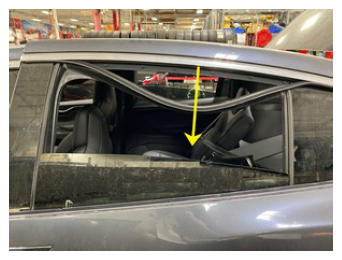
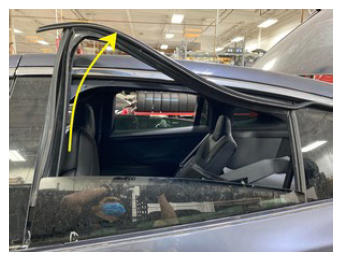
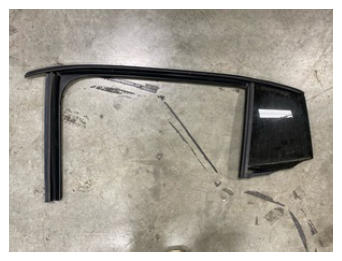
- Remove LH falcon door fixed glass
NOTE:
5x patched screws, T25, 3.5 N.m, Discard after removal, Carefully lift up airbag to access the lower screws, Release fixed glass seal from door assembly, Lift fixed glass from bottom edge and pull downwards to release upper edge from between upper cantrail and release seal from door assembly
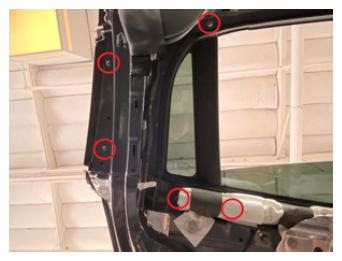 Courtesy of TESLA, INC. Courtesy of TESLA, INC.
|
 Courtesy of TESLA, INC. Courtesy of TESLA, INC.
|
 Courtesy of TESLA, INC. Courtesy of TESLA, INC.
|
 Courtesy of TESLA, INC. Courtesy of TESLA, INC.
|
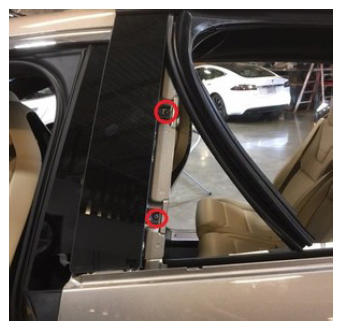
- Remove screws securing LH front falcon door applique
NOTE:
2x screws, T25, 3 N.m
 Courtesy of TESLA, INC. Courtesy of TESLA, INC.
|
- Remove LH falcon door applique
NOTE:
2x bolts, T25, 4.5 N.m
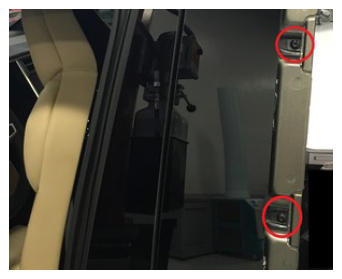 Courtesy of TESLA, INC. Courtesy of TESLA, INC.
|
- Remove screws securing LH rear upper bright molding to door
NOTE:
7x screws, T20, 4 N.m
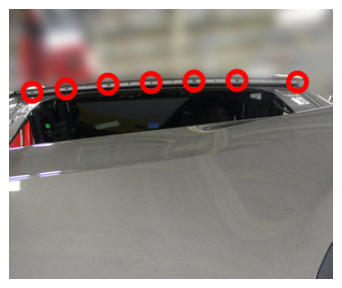 Courtesy of TESLA, INC. Courtesy of TESLA, INC.
|
- Disconnect the electrical connector from the LH rear window motor
NOTE:
1x connector
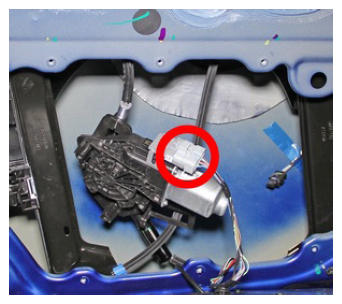 Courtesy of TESLA, INC. Courtesy of TESLA, INC.
|
- Remove the upper and lower nuts that secure the regulator to the LH rear door
NOTE:
4x nuts, 10 mm, 10 N.m
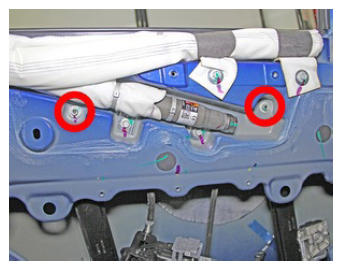 Courtesy of TESLA, INC. Courtesy of TESLA, INC.
|
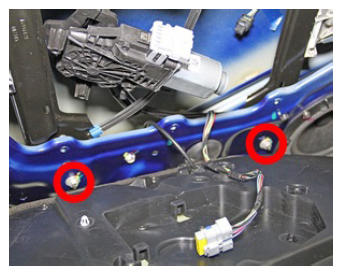 Courtesy of TESLA, INC. Courtesy of TESLA, INC.
|
- Push the regulator outboard so that the studs no longer protrude through the door shell and push the 2 beams of the regulator together and remove the window motor/regulator assembly from the LH rear door
NOTE:
Do not allow the washers to fall off the studs on the regulator
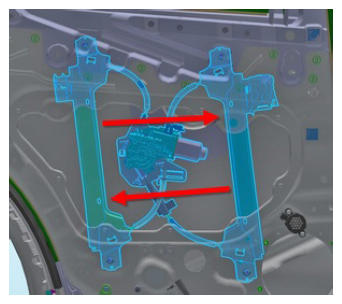 Courtesy of TESLA, INC. Courtesy of TESLA, INC.
|
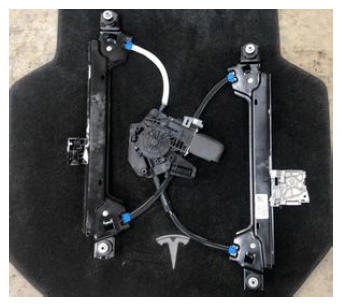 Courtesy of TESLA, INC. Courtesy of TESLA, INC.
|
- Disconnect LH ultrasonic sensor connector
NOTE:
1x connector, Do not use pry tool on tripod
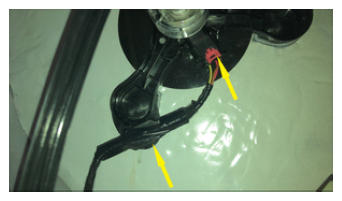 Courtesy of TESLA, INC. Courtesy of TESLA, INC.
|
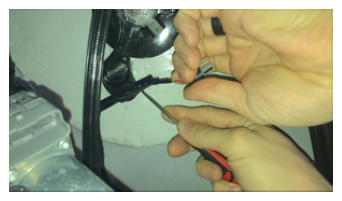 Courtesy of TESLA, INC. Courtesy of TESLA, INC.
|
- Disconnect LH outer door handle carrier connector
NOTE:
1x connector
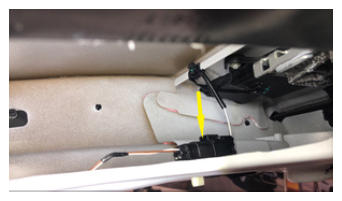 Courtesy of TESLA, INC. Courtesy of TESLA, INC.
|
- Release clip from LH falcon door
NOTE:
1x clip
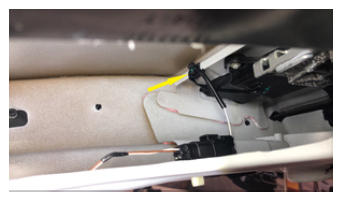 Courtesy of TESLA, INC. Courtesy of TESLA, INC.
|
- Pull back butyl patches to expose LH falcon door outer handle carrier fasteners
NOTE:
3x butyl patches
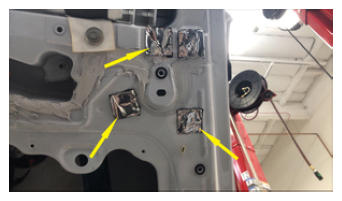 Courtesy of TESLA, INC. Courtesy of TESLA, INC.
|
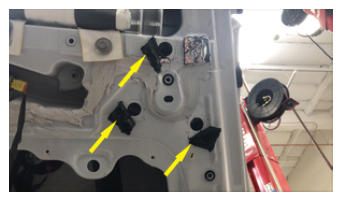 Courtesy of TESLA, INC. Courtesy of TESLA, INC.
|
- Remove LH falcon door outer door handle carrier fasteners
NOTE:
3x nuts, 10 mm, 8 N.m
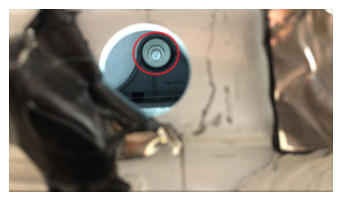 Courtesy of TESLA, INC. Courtesy of TESLA, INC.
|
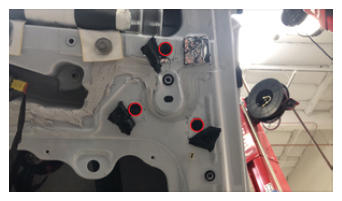 Courtesy of TESLA, INC. Courtesy of TESLA, INC.
|
- Remove LH falcon door outer door handle carrier
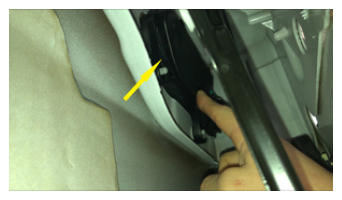 Courtesy of TESLA, INC. Courtesy of TESLA, INC.
|
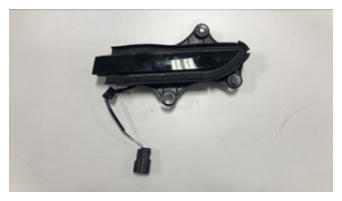 Courtesy of TESLA, INC. Courtesy of TESLA, INC.
|
- Disconnect LH falcon door close switch
NOTE:
1x connector
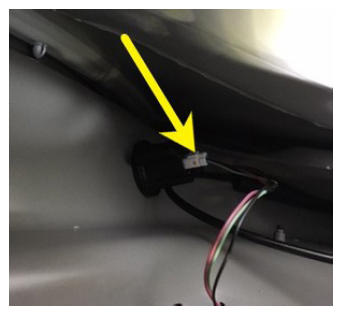 Courtesy of TESLA, INC. Courtesy of TESLA, INC.
|
- Remove LH falcon door close switch
NOTE:
Hold on to the connector that's part of the lit button close switch, while you turn the black prongs surrounding the switch counterclockwise, As the lit button close switch becomes increasingly loose, pull it free from the outside of the door
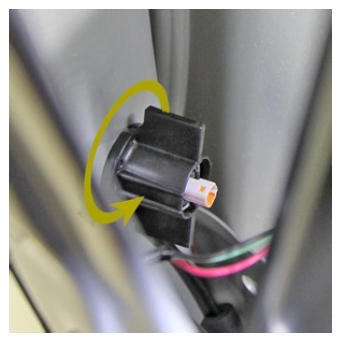 Courtesy of TESLA, INC. Courtesy of TESLA, INC.
|
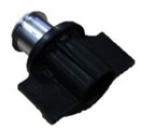 Courtesy of TESLA, INC. Courtesy of TESLA, INC.
|
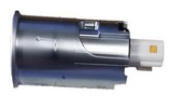 Courtesy of TESLA, INC. Courtesy of TESLA, INC.
|
- Disconnect clip from LH lower latch cover
NOTE:
1x clip
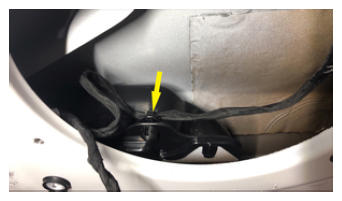 Courtesy of TESLA, INC. Courtesy of TESLA, INC.
|
- Remove LH rear door latch shroud
NOTE:
2x tabs
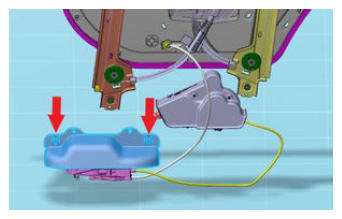 Courtesy of TESLA, INC. Courtesy of TESLA, INC.
|
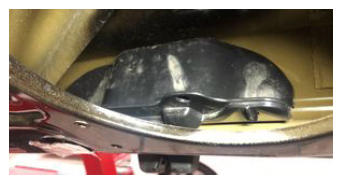 Courtesy of TESLA, INC. Courtesy of TESLA, INC.
|
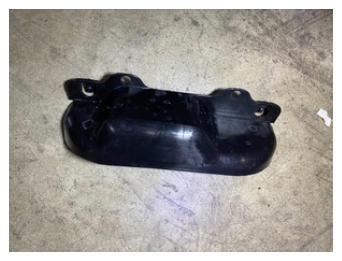 Courtesy of TESLA, INC. Courtesy of TESLA, INC.
|
- Disconnect LH lower latch connector
NOTE:
1x connector
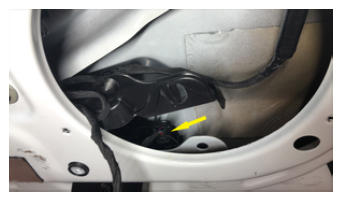 Courtesy of TESLA, INC. Courtesy of TESLA, INC.
|
- Remove bolts securing LH actuator and pull actuator up to gain access
NOTE:
3x nuts, 10 mm, 3 N.m
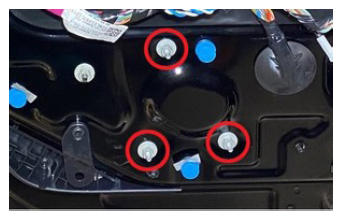 Courtesy of TESLA, INC. Courtesy of TESLA, INC.
|
- Remove door latch cover from LH door
NOTE:
2x screws, T30, 22 N.m, Discard after removal
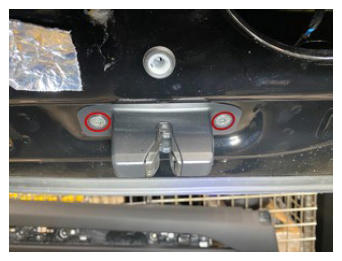 Courtesy of TESLA, INC. Courtesy of TESLA, INC.
|
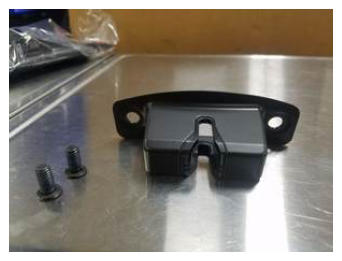 Courtesy of TESLA, INC. Courtesy of TESLA, INC.
|
- Remove the latch and cinching actuator assembly from the LH falcon door
NOTE:
2x connectors
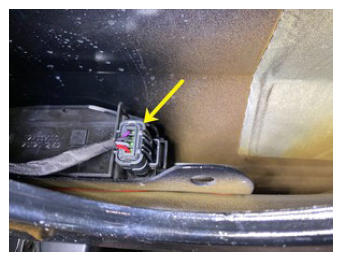 Courtesy of TESLA, INC. Courtesy of TESLA, INC.
|
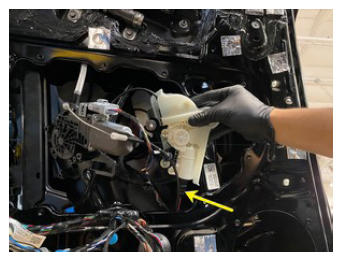 Courtesy of TESLA, INC. Courtesy of TESLA, INC.
|
- Remove LH rear door lower gap hider
NOTE:
2x screws, T25, 4 N.m
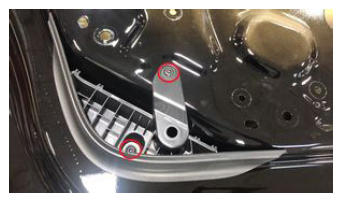 Courtesy of TESLA, INC. Courtesy of TESLA, INC.
|
- Remove LH falcon bump stop bumper
NOTE:
Note height before removal, twist in a counterclockwise direction to remove
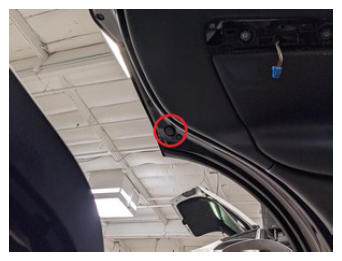 Courtesy of TESLA, INC. Courtesy of TESLA, INC.
|
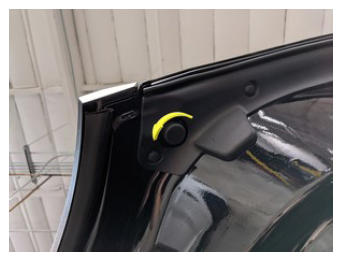 Courtesy of TESLA, INC. Courtesy of TESLA, INC.
|
- Remove LH rear door lower harness
NOTE:
8x fasteners, 1x plug
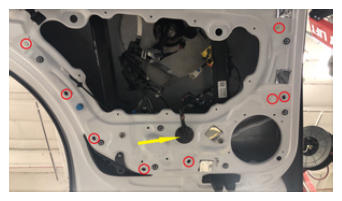 Courtesy of TESLA, INC. Courtesy of TESLA, INC.
|
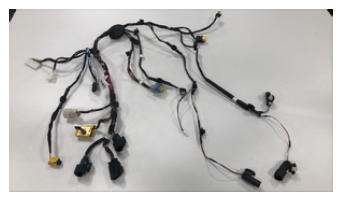 Courtesy of TESLA, INC. Courtesy of TESLA, INC.
|
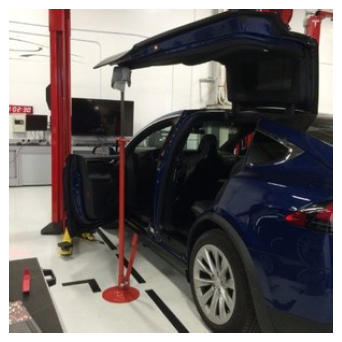
- Support the rear door
NOTE:
May need assist to open
 Courtesy of TESLA, INC. Courtesy of TESLA, INC.
|
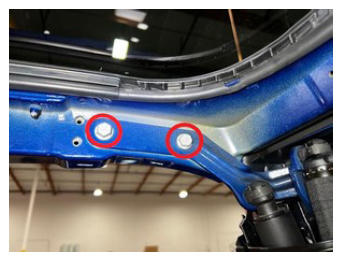
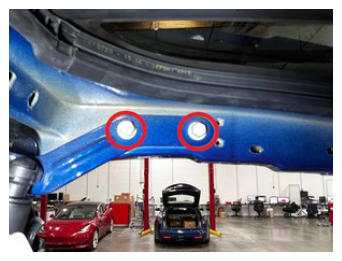
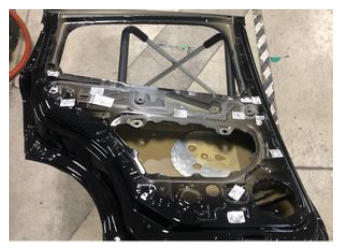
- Remove lower falcon door from vehicle
NOTE:
4x bolts, 13 mm, 24 N.m, Recommend assistant to hold the lower falcon door.
 Courtesy of TESLA, INC. Courtesy of TESLA, INC.
|
 Courtesy of TESLA, INC. Courtesy of TESLA, INC.
|
 Courtesy of TESLA, INC. Courtesy of TESLA, INC.
|
- Remove the front screws of the cantrail seal
NOTE:
2x screws, T25, 3.5 N.m
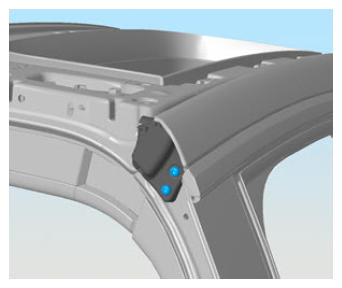 Courtesy of TESLA, INC. Courtesy of TESLA, INC.
|
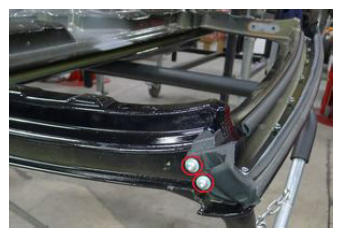 Courtesy of TESLA, INC. Courtesy of TESLA, INC.
|
- Remove the rear screws of the cantrail seal
NOTE:
2x screws, T25, 3.5 N.m
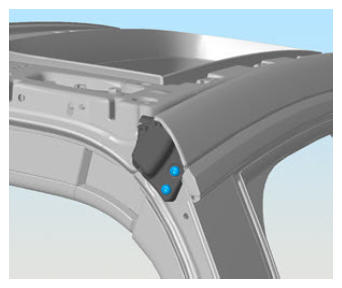 Courtesy of TESLA, INC. Courtesy of TESLA, INC.
|
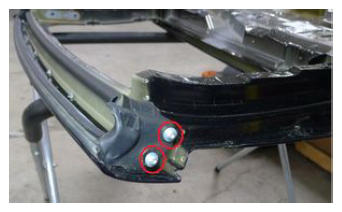 Courtesy of TESLA, INC. Courtesy of TESLA, INC.
|
- Remove cantrail seal nuts
NOTE:
7x nuts, 8 mm, 5 N.m
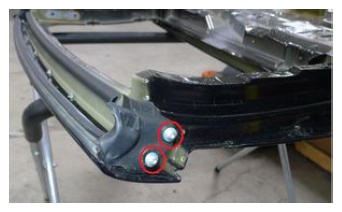 Courtesy of TESLA, INC. Courtesy of TESLA, INC.
|
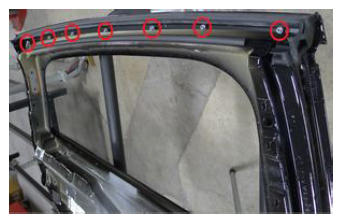 Courtesy of TESLA, INC. Courtesy of TESLA, INC.
|
- Remove cantrail seal
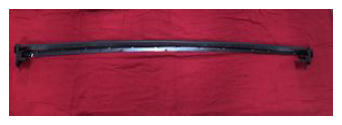 Courtesy of TESLA, INC. Courtesy of TESLA, INC.
|
- Prepare LH lower falcon door inner panel
NOTE:
Clean areas where butyl patches will be applied with IPA, Allow 1 minute to dry
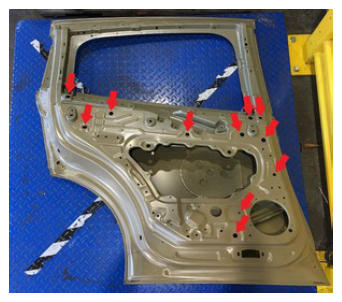 Courtesy of TESLA, INC. Courtesy of TESLA, INC.
|
- Apply butyl patches to LH lower falcon door inner panel
NOTE:
11x butyl patches
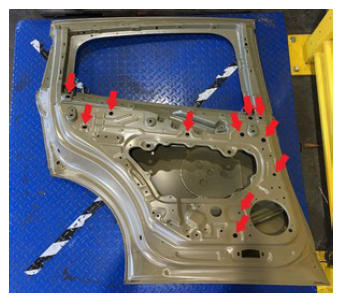 Courtesy of TESLA, INC. Courtesy of TESLA, INC.
|
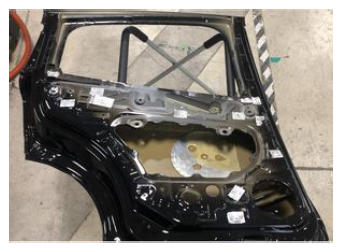 Courtesy of TESLA, INC. Courtesy of TESLA, INC.
|
- Prepare LH lower falcon door outer panel
NOTE:
Clean areas where butyl patches will be applied with IPA, Allow 1 minute to dry
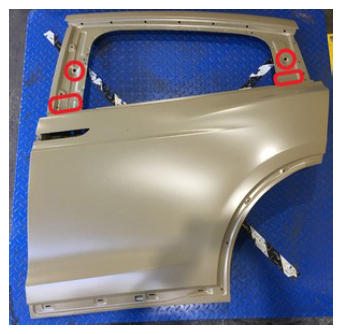 Courtesy of TESLA, INC. Courtesy of TESLA, INC.
|
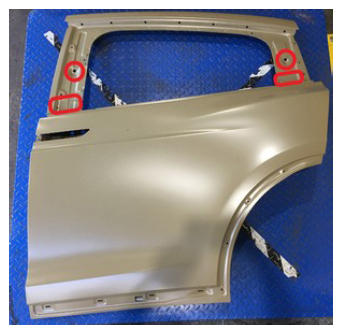
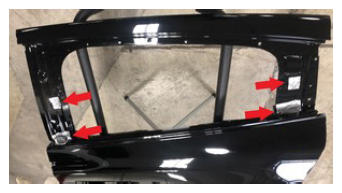
- Apply butyl patches to LH lower falcon door outer panel
NOTE:
Ensure butyl patch seals openings to avoid water leaks
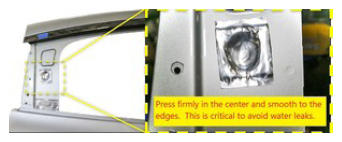 Courtesy of TESLA, INC. Courtesy of TESLA, INC.
|
 Courtesy of TESLA, INC. Courtesy of TESLA, INC.
|
 Courtesy of TESLA, INC. Courtesy of TESLA, INC.
|
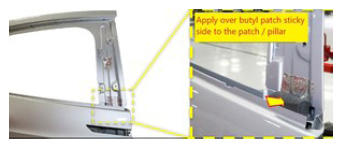
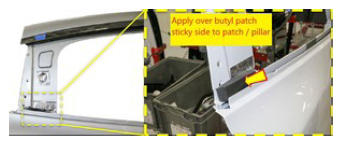
- Apply support foam to lower outer B-pillar and lower outer C-pillar of LH lower falcon door
NOTE:
Cut to length
 Courtesy of TESLA, INC. Courtesy of TESLA, INC.
|
 Courtesy of TESLA, INC. Courtesy of TESLA, INC.
|
- Install cantrail seal onto LH lower falcon door
NOTE:
7x nuts, 8 mm, 5 N.m, Make sure seal slides behind the nuts, Start from the back and working your way forward
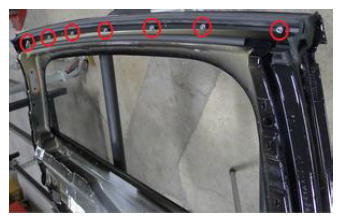 Courtesy of TESLA, INC. Courtesy of TESLA, INC.
|
- Install screws securing the rear of cantrail seal
NOTE:
2x screws, T25, 3.5 N.m
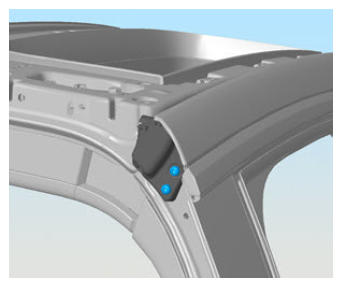 Courtesy of TESLA, INC. Courtesy of TESLA, INC.
|
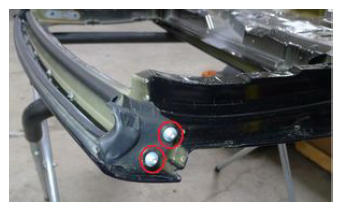 Courtesy of TESLA, INC. Courtesy of TESLA, INC.
|
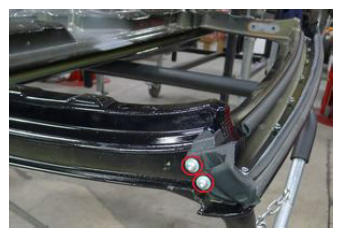
- Install screws securing the front of cantrail seal
NOTE:
2x screws, T25, 3.5 N.m
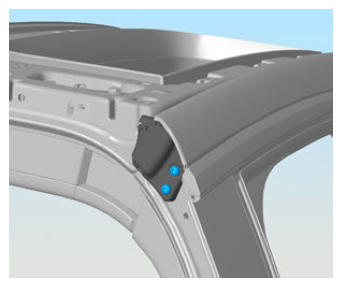 Courtesy of TESLA, INC. Courtesy of TESLA, INC.
|
 Courtesy of TESLA, INC. Courtesy of TESLA, INC.
|
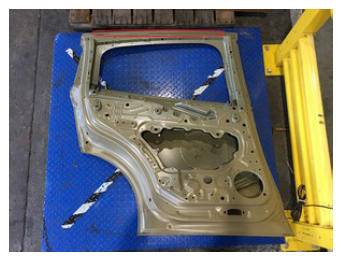
- Prepare LH lower falcon door inner upper panel
NOTE:
Clean area where the seal for the lower NVH extrusion will be applied with IPA, Allow 1 minute to dry
 Courtesy of TESLA, INC. Courtesy of TESLA, INC.
|
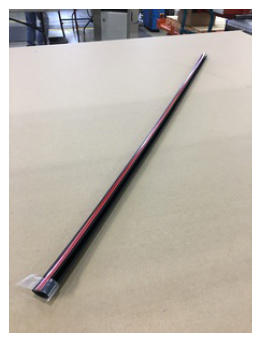
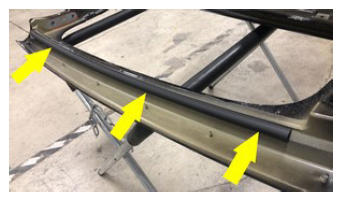
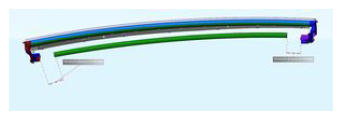
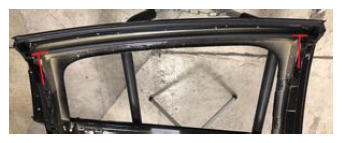
- Install lower NVH extrusion seal onto LH lower falcon door
NOTE:
Apply adhesive promoter along installation area, Allow 1 minute for dry time, Remove adhesive cover from seal, Center seal approximately 57 mm from the rear of cantrail seal and 51 mm from the front of cantrail seal
 Courtesy of TESLA, INC. Courtesy of TESLA, INC.
|
 Courtesy of TESLA, INC. Courtesy of TESLA, INC.
|
 Courtesy of TESLA, INC. Courtesy of TESLA, INC.
|
 Courtesy of TESLA, INC. Courtesy of TESLA, INC.
|
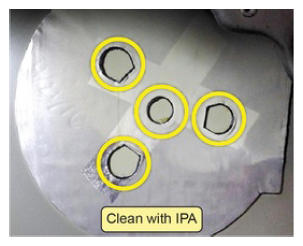
- Use IPA wipes or isopropyl alcohol to clean sensor mounting area
NOTE:
Allow 1 minute to dry
 Courtesy of TESLA, INC. Courtesy of TESLA, INC.
|
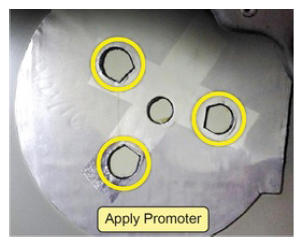
- Apply adhesion promoter to door skins
NOTE:
Allow 1 minute to dry
 Courtesy of TESLA, INC. Courtesy of TESLA, INC.
|
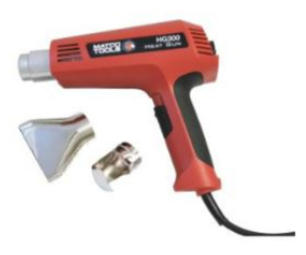
- Use heat gun and heat up the door skin. If necessary, use the infrared thermometer to check the temperature of door panel to at least 25 degrees C (77 degrees F) evenly
 Courtesy of TESLA, INC. Courtesy of TESLA, INC.
|
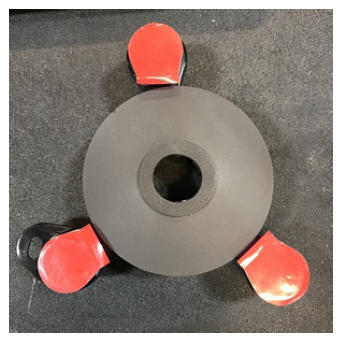
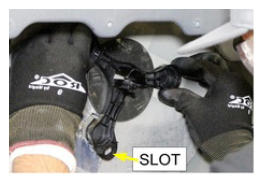
- Peel off stickers and Install new holder onto door skin with harness slot in bottom position
NOTE:
Use the force gauge to apply a force of 70 N to the top of each of the carrier pads for at least 10 seconds.
 Courtesy of TESLA, INC. Courtesy of TESLA, INC.
|
 Courtesy of TESLA, INC. Courtesy of TESLA, INC.
|
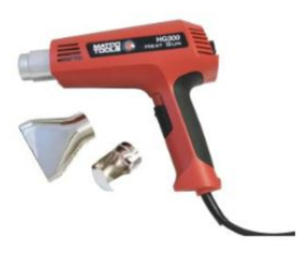
- Use heat gun and IR temp gun to read temperature of door panel to install Ultrasonic sensor
NOTE:
Panel must be 25° C or warmer - use heat gun to warm if necessary
 Courtesy of TESLA, INC. Courtesy of TESLA, INC.
|
- Peel off the adhesive from new sensor, Use heat gun and IR gun to heat sensor prior to application
NOTE:
Sensor must be between 40° -50° C prior to installation
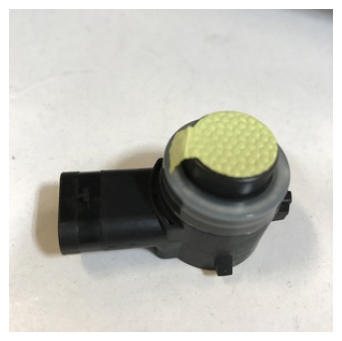 Courtesy of TESLA, INC. Courtesy of TESLA, INC.
|
- Install sensor onto door skin
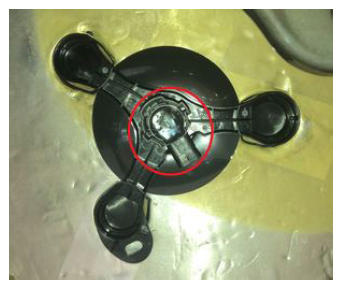 Courtesy of TESLA, INC. Courtesy of TESLA, INC.
|
- Use force gauge to press sensor into door and secure
NOTE:
Attach the 22 mm tip to the force gauge, Press @ 50 N for 10 seconds
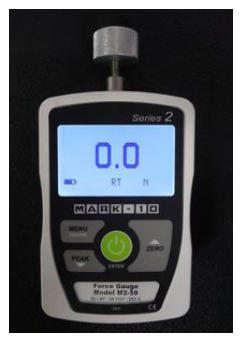 Courtesy of TESLA, INC. Courtesy of TESLA, INC.
|
- Install spacer, spring, and cap to secure sensor
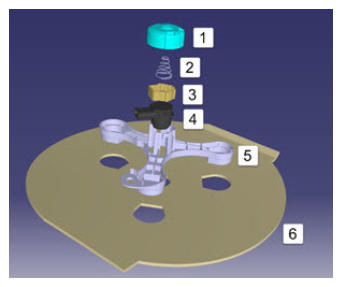 Courtesy of TESLA, INC. Courtesy of TESLA, INC.
|
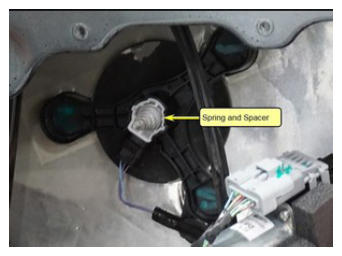 Courtesy of TESLA, INC. Courtesy of TESLA, INC.
|
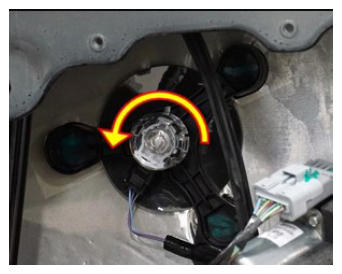 Courtesy of TESLA, INC. Courtesy of TESLA, INC.
|
- Install LH rear door lower harness
NOTE:
8x fasteners, 1x plug
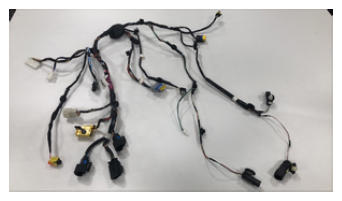 Courtesy of TESLA, INC. Courtesy of TESLA, INC.
|
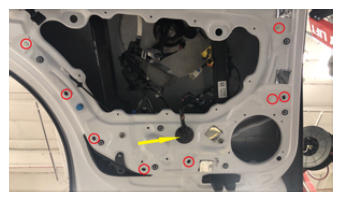 Courtesy of TESLA, INC. Courtesy of TESLA, INC.
|
- Install LH falcon bump stop bumper
NOTE:
Twist in a clockwise direction to install, set height to previously noted level
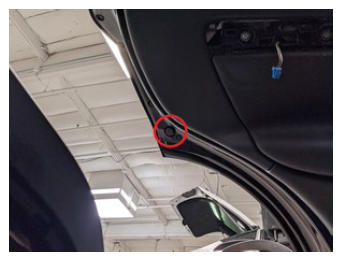 Courtesy of TESLA, INC. Courtesy of TESLA, INC.
|
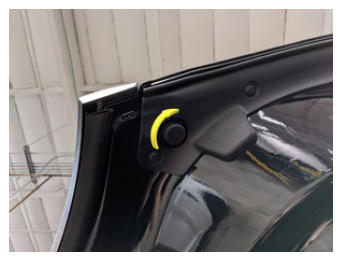 Courtesy of TESLA, INC. Courtesy of TESLA, INC.
|
- Install LH rear door lower gap hider
NOTE:
2x screws, T25, 4 N.m
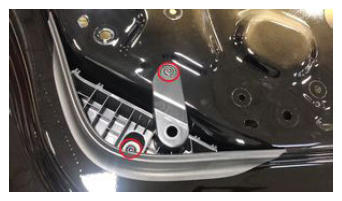 Courtesy of TESLA, INC. Courtesy of TESLA, INC.
|
- Install latch and cinching actuator assembly into the LH falcon door
NOTE:
2x connectors
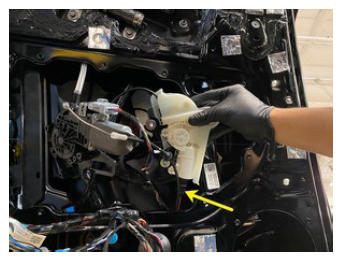 Courtesy of TESLA, INC. Courtesy of TESLA, INC.
|
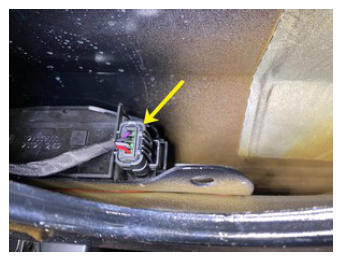 Courtesy of TESLA, INC. Courtesy of TESLA, INC.
|
- Install latch cover onto LH door
NOTE:
2x screws, T30, 22 N.m, Install new screw
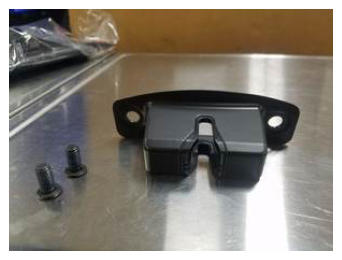 Courtesy of TESLA, INC. Courtesy of TESLA, INC.
|
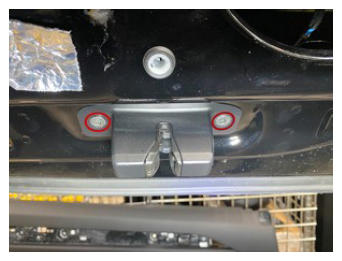 Courtesy of TESLA, INC. Courtesy of TESLA, INC.
|
- Install nuts securing cinching actuator assembly onto LH rear door
NOTE:
3x nuts, 10 mm, 3 N.m
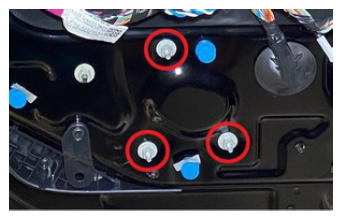 Courtesy of TESLA, INC. Courtesy of TESLA, INC.
|
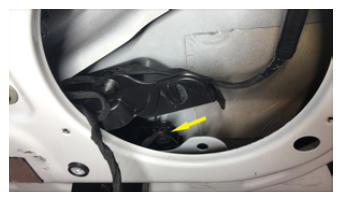
- Connect LH lower latch connector
NOTE:
1x connector
 Courtesy of TESLA, INC. Courtesy of TESLA, INC.
|
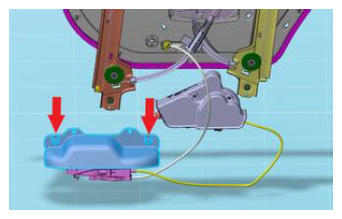
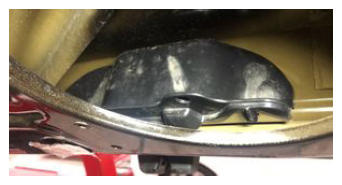
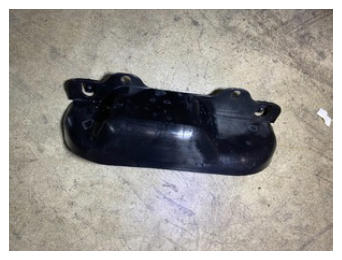
- Install LH rear door latch shroud
NOTE:
2x tabs
 Courtesy of TESLA, INC. Courtesy of TESLA, INC.
|
 Courtesy of TESLA, INC. Courtesy of TESLA, INC.
|
 Courtesy of TESLA, INC. Courtesy of TESLA, INC.
|
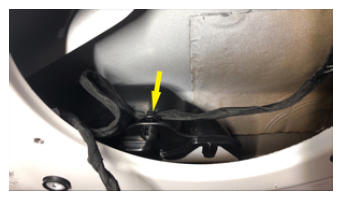
- Attach clip to LH lower latch cover
NOTE:
1x clip
 Courtesy of TESLA, INC. Courtesy of TESLA, INC.
|
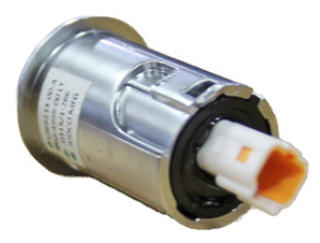
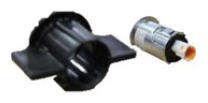
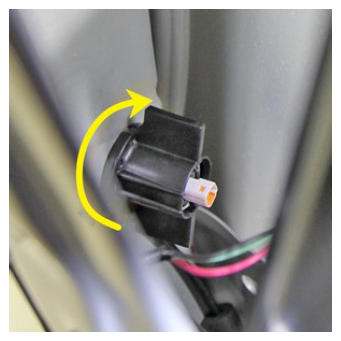
- Install LH falcon door close switch
NOTE:
Place it over switch and rotate the black tabs clockwise
 Courtesy of TESLA, INC. Courtesy of TESLA, INC.
|
 Courtesy of TESLA, INC. Courtesy of TESLA, INC.
|
 Courtesy of TESLA, INC. Courtesy of TESLA, INC.
|
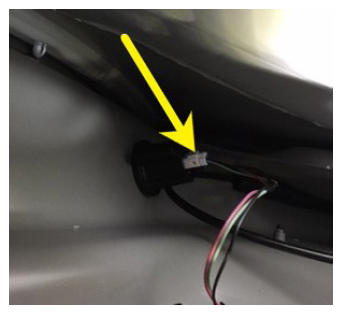
- Connect LH falcon door close switch
NOTE:
1x connector
 Courtesy of TESLA, INC. Courtesy of TESLA, INC.
|
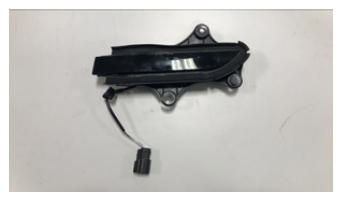
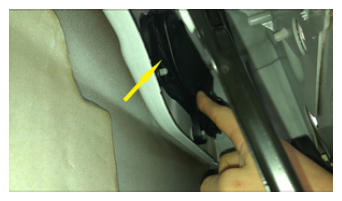
- Install LH falcon door outer door handle carrier
 Courtesy of TESLA, INC. Courtesy of TESLA, INC.
|
 Courtesy of TESLA, INC. Courtesy of TESLA, INC.
|
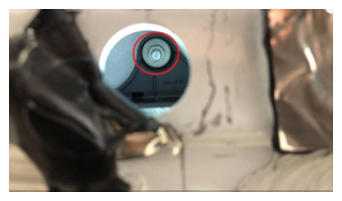
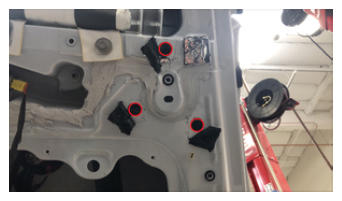
- Install nuts securing outer door handle carrier to LH falcon door
NOTE:
3x nuts, 10 mm, 8 N.m
 Courtesy of TESLA, INC. Courtesy of TESLA, INC.
|
 Courtesy of TESLA, INC. Courtesy of TESLA, INC.
|
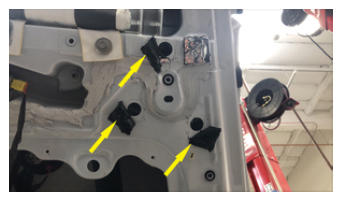
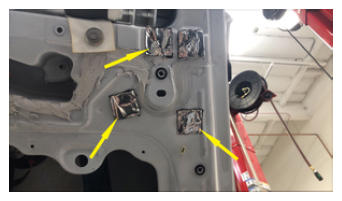
- Secure LH falcon door butyl patches
NOTE:
3x butyl patches
 Courtesy of TESLA, INC. Courtesy of TESLA, INC.
|
 Courtesy of TESLA, INC. Courtesy of TESLA, INC.
|
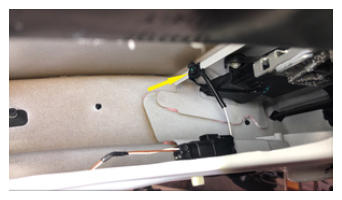
- Secure LH falcon door outer door handle harness clip
NOTE:
1x clip
 Courtesy of TESLA, INC. Courtesy of TESLA, INC.
|
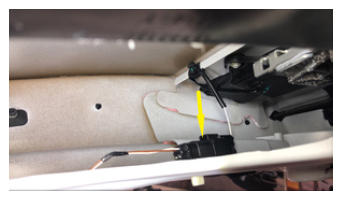
- Connect LH outer door handle carrier connector
NOTE:
1x connector
 Courtesy of TESLA, INC. Courtesy of TESLA, INC.
|
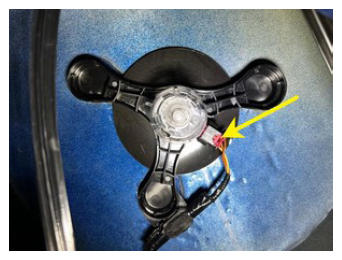
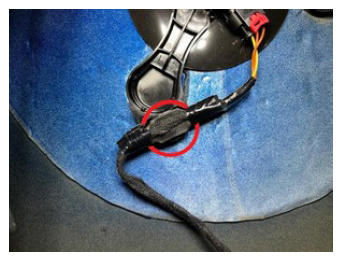
- Connect LH ultrasonic sensor
NOTE:
1x connector, 1x clip
 Courtesy of TESLA, INC. Courtesy of TESLA, INC.
|
 Courtesy of TESLA, INC. Courtesy of TESLA, INC.
|
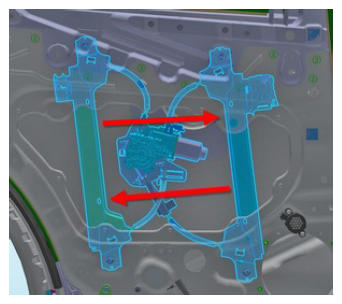
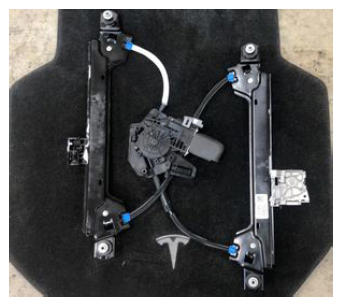
- Position the regulator inside the rear door panel, push the 2 beams together and ensure the studs protrude through the door shell
NOTE:
Do not allow the washers to fall off the studs on the regulator
 Courtesy of TESLA, INC. Courtesy of TESLA, INC.
|
 Courtesy of TESLA, INC. Courtesy of TESLA, INC.
|
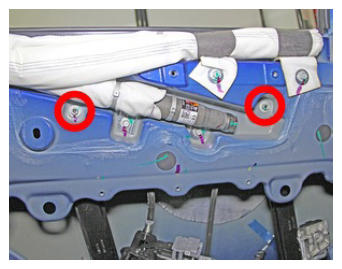
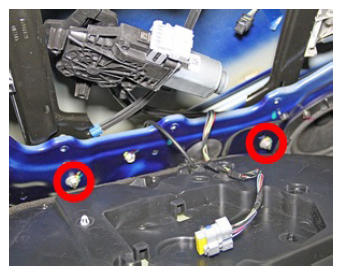
- Install the upper and lower nuts that secure the regulator to the LH rear door
NOTE:
4x nuts, 10 mm, 10 N.m
 Courtesy of TESLA, INC. Courtesy of TESLA, INC.
|
 Courtesy of TESLA, INC. Courtesy of TESLA, INC.
|
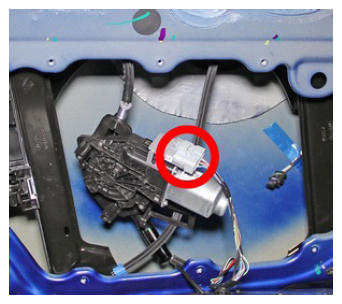
- Connect the electrical connector from the LH rear window motor
 Courtesy of TESLA, INC. Courtesy of TESLA, INC.
|
- Install screws securing LH rear upper bright molding to door
NOTE:
7x screws, T20, 4 N.m
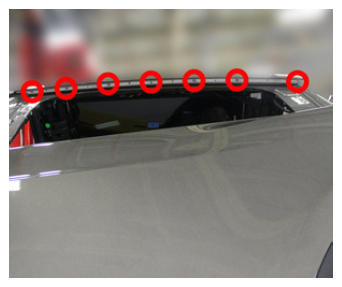 Courtesy of TESLA, INC. Courtesy of TESLA, INC.
|
- Install LH falcon door applique
NOTE:
2x bolts, T25, 4.5 N.m
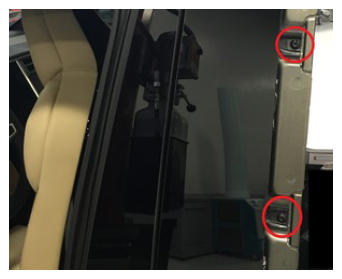 Courtesy of TESLA, INC. Courtesy of TESLA, INC.
|
- Install screws securing LH front falcon door applique
NOTE:
2x screws, T25, 3 N.m
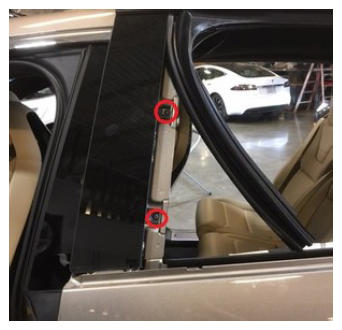 Courtesy of TESLA, INC. Courtesy of TESLA, INC.
|
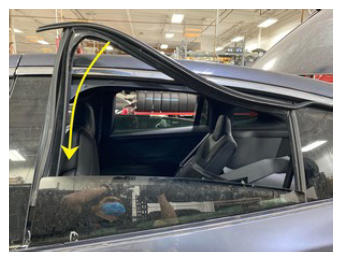
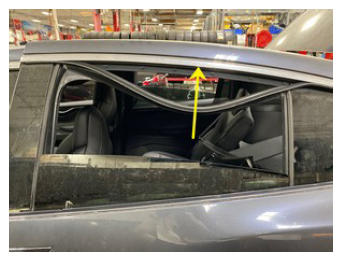
- Install LH falcon door fixed glass
NOTE:
5x patched screws, T25, 3.5 N.m, Install new patched bolts, Carefully lift up airbag to access the lower screws, Place upper edge of fixed glass assembly in between cantrail seal, Position fixed glass to lineup with the rivnuts, Insert and secure fixed glass seal onto door assembly
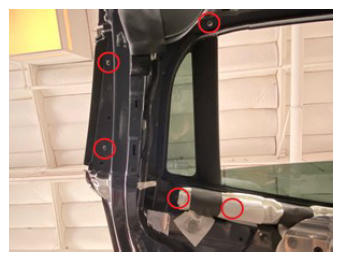 Courtesy of TESLA, INC. Courtesy of TESLA, INC.
|
 Courtesy of TESLA, INC. Courtesy of TESLA, INC.
|
 Courtesy of TESLA, INC. Courtesy of TESLA, INC.
|
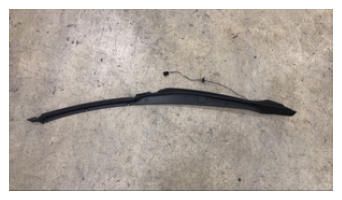
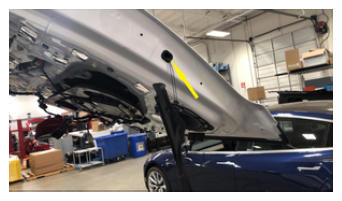
- Install front pinch sensor to LH falcon door
NOTE:
1x grommet, Route harness into LH falcon door and secure harness grommet
 Courtesy of TESLA, INC. Courtesy of TESLA, INC.
|
 Courtesy of TESLA, INC. Courtesy of TESLA, INC.
|
- Install push clips securing front pinch sensor to LH falcon door
NOTE:
7x push clips
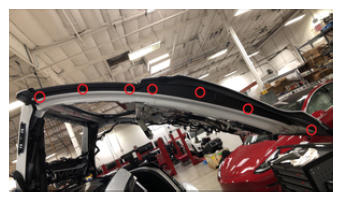 Courtesy of TESLA, INC. Courtesy of TESLA, INC.
|
- Connect LH front pinch sensor connector
NOTE:
1x connector
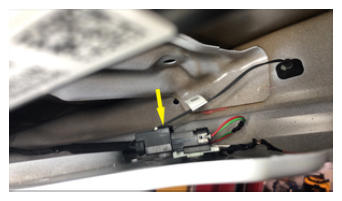 Courtesy of TESLA, INC. Courtesy of TESLA, INC.
|
- Install rear pinch sensor to LH falcon door
NOTE:
1x grommet, Route harness into LH falcon door and secure harness grommet
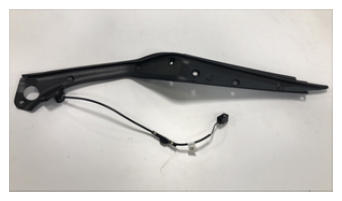 Courtesy of TESLA, INC. Courtesy of TESLA, INC.
|
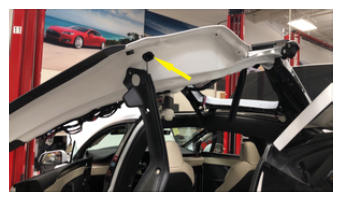 Courtesy of TESLA, INC. Courtesy of TESLA, INC.
|
- Install push clips securing rear pinch sensor to LH falcon door
NOTE:
7x clips
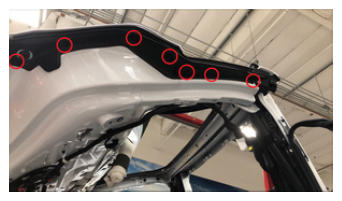 Courtesy of TESLA, INC. Courtesy of TESLA, INC.
|
- Install clip securing rear pinch sensor harness to LH falcon door
NOTE:
1x clip
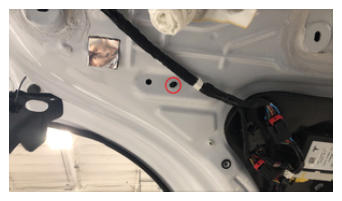 Courtesy of TESLA, INC. Courtesy of TESLA, INC.
|
- Connect LH rear pinch sensor connector
NOTE:
1x connector
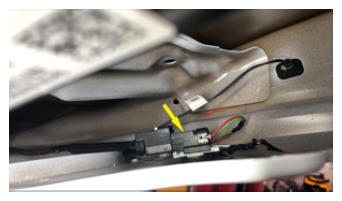 Courtesy of TESLA, INC. Courtesy of TESLA, INC.
|
- Clean LH rear door cladding surface area and prepare for installation
NOTE:
Allow IPA to dry for at least 1 minute
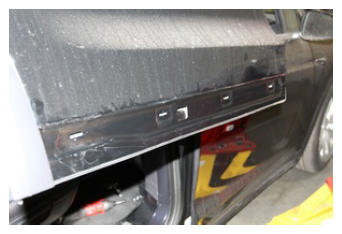 Courtesy of TESLA, INC. Courtesy of TESLA, INC.
|
- Install LH rear door cladding
NOTE:
4x clips, Remove backing from double side tape and align clips with body
 Courtesy of TESLA, INC. Courtesy of TESLA, INC.
|
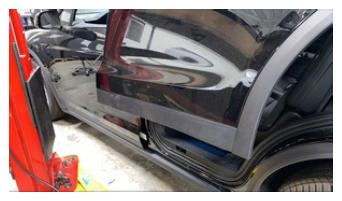 Courtesy of TESLA, INC. Courtesy of TESLA, INC.
|
- Install LH wheel arch cladding
NOTE:
4x clips, Remove adhesive strip protector from double-sided tape, Align wheel arch onto rear door, Ensure double-sided tape and all clips are fully secured onto rear door
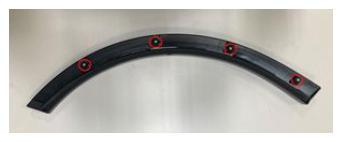 Courtesy of TESLA, INC. Courtesy of TESLA, INC.
|
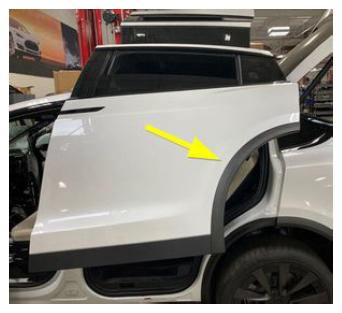 Courtesy of TESLA, INC. Courtesy of TESLA, INC.
|
- Apply P-80 Emulsion Grease onto seals attached to LH rear door fixed glass for easier installation
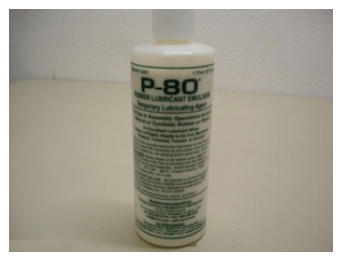 Courtesy of TESLA, INC. Courtesy of TESLA, INC.
|
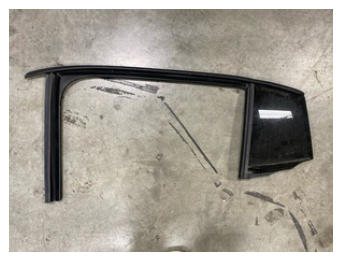 Courtesy of TESLA, INC. Courtesy of TESLA, INC.
|
- Install LH falcon door fixed glass
NOTE:
5x patched screws, T25, 3.5 N.m, Install new patched bolts, Carefully lift up airbag to access the lower screws, Place upper edge of fixed glass assembly in between cantrail seal, Position fixed glass to lineup with the rivnuts, Insert and secure fixed glass seal onto door assembly
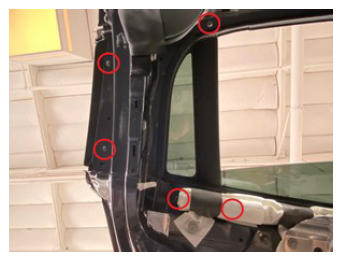 Courtesy of TESLA, INC. Courtesy of TESLA, INC.
|
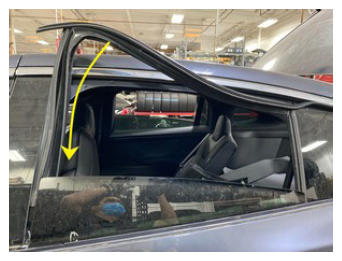 Courtesy of TESLA, INC. Courtesy of TESLA, INC.
|
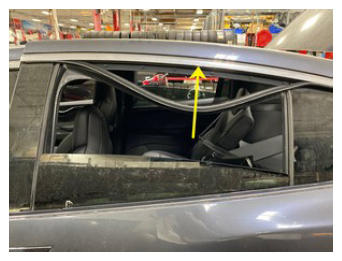 Courtesy of TESLA, INC. Courtesy of TESLA, INC.
|
- Install window glass into vehicle and seat it onto the regulator
NOTE:
1x clip, Recommend assistance, Carefully feed window glass into door and seat it into the rear clip and forward brace
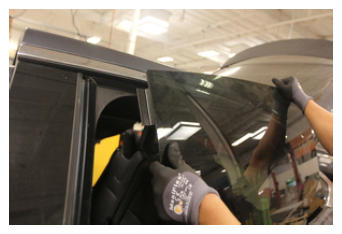 Courtesy of TESLA, INC. Courtesy of TESLA, INC.
|
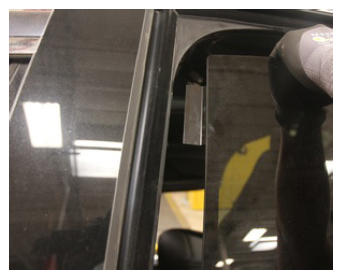 Courtesy of TESLA, INC. Courtesy of TESLA, INC.
|
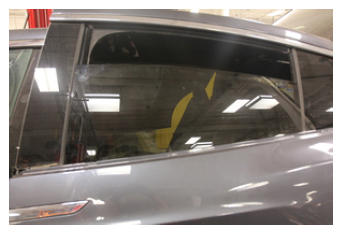 Courtesy of TESLA, INC. Courtesy of TESLA, INC.
|
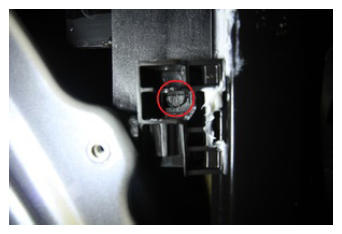 Courtesy of TESLA, INC. Courtesy of TESLA, INC.
|
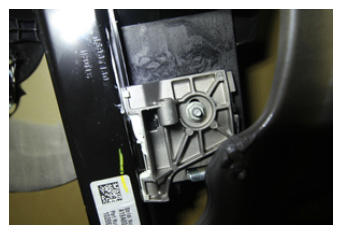 Courtesy of TESLA, INC. Courtesy of TESLA, INC.
|
- Verify window glass fitment and tighten nut securing the front of the window to the regulator
NOTE:
1x nut, 10 mm, 9 N.m,
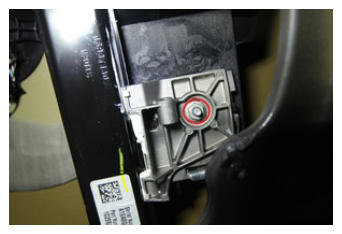 Courtesy of TESLA, INC. Courtesy of TESLA, INC.
|
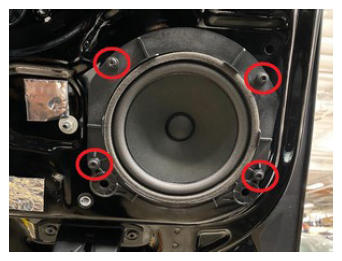
- Install LH falcon door speaker
NOTE:
4x screws, T25, 4 N.m, 1x connector
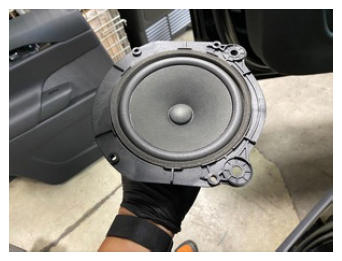 Courtesy of TESLA, INC. Courtesy of TESLA, INC.
|
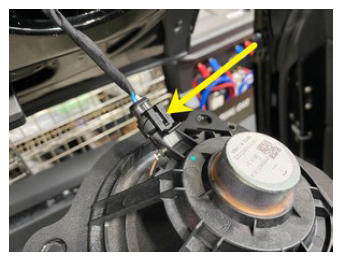 Courtesy of TESLA, INC. Courtesy of TESLA, INC.
|
 Courtesy of TESLA, INC. Courtesy of TESLA, INC.
|
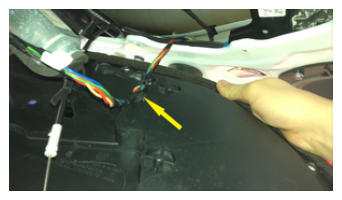
- Secure window regulator harness
NOTE:
1x clip
 Courtesy of TESLA, INC. Courtesy of TESLA, INC.
|
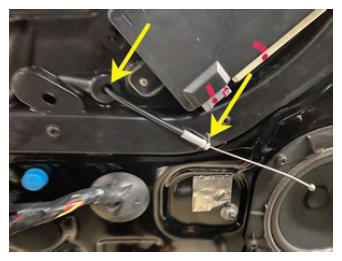
- Install release cable through the LH closeout panel
 Courtesy of TESLA, INC. Courtesy of TESLA, INC.
|
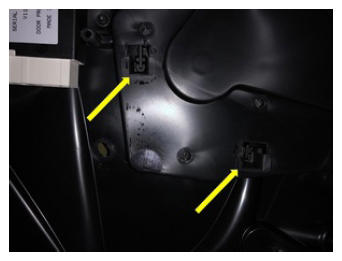
- Secure LH window motor onto the back of the closeout panel
NOTE:
2x tabs
 Courtesy of TESLA, INC. Courtesy of TESLA, INC.
|
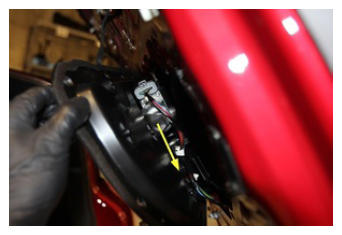 Courtesy of TESLA, INC. Courtesy of TESLA, INC.
|
- Install screws securing window motor to LH closeout panel
NOTE:
3x screws, T30, 1.8 N.m
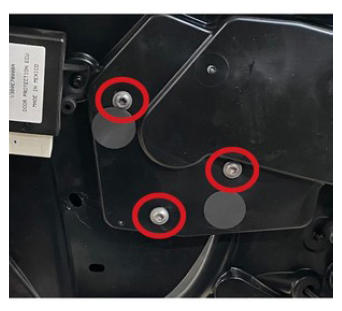 Courtesy of TESLA, INC. Courtesy of TESLA, INC.
|
- Install clips securing harness to falcon door
NOTE:
4x clips
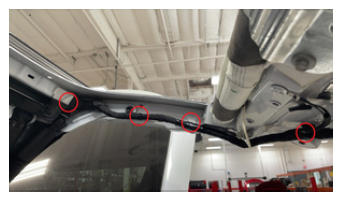 Courtesy of TESLA, INC. Courtesy of TESLA, INC.
|
- Install bolt securing ground to LH rear door
NOTE:
1x bolt, 10 mm, 10 N.m
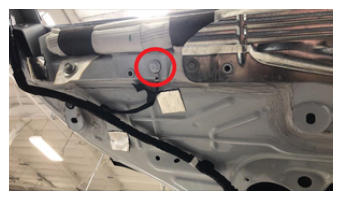 Courtesy of TESLA, INC. Courtesy of TESLA, INC.
|
- Install clips securing harnesses and connectors to LH closeout panel
NOTE:
7x clips
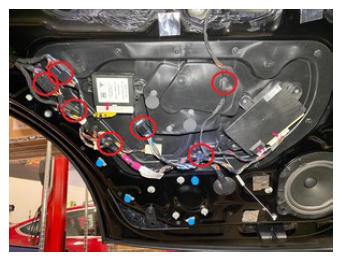 Courtesy of TESLA, INC. Courtesy of TESLA, INC.
|
- Connect LH falcon door module
NOTE:
2x connectors
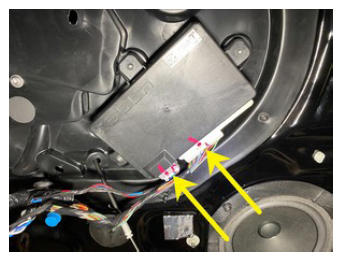 Courtesy of TESLA, INC. Courtesy of TESLA, INC.
|
- Connect LH falcon door protection ECU
NOTE:
1x connector, securing locking tab
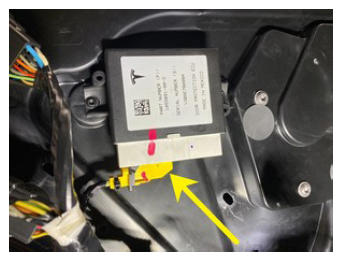 Courtesy of TESLA, INC. Courtesy of TESLA, INC.
|
- Install LH 2nd row head air bag
NOTE:
4x clips, Lift 2nd row head air bag straight up to expose the fir tree clips, Install into LH rear door, Ensure fir clips fully seated
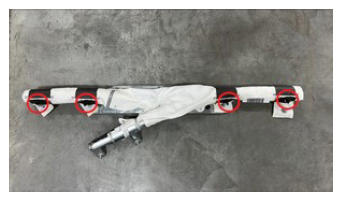 Courtesy of TESLA, INC. Courtesy of TESLA, INC.
|
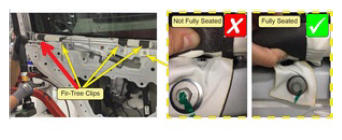 Courtesy of TESLA, INC. Courtesy of TESLA, INC.
|
- Install bolts securing LH 2nd row head air bag to LH rear door assembly
NOTE:
6x bolts, 10 mm, 7 N.m
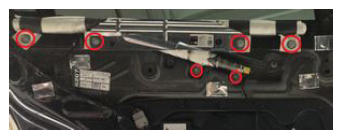 Courtesy of TESLA, INC. Courtesy of TESLA, INC.
|
- Connect LH 2nd row head air bag connector
NOTE:
1x connector, Engage locking tab
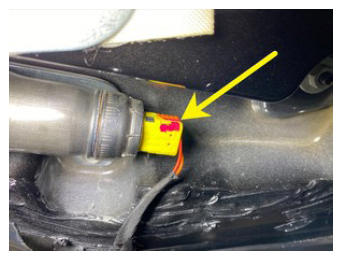 Courtesy of TESLA, INC. Courtesy of TESLA, INC.
|
- Install LH rear door inner belt seal
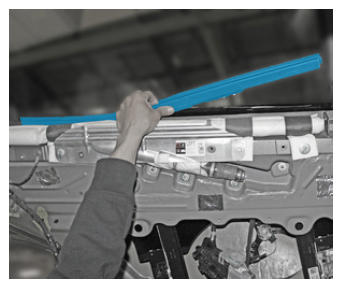 Courtesy of TESLA, INC. Courtesy of TESLA, INC.
|
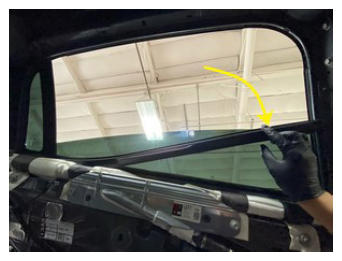 Courtesy of TESLA, INC. Courtesy of TESLA, INC.
|
- Connect First Responder Loop and LV battery connector
NOTE:
2x connectors, Secure FRL first, Seat LV battery connection and push black connector lock inwards to secure, Engage upper locking tab when fully seated
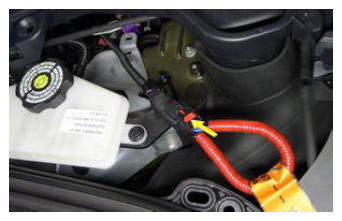 Courtesy of TESLA, INC. Courtesy of TESLA, INC.
|
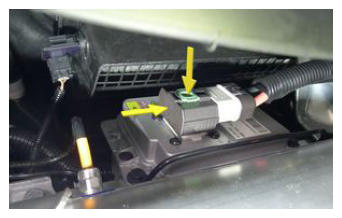 Courtesy of TESLA, INC. Courtesy of TESLA, INC.
|
- Install rear underhood apron
NOTE:
11x clips, 2x datums
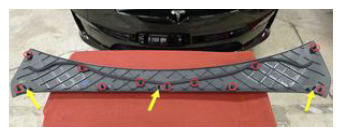 Courtesy of TESLA, INC. Courtesy of TESLA, INC.
|
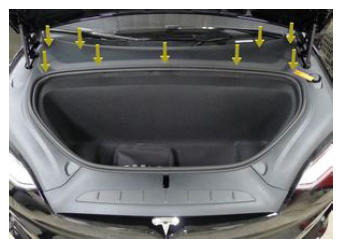 Courtesy of TESLA, INC. Courtesy of TESLA, INC.
|
- Close hood
- Install LH rear door trim panel
NOTE:
2x connectors, 13x clips, Install door trim starting from top and make sure the door trim tab is fitted correctly on the inner belt seal
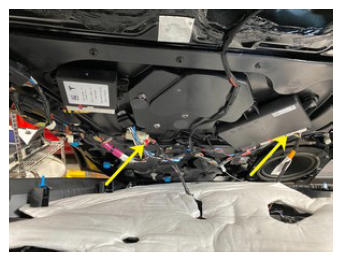 Courtesy of TESLA, INC. Courtesy of TESLA, INC.
|
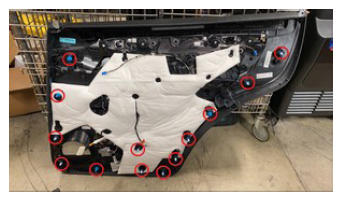 Courtesy of TESLA, INC. Courtesy of TESLA, INC.
|
- Install bolts securing LH rear door panel to door
NOTE:
8x bolts, 10 mm, 6 N.m
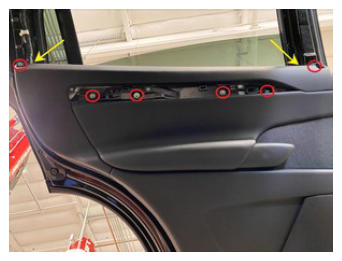 Courtesy of TESLA, INC. Courtesy of TESLA, INC.
|
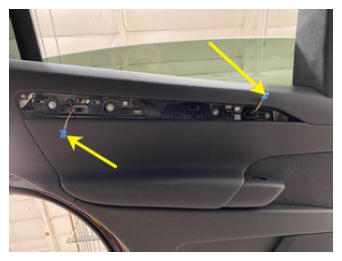
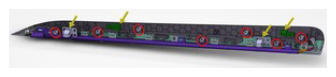
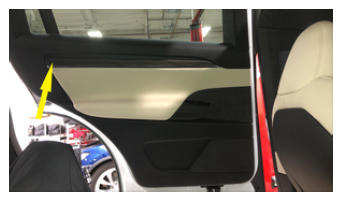
- Install LH rear door decor trim panel
NOTE:
7x clips, 2x connectors, Take care not to damage door trim panel
 Courtesy of TESLA, INC. Courtesy of TESLA, INC.
|
 Courtesy of TESLA, INC. Courtesy of TESLA, INC.
|
 Courtesy of TESLA, INC. Courtesy of TESLA, INC.
|
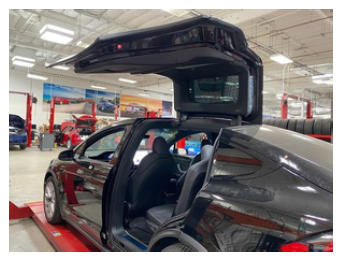
- Open LH falcon wing door
NOTE:
Adjust position as required
 Courtesy of TESLA, INC. Courtesy of TESLA, INC.
|
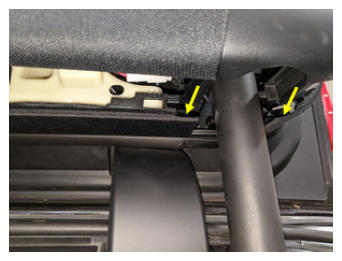
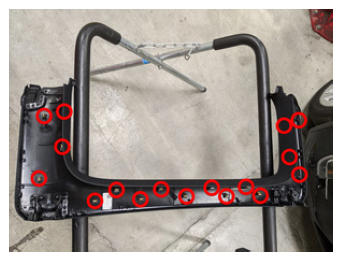
- Install LH upper falcon door trim
NOTE:
17x clips, Align strut cover first, 1x connector may be present on early production vehicles
 Courtesy of TESLA, INC. Courtesy of TESLA, INC.
|
 Courtesy of TESLA, INC. Courtesy of TESLA, INC.
|
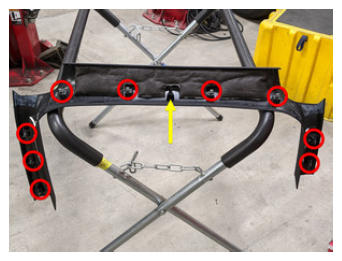
- Install LH falcon door lower garnish
NOTE:
9x V-clips, 1x guide tab
 Courtesy of TESLA, INC. Courtesy of TESLA, INC.
|
- Calibrate the rear doors.
NOTE:
If the "Calibration Needed" message appears on the vehicle touchscreen, touch and hold Calibrate
to calibrate the rear doors.
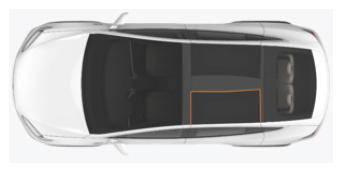
- Measure the gap and flush of LH falcon door according to specification
NOTE:
Adjust door as necessary
 Courtesy of TESLA, INC. Courtesy of TESLA, INC.
|
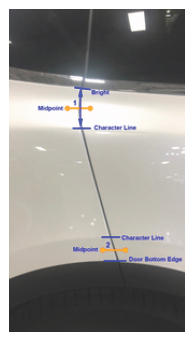 Courtesy of TESLA, INC. Courtesy of TESLA, INC.
|
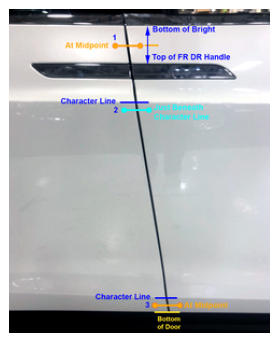 Courtesy of TESLA, INC. Courtesy of TESLA, INC.
|
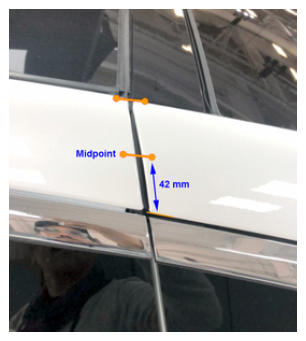 Courtesy of TESLA, INC. Courtesy of TESLA, INC.
|
- Move LH front seat to original position
- Raise both LH side windows
- Close LH front door