- Open the LH front and LH rear doors
- Open hood
NOTE:
Using MCU touchscreen > Controls > Frunk Trunk
- Move LH front seat forward
- Remove LH front seat rear fasteners
NOTE:
2x patch bolts, T45P, 34 N.m, Discard after removal, Use Torchless heat induction tool to help remove bolts if necessary
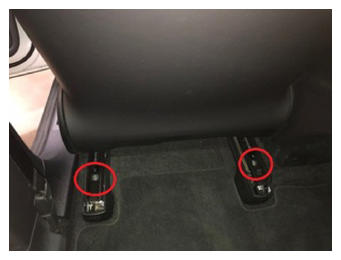 Courtesy of TESLA, INC. Courtesy of TESLA, INC.
|
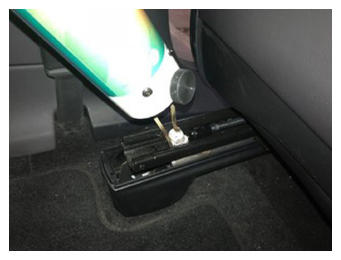 Courtesy of TESLA, INC. Courtesy of TESLA, INC.
|
- Move LH front seat backward
- Remove LH front seat front fasteners
NOTE:
2x patch bolts, T45P, 34 N.m, Discard after removal, Use Torchless heat induction tool to help remove bolts if necessary
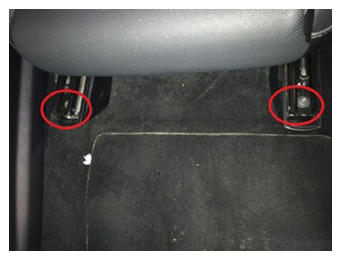 Courtesy of TESLA, INC. Courtesy of TESLA, INC.
|
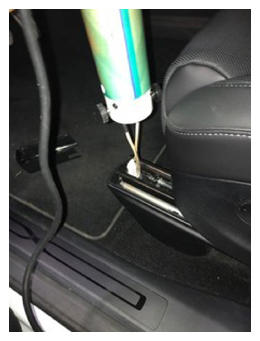 Courtesy of TESLA, INC. Courtesy of TESLA, INC.
|
- Adjust the position of the LH seat for easy removal
NOTE:
Middle of track, most upright position, seat fully up off the floor
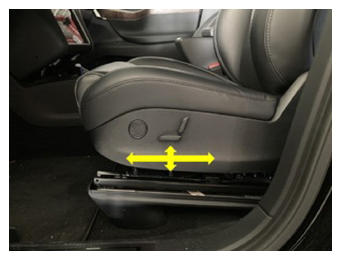 Courtesy of TESLA, INC. Courtesy of TESLA, INC.
|
- Power down vehicle using MCU
NOTE:
Via Controls > Safety & Security > "Power off"
- Remove underhood aprons
NOTE:
4x aprons
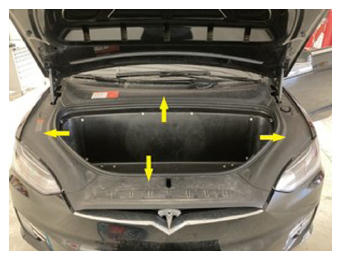 Courtesy of TESLA, INC. Courtesy of TESLA, INC.
|
- Remove frunk carpet
NOTE:
2x connectors
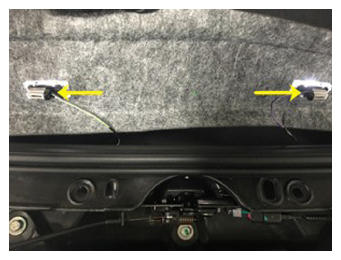 Courtesy of TESLA, INC. Courtesy of TESLA, INC.
|
- Remove underhood storage unit
NOTE:
10x bolts, 10 mm, 4 N.m, 10x bolts, 10 mm, 7 N.m
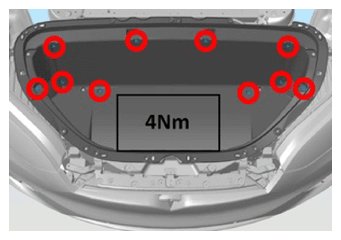 Courtesy of TESLA, INC.
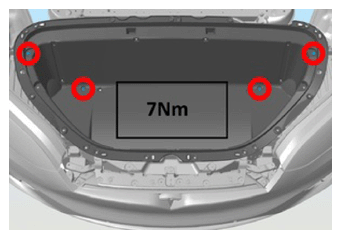 Courtesy of TESLA, INC.
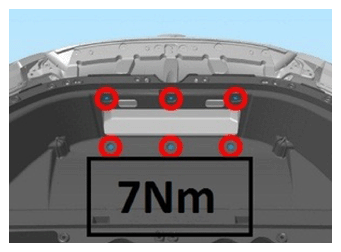 Courtesy of TESLA, INC.
- Remove HEPA filter
NOTE:
Lift up from bottom and pull out
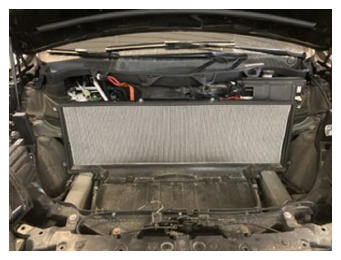 Courtesy of TESLA, INC. Courtesy of TESLA, INC.
|
- Disconnect 12V negative terminal and First Responder Loop
NOTE:
1x nut, 10 mm, 5 N.m, 1x connector, Wait at least 2 minutes before disconnecting modules or HV components
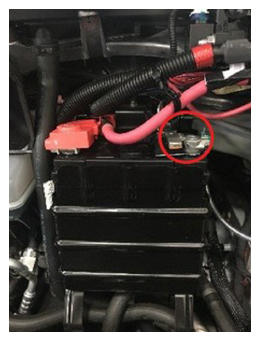 Courtesy of TESLA, INC. Courtesy of TESLA, INC.
|
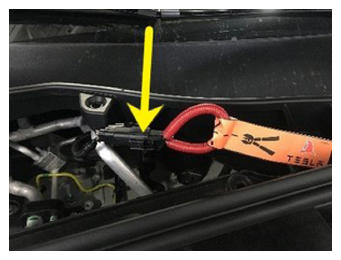 Courtesy of TESLA, INC. Courtesy of TESLA, INC.
|
- Disconnect LH front seat harness
NOTE:
1x connector
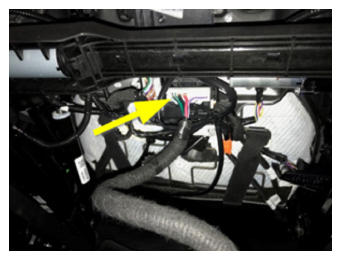 Courtesy of TESLA, INC. Courtesy of TESLA, INC.
|
- Remove LH front seat from vehicle
NOTE:
Recommend Assistance, Caution: Do not damage other components
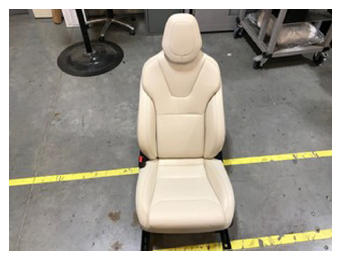 Courtesy of TESLA, INC. Courtesy of TESLA, INC.
|
- Remove partially RH outer seat trim assembly
NOTE:
1x clip, 1x hook, Ensure hook is released from seat bottom frame, Release inboard side shield clip from seat, But do not fully remove
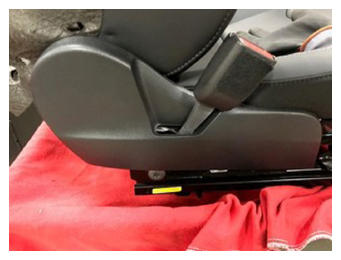 Courtesy of TESLA, INC. Courtesy of TESLA, INC.
|
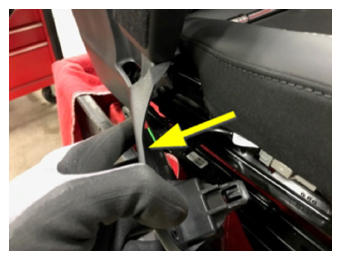 Courtesy of TESLA, INC. Courtesy of TESLA, INC.
|
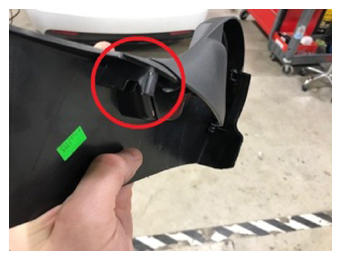 Courtesy of TESLA, INC. Courtesy of TESLA, INC.
|
- Route seat belt buckle out of inboard side shield
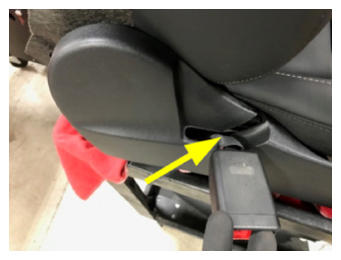 Courtesy of TESLA, INC. Courtesy of TESLA, INC.
|
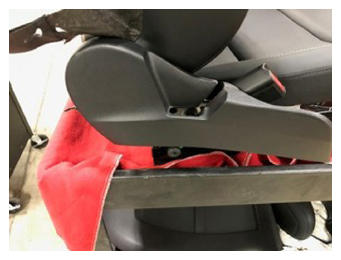 Courtesy of TESLA, INC. Courtesy of TESLA, INC.
|
- Remove RH outer seat trim assembly
NOTE:
Slide inboard side shield rearward to release tab from frame and lift up
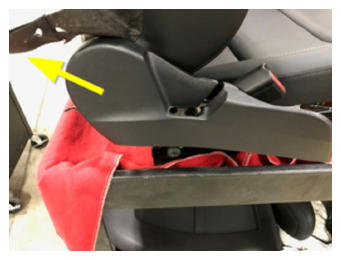 Courtesy of TESLA, INC. Courtesy of TESLA, INC.
|
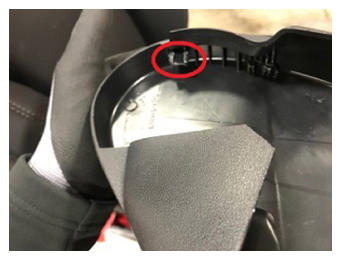 Courtesy of TESLA, INC. Courtesy of TESLA, INC.
|
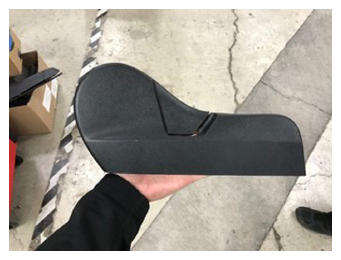 Courtesy of TESLA, INC. Courtesy of TESLA, INC.
|
- Remove front screw securing LH outer seat trim assembly
NOTE:
1x screw, T20, 4 N.m
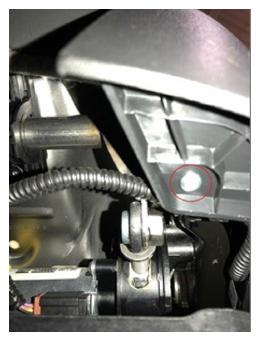 Courtesy of TESLA, INC. Courtesy of TESLA, INC.
|
- Remove partially LH outer seat trim assembly
NOTE:
1x clip, Do not fully remove, possible damage to the trim/switch pack/harness
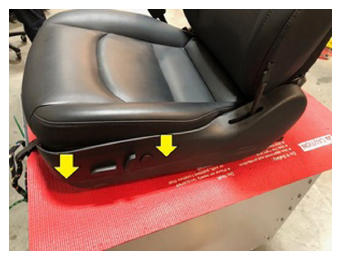 Courtesy of TESLA, INC. Courtesy of TESLA, INC.
|
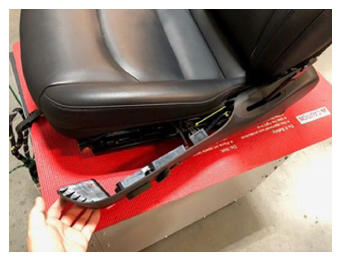 Courtesy of TESLA, INC. Courtesy of TESLA, INC.
|
- Disconnect seat switch connector
NOTE:
1x connector
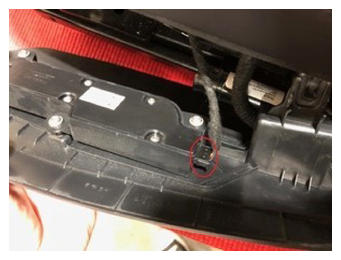 Courtesy of TESLA, INC. Courtesy of TESLA, INC.
|
- Remove LH outer seat trim assembly
NOTE:
1x clip, Slide outer cover rearward to release clip from frame and lift up over pre-tensioner to remove
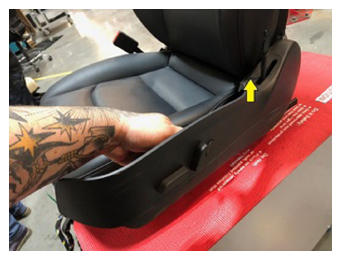 Courtesy of TESLA, INC. Courtesy of TESLA, INC.
|
- Rotate the seat to gain access to the underside of the seat
NOTE:
Place fender cover to protect seat cushion from damage
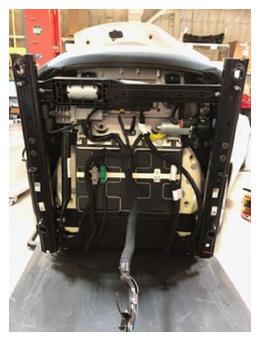 Courtesy of TESLA, INC. Courtesy of TESLA, INC.
|
- Release toe kick straps from both sides of interior seat base
NOTE:
2x hook clips
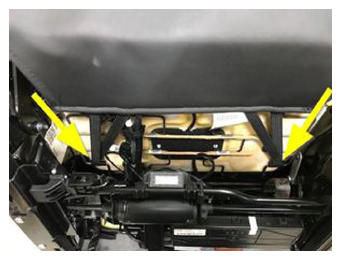 Courtesy of TESLA, INC. Courtesy of TESLA, INC.
|
- Release toe kick j-hooks from seat mat spring
NOTE:
2x J-hooks
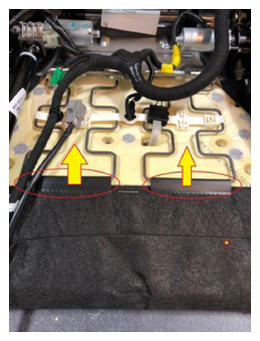 Courtesy of TESLA, INC. Courtesy of TESLA, INC.
|
- Remove zip tie securing harnesses to spring mat
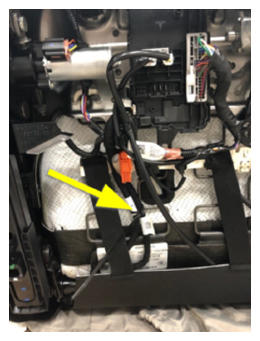 Courtesy of TESLA, INC. Courtesy of TESLA, INC.
|
- Disconnect seat heat pad connector
NOTE:
1x connector, 1x clip, Remove connector from spring mat clip
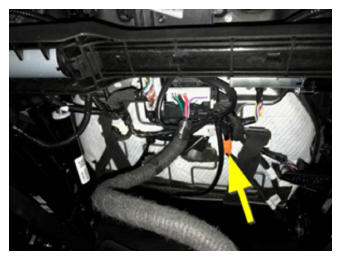 Courtesy of TESLA, INC. Courtesy of TESLA, INC.
|
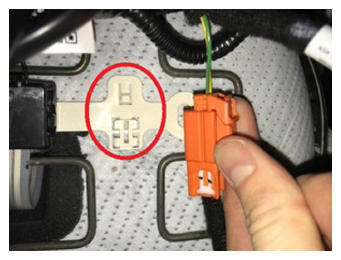 Courtesy of TESLA, INC. Courtesy of TESLA, INC.
|
- Disconnect seat bottom connectors
NOTE:
2x connectors, 1x fir tree clip
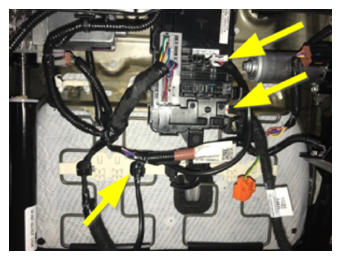 Courtesy of TESLA, INC. Courtesy of TESLA, INC.
|
- Disconnect seat belt reminder connector
NOTE:
1x connector, 1x clip, Slide connector towards back of seat bottom to release connector from clip
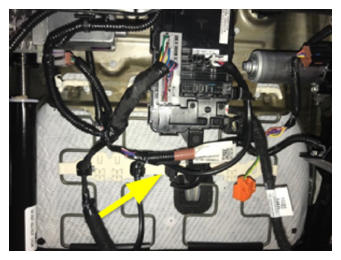 Courtesy of TESLA, INC. Courtesy of TESLA, INC.
|
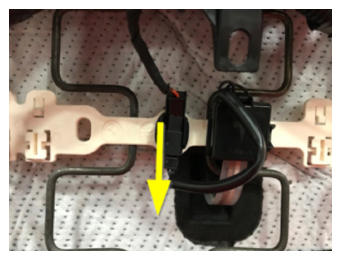 Courtesy of TESLA, INC. Courtesy of TESLA, INC.
|
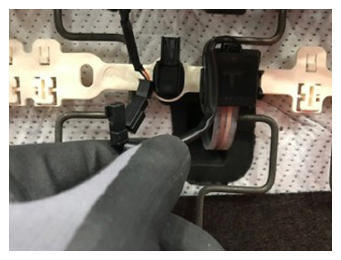 Courtesy of TESLA, INC. Courtesy of TESLA, INC.
|
- Release seat belt reminder from spring mat
NOTE:
1x clip, Slide seat belt reminder towards back of seat bottom to release connector from clip
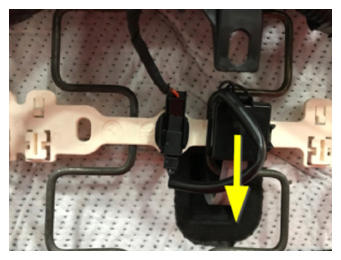 Courtesy of TESLA, INC. Courtesy of TESLA, INC.
|
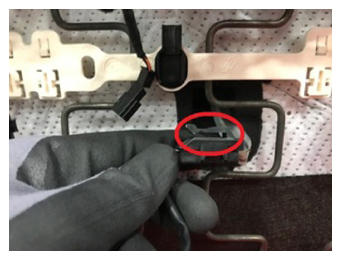 Courtesy of TESLA, INC. Courtesy of TESLA, INC.
|
- Return seat to upright position
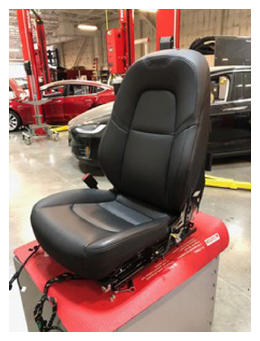 Courtesy of TESLA, INC. Courtesy of TESLA, INC.
|
- Remove inboard seat cushion soft trim from seat cushion frame
NOTE:
1x J-clip, May need to start with a hook tool, Pull the clip away from the frame to release
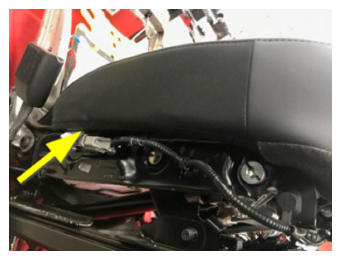 Courtesy of TESLA, INC. Courtesy of TESLA, INC.
|
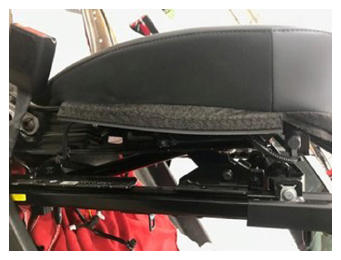 Courtesy of TESLA, INC. Courtesy of TESLA, INC.
|
- Remove outboard seat cushion soft trim from seat cushion frame
NOTE:
1x J-clip, May need to start with a hook tool, Pull the clip away from the frame to release
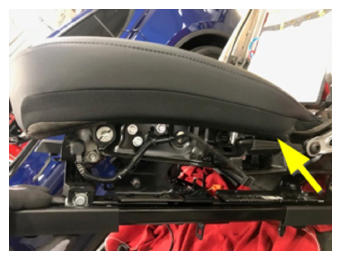 Courtesy of TESLA, INC. Courtesy of TESLA, INC.
|
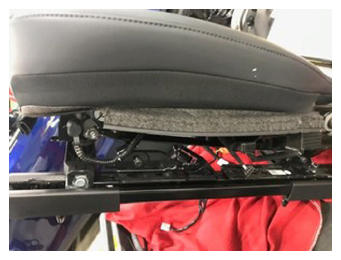 Courtesy of TESLA, INC. Courtesy of TESLA, INC.
|
- Remove front of seat cushion soft trim from seat cushion frame
NOTE:
1x J-clip, May need to start with a hook tool, Pull the clip away from the frame to release
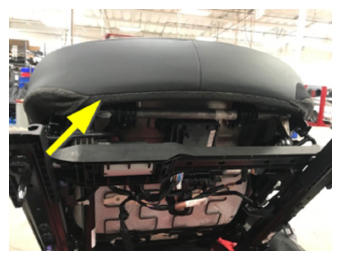 Courtesy of TESLA, INC. Courtesy of TESLA, INC.
|
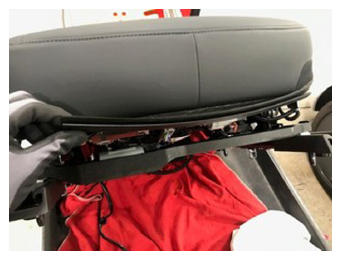 Courtesy of TESLA, INC. Courtesy of TESLA, INC.
|
- Remove seat cushion from seat bottom frame
NOTE:
Lift up at the front of the seat cushion and pull up to remove seat cushion from seat bottom frame, Ensure harness connectors do not catch on seat bottom frame when removing
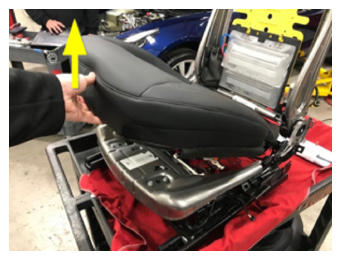 Courtesy of TESLA, INC. Courtesy of TESLA, INC.
|
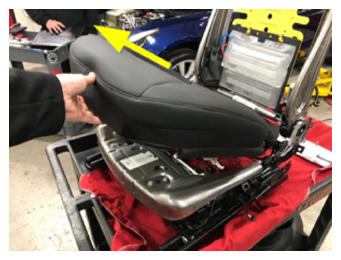 Courtesy of TESLA, INC. Courtesy of TESLA, INC.
|
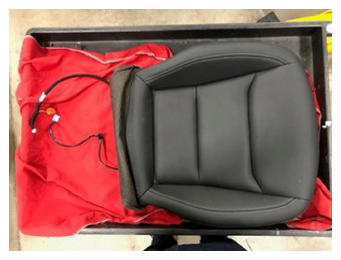 Courtesy of TESLA, INC. Courtesy of TESLA, INC.
|
- Release seat bottom upholstery strap at the bottom of seat cushion foam
NOTE:
Push both inboard and outboard upholstery strap buckles towards each other to release
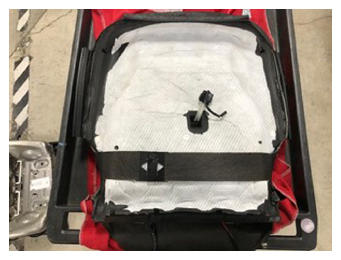 Courtesy of TESLA, INC. Courtesy of TESLA, INC.
|
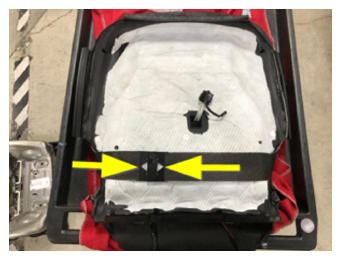 Courtesy of TESLA, INC. Courtesy of TESLA, INC.
|
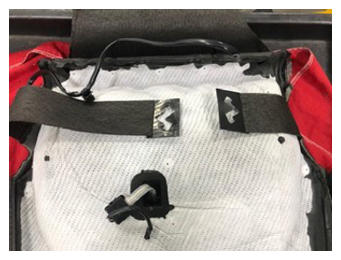 Courtesy of TESLA, INC. Courtesy of TESLA, INC.
|
- Remove seat bottom upholstery trim hog rings from seat cushion foam
NOTE:
10x hog rings, At the rear of the seat bottom cushion gently remove seat bottom upholstery from seat cushion foam velcro and hog rings
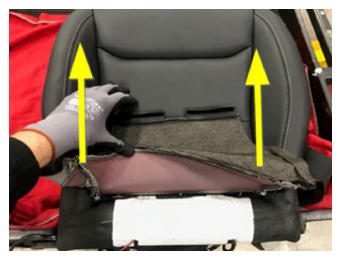 Courtesy of TESLA, INC. Courtesy of TESLA, INC.
|
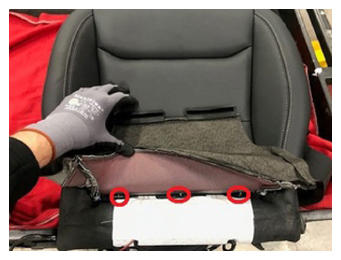 Courtesy of TESLA, INC. Courtesy of TESLA, INC.
|
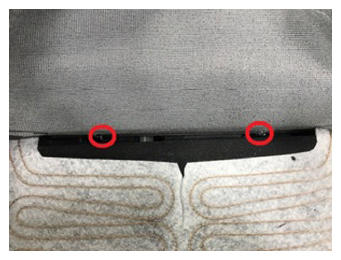 Courtesy of TESLA, INC. Courtesy of TESLA, INC.
|
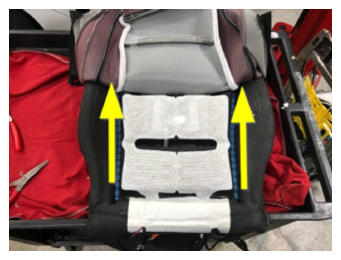 Courtesy of TESLA, INC. Courtesy of TESLA, INC.
|
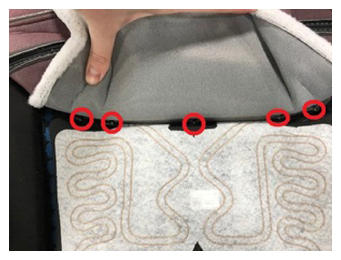 Courtesy of TESLA, INC. Courtesy of TESLA, INC.
|
- Separate seat bottom upholstery from seat cushion foam
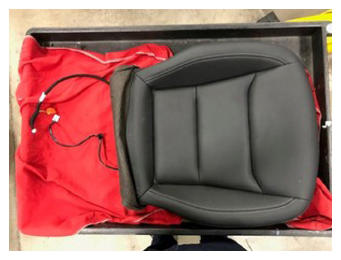 Courtesy of TESLA, INC. Courtesy of TESLA, INC.
|
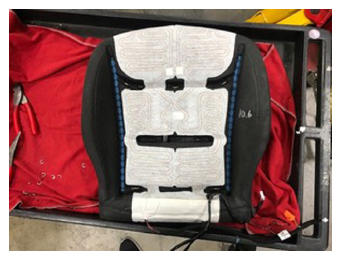 Courtesy of TESLA, INC. Courtesy of TESLA, INC.
|
- Turn front and sides of seat upholstery inside out
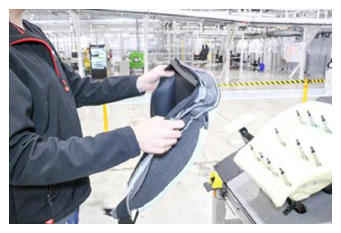 Courtesy of TESLA, INC. Courtesy of TESLA, INC.
|
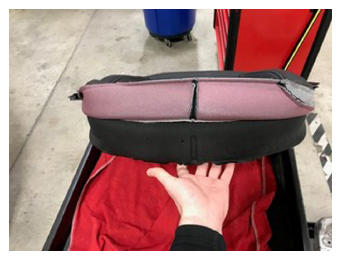 Courtesy of TESLA, INC. Courtesy of TESLA, INC.
|
- Line seat bottom upholstery up with seat cushion foam
NOTE:
Use center of front seat bottom upholstery retainer to line up with seat cushion foam hog ring bar
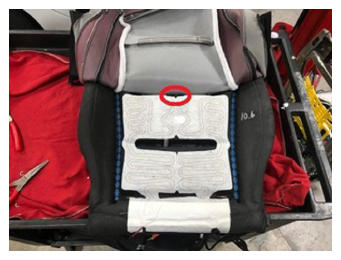 Courtesy of TESLA, INC. Courtesy of TESLA, INC.
|
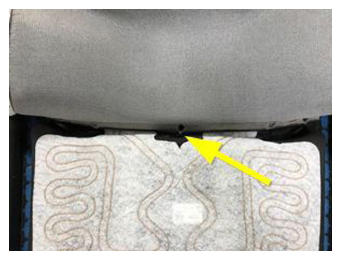 Courtesy of TESLA, INC. Courtesy of TESLA, INC.
|
- Install seat bottom upholstery trim hog rings to seat cushion foam
NOTE:
10x hog rings, Working your way back from front of seat cushion install hog rings
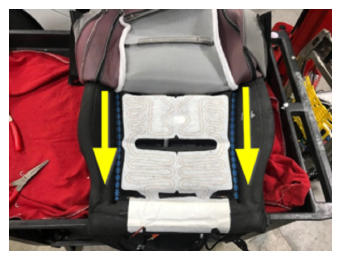 Courtesy of TESLA, INC. Courtesy of TESLA, INC.
|
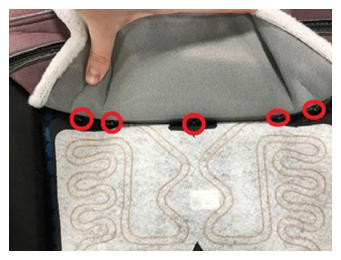 Courtesy of TESLA, INC. Courtesy of TESLA, INC.
|
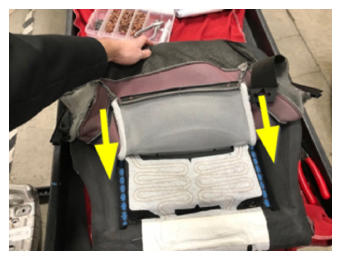 Courtesy of TESLA, INC. Courtesy of TESLA, INC.
|
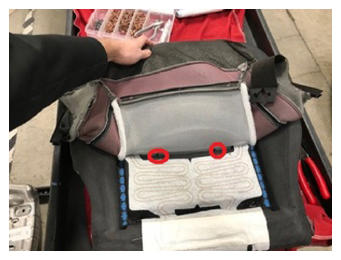 Courtesy of TESLA, INC. Courtesy of TESLA, INC.
|
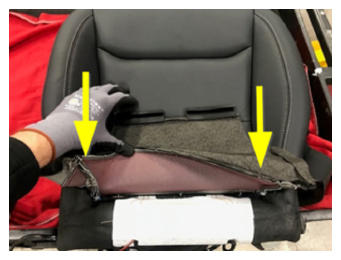 Courtesy of TESLA, INC. Courtesy of TESLA, INC.
|
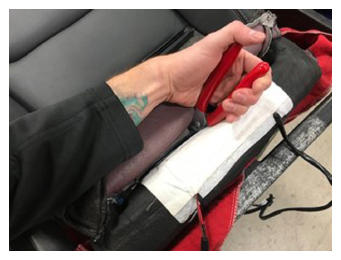 Courtesy of TESLA, INC. Courtesy of TESLA, INC.
|
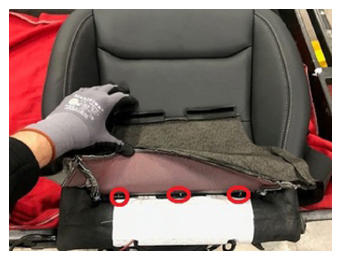 Courtesy of TESLA, INC. Courtesy of TESLA, INC.
|
- Firmly press both sides of seat bottom upholstery velcro into inboard channels of seat cushion foam
NOTE:
Pull the seat bottom upholstery trim back with one hand and push on the Velcro from inside with the other, Push the Velcro into the channel until it is firmly attached, Working your way from back of seat cushion foam to the front
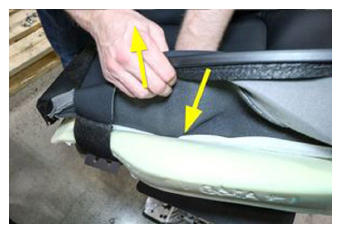 Courtesy of TESLA, INC. Courtesy of TESLA, INC.
|
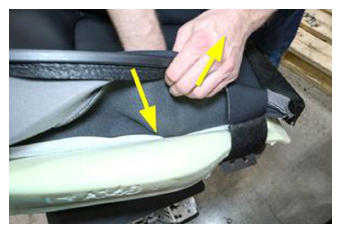 Courtesy of TESLA, INC. Courtesy of TESLA, INC.
|
- Roll LH seat bottom upholstery front corner and then side over seat cushion foam
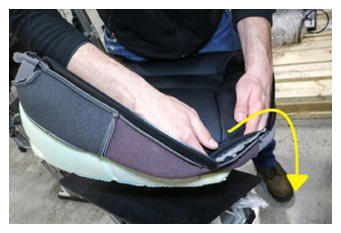 Courtesy of TESLA, INC. Courtesy of TESLA, INC.
|
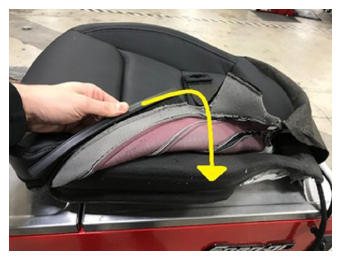 Courtesy of TESLA, INC. Courtesy of TESLA, INC.
|
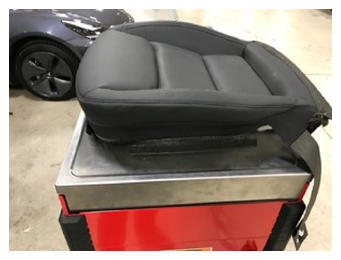 Courtesy of TESLA, INC. Courtesy of TESLA, INC.
|
- Roll RH seat bottom upholstery front corner and then side over seat cushion foam
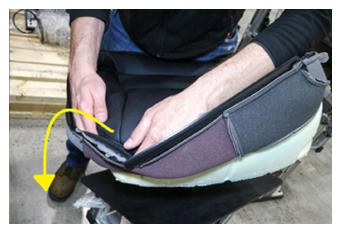 Courtesy of TESLA, INC. Courtesy of TESLA, INC.
|
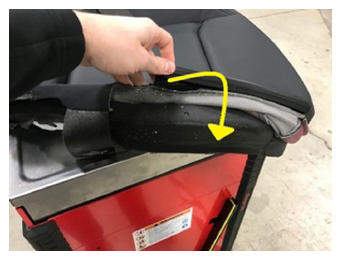 Courtesy of TESLA, INC. Courtesy of TESLA, INC.
|
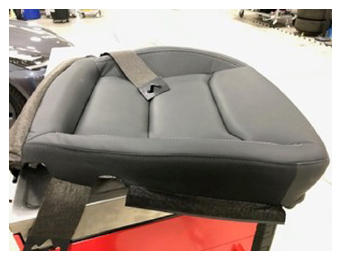 Courtesy of TESLA, INC. Courtesy of TESLA, INC.
|
- Fasten seat bottom upholstery strap at the bottom of seat cushion foam
NOTE:
Pull both inboard and outboard upholstery strap buckles towards each other to fasten
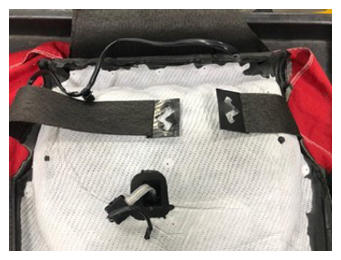 Courtesy of TESLA, INC. Courtesy of TESLA, INC.
|
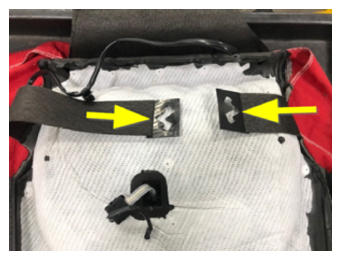 Courtesy of TESLA, INC. Courtesy of TESLA, INC.
|
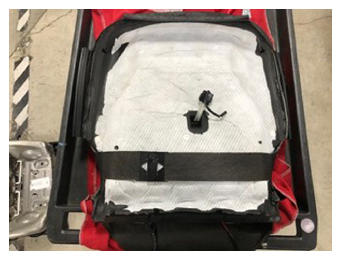 Courtesy of TESLA, INC. Courtesy of TESLA, INC.
|
- Install seat cushion to seat bottom frame
NOTE:
Insert the rear of the seat cushion to seat bottom frame and then lower the rest on the seat cushion to the seat bottom frame, Ensure wiring harness are routed through the back of seat frame
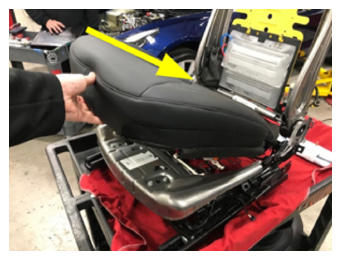 Courtesy of TESLA, INC. Courtesy of TESLA, INC.
|
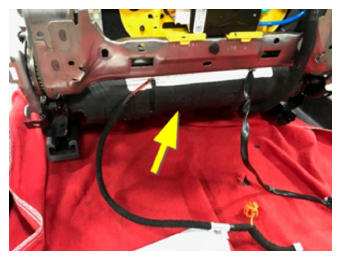 Courtesy of TESLA, INC. Courtesy of TESLA, INC.
|
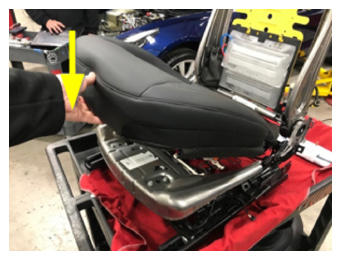 Courtesy of TESLA, INC. Courtesy of TESLA, INC.
|
- Install outboard seat cushion soft trim to seat cushion frame
NOTE:
1x J-clip, Fold the clip over towards the frame, The open end should engage the seat frame, if not the trim will need to be pulled until the correct amount of tension is achieved, Line up one end of the clip strip opening with the seat frame and press down until the clip is fully seated onto the frame
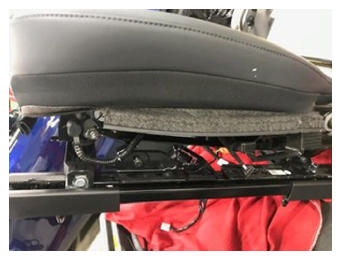 Courtesy of TESLA, INC. Courtesy of TESLA, INC.
|
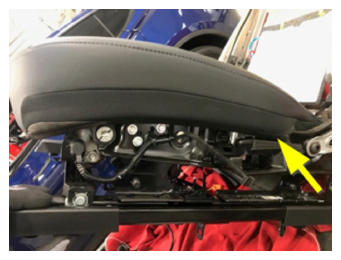 Courtesy of TESLA, INC. Courtesy of TESLA, INC.
|
- Install inboard seat cushion soft trim to seat cushion frame
NOTE:
1x J-clip, Fold the clip over towards the frame, The open end should engage the seat frame, if not the trim will need to be pulled until the correct amount of tension is achieved, Line up one end of the clip strip opening with the seat frame and press down until the clip is fully seated onto the frame
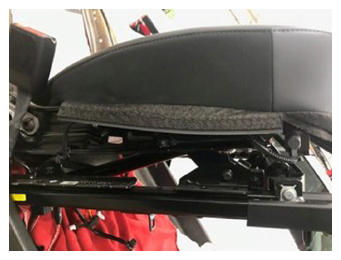 Courtesy of TESLA, INC. Courtesy of TESLA, INC.
|
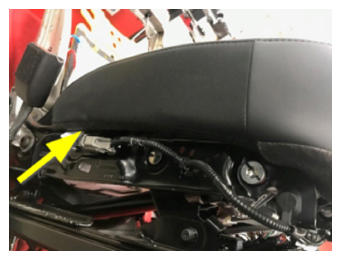 Courtesy of TESLA, INC. Courtesy of TESLA, INC.
|
- Install front of seat cushion soft trim to seat cushion frame
NOTE:
1x J-clip, Fold the clip over towards the frame, The open end should engage the seat frame, if not the trim will need to be pulled until the correct amount of tension is achieved, Line up one end of the clip strip opening with the seat frame and press down until the clip is fully seated onto the frame
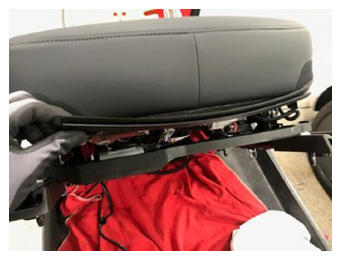 Courtesy of TESLA, INC. Courtesy of TESLA, INC.
|
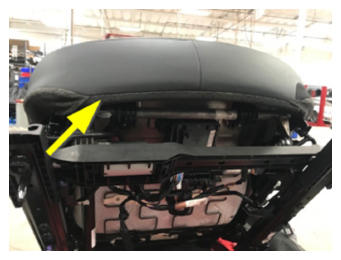 Courtesy of TESLA, INC. Courtesy of TESLA, INC.
|
- Place the front seat in a position to gain access to the bottom of the seat
NOTE:
Protect seat cushion from damage
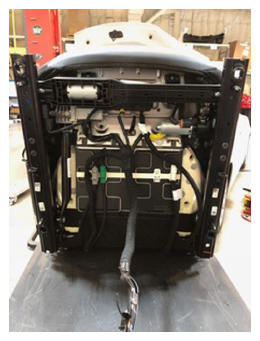 Courtesy of TESLA, INC. Courtesy of TESLA, INC.
|
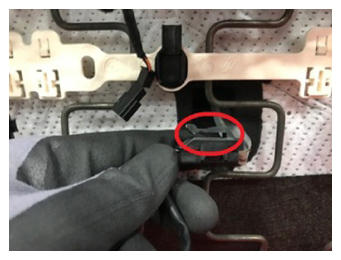
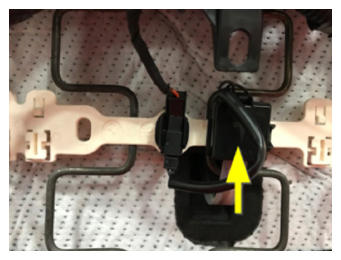
- Install seat belt reminder to spring mat
NOTE:
1x clip
 Courtesy of TESLA, INC. Courtesy of TESLA, INC.
|
 Courtesy of TESLA, INC. Courtesy of TESLA, INC.
|
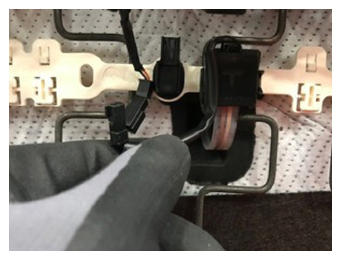
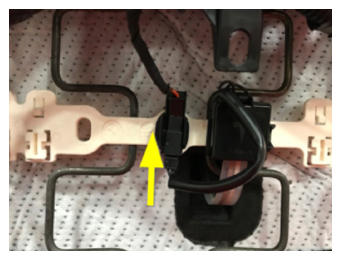
- Connect seat belt reminder connector
NOTE:
1x connector, 1x clip, Slide connector towards front of seat bottom to secure connector to clip
 Courtesy of TESLA, INC. Courtesy of TESLA, INC.
|
 Courtesy of TESLA, INC. Courtesy of TESLA, INC.
|
- Install seat bottom connectors
NOTE:
2x connector, 1x fir tree clip
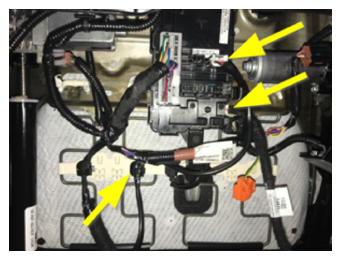 Courtesy of TESLA, INC. Courtesy of TESLA, INC.
|
- Connect the seat heater harness and secure to spring mat clip
NOTE:
1x connector, 1x clip, secure connector to spring mat clip
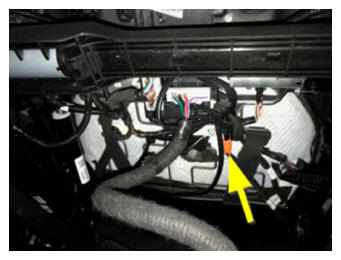 Courtesy of TESLA, INC. Courtesy of TESLA, INC.
|
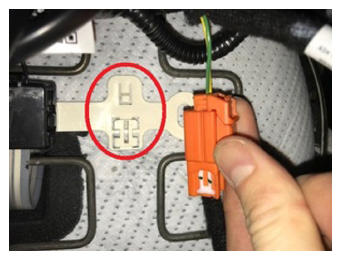 Courtesy of TESLA, INC. Courtesy of TESLA, INC.
|
- Install toe kick j-hooks to seat mat spring
NOTE:
2x J-hooks
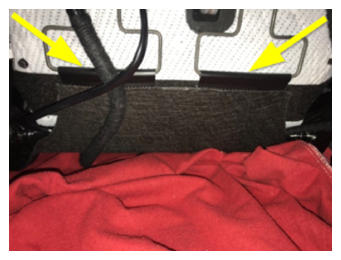 Courtesy of TESLA, INC. Courtesy of TESLA, INC.
|
- Secure the toe kick straps to both sides of the interior seat base
NOTE:
2x hook clips
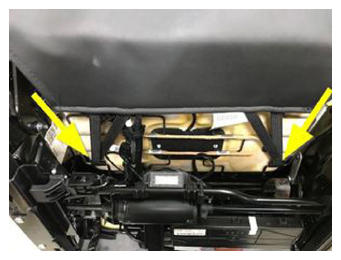 Courtesy of TESLA, INC. Courtesy of TESLA, INC.
|
- Route LH sensor harnesses underneath toe kick strap
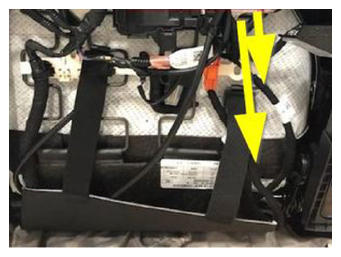 Courtesy of TESLA, INC. Courtesy of TESLA, INC.
|
- Zip-tie both LH seat back heater and sensor harnesses onto spring mat
NOTE:
1x zip tie
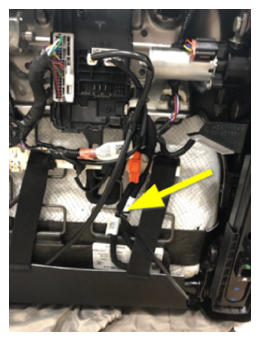 Courtesy of TESLA, INC. Courtesy of TESLA, INC.
|
- Rotate the seat back to the upright position
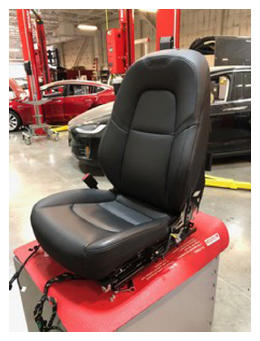 Courtesy of TESLA, INC. Courtesy of TESLA, INC.
|
- Install partially LH outer seat trim assembly
NOTE:
Apply light pressure to the rear of the outer trim to fully seat onto the seat frame, A fully installed trim should not show any metal from the frame and should line up with the contour of the seat back
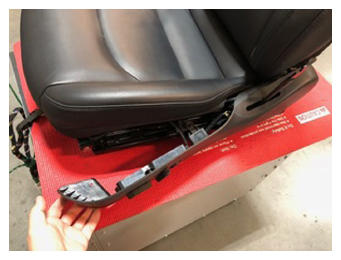 Courtesy of TESLA, INC. Courtesy of TESLA, INC.
|
- Install seat switch connector
NOTE:
1x connector
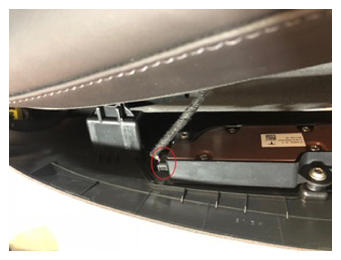 Courtesy of TESLA, INC. Courtesy of TESLA, INC.
|
- Secure LH outer seat trim assembly
NOTE:
1x clip
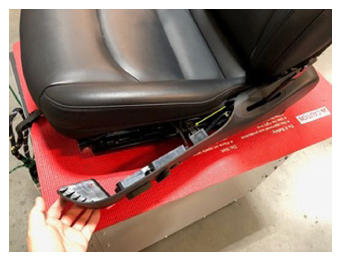 Courtesy of TESLA, INC. Courtesy of TESLA, INC.
|
- Install front screw securing LH outer seat trim assembly
NOTE:
1x screw, T20, 4 N.m
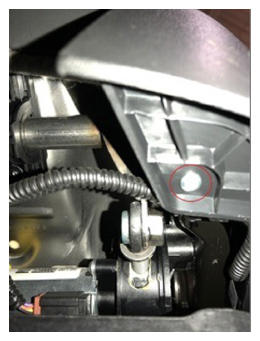 Courtesy of TESLA, INC. Courtesy of TESLA, INC.
|
- Install partially RH outer seat trim assembly
NOTE:
Apply light pressure to the rear of the inboard side shield to fully seat onto the seat frame, A fully installed trim should not show any metal from the frame and should line up with the contour of the seat back
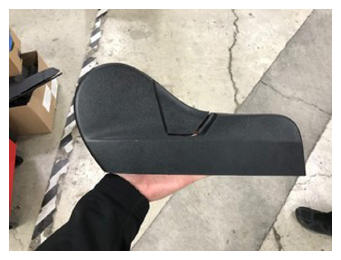 Courtesy of TESLA, INC. Courtesy of TESLA, INC.
|
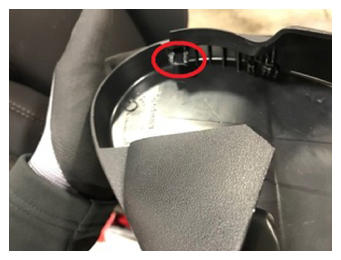 Courtesy of TESLA, INC. Courtesy of TESLA, INC.
|
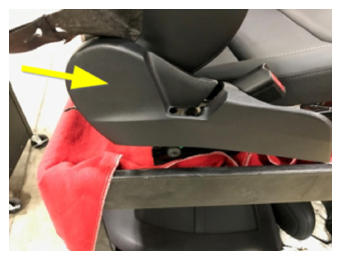 Courtesy of TESLA, INC. Courtesy of TESLA, INC.
|
- Route seat belt buckle into inboard side shield
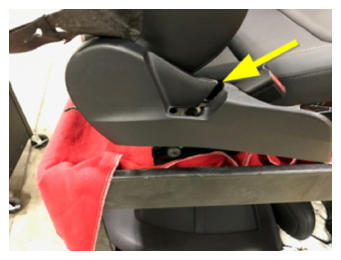 Courtesy of TESLA, INC. Courtesy of TESLA, INC.
|
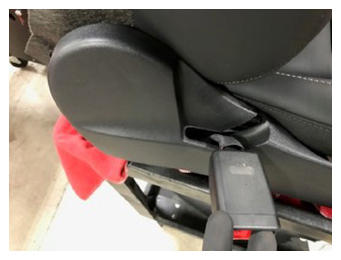 Courtesy of TESLA, INC. Courtesy of TESLA, INC.
|
- Install RH outer seat trim assembly
NOTE:
1x clip, 1x hook, Ensure hook is secured to seat bottom frame
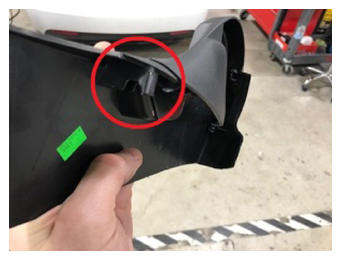 Courtesy of TESLA, INC. Courtesy of TESLA, INC.
|
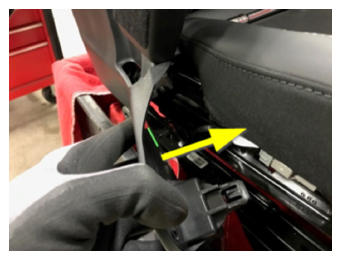 Courtesy of TESLA, INC. Courtesy of TESLA, INC.
|
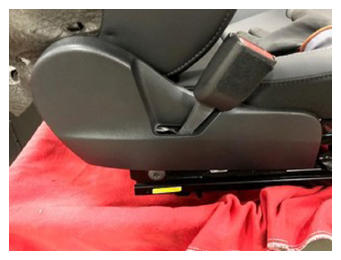 Courtesy of TESLA, INC. Courtesy of TESLA, INC.
|
- Install LH front seat into vehicle
NOTE:
Recommend assistance, Caution: Do not damage other components
- Connect LH front seat harness
NOTE:
1x connector
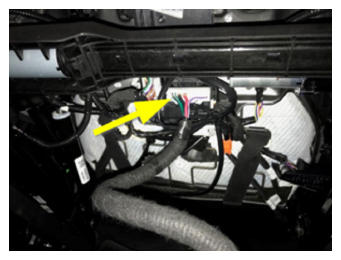 Courtesy of TESLA, INC. Courtesy of TESLA, INC.
|
- Connect first responder loop and then 12V negative terminal
NOTE:
1x connector, 1x nut, 10 mm, 5 N.m
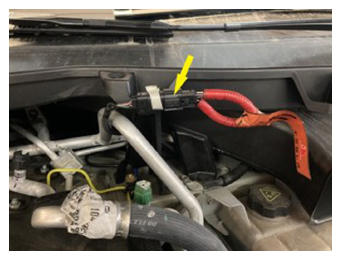 Courtesy of TESLA, INC. Courtesy of TESLA, INC.
|
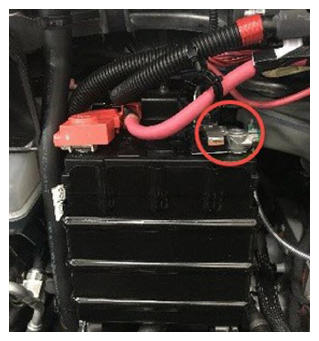 Courtesy of TESLA, INC. Courtesy of TESLA, INC.
|
- Move LH front seat fully rearward
- Install LH front seat front fasteners
NOTE:
2x patch bolts, T45P, 34 N.m, Install new patch bolts
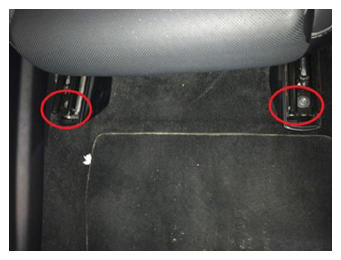 Courtesy of TESLA, INC. Courtesy of TESLA, INC.
|
- Move LH front seat fully forward
- Install LH front seat rear fasteners
NOTE:
2x patch bolts, T45P, 34 N.m, Install new patch bolts
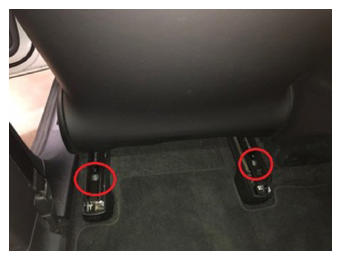 Courtesy of TESLA, INC. Courtesy of TESLA, INC.
|
- Close LH Falcon door
- Move LH front seat to original position
- Install HEPA filter housing
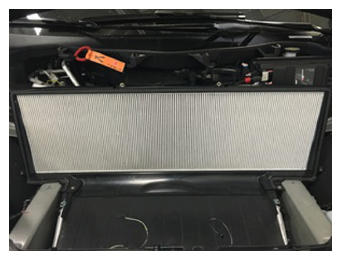 Courtesy of TESLA, INC. Courtesy of TESLA, INC.
|
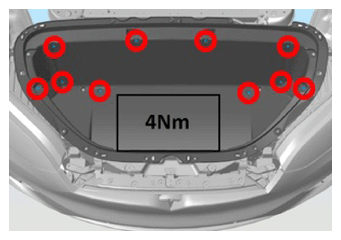
- Install underhood storage unit
NOTE:
10x bolts, 10 mm, 4 N.m, 10x bolts, 10 mm, 7 N.m
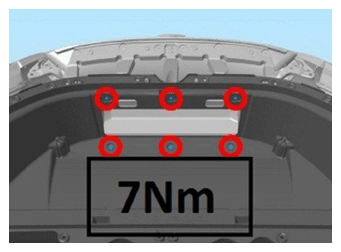 Courtesy of TESLA, INC.
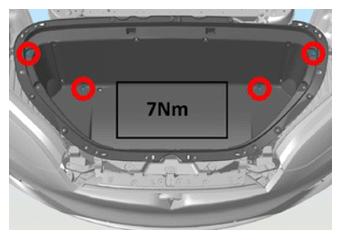 Courtesy of TESLA, INC.
 Courtesy of TESLA, INC.
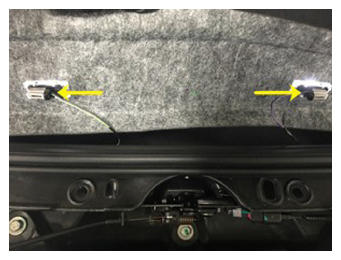
- Install frunk carpet
NOTE:
2x connectors
 Courtesy of TESLA, INC. Courtesy of TESLA, INC.
|
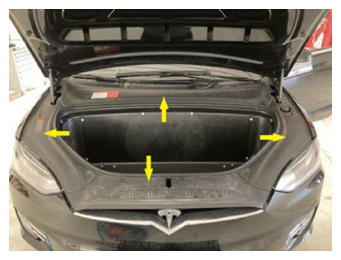
- Install under hood aprons
NOTE:
4x aprons
 Courtesy of TESLA, INC. Courtesy of TESLA, INC.
|
- Close hood
- Calibrate falcon doors using MCU
NOTE:
Required after 12V and FRL disconnect
- Close LH front door