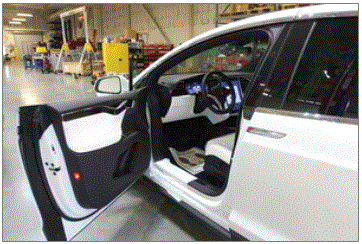
- Open LH front door
 Courtesy of TESLA, INC. Courtesy of TESLA, INC.
|
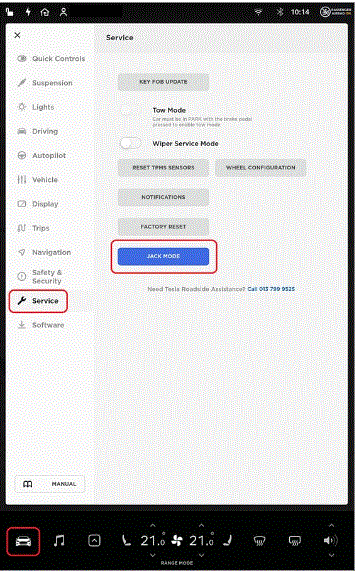
- Place air suspension into "Jack Mode"
NOTE:
Using MCU touchscreen > Controls > Suspension > Jack Mode
 Courtesy of TESLA, INC. Courtesy of TESLA, INC.
|
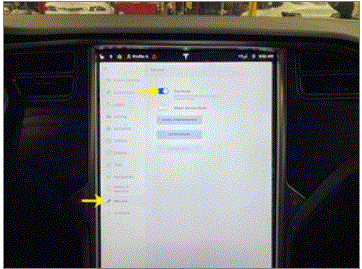
- Place vehicle into "Tow Mode"
NOTE:
Via Controls > "Service"
 Courtesy of TESLA, INC. Courtesy of TESLA, INC.
|
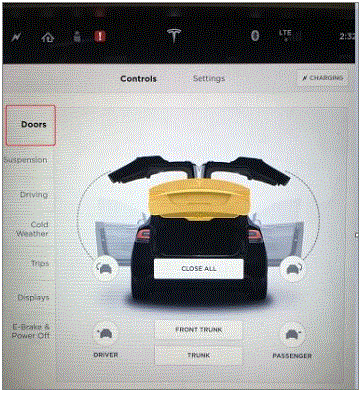
- Open all doors and liftgate
NOTE:
Using MCU touchscreen > Controls > Trunk, touchscreen > Controls > Front doors
 Courtesy of TESLA, INC. Courtesy of TESLA, INC.
|
- Open glove box
NOTE:
Release button on RH side of MCU bezel
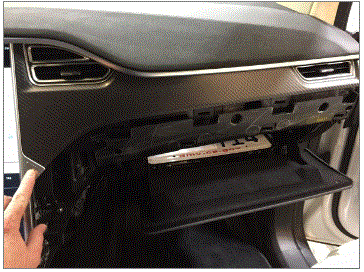 Courtesy of TESLA, INC. Courtesy of TESLA, INC.
|
- Move LH front seat forward
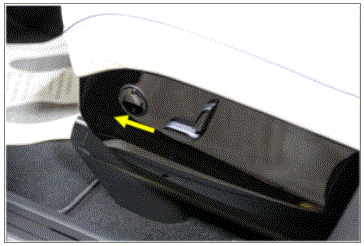 Courtesy of TESLA, INC. Courtesy of TESLA, INC.
|
- Remove LH front seat rear fasteners
NOTE:
2x patch bolts, T45P, 34 Nm, Discard after removal, Use Torchless heat induction tool to help remove bolts if necessary
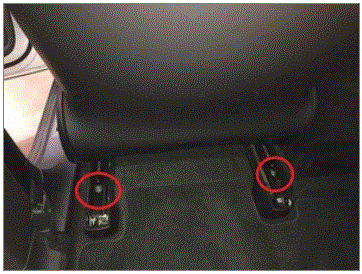 Courtesy of TESLA, INC. Courtesy of TESLA, INC.
|
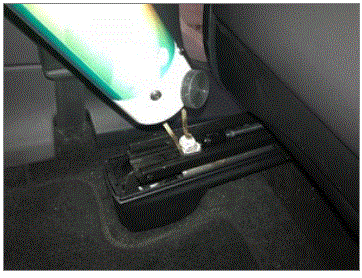 Courtesy of TESLA, INC. Courtesy of TESLA, INC.
|
- Move LH front seat backward
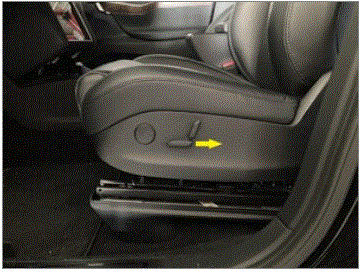 Courtesy of TESLA, INC. Courtesy of TESLA, INC.
|
- Remove LH front seat front fasteners
NOTE:
2x patch bolts, T45P, 34 Nm, Discard after removal, Use Torchless heat induction tool to help remove bolts if necessary
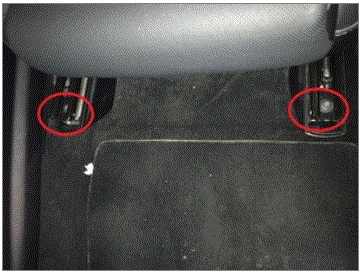 Courtesy of TESLA, INC. Courtesy of TESLA, INC.
|
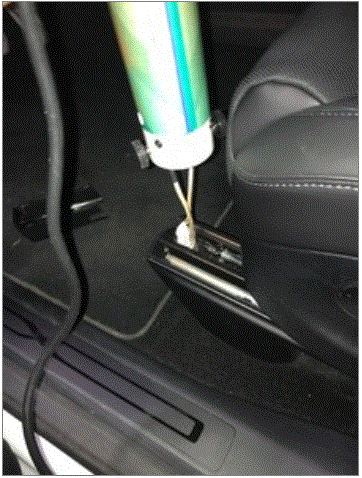 Courtesy of TESLA, INC. Courtesy of TESLA, INC.
|
- Move RH front seat forward
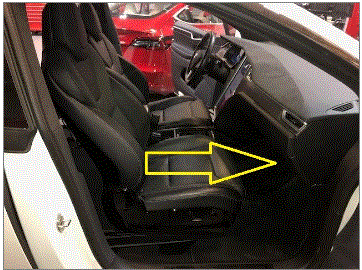 Courtesy of TESLA, INC. Courtesy of TESLA, INC.
|
- Remove RH front seat rear fasteners
NOTE:
2x bolts, T45+, 34 Nm, Discard after removal, Use Torchless heat induction tool to help remove bolts
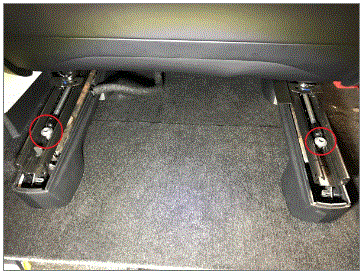 Courtesy of TESLA, INC. Courtesy of TESLA, INC.
|
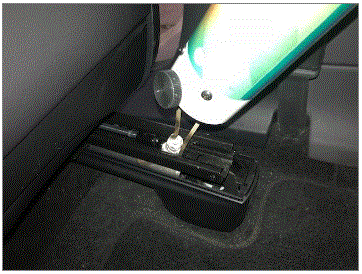 Courtesy of TESLA, INC. Courtesy of TESLA, INC.
|
- Move RH front seat backward
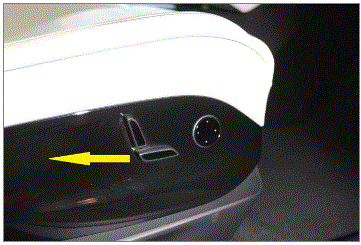 Courtesy of TESLA, INC. Courtesy of TESLA, INC.
|
- Remove RH front seat front fasteners
NOTE:
2x bolts, T45, 34 Nm, Discard after removal, Use Torchless heat induction tool to help remove bolts
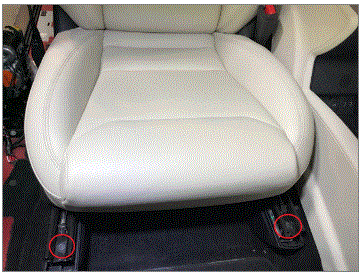 Courtesy of TESLA, INC. Courtesy of TESLA, INC.
|
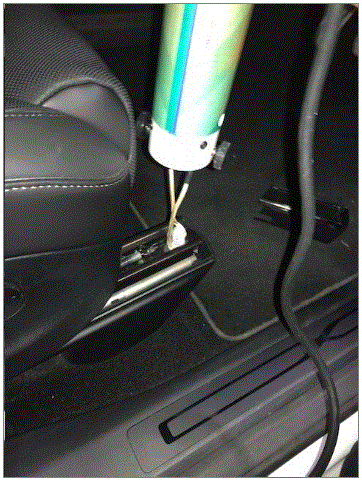 Courtesy of TESLA, INC. Courtesy of TESLA, INC.
|
- Fold down RH 3rd row seat
NOTE:
Press button located on RH 3rd row seat back assembly near headrest, fold seat back down towards front of vehicle into a flat position
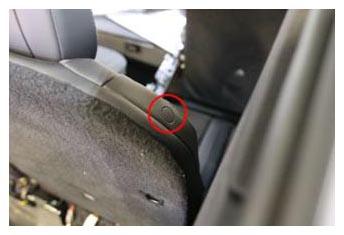 Courtesy of TESLA, INC. Courtesy of TESLA, INC.
|
- Fold down LH 3rd row seat
NOTE:
Press button located on LH 3rd row seat back assembly near headrest, fold seat back down towards front of vehicle into a flat position
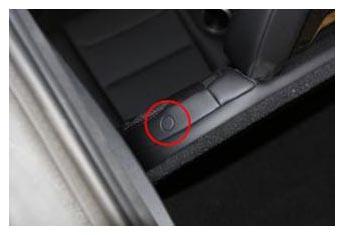 Courtesy of TESLA, INC. Courtesy of TESLA, INC.
|
- Remove rear load floor
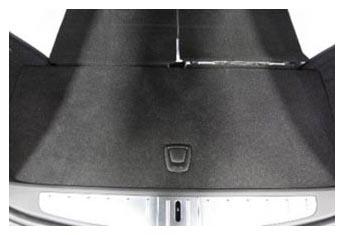 Courtesy of TESLA, INC. Courtesy of TESLA, INC.
|
- Remove trunk board
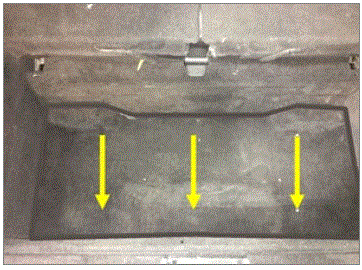 Courtesy of TESLA, INC. Courtesy of TESLA, INC.
|
- Remove trunk floor carpet
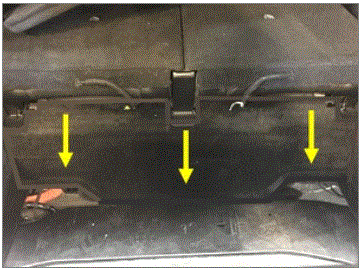 Courtesy of TESLA, INC. Courtesy of TESLA, INC.
|
- Fold 3rd row seats up
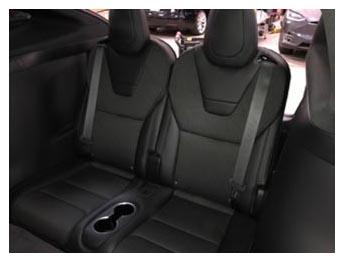 Courtesy of TESLA, INC. Courtesy of TESLA, INC.
|
- Open hood
NOTE:
Via center display > Controls > Front Trunk
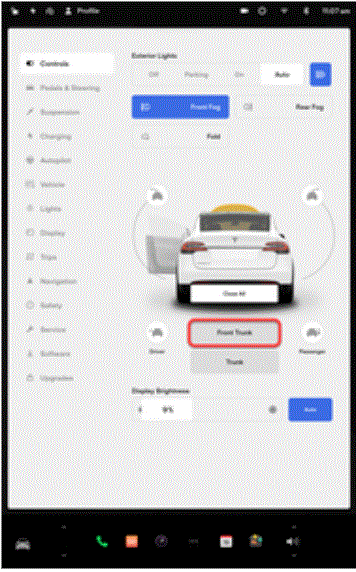 Courtesy of TESLA, INC. Courtesy of TESLA, INC.
|
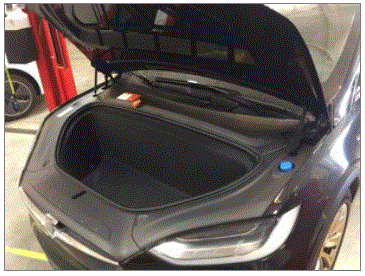 Courtesy of TESLA, INC. Courtesy of TESLA, INC.
|
- Power down vehicle
NOTE:
Via center display > Controls > Safety > Power Off
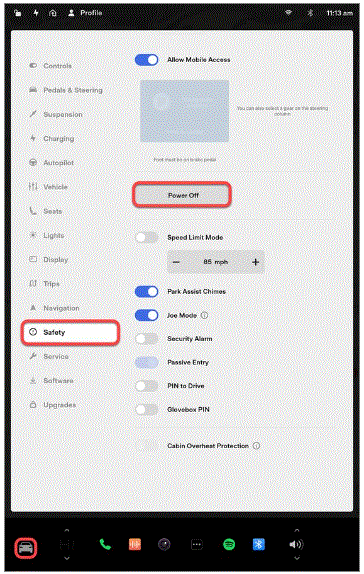 Courtesy of TESLA, INC. Courtesy of TESLA, INC.
|
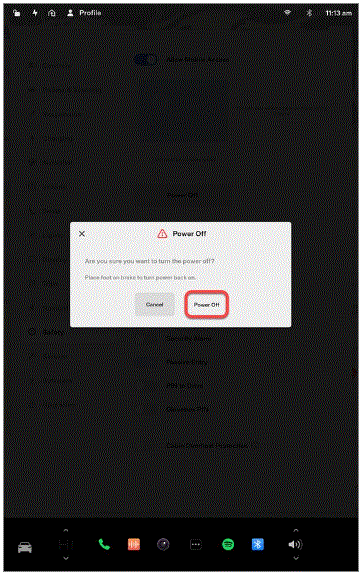 Courtesy of TESLA, INC. Courtesy of TESLA, INC.
|
- Remove underhood aprons
NOTE:
4x aprons, LH and RH aprons have 1x clip each
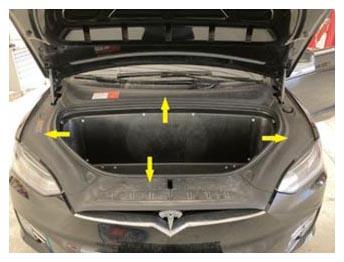 Courtesy of TESLA, INC. Courtesy of TESLA, INC.
|
- Remove frunk carpet
NOTE:
2x connectors
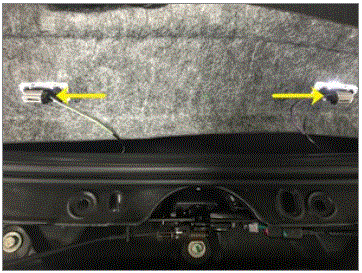 Courtesy of TESLA, INC. Courtesy of TESLA, INC.
|
- Remove underhood storage unit
NOTE:
10x bolts, 10mm, 4 Nm, 10x bolts, 10mm, 7 Nm
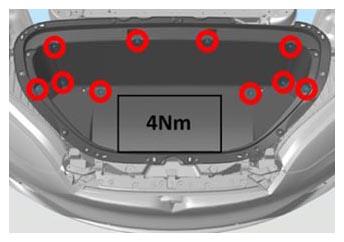 Courtesy of TESLA, INC. Courtesy of TESLA, INC.
|
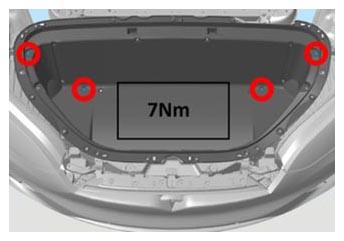 Courtesy of TESLA, INC. Courtesy of TESLA, INC.
|
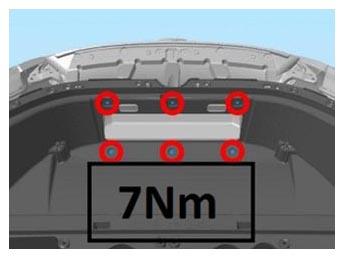 Courtesy of TESLA, INC. Courtesy of TESLA, INC.
|
- Remove HEPA filter
NOTE:
Lift up from bottom and pull out
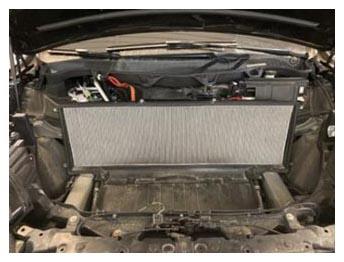 Courtesy of TESLA, INC. Courtesy of TESLA, INC.
|
- Disconnect 12V negative terminal and First Responder Loop
NOTE:
1x nut, 10mm, 5 Nm, 1x connector, Wait at least 2 minutes before disconnecting modules or HV components
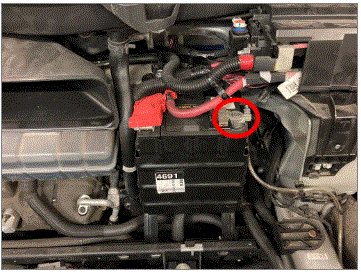 Courtesy of TESLA, INC. Courtesy of TESLA, INC.
|
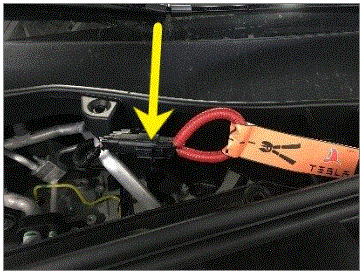 Courtesy of TESLA, INC. Courtesy of TESLA, INC.
|
- Disconnect LH front seat harness
NOTE:
1x connector, 1 clip
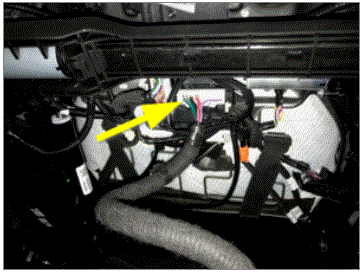 Courtesy of TESLA, INC. Courtesy of TESLA, INC.
|
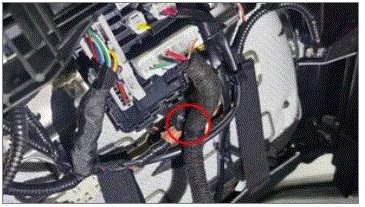 Courtesy of TESLA, INC. Courtesy of TESLA, INC.
|
- Remove LH front seat from vehicle
NOTE:
Recommend Assistance, Caution: Do not damage other components
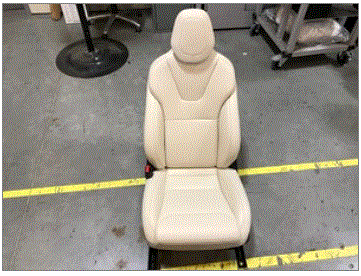 Courtesy of TESLA, INC. Courtesy of TESLA, INC.
|
- Disconnect RH front seat harness
NOTE:
1x connector, 1x clip
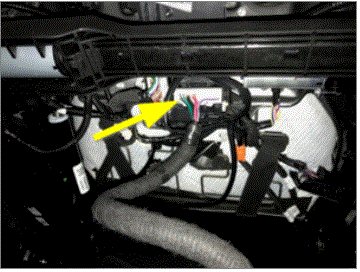 Courtesy of TESLA, INC. Courtesy of TESLA, INC.
|
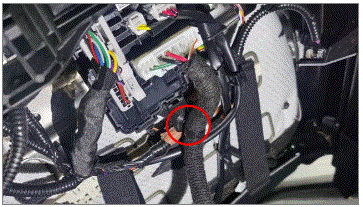 Courtesy of TESLA, INC. Courtesy of TESLA, INC.
|
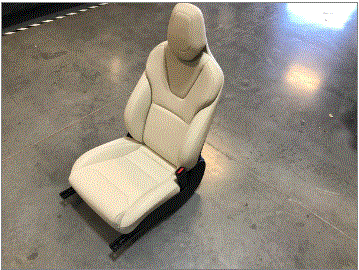
- Remove RH front seat from vehicle
NOTE:
Recommend Assistance, Caution: Do not damage other components
 Courtesy of TESLA, INC. Courtesy of TESLA, INC.
|
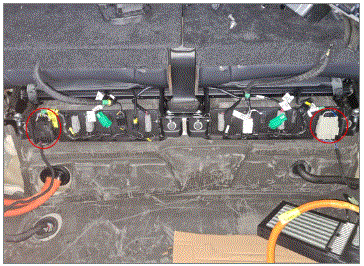
- Disconnect 3rd row seat electrical connectors
NOTE:
2x connectors
 Courtesy of TESLA, INC. Courtesy of TESLA, INC.
|
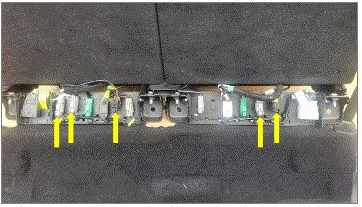
- Disconnect 3rd row seat cushion
NOTE:
5x connectors
 Courtesy of TESLA, INC. Courtesy of TESLA, INC.
|
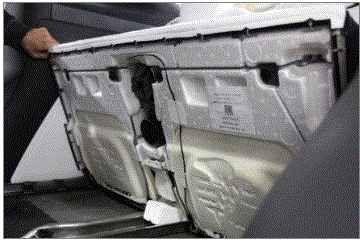
- Lift 3rd row lower cushion
NOTE:
3x clips
 Courtesy of TESLA, INC. Courtesy of TESLA, INC.
|
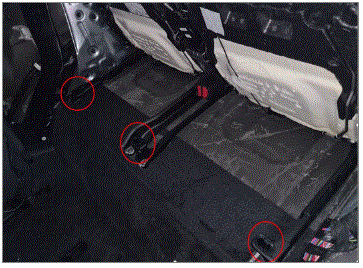 Courtesy of TESLA, INC. Courtesy of TESLA, INC.
|
- Remove 3rd row seats front bolts
NOTE:
4x bolts, T45, 34 Nm, discard patch bolts
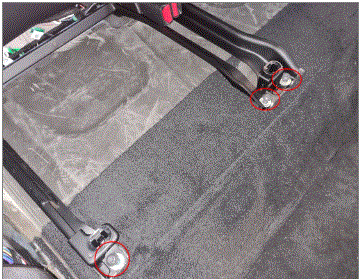 Courtesy of TESLA, INC. Courtesy of TESLA, INC.
|
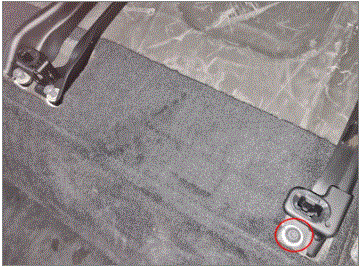 Courtesy of TESLA, INC. Courtesy of TESLA, INC.
|
- Remove 3rd row seats rear bolts
NOTE:
4x bolts, T45, 34 Nm, discard patch bolts
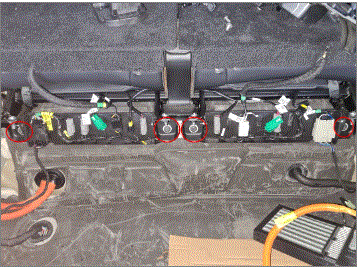 Courtesy of TESLA, INC. Courtesy of TESLA, INC.
|
- Remove 3rd row seat from vehicle
NOTE:
Recommend assistance
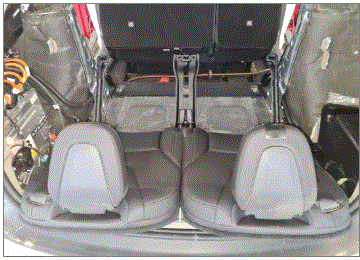 Courtesy of TESLA, INC. Courtesy of TESLA, INC.
|
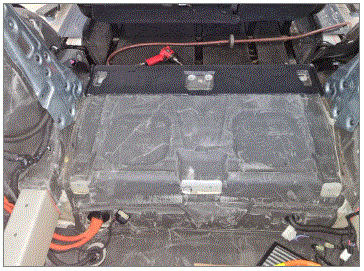 Courtesy of TESLA, INC. Courtesy of TESLA, INC.
|
- Remove 3rd row floor carpet
NOTE:
Carefully pull up
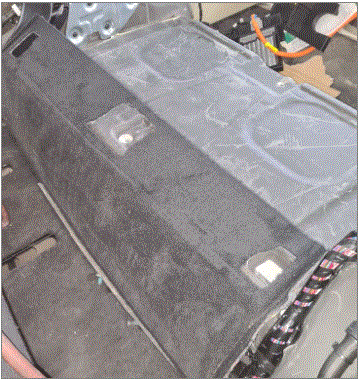 Courtesy of TESLA, INC. Courtesy of TESLA, INC.
|
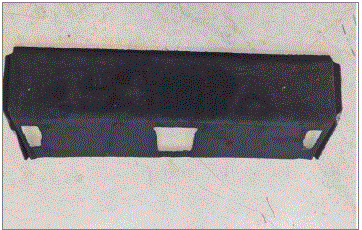 Courtesy of TESLA, INC. Courtesy of TESLA, INC.
|
- Apply tape to LH racetrack to avoid damage
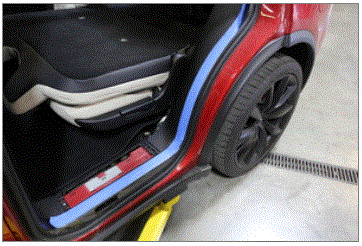 Courtesy of TESLA, INC. Courtesy of TESLA, INC.
|
- Remove LH trunk sill side trim
NOTE:
4x clips, replace any broken clips
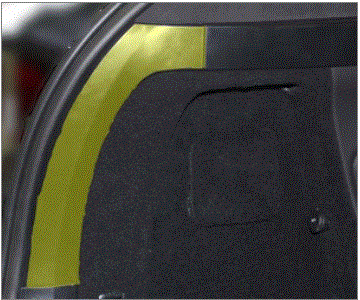 Courtesy of TESLA, INC. Courtesy of TESLA, INC.
|
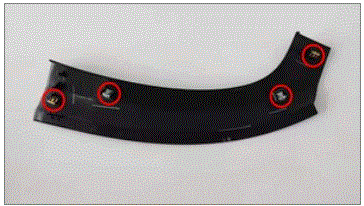 Courtesy of TESLA, INC. Courtesy of TESLA, INC.
|
- Remove screw securing LH C-pillar mid trim
NOTE:
1x screw, T20, 2 Nm
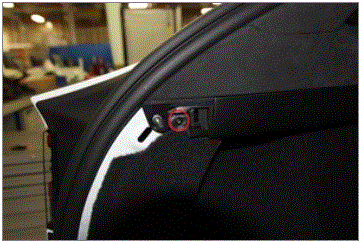 Courtesy of TESLA, INC. Courtesy of TESLA, INC.
|
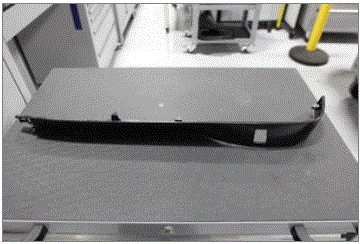
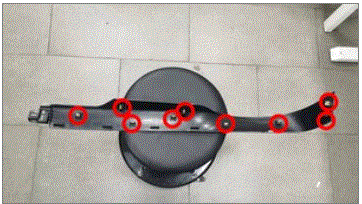
- Release clips securing LH C-pillar mid trim and remove
NOTE:
9x clips
 Courtesy of TESLA, INC. Courtesy of TESLA, INC.
|
 Courtesy of TESLA, INC. Courtesy of TESLA, INC.
|
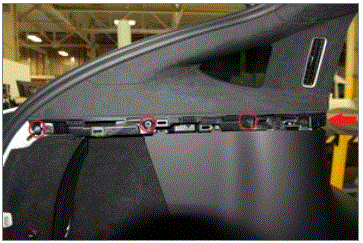
- Remove fasteners securing LH upper C-pillar trim panel
NOTE:
1x patch bolt, T25, 3 Nm, 3x screws, T20, 2 Nm
 Courtesy of TESLA, INC. Courtesy of TESLA, INC.
|
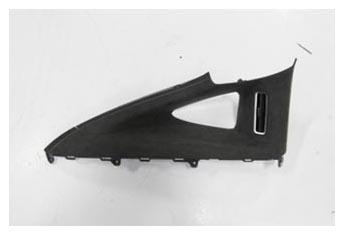
- Release clips and remove LH upper C-pillar trim panel
NOTE:
6x clips, 2 clips along front edge and 4 clips along top edge
 Courtesy of TESLA, INC. Courtesy of TESLA, INC.
|
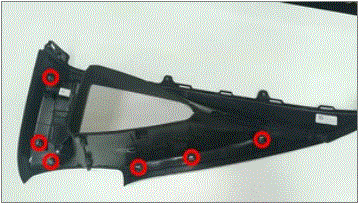 Courtesy of TESLA, INC. Courtesy of TESLA, INC.
|
- Remove screws securing C-pillar lower panel to LH parcel shelf support
NOTE:
2x screws, T20, 2 Nm
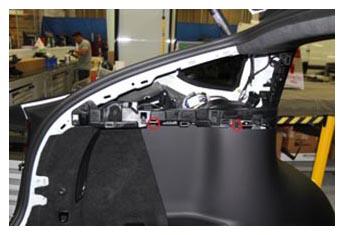 Courtesy of TESLA, INC. Courtesy of TESLA, INC.
|
- Remove LH rear welcome plate
NOTE:
8x clips
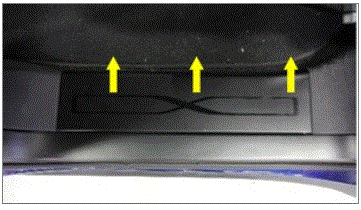 Courtesy of TESLA, INC. Courtesy of TESLA, INC.
|
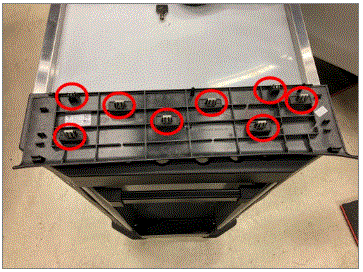 Courtesy of TESLA, INC. Courtesy of TESLA, INC.
|
- Remove front screw securing LH lower C-pillar
NOTE:
1x screw, T25, 2.5 Nm, Discard patch bolt
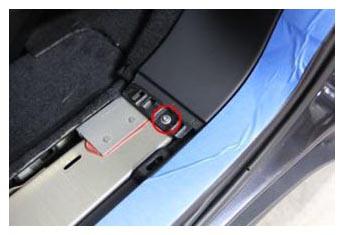 Courtesy of TESLA, INC. Courtesy of TESLA, INC.
|
- Release clips securing LH C-pillar lower panel along front edge and remove panel
NOTE:
9x clips, 1x magnet
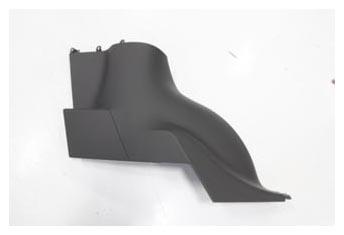 Courtesy of TESLA, INC. Courtesy of TESLA, INC.
|
- Remove LH rear door sill trim
NOTE:
1x bolt, T25, 2x clips, 2.5 Nm. Discard bolt after removal
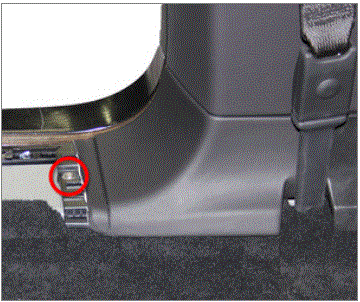 Courtesy of TESLA, INC. Courtesy of TESLA, INC.
|
- Release LH front door seal from lower door sill
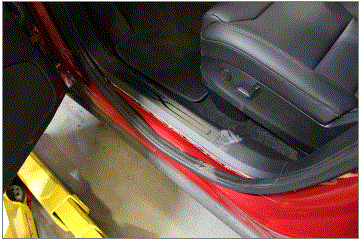 Courtesy of TESLA, INC. Courtesy of TESLA, INC.
|
- Remove LH front lower door sill
NOTE:
8x clips, 3x datums
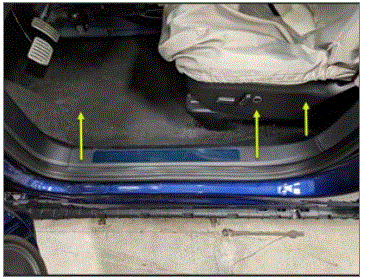 Courtesy of TESLA, INC. Courtesy of TESLA, INC.
|
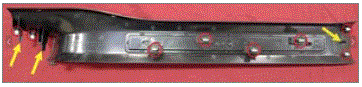 Courtesy of TESLA, INC. Courtesy of TESLA, INC.
|
- Remove LH IP side cover
NOTE:
5x clips
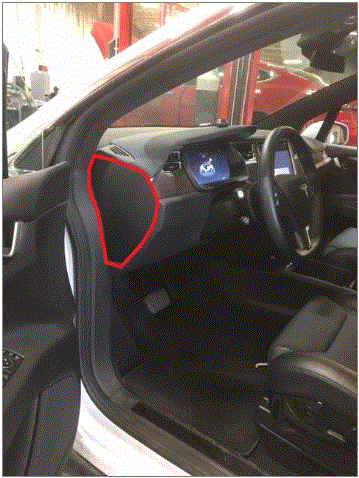 Courtesy of TESLA, INC. Courtesy of TESLA, INC.
|
- Remove LH lower A-pillar trim
NOTE:
1x bolt, T25, 5 Nm, 4x clips
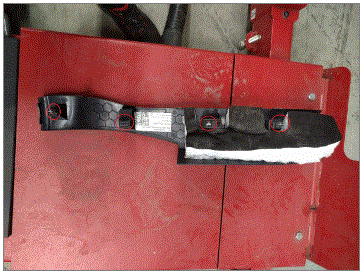 Courtesy of TESLA, INC. Courtesy of TESLA, INC.
|
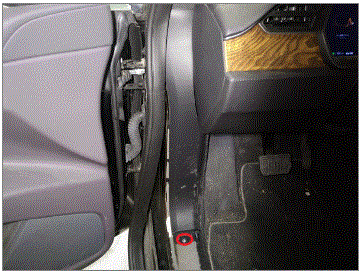 Courtesy of TESLA, INC. Courtesy of TESLA, INC.
|
- Remove LH sunvisor bezel
NOTE:
6x clips, 5x tabs, Release clips then slide bezel toward front of vehicle
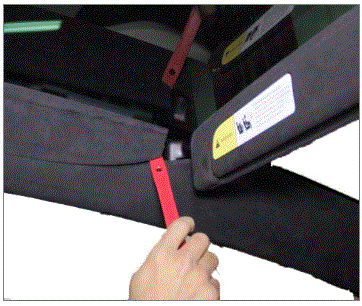 Courtesy of TESLA, INC. Courtesy of TESLA, INC.
|
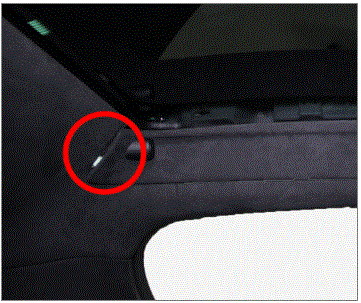 Courtesy of TESLA, INC. Courtesy of TESLA, INC.
|
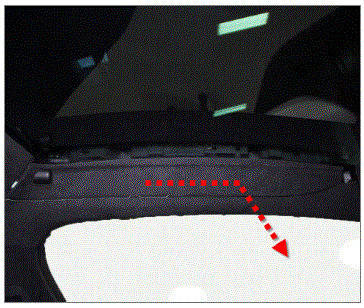 Courtesy of TESLA, INC. Courtesy of TESLA, INC.
|
- Remove bolts securing LH upper A-pillar to body
NOTE:
2x bolts, 10mm, 5 Nm, 1x screw, T20, 2.5 Nm, 1x nyloc nut, 13mm, 5 Nm,
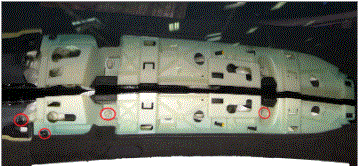 Courtesy of TESLA, INC. Courtesy of TESLA, INC.
|
- Remove LH upper A-pillar from vehicle
NOTE:
1x connector, 2x datums, 6x clips, Release clips and rotate pillar inboard to access connector, Release datums upward out of IP sub assembly
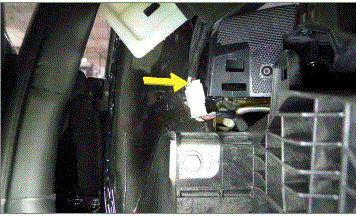 Courtesy of TESLA, INC. Courtesy of TESLA, INC.
|
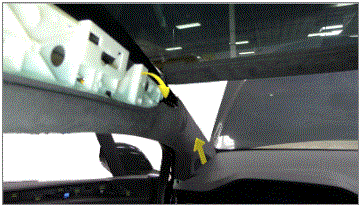 Courtesy of TESLA, INC. Courtesy of TESLA, INC.
|
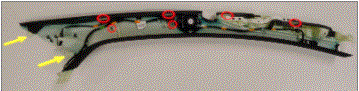 Courtesy of TESLA, INC. Courtesy of TESLA, INC.
|
- Remove bolts securing LH lower B-pillar
NOTE:
7x clips, 2x bolts, T25, 3 Nm
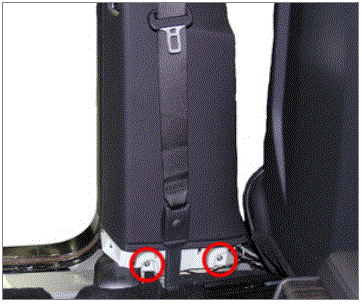 Courtesy of TESLA, INC. Courtesy of TESLA, INC.
|
- Release upper portion of LH lower B-pillar to LH upper B-pillar
NOTE:
5x clips
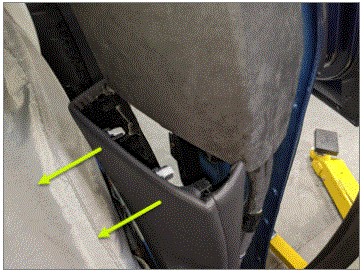 Courtesy of TESLA, INC. Courtesy of TESLA, INC.
|
- Remove bolts securing LH upper B-pillar
NOTE:
2x bolts, T25, 3 Nm, 3x clips
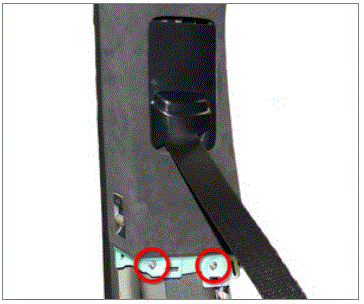 Courtesy of TESLA, INC. Courtesy of TESLA, INC.
|
- Release LH upper B-pillar from body
NOTE:
3x clips, 2x magnets
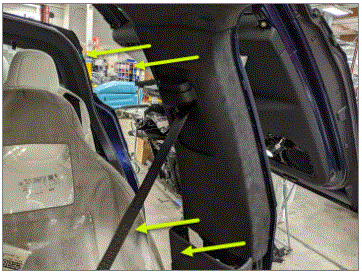 Courtesy of TESLA, INC. Courtesy of TESLA, INC.
|
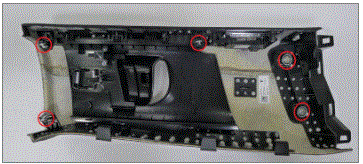 Courtesy of TESLA, INC. Courtesy of TESLA, INC.
|
- Disconnect LH B-pillar switch and temp sensor
NOTE:
2x black connector
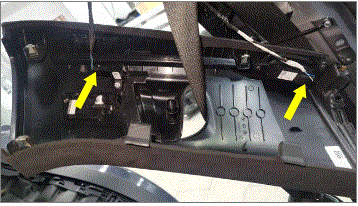 Courtesy of TESLA, INC. Courtesy of TESLA, INC.
|
- Move LH upper B-pillar aside
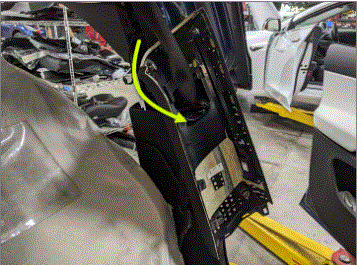 Courtesy of TESLA, INC. Courtesy of TESLA, INC.
|
- Pull back lower seal on LH B-Pillar applique and remove screws securing LH B-Pillar applique
NOTE:
2x bolts, T25, 3 Nm
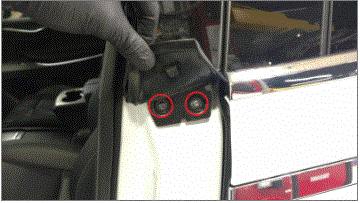 Courtesy of TESLA, INC. Courtesy of TESLA, INC.
|
- Release retaining clip securing the LH B-Pillar applique to the body
NOTE:
1x retaining clip, Clip is located about 80mm below camera lens opening, Slide plastic pry tool behind LH applique seal and twist to release clip
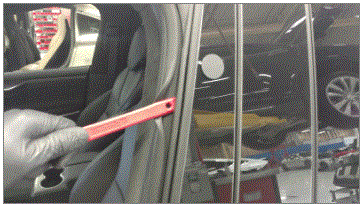 Courtesy of TESLA, INC. Courtesy of TESLA, INC.
|
- Release the LH B-Pillar applique from the body
NOTE:
Pull applique down to release upper tab and pull applique away from body, Use caution as camera harness does not have much slack
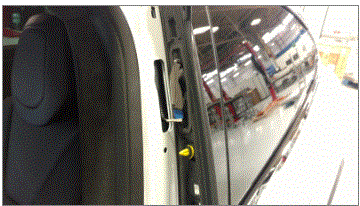 Courtesy of TESLA, INC. Courtesy of TESLA, INC.
|
- Disconnect LH B-Pillar camera connector
NOTE:
1x connector, Hold LH B-Pillar applique away from body to gain better access to the camera connector
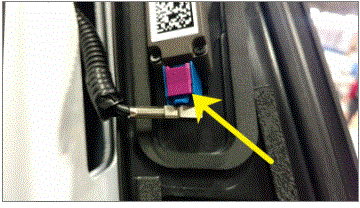 Courtesy of TESLA, INC. Courtesy of TESLA, INC.
|
- Remove LH B-Pillar applique from vehicle
NOTE:
Release B-pillar applique seal away from applique, Start at the top side and work around until seal is off, Do not damage seal
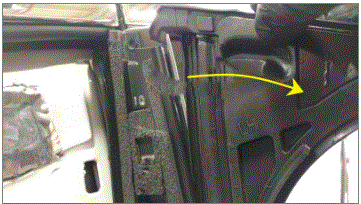 Courtesy of TESLA, INC. Courtesy of TESLA, INC.
|
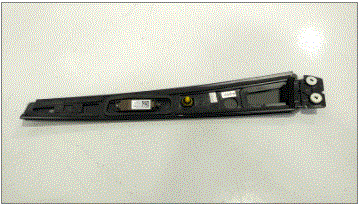 Courtesy of TESLA, INC. Courtesy of TESLA, INC.
|
- Apply tape to the RH racetrack to avoid damage
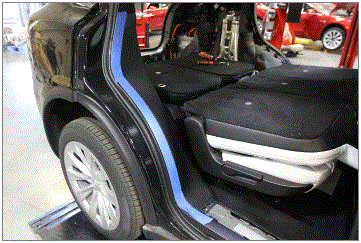 Courtesy of TESLA, INC. Courtesy of TESLA, INC.
|
- Remove RH trunk sill side trim
NOTE:
4x clips, replace any broken clips
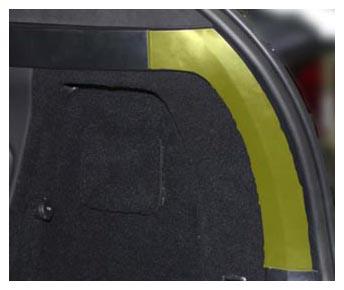 Courtesy of TESLA, INC. Courtesy of TESLA, INC.
|
- Remove screw securing RH C-pillar mid trim
NOTE:
1x screw, T20, 2 Nm
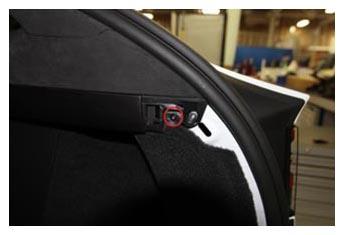 Courtesy of TESLA, INC. Courtesy of TESLA, INC.
|
- Release clips securing RH C-pillar mid trim and remove
NOTE:
9x clips
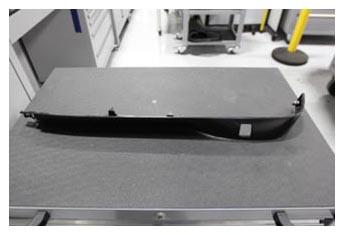 Courtesy of TESLA, INC. Courtesy of TESLA, INC.
|
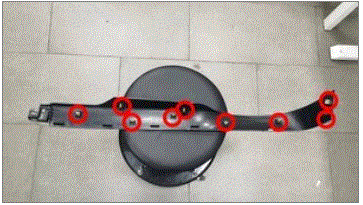 Courtesy of TESLA, INC. Courtesy of TESLA, INC.
|
- Remove fasteners securing RH upper C-pillar trim panel
NOTE:
1x screw, T25, 3 Nm, 3x screws, T20, 2 Nm, Discard T25 fastener after removal
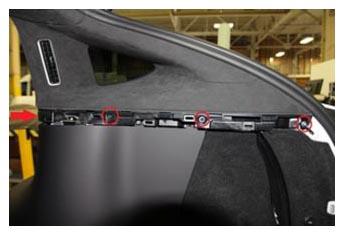 Courtesy of TESLA, INC. Courtesy of TESLA, INC.
|
- Release clips and remove RH upper C-pillar trim panel
NOTE:
6x clips
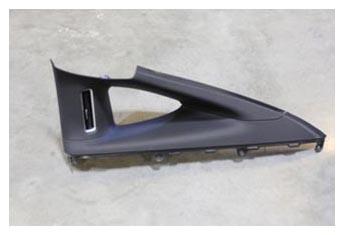 Courtesy of TESLA, INC. Courtesy of TESLA, INC.
|
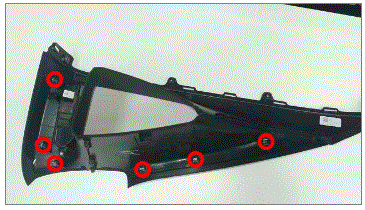 Courtesy of TESLA, INC. Courtesy of TESLA, INC.
|
- Remove fasteners securing C-pillar lower panel to RH parcel shelf support
NOTE:
2x screws, T20, 2 Nm
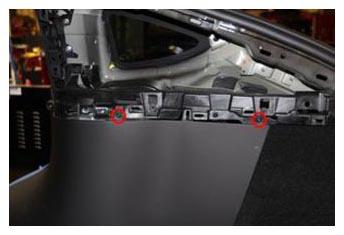 Courtesy of TESLA, INC. Courtesy of TESLA, INC.
|
- Remove RH rear welcome plate
NOTE:
8x clips
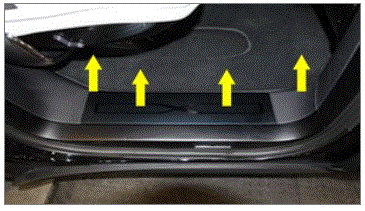 Courtesy of TESLA, INC. Courtesy of TESLA, INC.
|
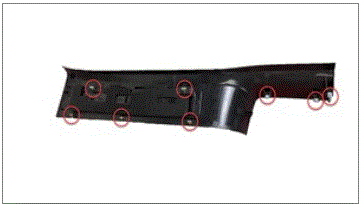 Courtesy of TESLA, INC. Courtesy of TESLA, INC.
|
- Remove front screw securing RH lower C-pillar
NOTE:
1x screw, T25, 2.5 Nm
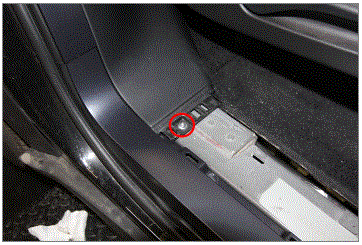 Courtesy of TESLA, INC. Courtesy of TESLA, INC.
|
- Release clips securing RH C-pillar lower panel along front edge and remove panel
NOTE:
9x clips, 1x magnet
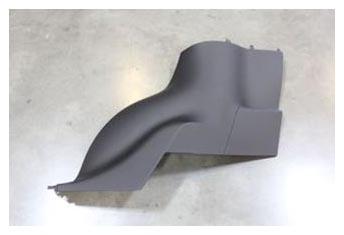 Courtesy of TESLA, INC. Courtesy of TESLA, INC.
|
- Remove RH rear door sill trim
NOTE:
1x patch bolt, T25, 2.5 Nm, 2x clips
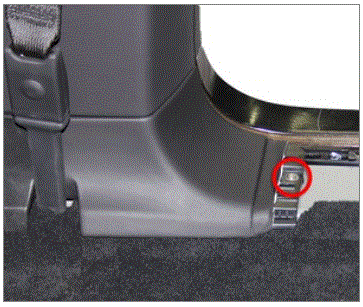 Courtesy of TESLA, INC. Courtesy of TESLA, INC.
|
- Remove RH front door sill trim panel
NOTE:
8x clips, 3x datums
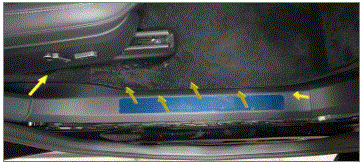 Courtesy of TESLA, INC. Courtesy of TESLA, INC.
|
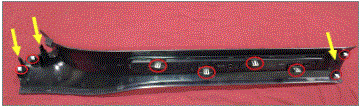 Courtesy of TESLA, INC. Courtesy of TESLA, INC.
|
- Remove RH IP side cover
NOTE:
5x clips
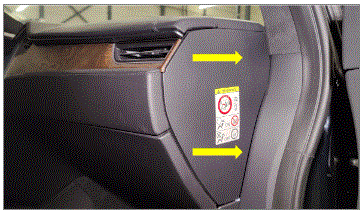 Courtesy of TESLA, INC. Courtesy of TESLA, INC.
|
- Release RH front door seal from lower door sill
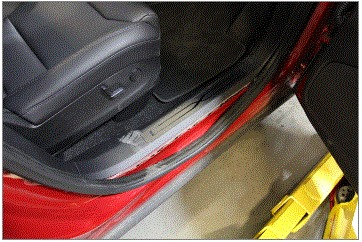 Courtesy of TESLA, INC. Courtesy of TESLA, INC.
|
- Remove RH lower A-pillar trim
NOTE:
1x bolt, T25, 5 Nm, 4x clips
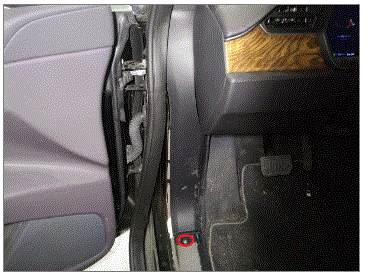 Courtesy of TESLA, INC. Courtesy of TESLA, INC.
|
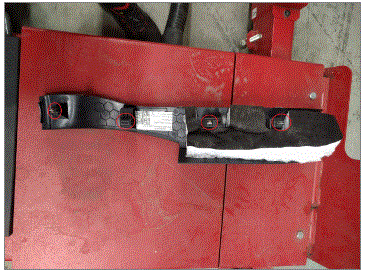 Courtesy of TESLA, INC. Courtesy of TESLA, INC.
|
- Remove RH sunvisor bezel
NOTE:
6x clips, 5x tabs, Release clips then slide bezel toward front of vehicle
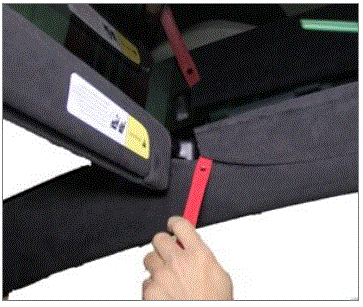 Courtesy of TESLA, INC. Courtesy of TESLA, INC.
|
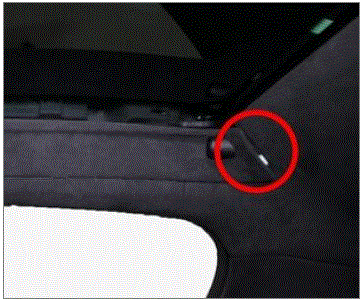 Courtesy of TESLA, INC. Courtesy of TESLA, INC.
|
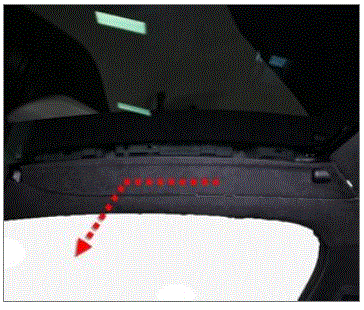 Courtesy of TESLA, INC. Courtesy of TESLA, INC.
|
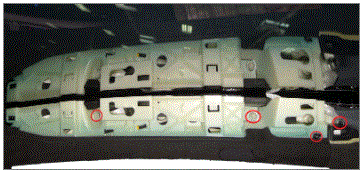
- Remove bolts securing RH upper A-pillar to body
NOTE:
2x bolts, 10mm, 5 Nm, 1x screw, T20, 2.5 Nm, 1x nyloc nut, 13mm, 5 Nm,
 Courtesy of TESLA, INC. Courtesy of TESLA, INC.
|
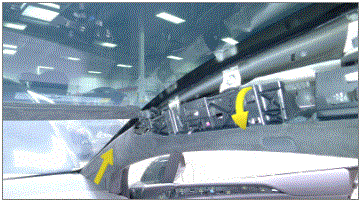
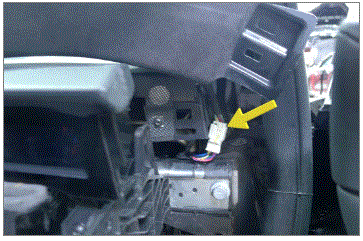
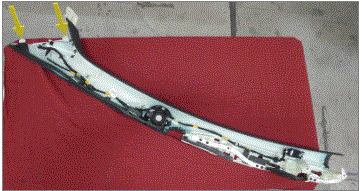
- Remove RH upper A-pillar from vehicle
NOTE:
1x connector, 2x datums, Rotate pillar inboard to access connector, Release datums upward out of IP sub assembly
 Courtesy of TESLA, INC. Courtesy of TESLA, INC.
|
 Courtesy of TESLA, INC. Courtesy of TESLA, INC.
|
 Courtesy of TESLA, INC. Courtesy of TESLA, INC.
|
- Remove bolts securing RH lower B-pillar
NOTE:
2x bolts, T25, 3 Nm, 7x clips
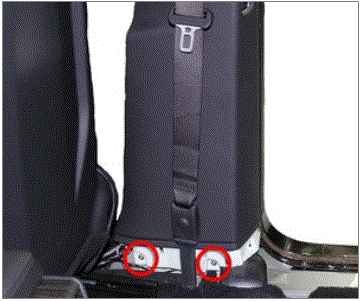 Courtesy of TESLA, INC. Courtesy of TESLA, INC.
|
- Release upper portion of RH lower B-pillar to RH upper B-pillar
NOTE:
5x clips
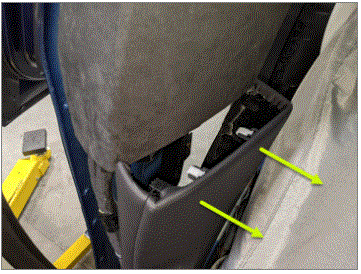 Courtesy of TESLA, INC. Courtesy of TESLA, INC.
|
- Remove bolts securing RH upper B-pillar
NOTE:
2x bolts, T25, 3 Nm, 3x clips
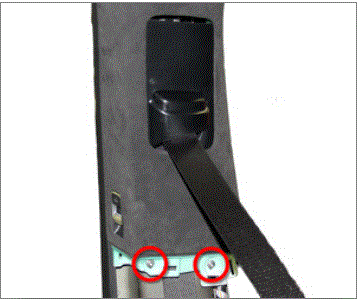 Courtesy of TESLA, INC. Courtesy of TESLA, INC.
|
- Release RH upper B-pillar from body
NOTE:
4x clips, 1 magnet
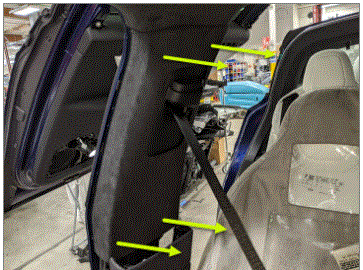 Courtesy of TESLA, INC. Courtesy of TESLA, INC.
|
- Disconnect RH B-pillar switch and temp sensor
NOTE:
2x black connectors
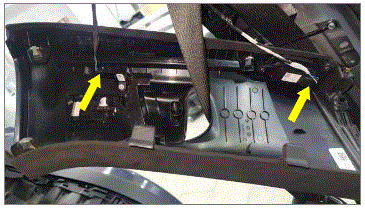 Courtesy of TESLA, INC. Courtesy of TESLA, INC.
|
- Move RH upper B-pillar aside
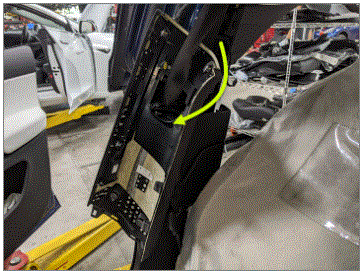 Courtesy of TESLA, INC. Courtesy of TESLA, INC.
|
- Pull back lower seal on RH side and remove screws securing RH applique
NOTE:
2x bolts, T25, 3 Nm
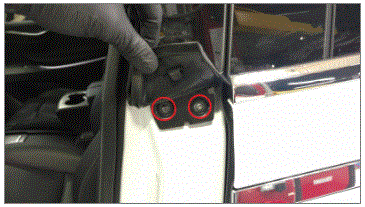 Courtesy of TESLA, INC. Courtesy of TESLA, INC.
|
- Release retaining clip securing the RH B-Pillar applique to the body
NOTE:
1x retaining clip, Clip is located about 80mm below camera lens opening, Slide plastic pry tool behind RH applique seal and twist to release clip
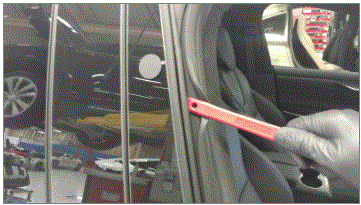 Courtesy of TESLA, INC. Courtesy of TESLA, INC.
|
- Release the RH B-Pillar applique from the body
NOTE:
1x tab, Pull applique down to release upper tab and pull applique away from body, Use caution as camera harness does not have much slack
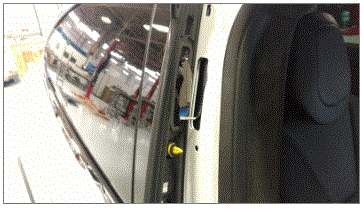 Courtesy of TESLA, INC. Courtesy of TESLA, INC.
|
- Hold RH applique away from body and disconnect camera harness connector
NOTE:
1x connector
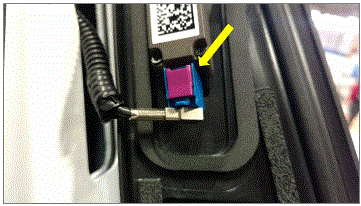 Courtesy of TESLA, INC. Courtesy of TESLA, INC.
|
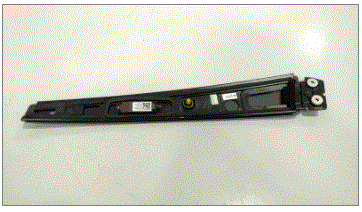
- Remove LH B-Pillar applique from vehicle
NOTE:
Release B-pillar applique seal away from applique, Start at the top side and work around until seal is off, Do not damage seal
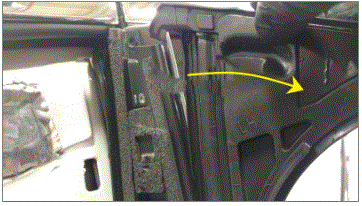 Courtesy of TESLA, INC. Courtesy of TESLA, INC.
|
 Courtesy of TESLA, INC. Courtesy of TESLA, INC.
|
- Remove IP cubby
NOTE:
2x clips
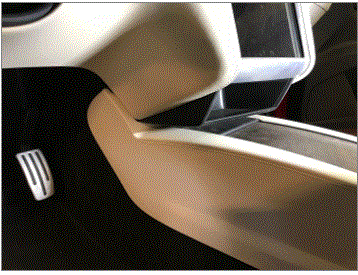 Courtesy of TESLA, INC. Courtesy of TESLA, INC.
|
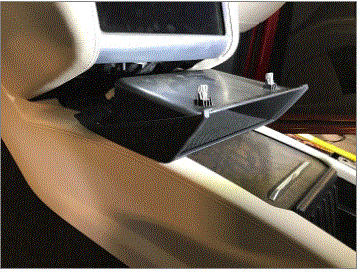 Courtesy of TESLA, INC. Courtesy of TESLA, INC.
|
- Open the rear cup holder
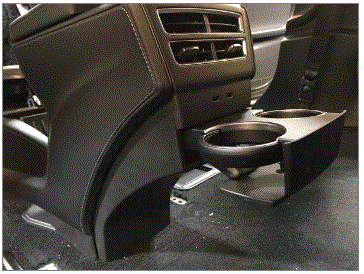 Courtesy of TESLA, INC. Courtesy of TESLA, INC.
|
- Pop out rear air outlet trim panel
NOTE:
4x clips
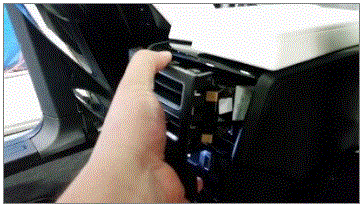 Courtesy of TESLA, INC. Courtesy of TESLA, INC.
|
- Disconnect the USB ports from the trim panel
NOTE:
2x connectors
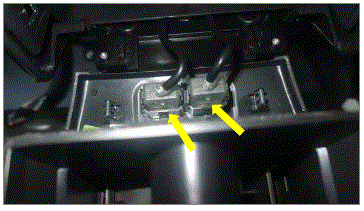 Courtesy of TESLA, INC. Courtesy of TESLA, INC.
|
- Remove the rear cupholder trim panel
NOTE:
Slide up to remove
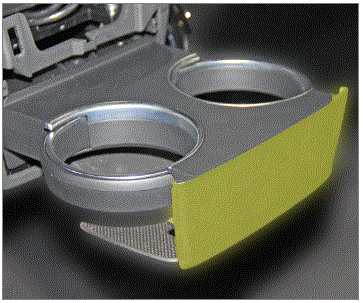 Courtesy of TESLA, INC. Courtesy of TESLA, INC.
|
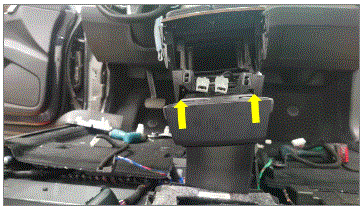 Courtesy of TESLA, INC. Courtesy of TESLA, INC.
|
- Close rear cup holder
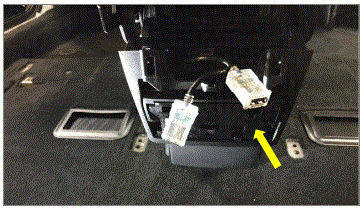 Courtesy of TESLA, INC. Courtesy of TESLA, INC.
|
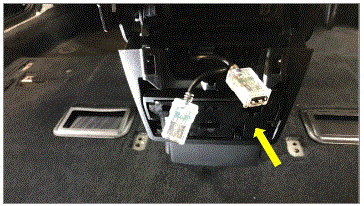 Courtesy of TESLA, INC. Courtesy of TESLA, INC.
|
- Release the rear center console trim panel
NOTE:
8x clips
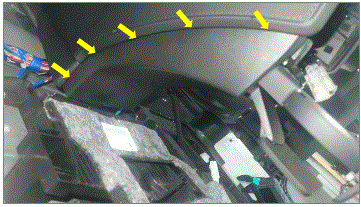 Courtesy of TESLA, INC. Courtesy of TESLA, INC.
|
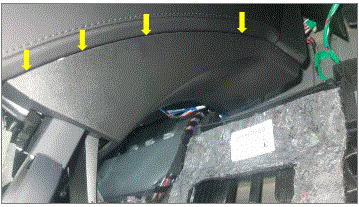 Courtesy of TESLA, INC. Courtesy of TESLA, INC.
|
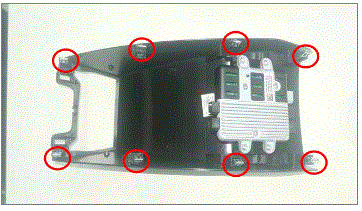 Courtesy of TESLA, INC. Courtesy of TESLA, INC.
|
- Disconnect the harnesses from the module at rear trim panel
NOTE:
6x connectors
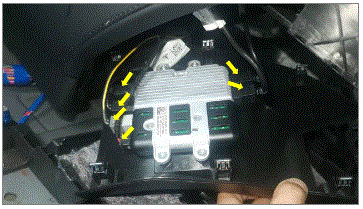 Courtesy of TESLA, INC. Courtesy of TESLA, INC.
|
- Release the RH center console side trim panel
NOTE:
13x clips
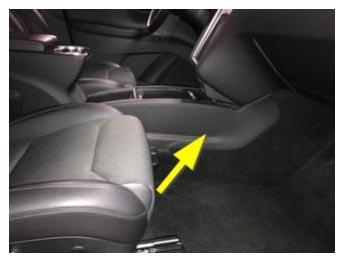 Courtesy of TESLA, INC. Courtesy of TESLA, INC.
|
- Release the LH center console side trim panel
NOTE:
13x clips
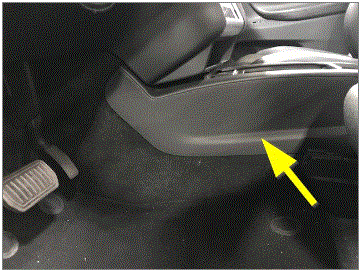 Courtesy of TESLA, INC. Courtesy of TESLA, INC.
|
- Remove LH center console closeout extension
NOTE:
6x clips
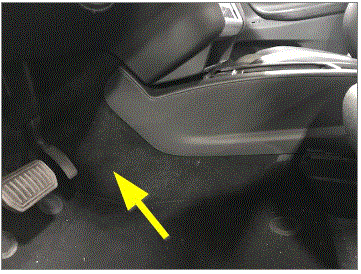 Courtesy of TESLA, INC. Courtesy of TESLA, INC.
|
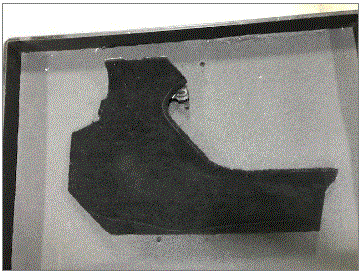 Courtesy of TESLA, INC. Courtesy of TESLA, INC.
|
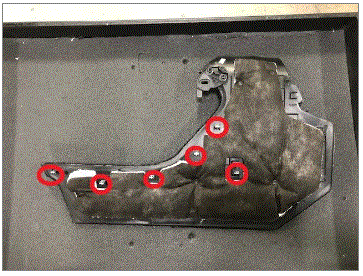 Courtesy of TESLA, INC. Courtesy of TESLA, INC.
|
- Remove RH center console closeout extension
NOTE:
6x clips
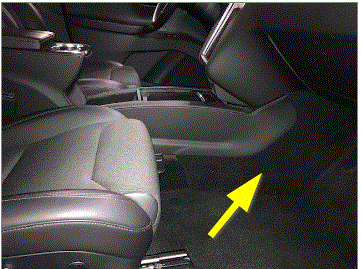 Courtesy of TESLA, INC. Courtesy of TESLA, INC.
|
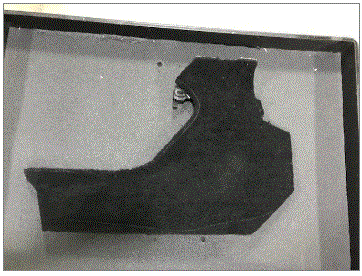 Courtesy of TESLA, INC. Courtesy of TESLA, INC.
|
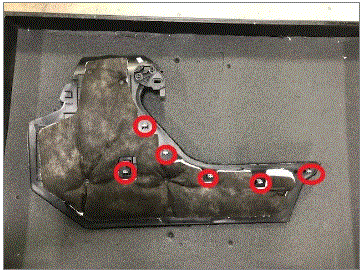 Courtesy of TESLA, INC. Courtesy of TESLA, INC.
|
- Remove the front cup holder dividers, then remove the rubber mat at the base of the console
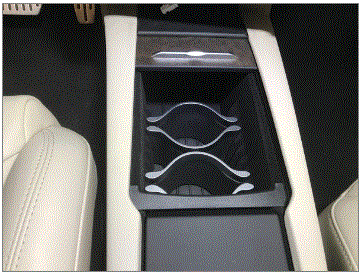 Courtesy of TESLA, INC. Courtesy of TESLA, INC.
|
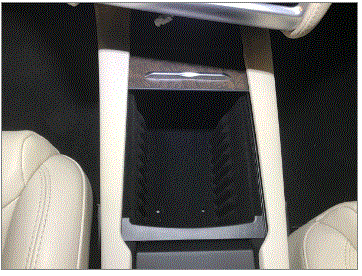 Courtesy of TESLA, INC. Courtesy of TESLA, INC.
|
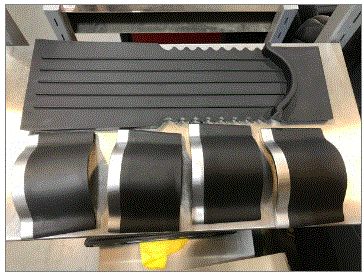 Courtesy of TESLA, INC. Courtesy of TESLA, INC.
|
- Disconnect center console harness
NOTE:
6x connectors
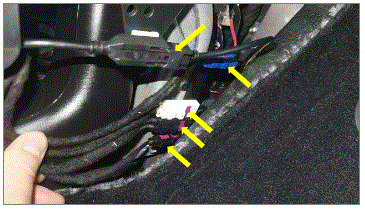 Courtesy of TESLA, INC. Courtesy of TESLA, INC.
|
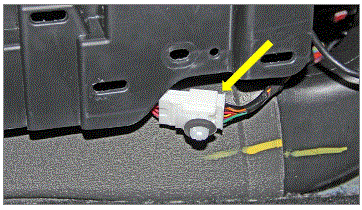 Courtesy of TESLA, INC. Courtesy of TESLA, INC.
|
- Remove the bolts securing center console assembly
NOTE:
1x screw, T20, 2 Nm, 6x bolts, 10mm, 5 Nm
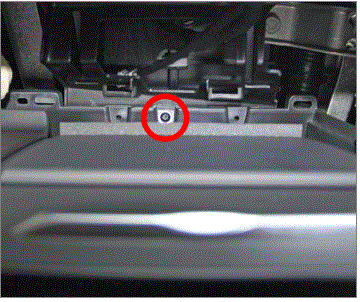 Courtesy of TESLA, INC. Courtesy of TESLA, INC.
|
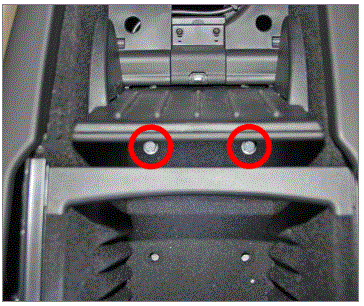 Courtesy of TESLA, INC. Courtesy of TESLA, INC.
|
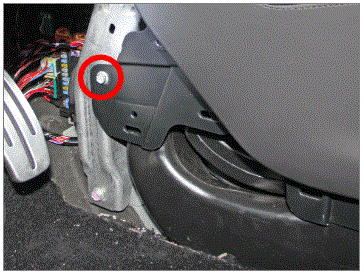 Courtesy of TESLA, INC. Courtesy of TESLA, INC.
|
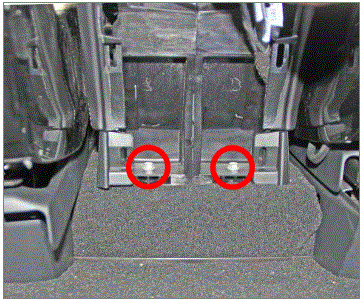 Courtesy of TESLA, INC. Courtesy of TESLA, INC.
|
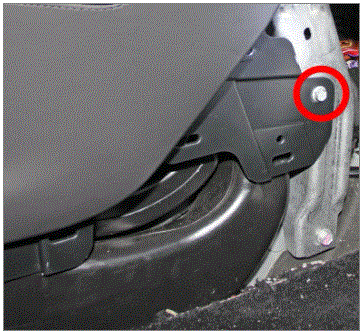 Courtesy of TESLA, INC. Courtesy of TESLA, INC.
|
- Remove center console from vehicle
NOTE:
Recommend assistance
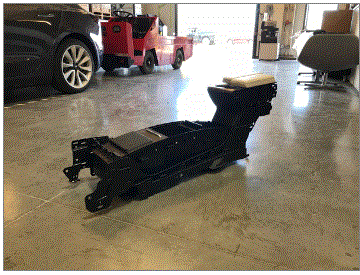 Courtesy of TESLA, INC. Courtesy of TESLA, INC.
|
- Remove LH inner seat riser trim covers
NOTE:
2x clips, Remove inner outboard cover first then inner inboard cover
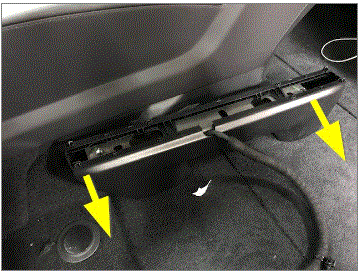 Courtesy of TESLA, INC. Courtesy of TESLA, INC.
|
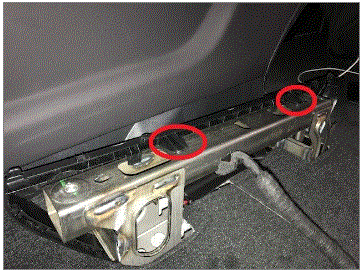 Courtesy of TESLA, INC. Courtesy of TESLA, INC.
|
- Remove RH inner seat riser trim covers
NOTE:
2x clips, Remove inner outboard cover first then inner inboard cover
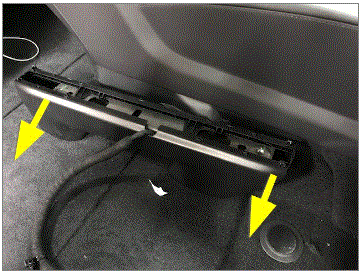 Courtesy of TESLA, INC. Courtesy of TESLA, INC.
|
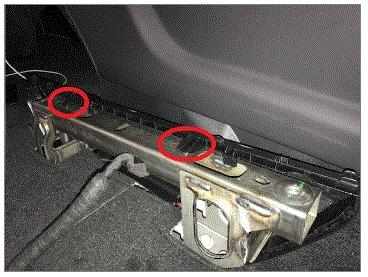 Courtesy of TESLA, INC. Courtesy of TESLA, INC.
|
- Remove seat harness from inner seat riser on LH and RH sides
NOTE:
2x clips
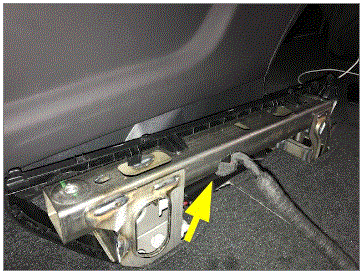 Courtesy of TESLA, INC. Courtesy of TESLA, INC.
|
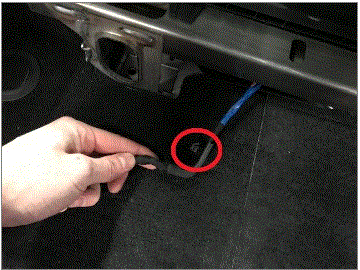 Courtesy of TESLA, INC. Courtesy of TESLA, INC.
|
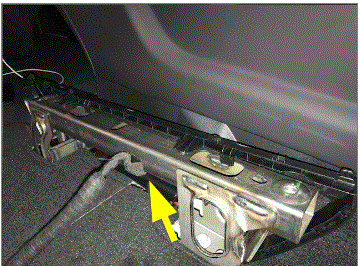 Courtesy of TESLA, INC. Courtesy of TESLA, INC.
|
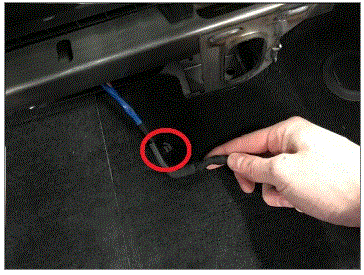 Courtesy of TESLA, INC. Courtesy of TESLA, INC.
|
- Remove the inner seat riser fasteners
NOTE:
4x fasteners, 14mm, 33 Nm, Discard after removal
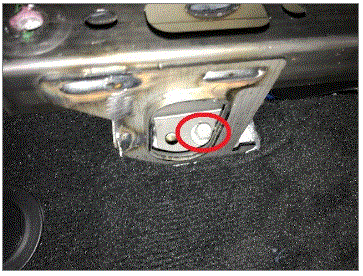 Courtesy of TESLA, INC. Courtesy of TESLA, INC.
|
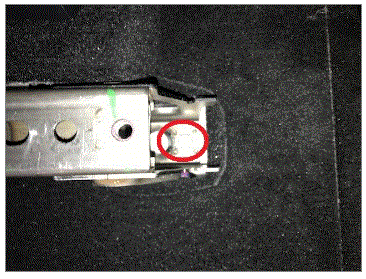 Courtesy of TESLA, INC. Courtesy of TESLA, INC.
|
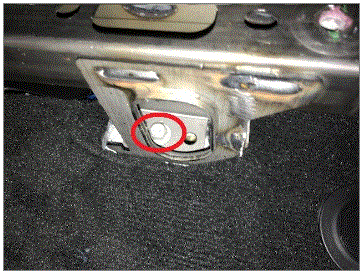 Courtesy of TESLA, INC. Courtesy of TESLA, INC.
|
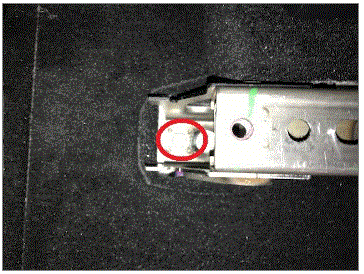 Courtesy of TESLA, INC. Courtesy of TESLA, INC.
|
- Remove inner seat riser
NOTE:
Fold carpet back to ease removal of inner seat riser
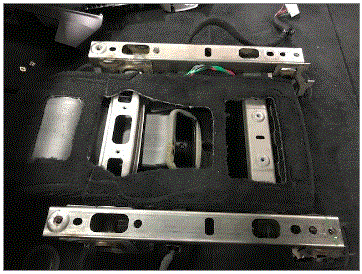 Courtesy of TESLA, INC. Courtesy of TESLA, INC.
|
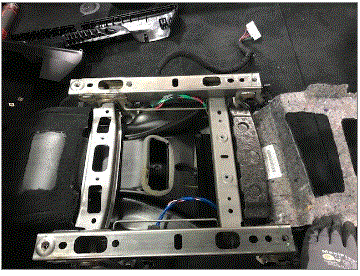 Courtesy of TESLA, INC. Courtesy of TESLA, INC.
|
- Remove LH outer seat riser
NOTE:
2x bolts, T45, 34 Nm
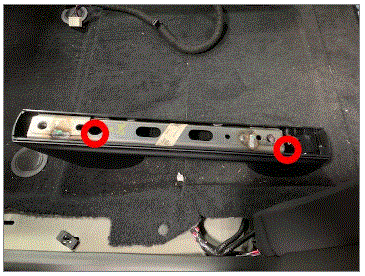 Courtesy of TESLA, INC. Courtesy of TESLA, INC.
|
- Remove RH outer seat riser
NOTE:
2x bolts, T45, 34 Nm
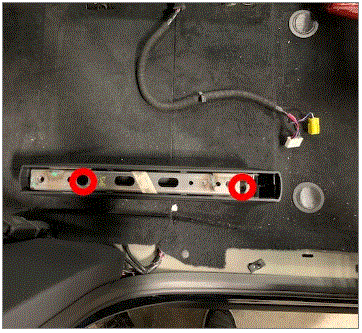 Courtesy of TESLA, INC. Courtesy of TESLA, INC.
|
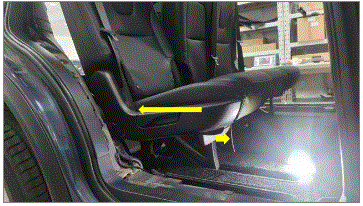
- Move the 40 seats fully rearward
 Courtesy of TESLA, INC. Courtesy of TESLA, INC.
|
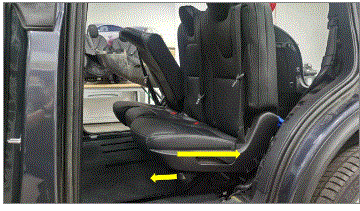
- Move the 60 seats fully rearward
 Courtesy of TESLA, INC. Courtesy of TESLA, INC.
|
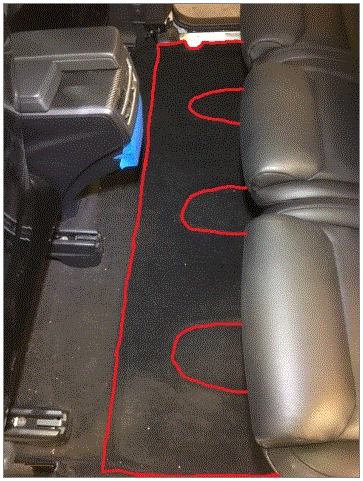
- Remove second row floor panel 2
NOTE:
4x clips, Recommend assistance, Tilt front edge upwards and remove in vertical position, Take precautions from damaging the rear of the console during removal
 Courtesy of TESLA, INC. Courtesy of TESLA, INC.
|
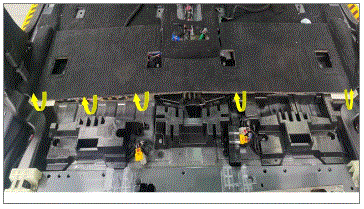
- Remove 2nd row front floor
NOTE:
3x clips
 Courtesy of TESLA, INC. Courtesy of TESLA, INC.
|
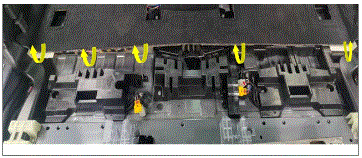 Courtesy of TESLA, INC. Courtesy of TESLA, INC.
|
- Remove the sliding isolation panel at the front of the center bench
NOTE:
4x Sliding isolation plate, 4x clips Need to peel sticker back to release clip
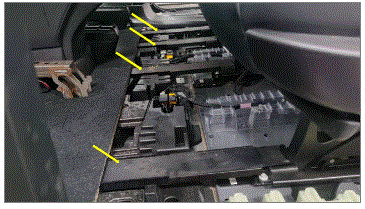 Courtesy of TESLA, INC. Courtesy of TESLA, INC.
|
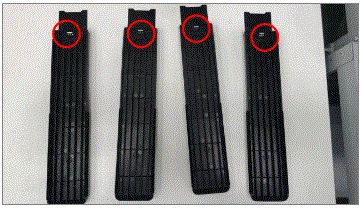 Courtesy of TESLA, INC. Courtesy of TESLA, INC.
|
- Remove drivers foot well panel
NOTE:
2x clips, 1x Connector
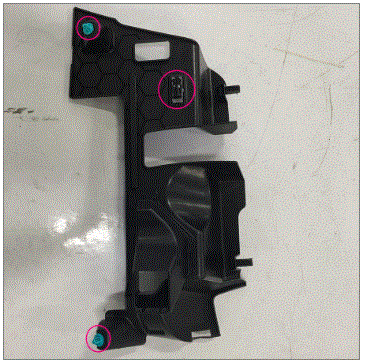 Courtesy of TESLA, INC. Courtesy of TESLA, INC.
|
- Remove passenger footwell cover
NOTE:
2x clips, 1x connector
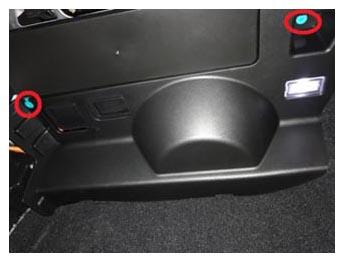 Courtesy of TESLA, INC. Courtesy of TESLA, INC.
|
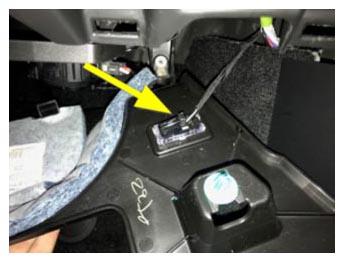 Courtesy of TESLA, INC. Courtesy of TESLA, INC.
|
- Remove front main carpet
NOTE:
4x clips
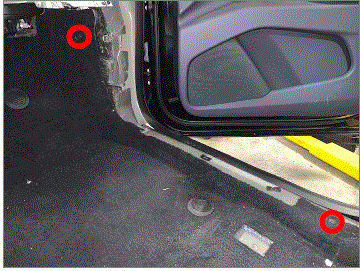 Courtesy of TESLA, INC. Courtesy of TESLA, INC.
|
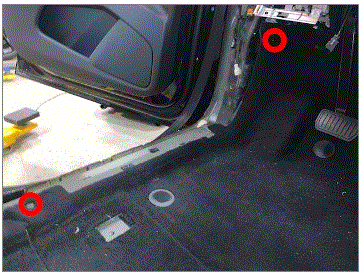 Courtesy of TESLA, INC. Courtesy of TESLA, INC.
|
- Remove foam floor support
NOTE:
2x fan clips, 2x fir tree clips
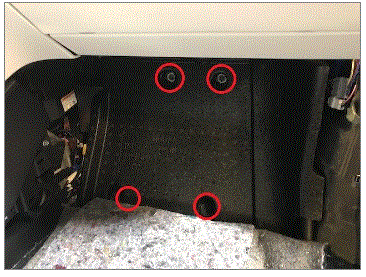 Courtesy of TESLA, INC. Courtesy of TESLA, INC.
|
- Remove console outlet duct from front HVAC assembly
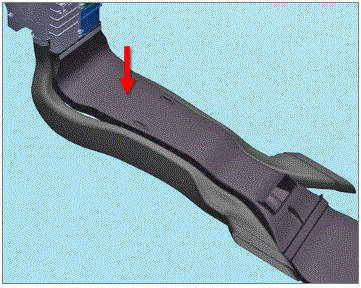 Courtesy of TESLA, INC. Courtesy of TESLA, INC.
|
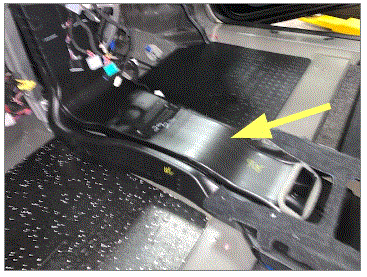 Courtesy of TESLA, INC. Courtesy of TESLA, INC.
|
- Remove 2nd row foot ducts
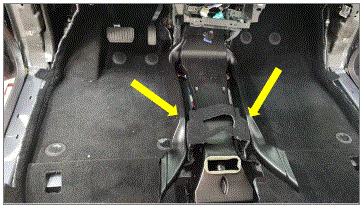 Courtesy of TESLA, INC. Courtesy of TESLA, INC.
|
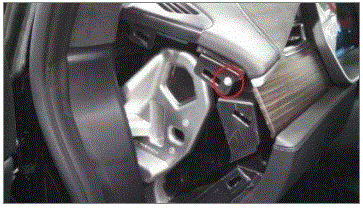
- Remove screw securing LH side of top pad to IP carrier
NOTE:
1x screw, T20, 1.2 Nm
 Courtesy of TESLA, INC. Courtesy of TESLA, INC.
|
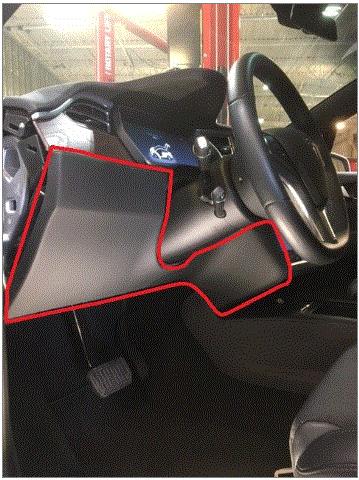
- Remove LH lower IP trim
NOTE:
9x clips
 Courtesy of TESLA, INC. Courtesy of TESLA, INC.
|
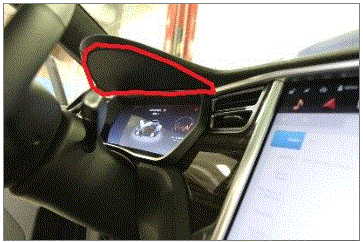
- Remove lower binnacle cover from IP area of vehicle
NOTE:
4x clips
 Courtesy of TESLA, INC. Courtesy of TESLA, INC.
|
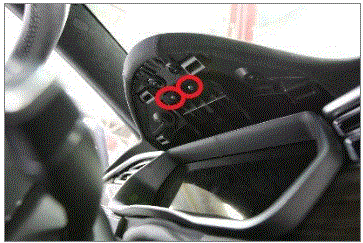
- Remove screws securing top pad to binnacle
NOTE:
2x screws, T20, 1.2 Nm
 Courtesy of TESLA, INC. Courtesy of TESLA, INC.
|
- Release clips securing upper steering column gap hider to IC bezel
NOTE:
2x clips
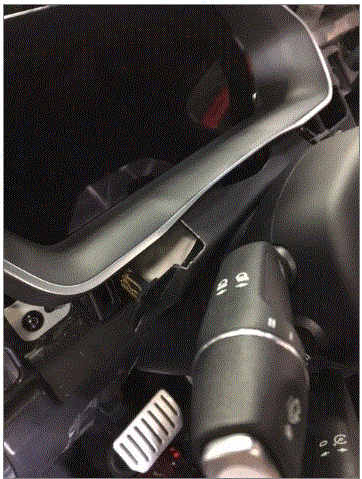 Courtesy of TESLA, INC. Courtesy of TESLA, INC.
|
- Remove screw securing RH side of top pad to IP carrier
NOTE:
1x screw, T25, 1.2 Nm
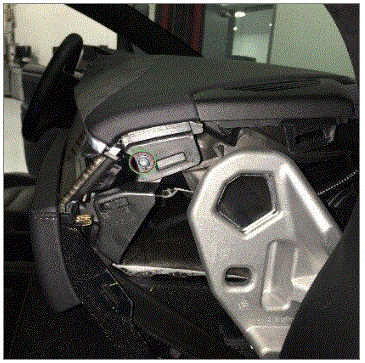 Courtesy of TESLA, INC. Courtesy of TESLA, INC.
|
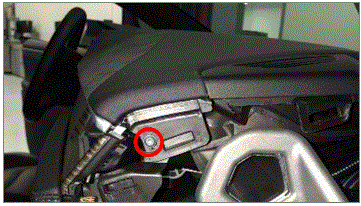 Courtesy of TESLA, INC. Courtesy of TESLA, INC.
|
- Remove RH instrument panel lower trim
NOTE:
13x clips
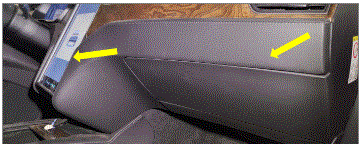 Courtesy of TESLA, INC. Courtesy of TESLA, INC.
|
- Remove the glove box assembly
NOTE:
6x screws, T20, 2.3 Nm, 3x connectors
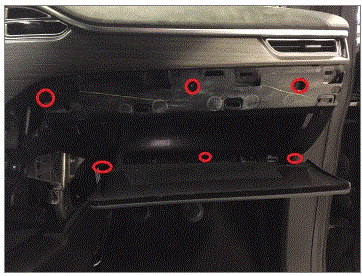 Courtesy of TESLA, INC. Courtesy of TESLA, INC.
|
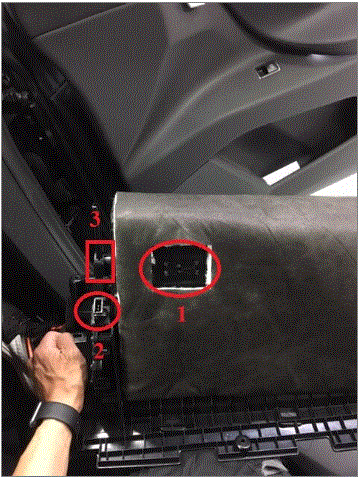 Courtesy of TESLA, INC. Courtesy of TESLA, INC.
|
- Cover the aluminum strip on the top pad and MCU bezel with tape for protection
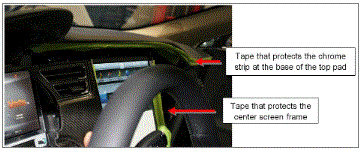 Courtesy of TESLA, INC. Courtesy of TESLA, INC.
|
- Release the top pad from the vehicle
NOTE:
Lifting with an inflatable wedge is recommended to reduce the risk of bending the top pad, Place the inflatable wedge above the vent outlet at the left and right side of the touchscreen
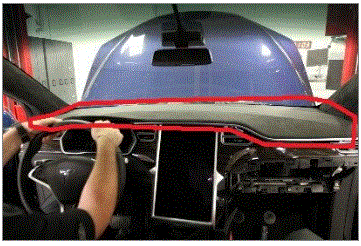 Courtesy of TESLA, INC. Courtesy of TESLA, INC.
|
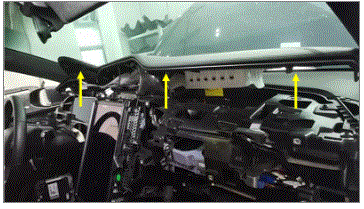 Courtesy of TESLA, INC. Courtesy of TESLA, INC.
|
- Remove the instrument cluster bezel from the IP carrier
NOTE:
4x screws, T20, 2.3 Nm
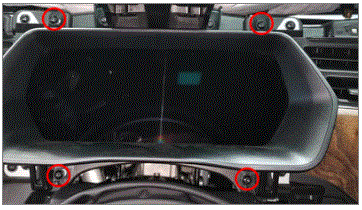 Courtesy of TESLA, INC. Courtesy of TESLA, INC.
|
- Remove screws securing LH IP finisher with vent to IP carrier
NOTE:
2x screws, T20, 2.3 Nm
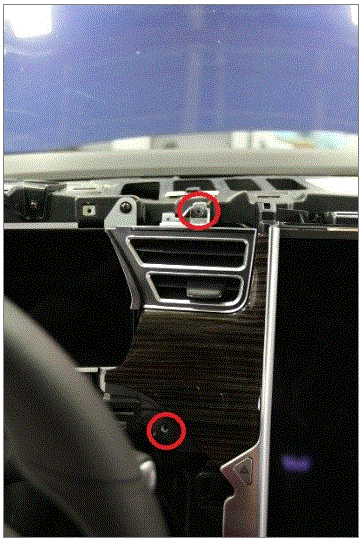 Courtesy of TESLA, INC. Courtesy of TESLA, INC.
|
- Release clips securing LH IP finisher with vent to the IP carrier and remove from vehicle
NOTE:
3x clips
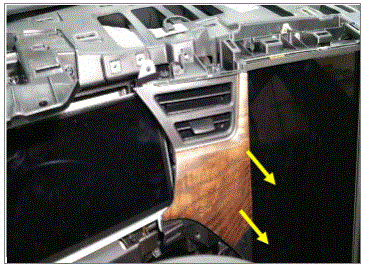 Courtesy of TESLA, INC. Courtesy of TESLA, INC.
|
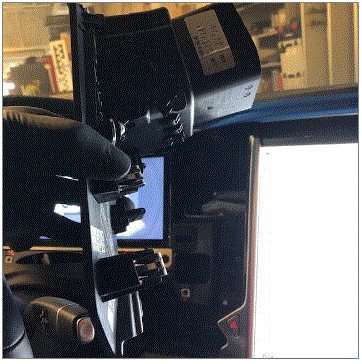 Courtesy of TESLA, INC. Courtesy of TESLA, INC.
|
- Remove screws securing RH instrument panel finisher assembly to the IP carrier
NOTE:
2x screws, T20, 2.3 Nm
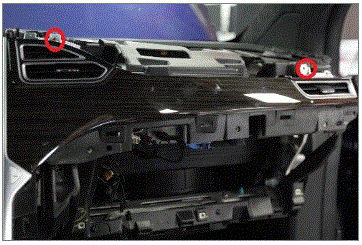 Courtesy of TESLA, INC. Courtesy of TESLA, INC.
|
- Release the clips for the RH finisher and remove from vehicle
NOTE:
6x clips
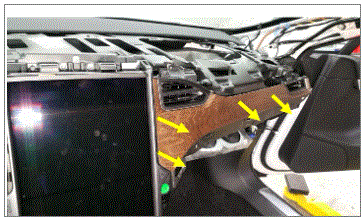 Courtesy of TESLA, INC. Courtesy of TESLA, INC.
|
- Remove the MCU mounting bolts
NOTE:
4x bolts, T25, 7 Nm, Note locations of washers if present
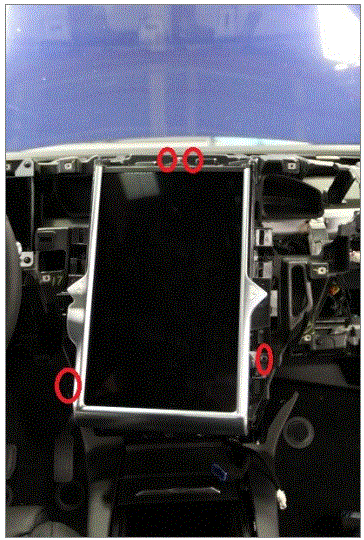 Courtesy of TESLA, INC. Courtesy of TESLA, INC.
|
- Release ground strap from top of MCU
NOTE:
1x connector
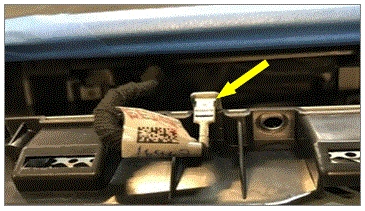 Courtesy of TESLA, INC. Courtesy of TESLA, INC.
|
- Tilt the MCU out from the IP carrier at the top in order to access connectors
NOTE:
Caution: Do not pull on harnesses as it can damage the connectors
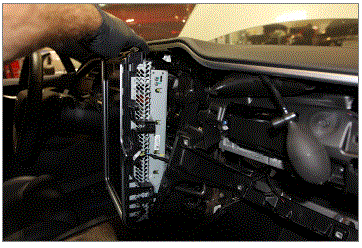 Courtesy of TESLA, INC. Courtesy of TESLA, INC.
|
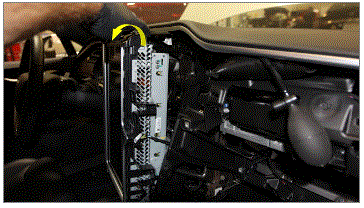 Courtesy of TESLA, INC. Courtesy of TESLA, INC.
|
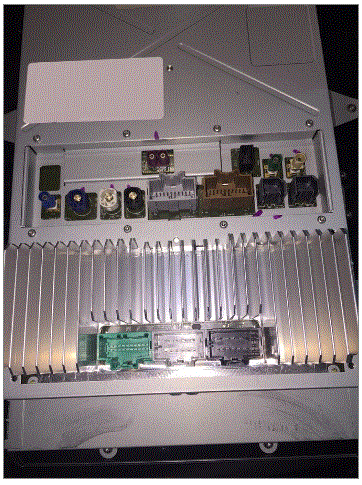
- Disconnect harness connectors from MCU and remove from vehicle
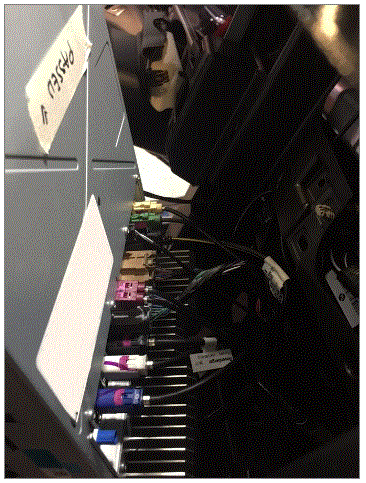 Courtesy of TESLA, INC. Courtesy of TESLA, INC.
|
 Courtesy of TESLA, INC. Courtesy of TESLA, INC.
|
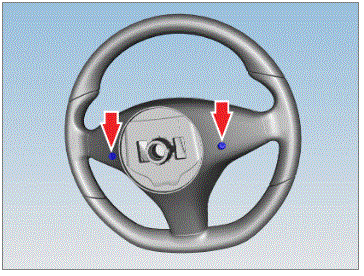
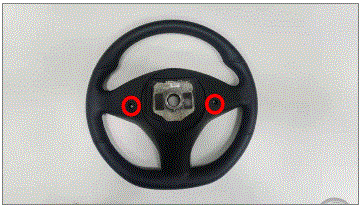
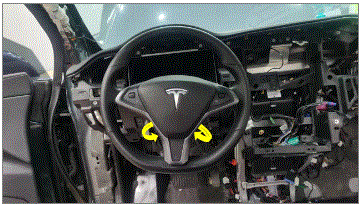
- Remove steering wheel air bag
NOTE:
2x screws, T-30, 3 Nm 3x connectors
 Courtesy of TESLA, INC. Courtesy of TESLA, INC.
|
 Courtesy of TESLA, INC. Courtesy of TESLA, INC.
|
 Courtesy of TESLA, INC. Courtesy of TESLA, INC.
|
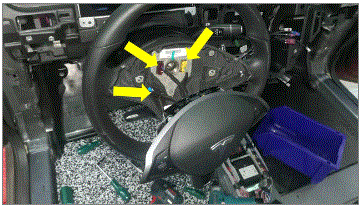 Courtesy of TESLA, INC. Courtesy of TESLA, INC.
|
- Remove steering wheel
NOTE:
1x bolt, 10mm, 80 Nm, Mark spline for installation orientation
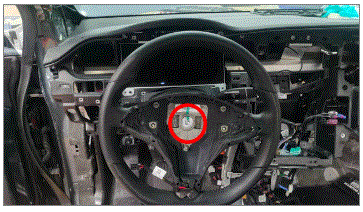 Courtesy of TESLA, INC. Courtesy of TESLA, INC.
|
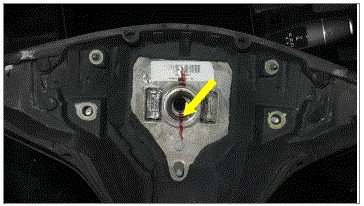 Courtesy of TESLA, INC. Courtesy of TESLA, INC.
|
- Remove steering column module
NOTE:
1x connector
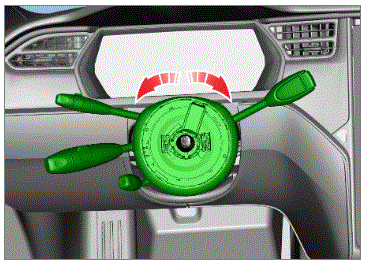 Courtesy of TESLA, INC. Courtesy of TESLA, INC.
|
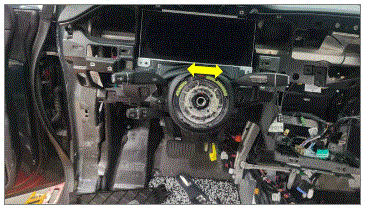 Courtesy of TESLA, INC. Courtesy of TESLA, INC.
|
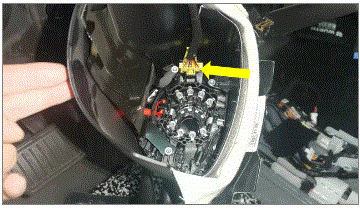 Courtesy of TESLA, INC. Courtesy of TESLA, INC.
|
- Remove bracket under steering column area
NOTE:
2x screws, T20, 2 Nm
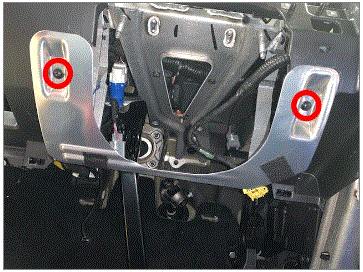 Courtesy of TESLA, INC. Courtesy of TESLA, INC.
|
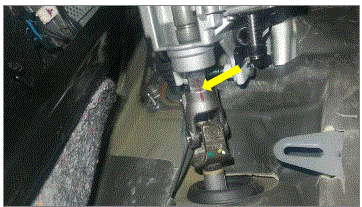
- Remove the bolt that secures the lower shaft to the steering column
NOTE:
1x bolt, 13mm, 30 Nm, Mark the lower shaft position relative to the column
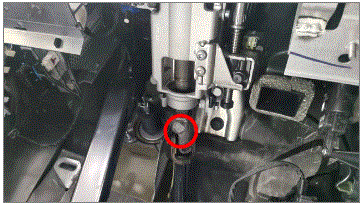 Courtesy of TESLA, INC. Courtesy of TESLA, INC.
|
 Courtesy of TESLA, INC. Courtesy of TESLA, INC.
|
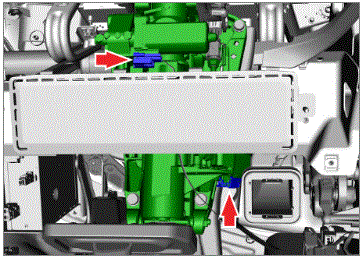
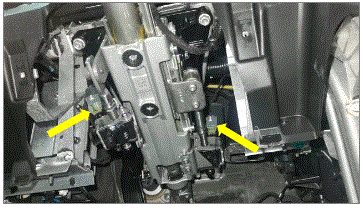
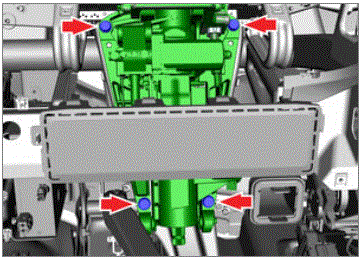
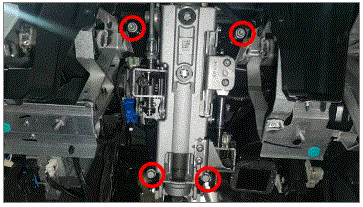
- Remove the steering column from the cross member
NOTE:
2x, bolts, 13mm, 30 Nm, 2x nuts, 13mm, 30 Nm, 2x connections
 Courtesy of TESLA, INC. Courtesy of TESLA, INC.
|
 Courtesy of TESLA, INC. Courtesy of TESLA, INC.
|
 Courtesy of TESLA, INC. Courtesy of TESLA, INC.
|
 Courtesy of TESLA, INC. Courtesy of TESLA, INC.
|
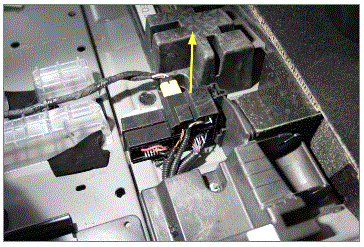
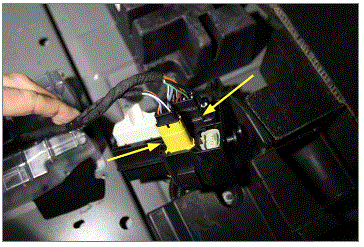
- Disconnect 40 seat harness
NOTE:
2x connectors, Release bracket for better access
 Courtesy of TESLA, INC. Courtesy of TESLA, INC.
|
 Courtesy of TESLA, INC. Courtesy of TESLA, INC.
|
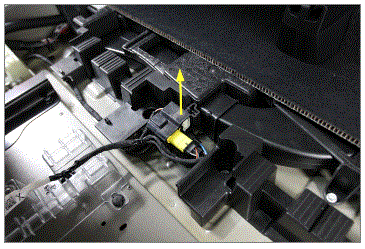
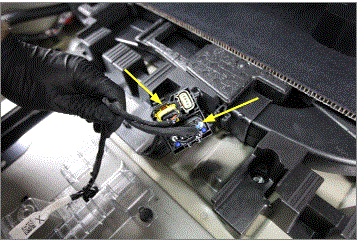
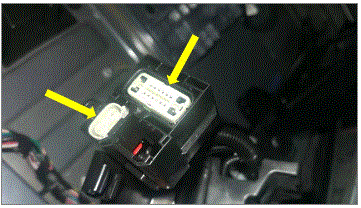
- Disconnect 60 seat harness
NOTE:
2x connectors, Release bracket for better access
 Courtesy of TESLA, INC. Courtesy of TESLA, INC.
|
 Courtesy of TESLA, INC. Courtesy of TESLA, INC.
|
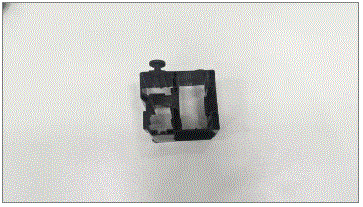
- Remove the LH bracket from the harness
NOTE:
2x clips
 Courtesy of TESLA, INC. Courtesy of TESLA, INC.
|
 Courtesy of TESLA, INC. Courtesy of TESLA, INC.
|
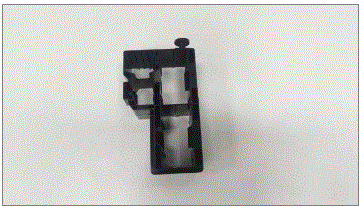
- Remove the RH bracket from the harness
 Courtesy of TESLA, INC. Courtesy of TESLA, INC.
|
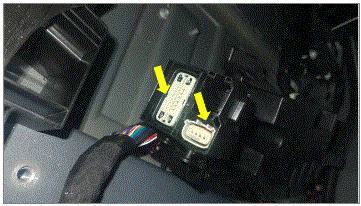 Courtesy of TESLA, INC. Courtesy of TESLA, INC.
|
- Remove the fasteners securing LH Outer beaver dam
NOTE:
2x nuts, 10mm, 5 Nm
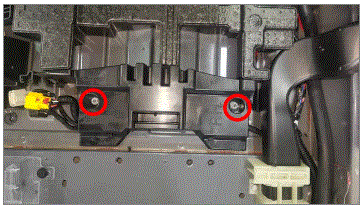 Courtesy of TESLA, INC. Courtesy of TESLA, INC.
|
- Release the harness clips from the LH Outer beaver dam remove from the vehicle
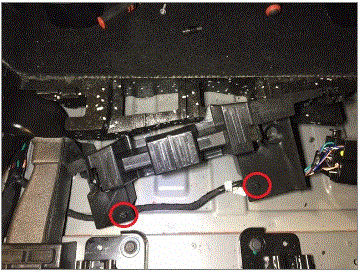 Courtesy of TESLA, INC. Courtesy of TESLA, INC.
|
- Remove the fasteners securing the RH Outer beaver dam
NOTE:
2x bolts, 10mm, 5 Nm
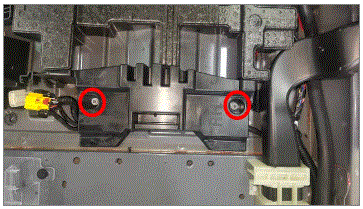 Courtesy of TESLA, INC. Courtesy of TESLA, INC.
|
- Release the harness clips from the RH Outer beaver dam and remove from the vehicle
NOTE:
2x harness clips
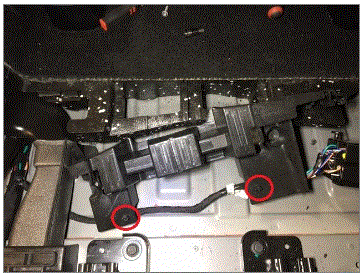 Courtesy of TESLA, INC. Courtesy of TESLA, INC.
|
- Remove LH 2nd row front carpet support
NOTE:
Foam block may vary depending on vehicle configuration and production level
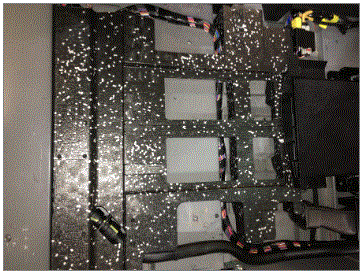 Courtesy of TESLA, INC. Courtesy of TESLA, INC.
|
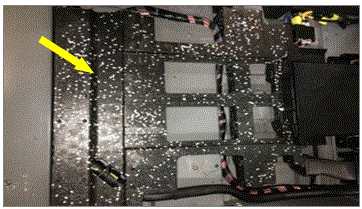 Courtesy of TESLA, INC. Courtesy of TESLA, INC.
|
- Remove RH 2nd row front carpet support
NOTE:
Foam block may vary depending on vehicle configuration and production level
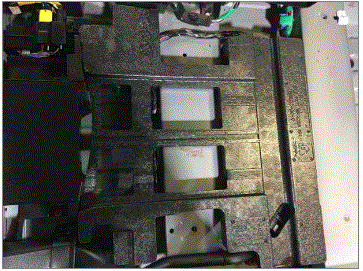 Courtesy of TESLA, INC. Courtesy of TESLA, INC.
|
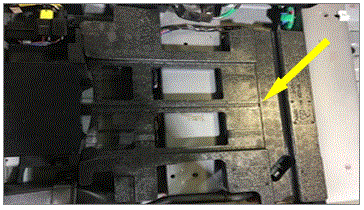 Courtesy of TESLA, INC. Courtesy of TESLA, INC.
|
- Remove LH HVAC ducting between lower B pillar and upper C pillar
NOTE:
2x bolts, 10mm, 5 Nm 1x nut, 10mm, 5 Nm, Remove all sections of ducting between the B-Pillar and C-Pillar, 2 foam ducts and 2 plastic duct couplers
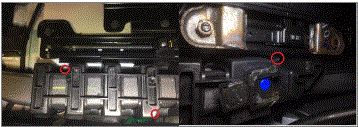 Courtesy of TESLA, INC. Courtesy of TESLA, INC.
|
- Remove RH HVAC ducting between lower B pillar and upper C pillar
NOTE:
2x bolts, 10mm, 5 Nm 1x nut, 10mm, 5 Nm, Remove all sections of ducting between the B- Pillar and C-Pillar, 2 foam ducts and 2 plastic duct couplers
Courtesy of TESLA, INC.
|
- Remove front LH, RH screws securing headliner to upper body panel
NOTE:
2x screws, T20, 2 Nm, 34x clips, Lower headliner starting from the rear side
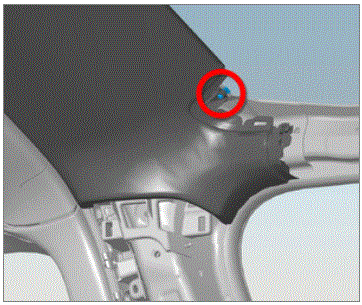 Courtesy of TESLA, INC. Courtesy of TESLA, INC.
|
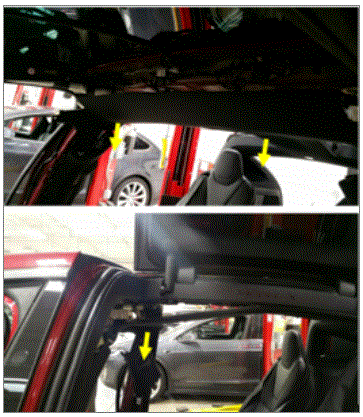 Courtesy of TESLA, INC. Courtesy of TESLA, INC.
|
- Disconnect headliner harness
NOTE:
1x connector
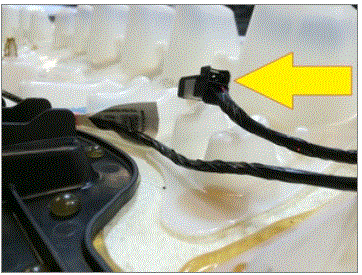 Courtesy of TESLA, INC. Courtesy of TESLA, INC.
|
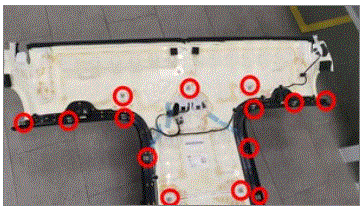
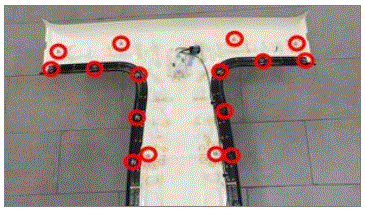
- Remove headliner from vehicle
NOTE:
30x clips, Recommend assistance Remove through liftgate
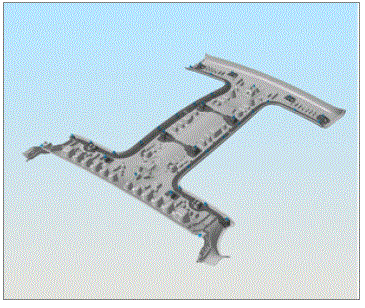 Courtesy of TESLA, INC. Courtesy of TESLA, INC.
|
 Courtesy of TESLA, INC. Courtesy of TESLA, INC.
|
 Courtesy of TESLA, INC. Courtesy of TESLA, INC.
|
- Remove trunk sill trim
NOTE:
4x clips, 2x patch bolts, T25, 2.5 Nm, Discard after removal
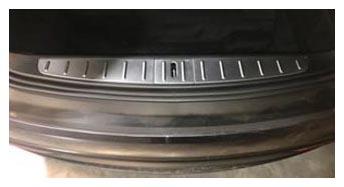 Courtesy of TESLA, INC. Courtesy of TESLA, INC.
|
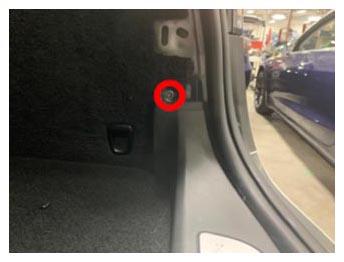 Courtesy of TESLA, INC. Courtesy of TESLA, INC.
|
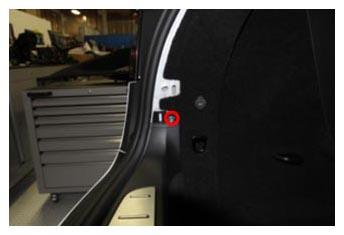 Courtesy of TESLA, INC. Courtesy of TESLA, INC.
|
- Remove rear load floor support
NOTE:
4x push clips, 2x clips
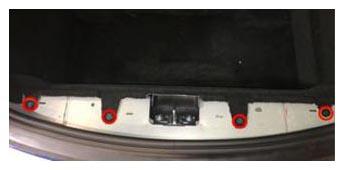 Courtesy of TESLA, INC. Courtesy of TESLA, INC.
|
- Remove vent cover from trunk side carpet
NOTE:
8x tabs
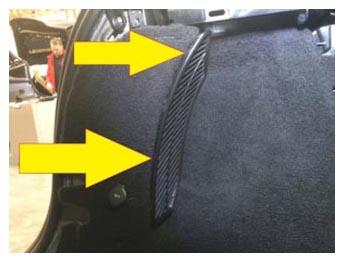 Courtesy of TESLA, INC. Courtesy of TESLA, INC.
|
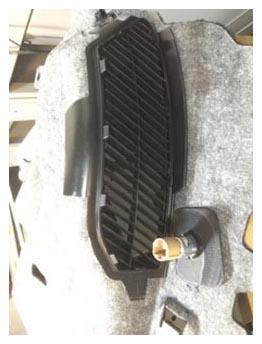 Courtesy of TESLA, INC. Courtesy of TESLA, INC.
|
- Release clips securing LH rear trunk side carpet panel to bracket
NOTE:
5x push clips, One is hidden between 3rd row seat and trunk side carpet panel
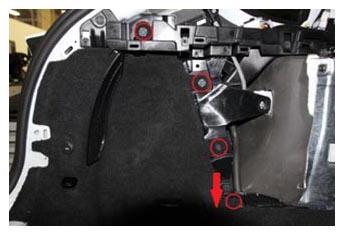 Courtesy of TESLA, INC. Courtesy of TESLA, INC.
|
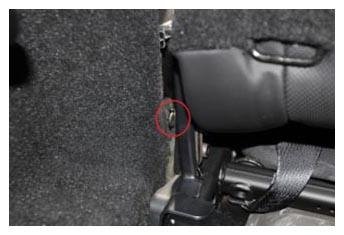 Courtesy of TESLA, INC. Courtesy of TESLA, INC.
|
- Release load floor support from LH trunk side carpet
NOTE:
3x tabs, 1x clip
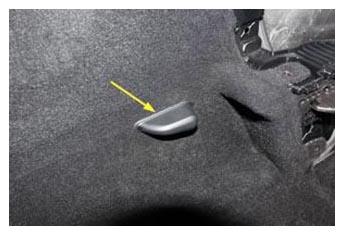 Courtesy of TESLA, INC. Courtesy of TESLA, INC.
|
- Remove LH trunk side carpet panel
NOTE:
2x connectors, Disconnect trunk light and 12V outlet connectors before removal, Pull rear lower corner of LH trunk side carpet panel out and downwards to remove panel
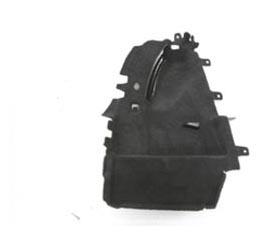 Courtesy of TESLA, INC. Courtesy of TESLA, INC.
|
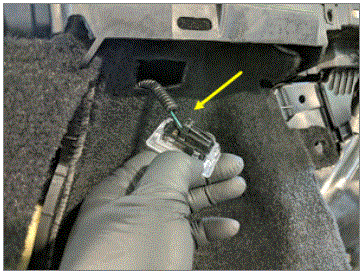 Courtesy of TESLA, INC. Courtesy of TESLA, INC.
|
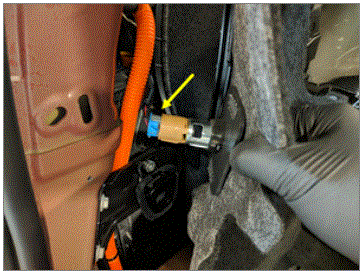 Courtesy of TESLA, INC. Courtesy of TESLA, INC.
|
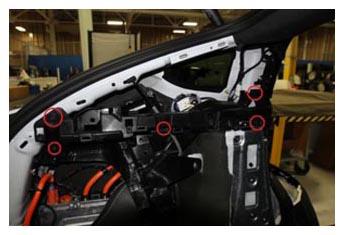
- Remove LH mid-zone C-pillar bracket from vehicle
NOTE:
2x screws, T20, 2.5 Nm, 3x push clips, 2x edge clips, Release edge clips securing charge port release cables, The following 6 steps apply to vehicles with rear HVAC and can be skipped for 5 seat configuration
 Courtesy of TESLA, INC. Courtesy of TESLA, INC.
|
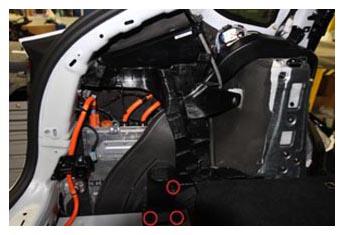
- Remove LH minion bracket from vehicle
NOTE:
3x push clips
 Courtesy of TESLA, INC. Courtesy of TESLA, INC.
|
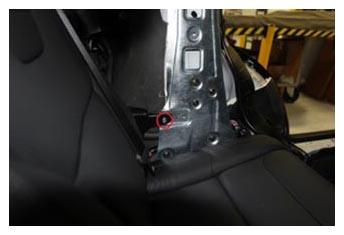
- Remove bolt securing front edge of LH trunk trim bracket
NOTE:
1x bolt, T30, 2.5 Nm
 Courtesy of TESLA, INC. Courtesy of TESLA, INC.
|
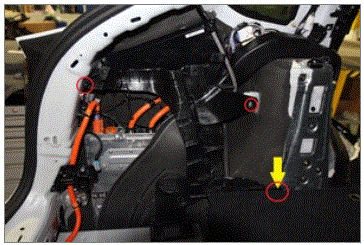
- Remove fasteners securing LH trunk trim bracket and remove from vehicle
NOTE:
2x bolts, T30, 2.5 Nm, 1x push clip
 Courtesy of TESLA, INC. Courtesy of TESLA, INC.
|
- Remove charger duct
NOTE:
Release from plastic ducts at top and bottom
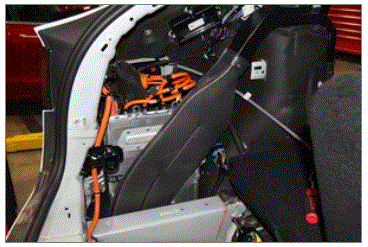 Courtesy of TESLA, INC. Courtesy of TESLA, INC.
|
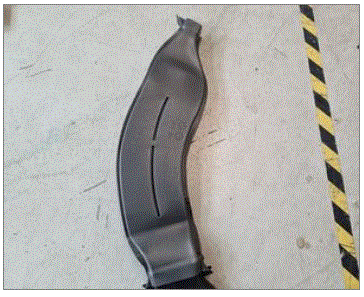 Courtesy of TESLA, INC. Courtesy of TESLA, INC.
|
- Release load floor support from RH trunk side carpet
NOTE:
3x tabs, 1x clip
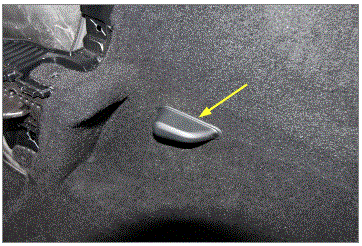 Courtesy of TESLA, INC. Courtesy of TESLA, INC.
|
- Release clips securing RH rear trunk side carpet panel to bracket
NOTE:
3x push clips, One is hidden between 3rd row seat and trunk side carpet panel
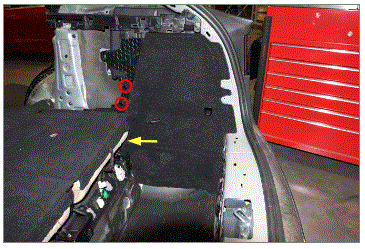 Courtesy of TESLA, INC. Courtesy of TESLA, INC.
|
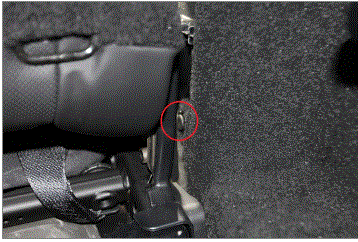 Courtesy of TESLA, INC. Courtesy of TESLA, INC.
|
- Pull rear lower corner of RH trunk side carpet panel out and downwards to remove panel
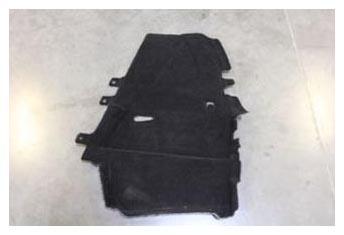 Courtesy of TESLA, INC. Courtesy of TESLA, INC.
|
- Remove clips securing RH minion bracket and remove bracket
NOTE:
3x push clips
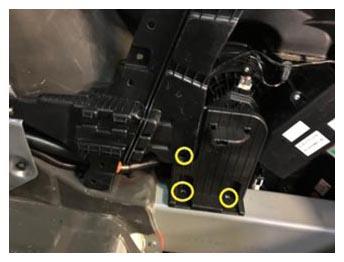 Courtesy of TESLA, INC. Courtesy of TESLA, INC.
|
- Remove the RH trunk bracket
NOTE:
2x bolts, T30, 7 Nm, 4x push clips
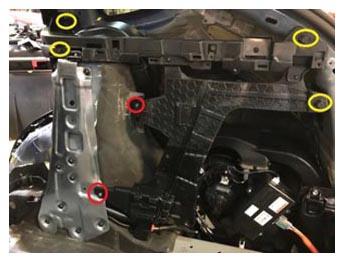 Courtesy of TESLA, INC. Courtesy of TESLA, INC.
|
- Remove LH shock tower brace
NOTE:
9x bolts, T40, 27 Nm
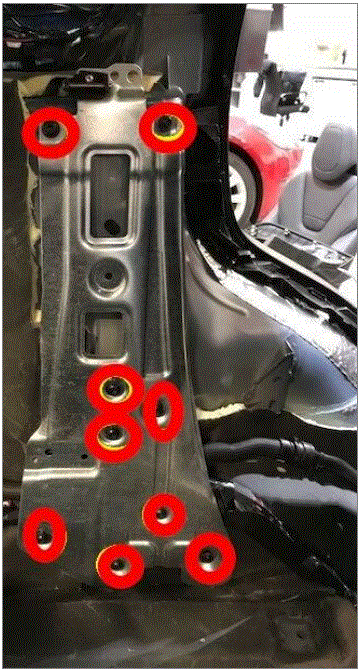 Courtesy of TESLA, INC. Courtesy of TESLA, INC.
|
- Remove RH wheel house bracket
NOTE:
Note 9x bolts, T40, 27 Nm
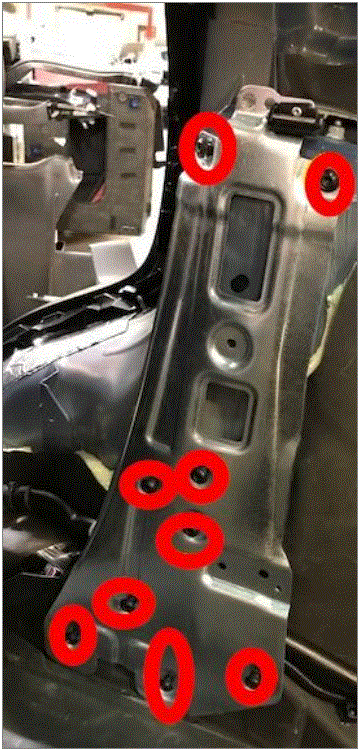 Courtesy of TESLA, INC. Courtesy of TESLA, INC.
|
- Push the vehicle in position to be lifted by hoist then reinstall wheel chocks
NOTE:
Recommend assistance, Ensure doors are clear of the lift posts before pushing forward
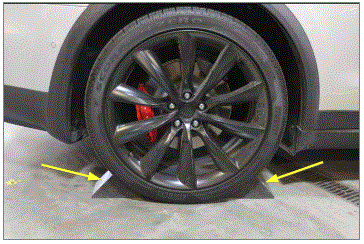 Courtesy of TESLA, INC. Courtesy of TESLA, INC.
|
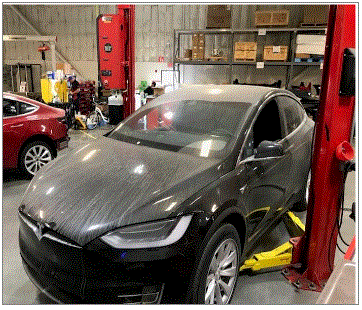 Courtesy of TESLA, INC. Courtesy of TESLA, INC.
|
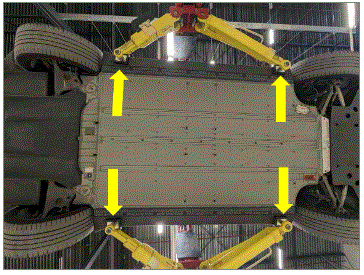
- Raise and support vehicle
NOTE:
Set air suspension to Jack Mode, Via Controls > Service > Jack Mode
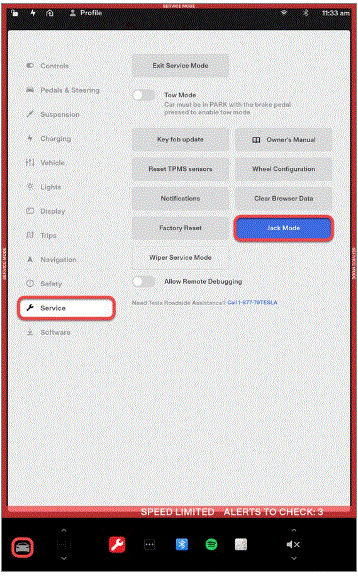 Courtesy of TESLA, INC. Courtesy of TESLA, INC.
|
 Courtesy of TESLA, INC. Courtesy of TESLA, INC.
|
- Raise vehicle fully and lower onto locks
NOTE:
Set vehicle to comfortable working height, Make sure there's an audible click of the locks on both sides before lowering, otherwise vehicle may tilt to the side
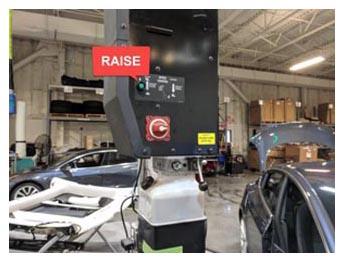 Courtesy of TESLA, INC. Courtesy of TESLA, INC.
|
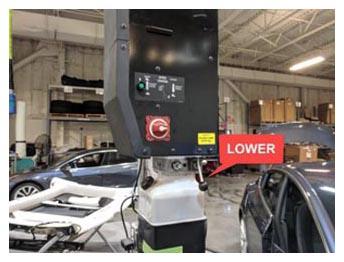 Courtesy of TESLA, INC. Courtesy of TESLA, INC.
|
- Remove LH shear plate
NOTE:
3x screws, T25, 6 Nm, 1x bolt, 10mm, 4 Nm, 2x push clips, 1x nylon nut, 15mm, 35 Nm Discard nylon nut after removal
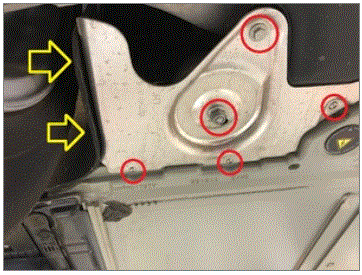 Courtesy of TESLA, INC. Courtesy of TESLA, INC.
|
- Remove RH shear plate
NOTE:
3x screws, T25, 6 Nm, 1x bolt, 10mm, 4 Nm, 2x push clips, 1x nylon nut, 15mm, 35 Nm Discard nylon nut after removal
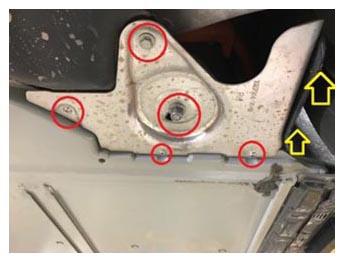 Courtesy of TESLA, INC. Courtesy of TESLA, INC.
|
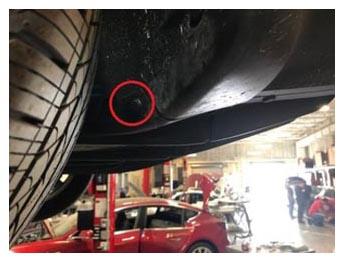
- Remove mid aero shield
NOTE:
20x bolts, 10mm, 4 Nm, 2x push clips
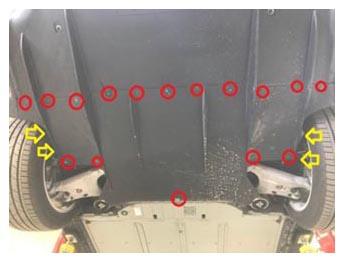 Courtesy of TESLA, INC. Courtesy of TESLA, INC.
|
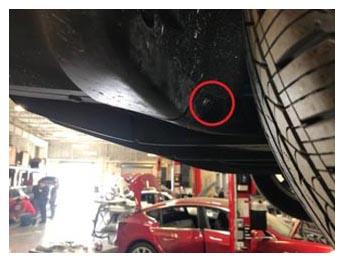 Courtesy of TESLA, INC. Courtesy of TESLA, INC.
|
 Courtesy of TESLA, INC. Courtesy of TESLA, INC.
|
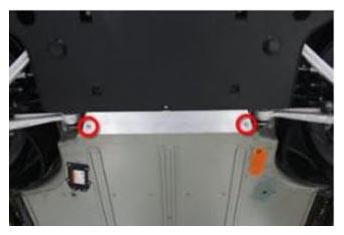
- Remove front bash plate extrusion
NOTE:
2x bolts, T30, 16 Nm
 Courtesy of TESLA, INC. Courtesy of TESLA, INC.
|
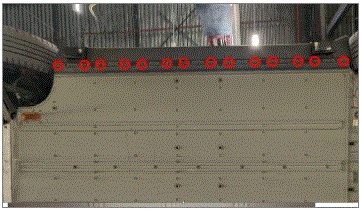
- Remove LH ski side covers
NOTE:
14x clips, 3x covers
 Courtesy of TESLA, INC. Courtesy of TESLA, INC.
|
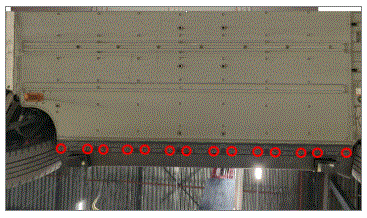
- Remove RH ski side covers
NOTE:
14x push clips, 3x covers
 Courtesy of TESLA, INC. Courtesy of TESLA, INC.
|
- Loosen four center bolts securing HV battery
NOTE:
4x patch bolts, E12, 38 Nm, Discard after removal
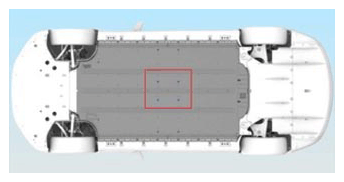 Courtesy of TESLA, INC. Courtesy of TESLA, INC.
|
- Remove four center bolts securing HV battery with battery powered drill
NOTE:
4x patch bolts, E12, 38 Nm, Discard after removal
Courtesy of TESLA, INC.
|
- Position battery table beneath vehicle
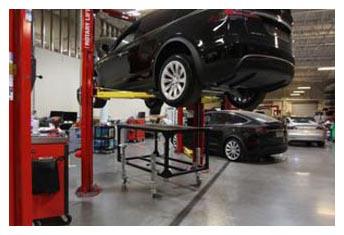 Courtesy of TESLA, INC. Courtesy of TESLA, INC.
|
- Lower vehicle to table
NOTE:
Recommend assistance, Align table to vehicle and raise casters to level table if necessary
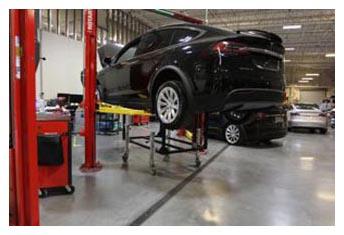 Courtesy of TESLA, INC. Courtesy of TESLA, INC.
|
- Loosen remaining eight outer center bolts securing HV battery
NOTE:
8x patch bolts, E12, 38 Nm, Discard after removal
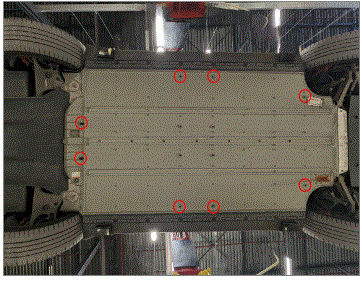 Courtesy of TESLA, INC. Courtesy of TESLA, INC.
|
- Remove remaining eight center bolts securing HV battery with battery powered drill
NOTE:
8x patch bolts, E12, 38 Nm, Discard after removal
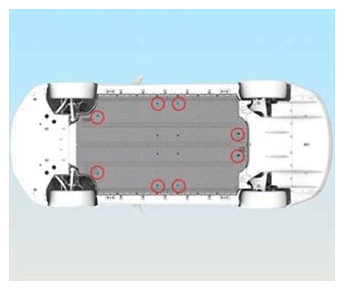 Courtesy of TESLA, INC. Courtesy of TESLA, INC.
|
- Loosen front four HV battery bolts
NOTE:
4x patch bolts, 13mm, 30 Nm, Discard after removal
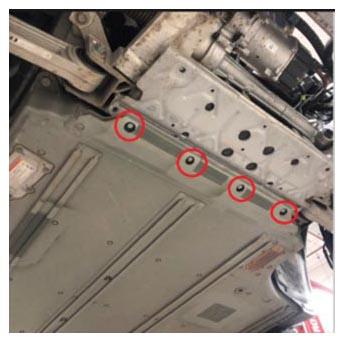 Courtesy of TESLA, INC. Courtesy of TESLA, INC.
|
- Remove front four HV battery bolts with battery powered drill
NOTE:
4x patch bolts, 13mm, 30 Nm, Discard after removal
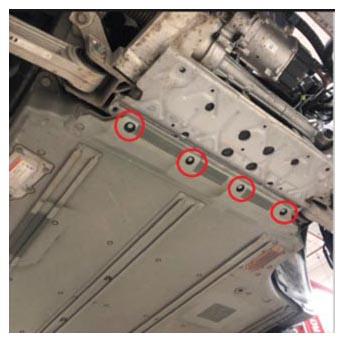 Courtesy of TESLA, INC. Courtesy of TESLA, INC.
|
- Loosen 21mm bolts securing front of HV battery
NOTE:
2x bolts, 21mm, 115 Nm, Discard after removal
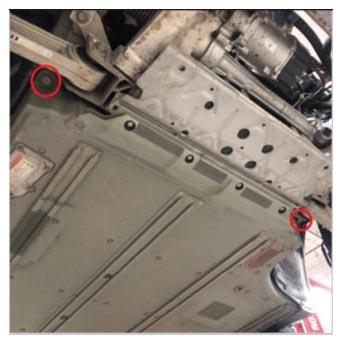 Courtesy of TESLA, INC. Courtesy of TESLA, INC.
|
- Remove and discard 21mm bolts securing front of HV battery
NOTE:
2x bolts, 21mm, 115 Nm, Discard after removal
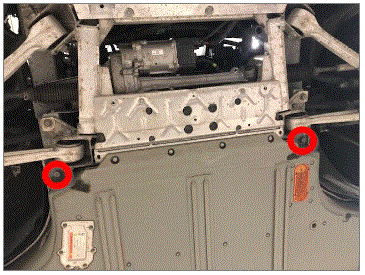 Courtesy of TESLA, INC. Courtesy of TESLA, INC.
|
- Loosen LH rocker bolts
NOTE:
8x patch bolts, 13mm, 55 Nm, Discard after removal
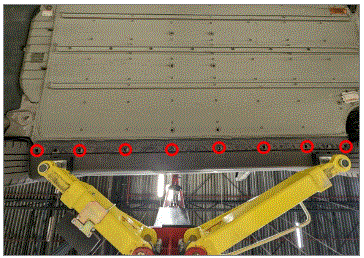 Courtesy of TESLA, INC. Courtesy of TESLA, INC.
|
- Remove LH rocker bolts with battery powered drill
NOTE:
8x patch bolts, 13mm, 55 Nm, Discard after removal
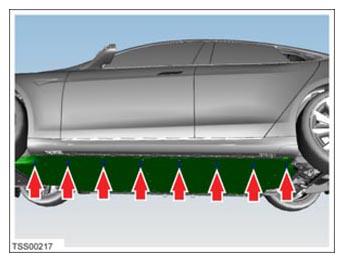 Courtesy of TESLA, INC. Courtesy of TESLA, INC.
|
- Loosen RH rocker bolts
NOTE:
Note 8x patch bolts, 13mm, 55 Nm, Discard after removal
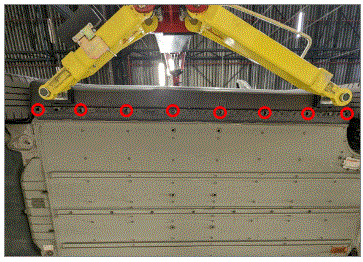 Courtesy of TESLA, INC. Courtesy of TESLA, INC.
|
- Remove RH rocker bolts with battery powered drill
NOTE:
8x patch bolts, 13mm, 55 Nm, Discard after removal
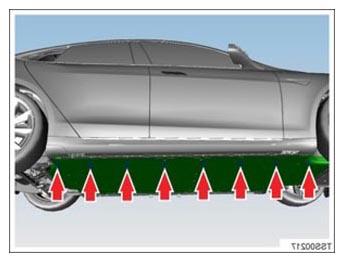 Courtesy of TESLA, INC. Courtesy of TESLA, INC.
|
- Raise vehicle off of HV battery
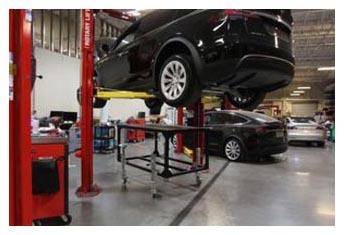 Courtesy of TESLA, INC. Courtesy of TESLA, INC.
|
- Move battery away from vehicle
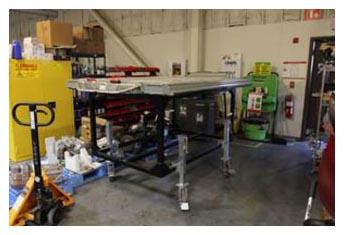 Courtesy of TESLA, INC. Courtesy of TESLA, INC.
|
- Remove all items from pockets and ensure not wearing metal items
 Courtesy of TESLA, INC. Courtesy of TESLA, INC.
|
- Inspect HV insulating gloves
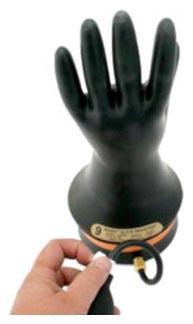 Courtesy of TESLA, INC. Courtesy of TESLA, INC.
|
- Put on HV insulating gloves and leather over gloves
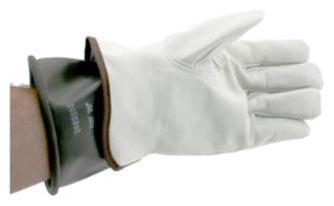 Courtesy of TESLA, INC. Courtesy of TESLA, INC.
|
- Verify no high voltage at HV rapid mate
NOTE:
Make sure to wear PPE (HV gloves, safety glasses) when working on high voltage component, Measure B+ to Ground, B- to Ground, B+ to B-, If voltage is greater than 10V, Pack contactors are not open or welded, Stop work and reach out to Service Engineering
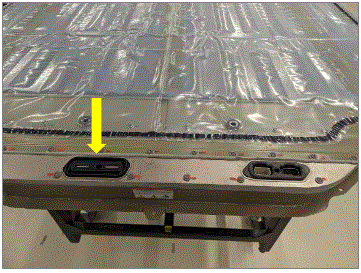 Courtesy of TESLA, INC. Courtesy of TESLA, INC.
|
- Install HV and LV Rapid Mate covers
NOTE:
2x covers, If covers not available then use masking tape to protect Rapid Mate from debris
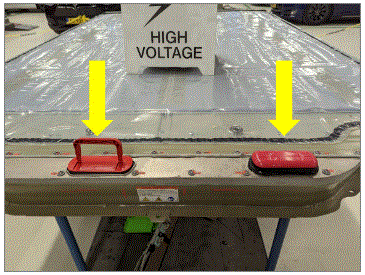 Courtesy of TESLA, INC. Courtesy of TESLA, INC.
|
- Remove bolts and Rear DU HV cable clips from HV battery LV logic connector bracket
NOTE:
2x bolts, 10mm, 5 Nm 2x harness clips
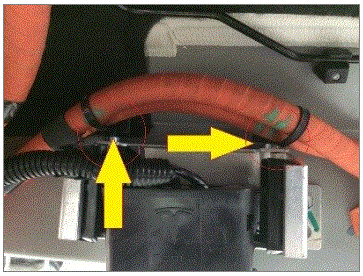 Courtesy of TESLA, INC. Courtesy of TESLA, INC.
|
- Release the HV battery LV logic connector cover from bracket
NOTE:
6x clips1x harness clip
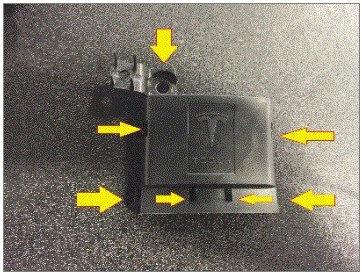 Courtesy of TESLA, INC. Courtesy of TESLA, INC.
|
- Remove the HV battery LV Logic connectors from bracket
NOTE:
2x connectors, Make sure to remember the location of the connectors
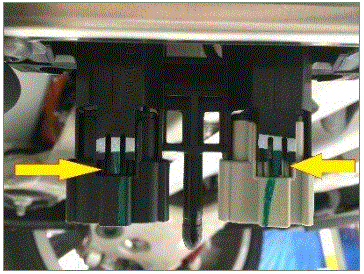 Courtesy of TESLA, INC. Courtesy of TESLA, INC.
|
- Push the logic harness through the body to the rear seat area
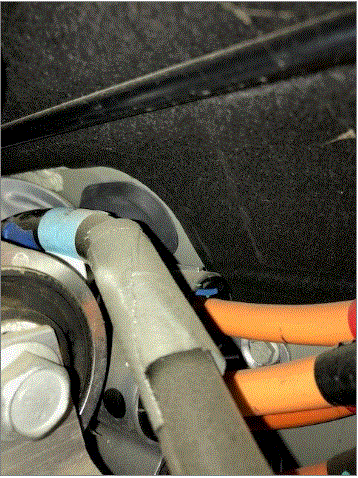 Courtesy of TESLA, INC. Courtesy of TESLA, INC.
|
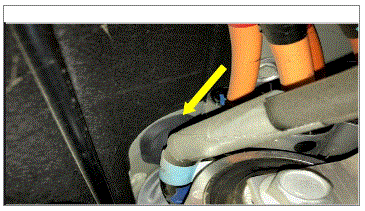 Courtesy of TESLA, INC. Courtesy of TESLA, INC.
|
- Disconnect subframe harness at LR of vehicle
NOTE:
3x connectors
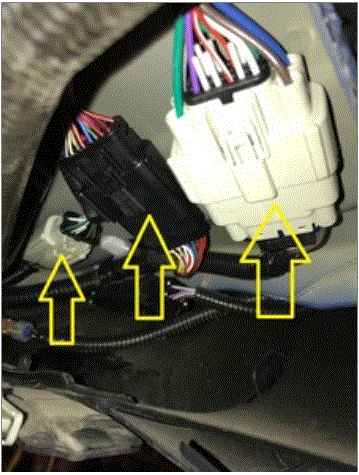 Courtesy of TESLA, INC. Courtesy of TESLA, INC.
|
- Disconnect the rear parking assist harness connector and rear BLE connector
NOTE:
2x connectors
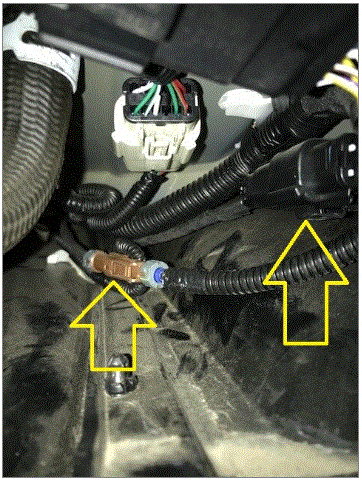 Courtesy of TESLA, INC. Courtesy of TESLA, INC.
|
- Disconnect 12V logic connector from the charger
NOTE:
1x connector
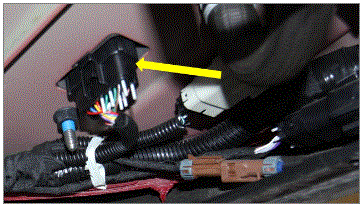 Courtesy of TESLA, INC. Courtesy of TESLA, INC.
|
- Release body harness from rear underbody
NOTE:
4x clips, 1x connector
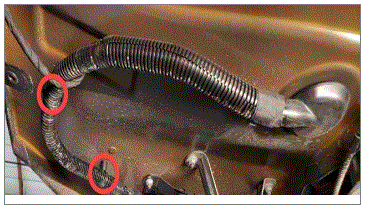 Courtesy of TESLA, INC. Courtesy of TESLA, INC.
|
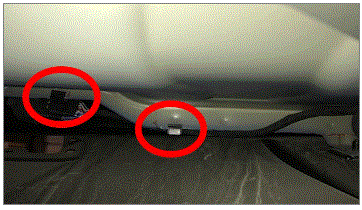 Courtesy of TESLA, INC. Courtesy of TESLA, INC.
|
- Push rubber grommet into the vehicle
NOTE:
Push the wiring harness into the vehicle from the bottom of the vehicle
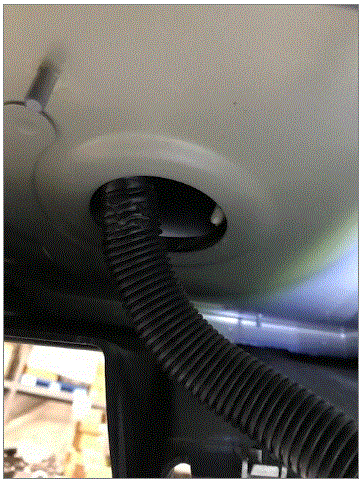 Courtesy of TESLA, INC. Courtesy of TESLA, INC.
|
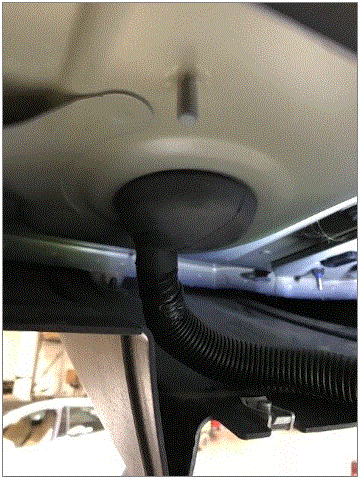 Courtesy of TESLA, INC. Courtesy of TESLA, INC.
|
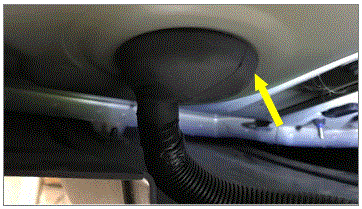 Courtesy of TESLA, INC. Courtesy of TESLA, INC.
|
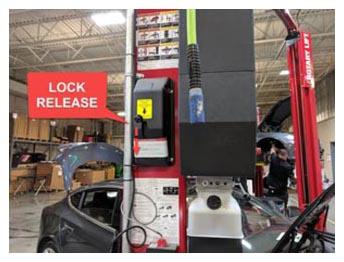
- Lower vehicle until tires are touching the ground
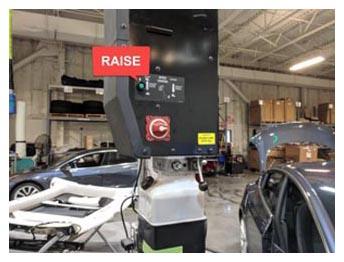 Courtesy of TESLA, INC. Courtesy of TESLA, INC.
|
 Courtesy of TESLA, INC. Courtesy of TESLA, INC.
|
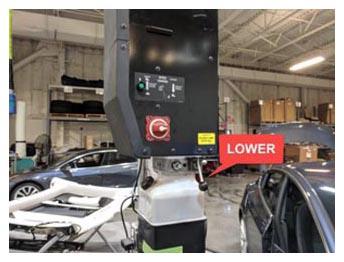 Courtesy of TESLA, INC. Courtesy of TESLA, INC.
|
- Release connector from HVAC box then Disconnect HVAC connector
NOTE:
1x black connector
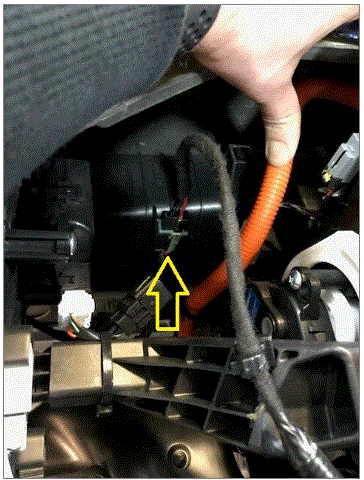 Courtesy of TESLA, INC. Courtesy of TESLA, INC.
|
- Disconnect harness from HVAC assembly
NOTE:
3x connectors, 3x clips
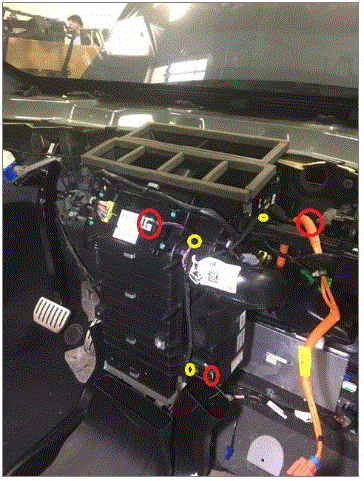 Courtesy of TESLA, INC. Courtesy of TESLA, INC.
|
- Disconnect PTC heat connector
NOTE:
1x black connector
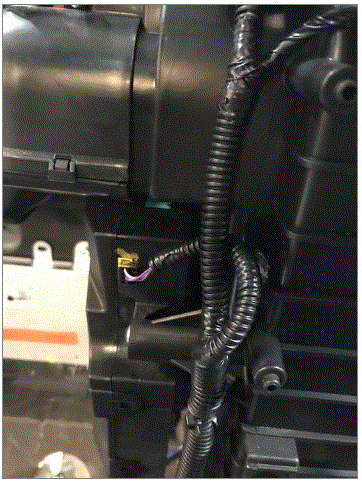 Courtesy of TESLA, INC. Courtesy of TESLA, INC.
|
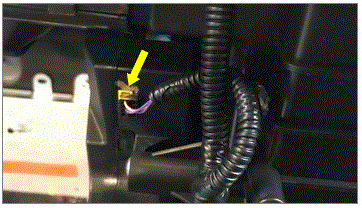 Courtesy of TESLA, INC. Courtesy of TESLA, INC.
|
- Remove 12v positive terminal from cabin fuse box
NOTE:
1x nut, 10mm, 5 Nm
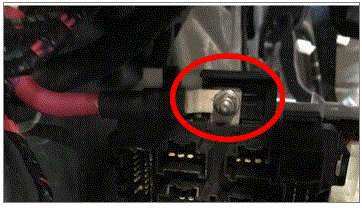 Courtesy of TESLA, INC. Courtesy of TESLA, INC.
|
- Disconnect all electrical connectors from the cabin fuse box
NOTE:
10x connectors
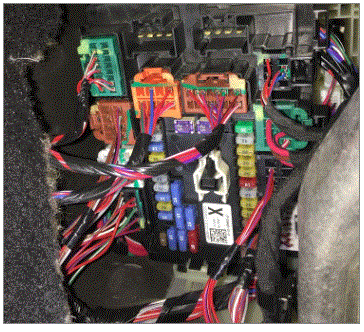 Courtesy of TESLA, INC. Courtesy of TESLA, INC.
|
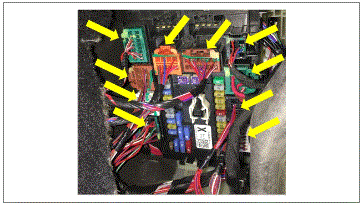 Courtesy of TESLA, INC. Courtesy of TESLA, INC.
|
- Remove cabin fuse box from vehicle
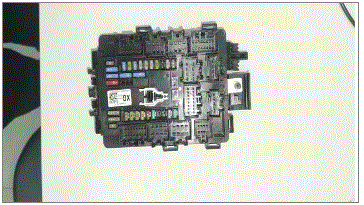 Courtesy of TESLA, INC. Courtesy of TESLA, INC.
|
- Disconnect brake sensor and acceleration pedal
NOTE:
1x white connector 1x black connector
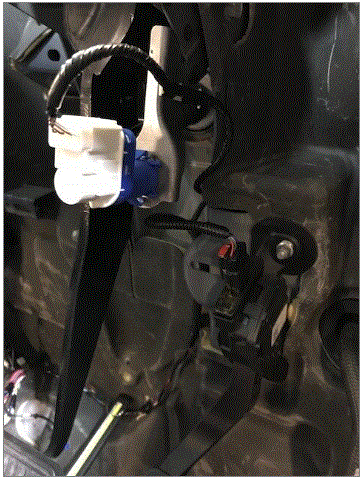 Courtesy of TESLA, INC. Courtesy of TESLA, INC.
|
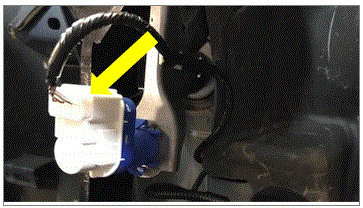 Courtesy of TESLA, INC. Courtesy of TESLA, INC.
|
- Release harness clips from body
NOTE:
5x harness clips
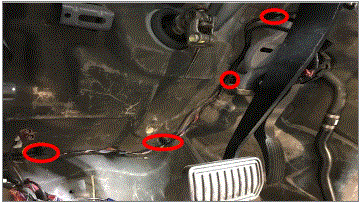 Courtesy of TESLA, INC. Courtesy of TESLA, INC.
|
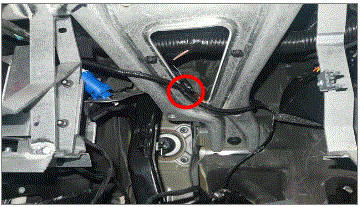 Courtesy of TESLA, INC. Courtesy of TESLA, INC.
|
- Remove the 12V cable from the connector housing
NOTE:
1x nut 10mm, 5 Nm
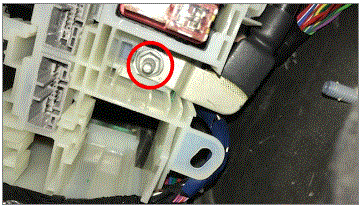 Courtesy of TESLA, INC. Courtesy of TESLA, INC.
|
- Release IP harness from RH side of fuse box
NOTE:
7x connectors
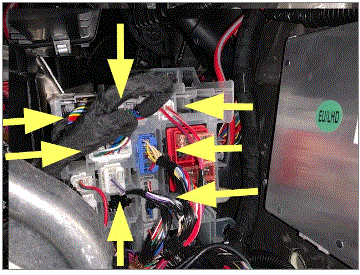 Courtesy of TESLA, INC. Courtesy of TESLA, INC.
|
- Remove ground from body under the front body module
NOTE:
1x nut, 13mm, 8 Nm
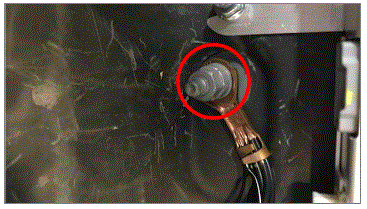 Courtesy of TESLA, INC. Courtesy of TESLA, INC.
|
- Remove connector from front body module
NOTE:
1x white connector
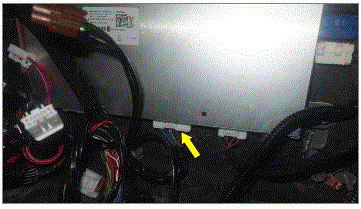 Courtesy of TESLA, INC. Courtesy of TESLA, INC.
|
- Release IP harness from center console area
NOTE:
5x connectors, 1x clip, Push tab on side to open cover
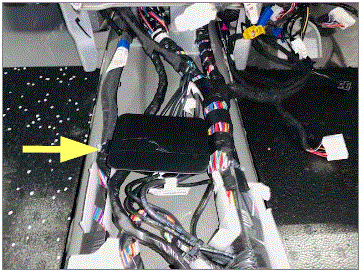 Courtesy of TESLA, INC. Courtesy of TESLA, INC.
|
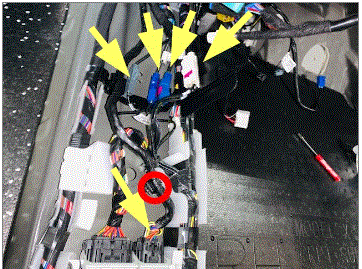 Courtesy of TESLA, INC. Courtesy of TESLA, INC.
|
- Disconnect the PRCM
NOTE:
1x black connector
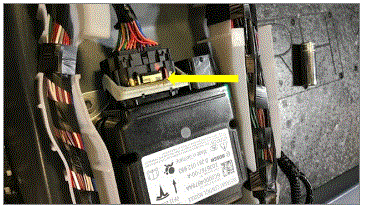 Courtesy of TESLA, INC. Courtesy of TESLA, INC.
|
- Release main body harness from body
NOTE:
2x white clips 1x black
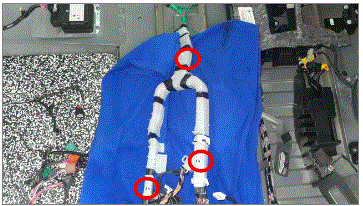 Courtesy of TESLA, INC. Courtesy of TESLA, INC.
|
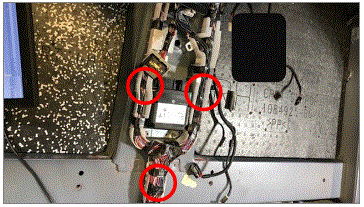 Courtesy of TESLA, INC. Courtesy of TESLA, INC.
|
- Release main body harness from body
NOTE:
14x clips
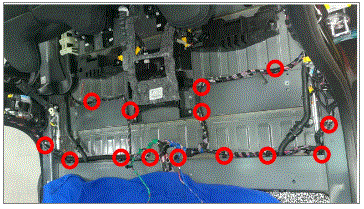 Courtesy of TESLA, INC. Courtesy of TESLA, INC.
|
- Release both seat harness clips from bracket
NOTE:
2x harness clips
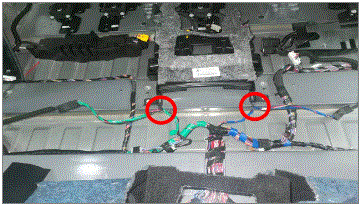 Courtesy of TESLA, INC. Courtesy of TESLA, INC.
|
- Disconnect RH 1st row retractor connector
NOTE:
2x yellow connectors 1x clip
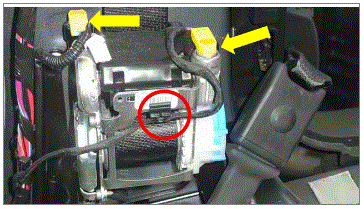 Courtesy of TESLA, INC. Courtesy of TESLA, INC.
|
- Disconnect harness from RH B-Pillar Accelerometer Sensor
NOTE:
1x black connector
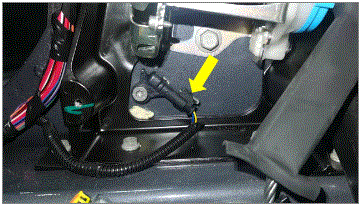 Courtesy of TESLA, INC. Courtesy of TESLA, INC.
|
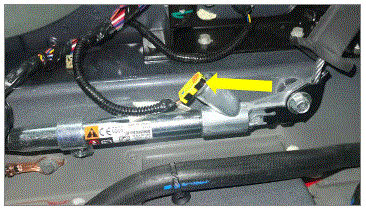
- Disconnect RH pretensioner connector
NOTE:
1x yellow connector
 Courtesy of TESLA, INC. Courtesy of TESLA, INC.
|
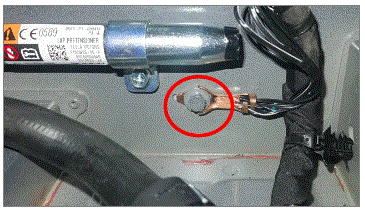
- Remove the RH B-pillar ground from body
NOTE:
1x bolt, 10mm, 8 Nm
 Courtesy of TESLA, INC. Courtesy of TESLA, INC.
|
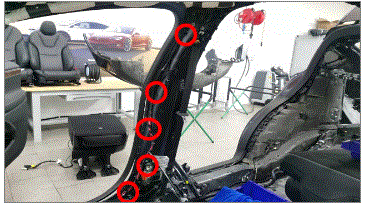
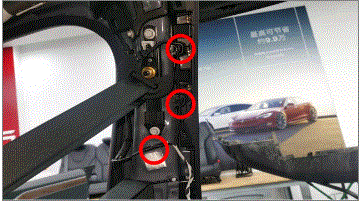
- Release the RH B-pillar part of the main body harness from the body
NOTE:
17x harness clips, Note routing of the harness
 Courtesy of TESLA, INC. Courtesy of TESLA, INC.
|
 Courtesy of TESLA, INC. Courtesy of TESLA, INC.
|
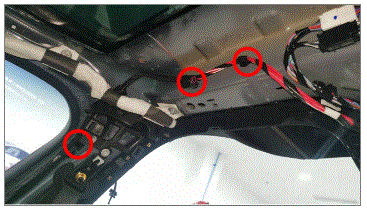 Courtesy of TESLA, INC. Courtesy of TESLA, INC.
|
- Disconnect harness from RH C-pillar accelerometer sensor
NOTE:
1x black connector
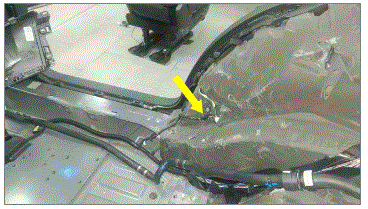 Courtesy of TESLA, INC. Courtesy of TESLA, INC.
|
- Release the rear part of the RH main body harness from body and flip towards the front
NOTE:
1x bolt, 10mm, 8 Nm5x harness clips. Note how the harness is routed
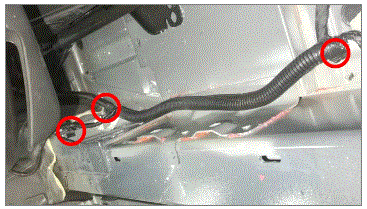 Courtesy of TESLA, INC. Courtesy of TESLA, INC.
|
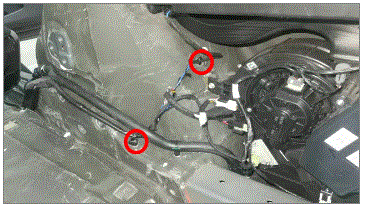 Courtesy of TESLA, INC. Courtesy of TESLA, INC.
|
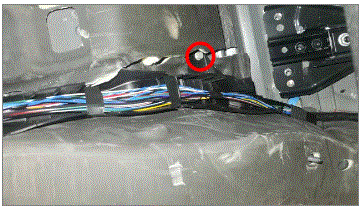 Courtesy of TESLA, INC. Courtesy of TESLA, INC.
|
- Remove the subwoofer from the vehicle
NOTE:
2x bolts, 10mm, 5 Nm, 1x nut, 10mm, 5 Nm
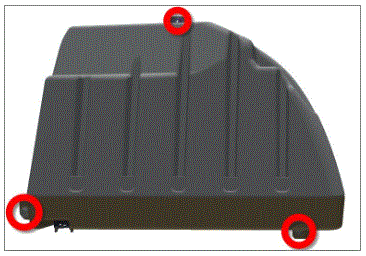 Courtesy of TESLA, INC. Courtesy of TESLA, INC.
|
- Disconnect connector for the subwoofer
NOTE:
1x connector
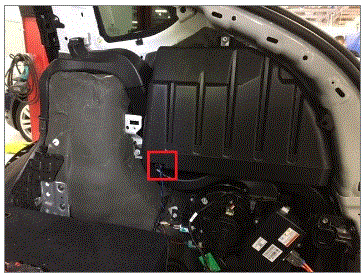 Courtesy of TESLA, INC. Courtesy of TESLA, INC.
|
- On the right side remove the 12V connector from PTC heater
NOTE:
1x white connector
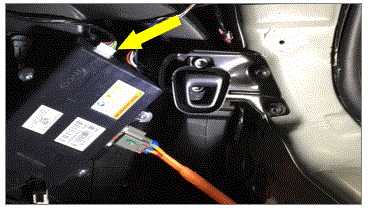 Courtesy of TESLA, INC. Courtesy of TESLA, INC.
|
- Release rear HVAC connectors from body harness
NOTE:
2x connectors
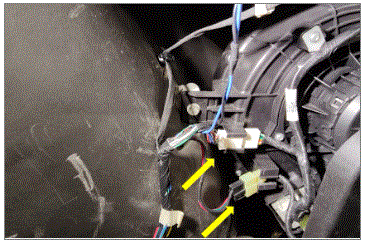 Courtesy of TESLA, INC. Courtesy of TESLA, INC.
|
- Disconnect the blower connector and the blower controller FET assembly connector
NOTE:
2x connectors, 1x bolt, T20, 1.2Nm
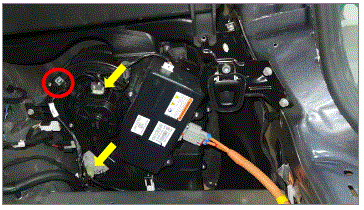 Courtesy of TESLA, INC. Courtesy of TESLA, INC.
|
- Pull HV logic connectors into the cabin
NOTE:
Lift up on NVH pad
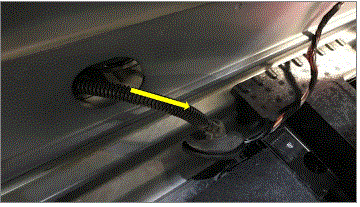 Courtesy of TESLA, INC. Courtesy of TESLA, INC.
|
- Disconnect RH falcon door harness from main body harness
NOTE:
1x white connector, 1x black connector
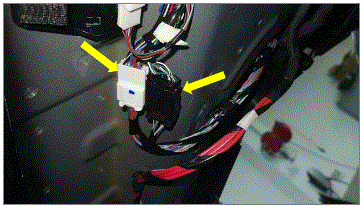 Courtesy of TESLA, INC. Courtesy of TESLA, INC.
|
- Remove ground from LH lower B-pillar
NOTE:
1x bolt, 10mm, 8 Nm
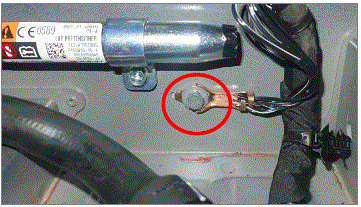 Courtesy of TESLA, INC. Courtesy of TESLA, INC.
|
- Disconnect LH pretensioner
NOTE:
1x yellow connector
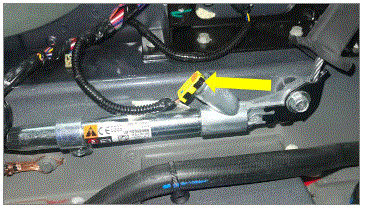 Courtesy of TESLA, INC. Courtesy of TESLA, INC.
|
- Disconnect LH 1st row retractor connector
NOTE:
2x yellow connectors, 1x clip
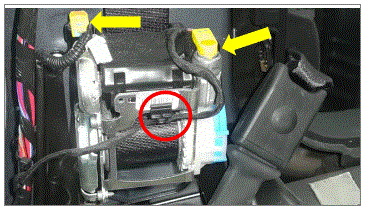 Courtesy of TESLA, INC. Courtesy of TESLA, INC.
|
- Disconnect LH falcon door harness from main harness
NOTE:
2x black connectors
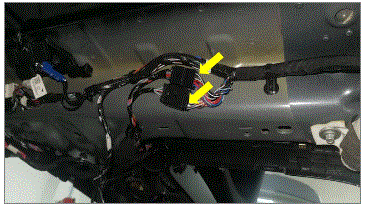 Courtesy of TESLA, INC. Courtesy of TESLA, INC.
|
- Disconnect harness from LH B-pillar accelerometer sensor
NOTE:
1x black connector
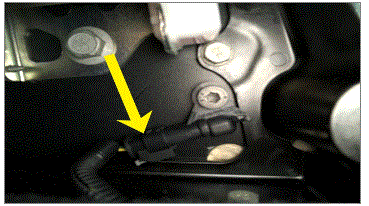 Courtesy of TESLA, INC. Courtesy of TESLA, INC.
|
- Disconnect harness from LH C-pillar accelerometer sensor
NOTE:
1x black connector
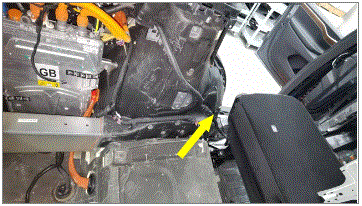 Courtesy of TESLA, INC. Courtesy of TESLA, INC.
|
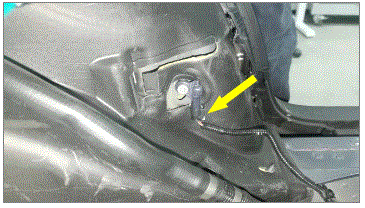 Courtesy of TESLA, INC. Courtesy of TESLA, INC.
|
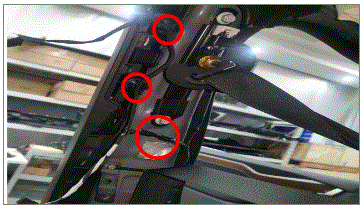
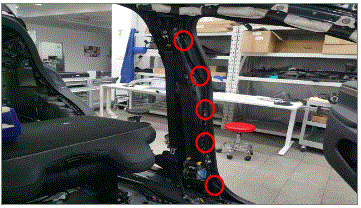
- Release the LH B-pillar part of the main body harness from the body
NOTE:
17x harness clips. Note routing of the harness
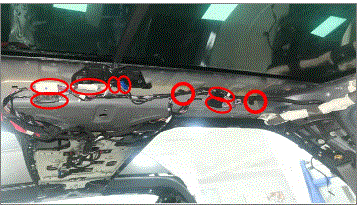 Courtesy of TESLA, INC. Courtesy of TESLA, INC.
|
 Courtesy of TESLA, INC. Courtesy of TESLA, INC.
|
 Courtesy of TESLA, INC. Courtesy of TESLA, INC.
|
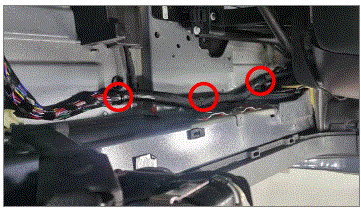
- Remove the harness clip from the LH B-pillar to the C-pillar
NOTE:
3x clips, May need to release coolant hose clips
 Courtesy of TESLA, INC. Courtesy of TESLA, INC.
|
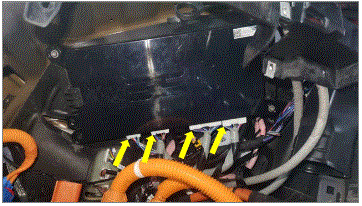
- Disconnect main body harness from BCM
NOTE:
4x white connectors
 Courtesy of TESLA, INC. Courtesy of TESLA, INC.
|
- Disconnect main body harness from rear lift gate harness
NOTE:
1x black connector, 1x yellow connector, 1x blue connector, 4x white connectors
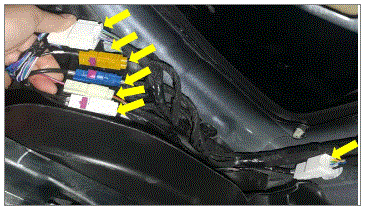 Courtesy of TESLA, INC. Courtesy of TESLA, INC.
|
- Disconnect LH rear bodyside lamp assembly
NOTE:
1x connector
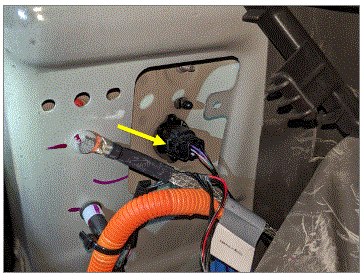 Courtesy of TESLA, INC. Courtesy of TESLA, INC.
|
- Disconnect main body harness from charge port light
NOTE:
1x white connector
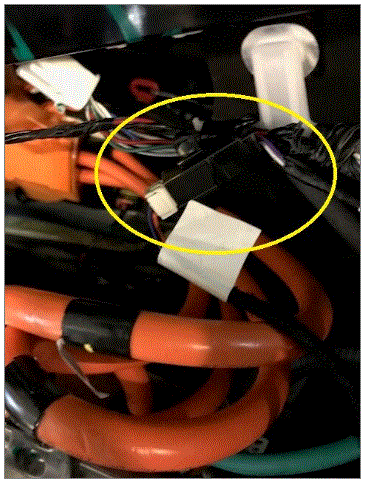 Courtesy of TESLA, INC. Courtesy of TESLA, INC.
|
- Disconnect park assist ECU and clip securing 12v harness to bracket
NOTE:
2x connectors, 1x barrel clip
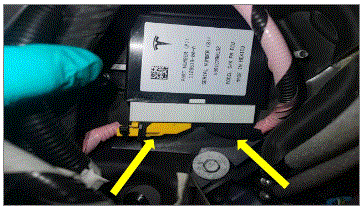 Courtesy of TESLA, INC. Courtesy of TESLA, INC.
|
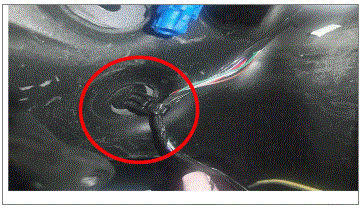 Courtesy of TESLA, INC. Courtesy of TESLA, INC.
|
- Disconnect rear LH D-pillar accelerometer
NOTE:
1x connector, 1x fir tree clip
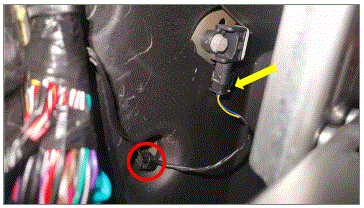 Courtesy of TESLA, INC. Courtesy of TESLA, INC.
|
- Release rear LH D-pillar body harness clips
NOTE:
3x fir tree clips
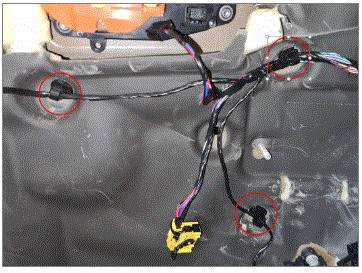 Courtesy of TESLA, INC. Courtesy of TESLA, INC.
|
- Release Rear LH C/D-pillar body harness clips
NOTE:
1x fir male tree clip, 1x barrel clip
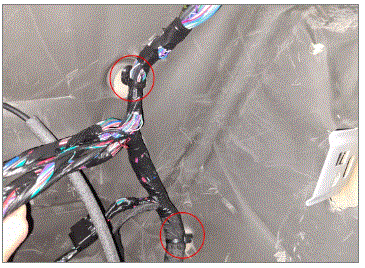 Courtesy of TESLA, INC. Courtesy of TESLA, INC.
|
- Release the rear part of the LH main body harness from body and flip towards the front
NOTE:
1x bolt, 10mm, 8 Nm 4x harness clips. Note how the harness is routed
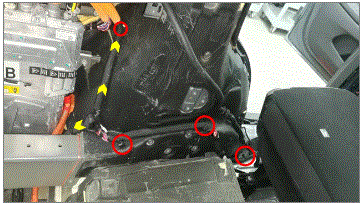 Courtesy of TESLA, INC. Courtesy of TESLA, INC.
|
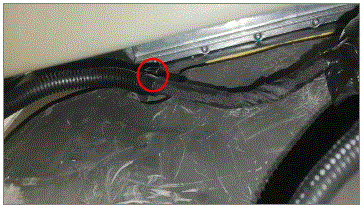 Courtesy of TESLA, INC. Courtesy of TESLA, INC.
|
- Disconnect the rear passive entry antenna
NOTE:
1x black connector
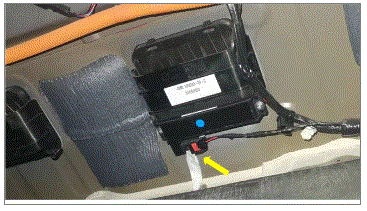 Courtesy of TESLA, INC. Courtesy of TESLA, INC.
|
- Remove ground bolt above passive entry antenna
NOTE:
1x bolt, 10mm, 8 Nm
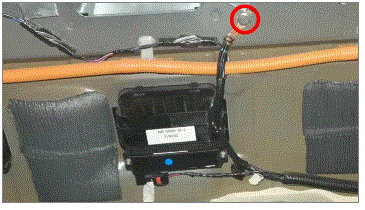 Courtesy of TESLA, INC. Courtesy of TESLA, INC.
|
- Disconnect RH tail light
NOTE:
1x black connector
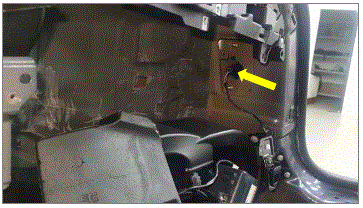 Courtesy of TESLA, INC. Courtesy of TESLA, INC.
|
- Release the main body harness from the rear of the vehicle
NOTE:
6x harness clips
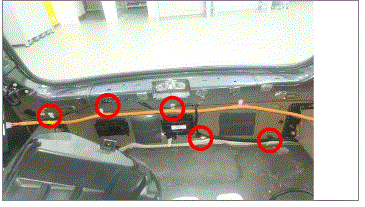 Courtesy of TESLA, INC. Courtesy of TESLA, INC.
|
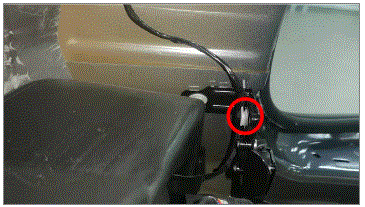 Courtesy of TESLA, INC. Courtesy of TESLA, INC.
|
- Release the clips that secure the harness to the closing plate
NOTE:
3x harness clips
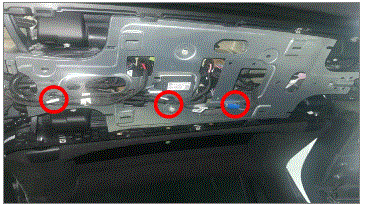 Courtesy of TESLA, INC. Courtesy of TESLA, INC.
|
- Disconnect the GPS radio harness
NOTE:
1x connector
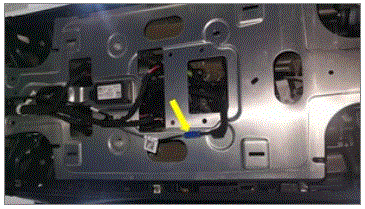 Courtesy of TESLA, INC. Courtesy of TESLA, INC.
|
- Disconnect connectors from LH and RH falcon door module
NOTE:
4x connectors
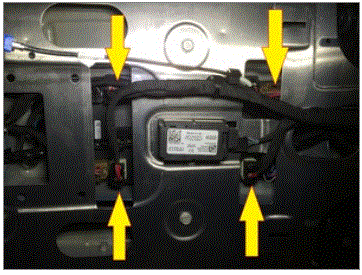 Courtesy of TESLA, INC. Courtesy of TESLA, INC.
|
- Remove the bolts that secure the closing plate to the body
NOTE:
8x bolts, 10mm, 10 Nm
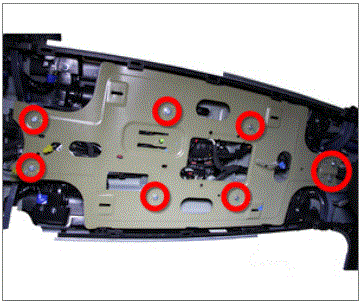 Courtesy of TESLA, INC. Courtesy of TESLA, INC.
|
- Remove Spine plate above headliner
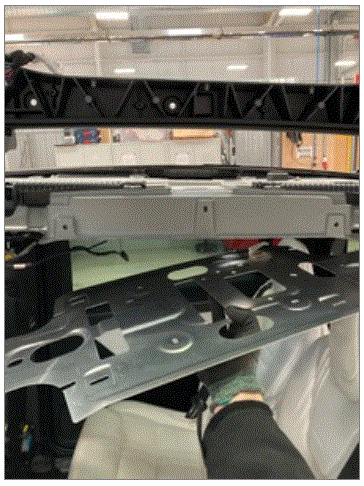 Courtesy of TESLA, INC. Courtesy of TESLA, INC.
|
- Disconnect front camera and rear view mirror from main body harness
NOTE:
1x white connector, 1x blue connector, 1x black connector
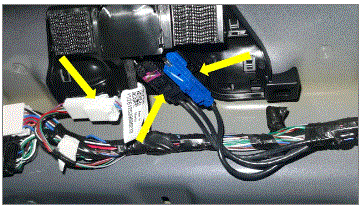 Courtesy of TESLA, INC. Courtesy of TESLA, INC.
|
- Remove both grounds near falcon door modules
NOTE:
2x bolts, 10mm, 8 Nm
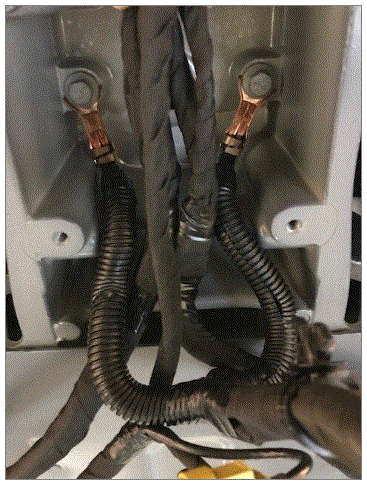 Courtesy of TESLA, INC. Courtesy of TESLA, INC.
|
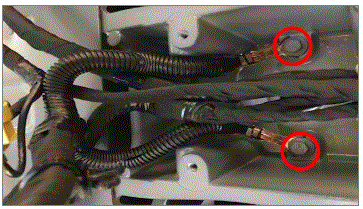 Courtesy of TESLA, INC. Courtesy of TESLA, INC.
|
- Disconnect both falcon door modules and roof USS
NOTE:
3x black connectors, 1x clip
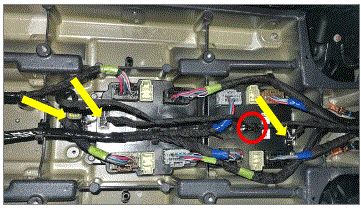 Courtesy of TESLA, INC. Courtesy of TESLA, INC.
|
- Remove the body harness from the vehicle
NOTE:
Recommend assistance
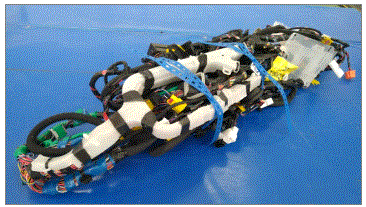 Courtesy of TESLA, INC. Courtesy of TESLA, INC.
|
- Install main body harness into vehicle
Courtesy of TESLA, INC.
|
- Connect brake sensor and acceleration pedal
NOTE:
1x white connector, 1x black connector, 5x clips
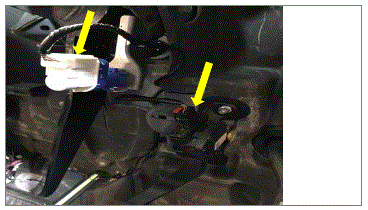 Courtesy of TESLA, INC. Courtesy of TESLA, INC.
|
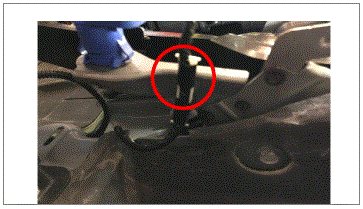 Courtesy of TESLA, INC. Courtesy of TESLA, INC.
|
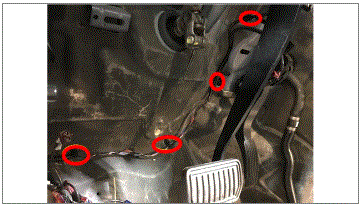 Courtesy of TESLA, INC. Courtesy of TESLA, INC.
|
- Connect connectors to HVAC assembly
NOTE:
3x connectors, 3x clips
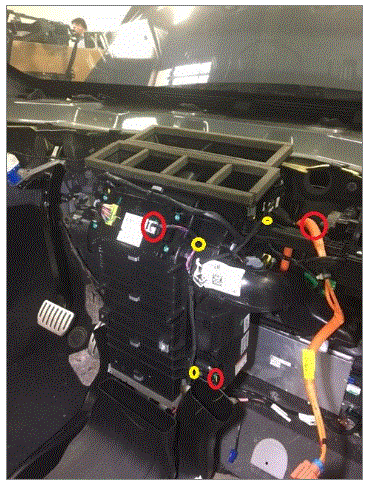 Courtesy of TESLA, INC. Courtesy of TESLA, INC.
|
- Install ground from body under the front body module
NOTE:
1x nut, 13mm, 10 Nm
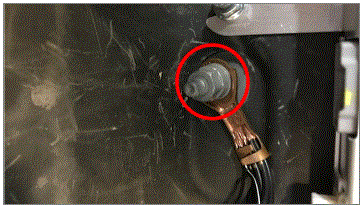 Courtesy of TESLA, INC. Courtesy of TESLA, INC.
|
- Install connector from front body module
NOTE:
1x white connector
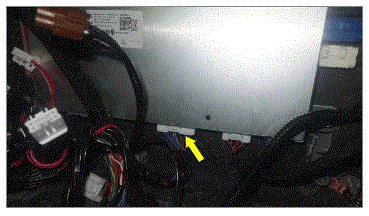 Courtesy of TESLA, INC. Courtesy of TESLA, INC.
|
- Secure IP harness to RH side of fuse box
NOTE:
7x connectors
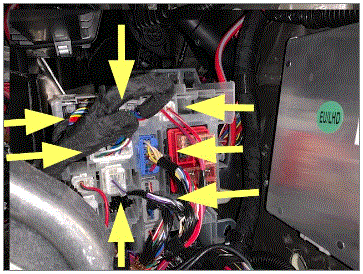 Courtesy of TESLA, INC. Courtesy of TESLA, INC.
|
- Install the 12V cable to the right side of the fuse box harness
NOTE:
1x nut 10mm, 5 Nm
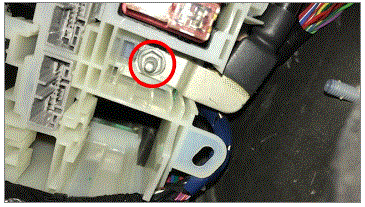 Courtesy of TESLA, INC. Courtesy of TESLA, INC.
|
- Connect all electrical connectors to the cabin fuse box
NOTE:
10x connectors
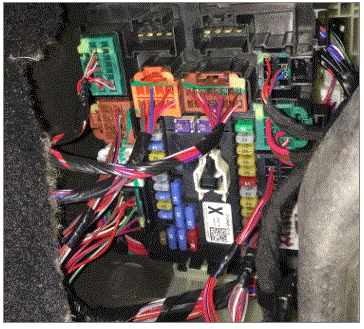 Courtesy of TESLA, INC. Courtesy of TESLA, INC.
|
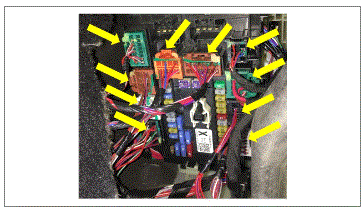 Courtesy of TESLA, INC. Courtesy of TESLA, INC.
|
- Install 12v positive terminal to the cabin fuse box
NOTE:
1x nut, 10mm, 5 Nm
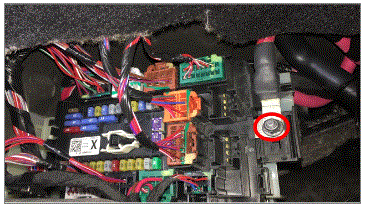 Courtesy of TESLA, INC. Courtesy of TESLA, INC.
|
- Connect IP harness at center console area
NOTE:
5x connectors, 1x clip, Latch cover
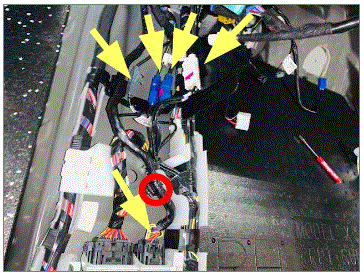 Courtesy of TESLA, INC. Courtesy of TESLA, INC.
|
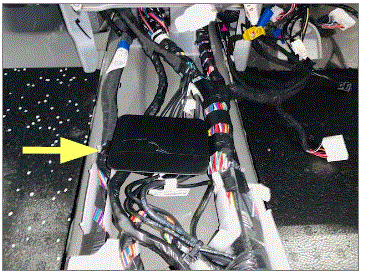 Courtesy of TESLA, INC. Courtesy of TESLA, INC.
|
- Connect the connector located on the RCM
NOTE:
1x connector, Fully install connector and pull release tab into locking position
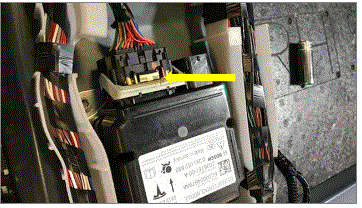 Courtesy of TESLA, INC. Courtesy of TESLA, INC.
|
- Secure main body harness to body between B pillars
NOTE:
14x clips, Note routing of the harness
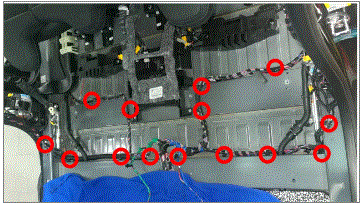 Courtesy of TESLA, INC. Courtesy of TESLA, INC.
|
- Secure main body harness to body near RCM
NOTE:
3x clips
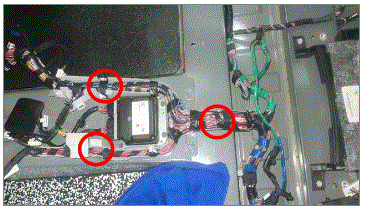 Courtesy of TESLA, INC. Courtesy of TESLA, INC.
|
- Secure both seat harness clips to bracket
NOTE:
2x harness clips
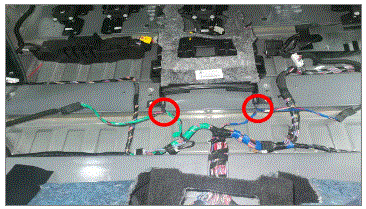 Courtesy of TESLA, INC. Courtesy of TESLA, INC.
|
- Install the main harness to the RH B-pillar
NOTE:
11x harness clips. Note routing of the harness
Courtesy of TESLA, INC.
|
Courtesy of TESLA, INC.
|
Courtesy of TESLA, INC.
|
- Connect RH 1st row retractor connector
NOTE:
2x connectors, 1x clip
Courtesy of TESLA, INC.
|
- Connect harness to RH B-Pillar Accelerometer Sensor
NOTE:
1x connector
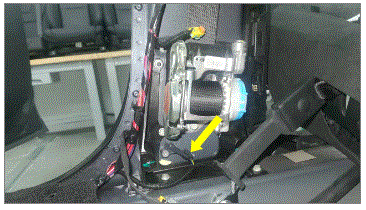 Courtesy of TESLA, INC. Courtesy of TESLA, INC.
|
- Connect the RH front seat belt pretensioner
NOTE:
1x connector
Courtesy of TESLA, INC.
|
- Install the grounding wire on the RH body
NOTE:
1x bolt, 10mm, 8 Nm
Courtesy of TESLA, INC.
|
- Connect RH falcon door harness to main body harness
NOTE:
1x white connector 1x black connector
Courtesy of TESLA, INC.
|
- Connect harness RH to C-pillar accelerometer sensor
NOTE:
1x connector
Courtesy of TESLA, INC.
|
- Connector rear HVAC connectors
NOTE:
2x connectors
Courtesy of TESLA, INC.
|
- Install low voltage connector for PTC heater
NOTE:
1x connector
Courtesy of TESLA, INC.
|
- Install the blower connector and blower controller FET connector to the assembly
NOTE:
2x connectors, 1x bolt, T20, 1.2 Nm
Courtesy of TESLA, INC.
|
- Install the main harness to the LH B-pillar
NOTE:
17x harness clips, Note routing of the harness
Courtesy of TESLA, INC.
|
Courtesy of TESLA, INC.
|
Courtesy of TESLA, INC.
|
- Connect LH falcon door harness to main harness
NOTE:
2x black connectors
Courtesy of TESLA, INC.
|
- Install the grounding wire on the LH body
NOTE:
1x bolt, 10mm, 8 Nm
Courtesy of TESLA, INC.
|
- Connect LH 1st row retractor connector
NOTE:
2x connectors, 1x clip
Courtesy of TESLA, INC.
|
- Connect harness to LH B-Pillar Accelerometer Sensor
NOTE:
1x connector
Courtesy of TESLA, INC.
|
- Connect the LH front seat belt pretensioner
NOTE:
1x connector
Courtesy of TESLA, INC.
|
- Connect harness to LH C-pillar accelerometer sensor
NOTE:
1x connector
Courtesy of TESLA, INC.
|
Courtesy of TESLA, INC.
|
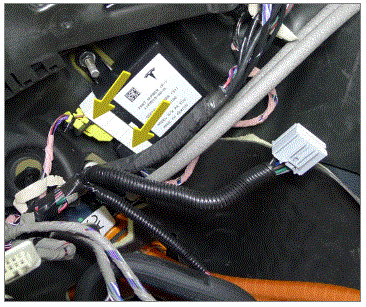
- Make connections at park assist ECU
NOTE:
2x connectors, 1x barrel clip
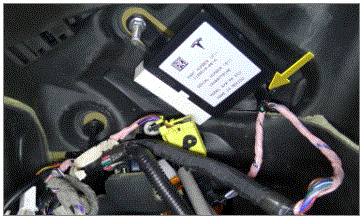 Courtesy of TESLA, INC. Courtesy of TESLA, INC.
|
 Courtesy of TESLA, INC. Courtesy of TESLA, INC.
|
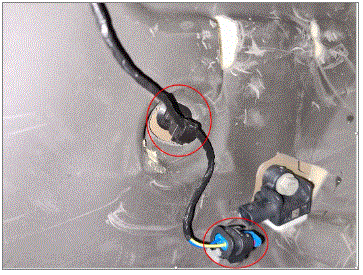
- Connect LH rear D-pillar accelerometer
NOTE:
1x connector, 1x fir tree clip
 Courtesy of TESLA, INC. Courtesy of TESLA, INC.
|
- Install LH rear D-pillar body harness clips
NOTE:
3x fir tree clips
Courtesy of TESLA, INC.
|
- Install LH rear C/D-pillar body harness clips
NOTE:
1x fir tree clip, 1x barrel clip
Courtesy of TESLA, INC.
|
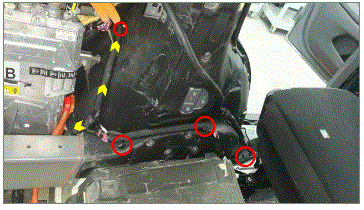
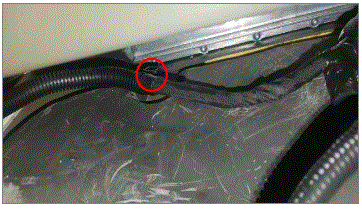
- Secure the body harness to LH rear the vehicle
NOTE:
1x bolt, 10mm, 8 Nm, 4x harness clips, Note how the harness is routed
 Courtesy of TESLA, INC. Courtesy of TESLA, INC.
|
 Courtesy of TESLA, INC. Courtesy of TESLA, INC.
|
- Connect the rear passive entry antenna.
NOTE:
1x black connector
Courtesy of TESLA, INC.
|
- Secure the main body harness to the rear of the vehicle
NOTE:
6x harness clips
Courtesy of TESLA, INC.
|
Courtesy of TESLA, INC.
|
- Connect RH tail light
NOTE:
1x black connector
Courtesy of TESLA, INC.
|
- Connect LH rear bodyside lamp assembly
NOTE:
1x connector
Courtesy of TESLA, INC.
|
- Install the subwoofer into the vehicle
NOTE:
2x bolts, 10mm 5 Nm, 1x nut, 10mm, 5 Nm,
Courtesy of TESLA, INC.
|
- Connect subwoofer connector
NOTE:
1x connector
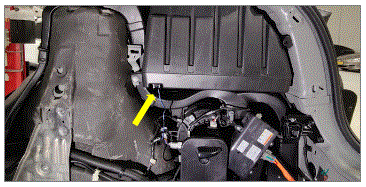 Courtesy of TESLA, INC. Courtesy of TESLA, INC.
|
- Route the HV battery LV Logic connector for installation
NOTE:
It passes through rear DU and sway bar
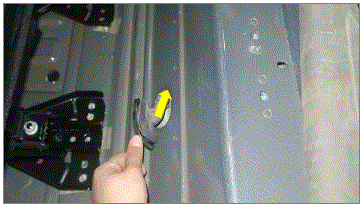 Courtesy of TESLA, INC. Courtesy of TESLA, INC.
|
- Push grommet out of the vehicle
NOTE:
Push the grommet through trunk bulkhead and feed harness through
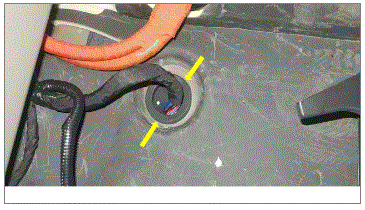 Courtesy of TESLA, INC. Courtesy of TESLA, INC.
|
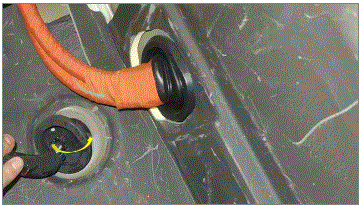 Courtesy of TESLA, INC. Courtesy of TESLA, INC.
|
- Install both grounds near falcon door modules
NOTE:
2x bolts, 10mm, 8 Nm
Courtesy of TESLA, INC.
|
- Connect both falcon door modules and roof USS
NOTE:
3x black connectors, 1x clip
Courtesy of TESLA, INC.
|
- Position Spine plate above headliner
Courtesy of TESLA, INC.
|
- Install the bolts that secure the closing plate to the body
NOTE:
8x bolts, 10mm, 10 Nm
Courtesy of TESLA, INC.
|
- Install the clips that secure the harness to the closing plate
NOTE:
5x harness clips
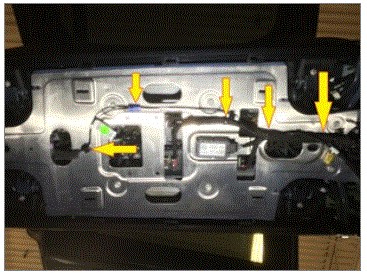 Courtesy of TESLA, INC. Courtesy of TESLA, INC.
|
- Connect the GPS radio harness
NOTE:
1x connector
Courtesy of TESLA, INC.
|
- Install connectors to LH and RH falcon door module
NOTE:
4x connectors
Courtesy of TESLA, INC.
|
- Connect front camera and rear view mirror to main body harness
NOTE:
1x white connector, 1x blue connector, 1x black connector
Courtesy of TESLA, INC.
|
- Raise vehicle for positioning of HV battery
NOTE:
Set vehicle to comfortable working height, Make sure there's an audible click of the locks on both sides before lowering, otherwise vehicle may tilt to the side
Courtesy of TESLA, INC.
|
Courtesy of TESLA, INC.
|
- Install the HV battery LV Logic connectors from bracket (caution: the rapid mate bracket clip is very easy to break)
NOTE:
2x connector clips
Courtesy of TESLA, INC.
|
- Install the HV battery LV logic connector cover to bracket
NOTE:
1x harness fur tree 6x clips
Courtesy of TESLA, INC.
|
- Install bolts and Rear DU HV cable clips to HV battery LV logic connector bracket
NOTE:
2x barrel clips, 2x bolts, 10mm, 5 Nm
Courtesy of TESLA, INC.
|
- Secure harness to body
NOTE:
4x clips, 1x connector, Secure LH body harness onto rear underbody
Courtesy of TESLA, INC.
|
Courtesy of TESLA, INC.
|
- Connect 12V logic connector to charger
NOTE:
1x connector
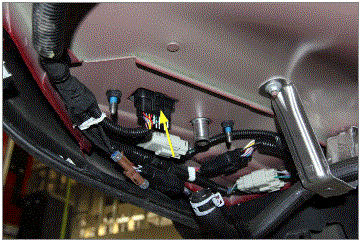 Courtesy of TESLA, INC. Courtesy of TESLA, INC.
|
- Connect the rear parking assist harness connector and rear BLE connector
NOTE:
2x connectors
Courtesy of TESLA, INC.
|
- Connect subframe harness connectors at LR of vehicle
NOTE:
3x connectors
Courtesy of TESLA, INC.
|
- Move battery under vehicle
Courtesy of TESLA, INC.
|
- Position HV battery underneath vehicle
Courtesy of TESLA, INC.
|
- Remove HV and LV Rapid Mate covers
NOTE:
2x covers
Courtesy of TESLA, INC.
|
- Lower vehicle onto pack
NOTE:
Align Rapid Mate connections before lowering fully, Recommend assistance
Courtesy of TESLA, INC.
|
- Loosely install 4 new front bolts for HV battery with battery powered drill
NOTE:
4x patch bolts, 13mm, 30 Nm, Install new patch bolts, Torque at later step
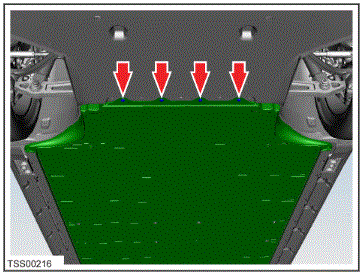 Courtesy of TESLA, INC. Courtesy of TESLA, INC.
|
Courtesy of TESLA, INC.
|
- Loosely install LH rocker bolts with battery powered drill
NOTE:
8x patch bolts, 13mm, 55 Nm, Install new patch bolts, Torque at later step
Courtesy of TESLA, INC.
|
- Loosely install RH rocker bolts with battery powered drill
NOTE:
8x patch bolts, 13mm, 55 Nm, Install new patch bolts, Torque at later step
Courtesy of TESLA, INC.
|
- Torque bolts securing HV battery to body on both side
NOTE:
16x patch bolts, 13mm, 55 Nm
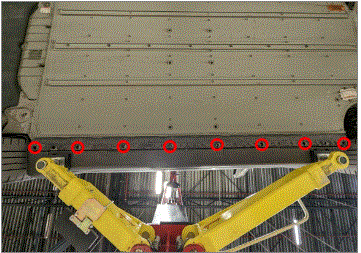 Courtesy of TESLA, INC. Courtesy of TESLA, INC.
|
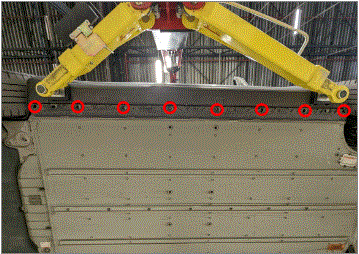 Courtesy of TESLA, INC. Courtesy of TESLA, INC.
|
- Loosely install 21mm bolts at front of HV battery with battery powered drill
NOTE:
2x bolts, 21mm, 115 Nm, Install new bolts, Torque at later step
Courtesy of TESLA, INC.
|
- Loosely install eight outer center bolts with battery powered drill
NOTE:
8x patch bolts, E12, 38 Nm, Install new patch bolts, Torque at later step
- Torque remaining HV battery bolts
NOTE:
8x bolts, E12, 38 Nm, 2x bolts, 21mm, 115 Nm, 4x bolts, 13mm, 30 Nm
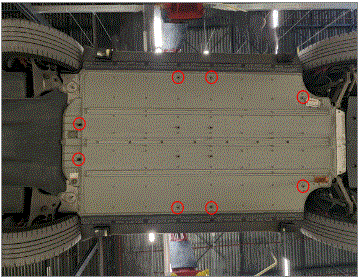 Courtesy of TESLA, INC. Courtesy of TESLA, INC.
|
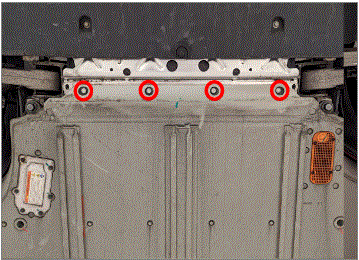 Courtesy of TESLA, INC. Courtesy of TESLA, INC.
|
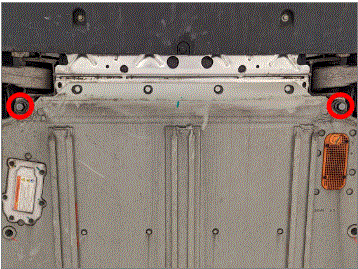 Courtesy of TESLA, INC. Courtesy of TESLA, INC.
|
- Raise vehicle off of HV battery
Courtesy of TESLA, INC.
|
- Move empty battery table away from vehicle
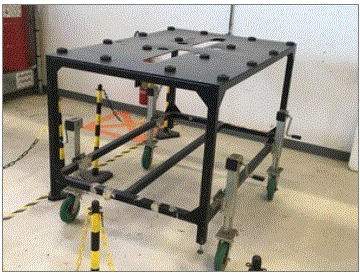 Courtesy of TESLA, INC. Courtesy of TESLA, INC.
|
- Install inner center HV battery bolts with battery powered drill
NOTE:
4x patch bolts, E12, 38 Nm, Install new patch bolts, Do not over tighten bolts
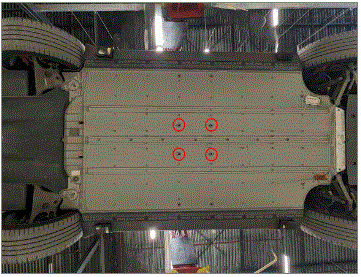 Courtesy of TESLA, INC. Courtesy of TESLA, INC.
|
- Torque the inner center HV battery bolts
NOTE:
4x patch bolts, E12, 38 Nm
Courtesy of TESLA, INC.
|
- Install LH ski side covers
NOTE:
14x clips, 3x covers
Courtesy of TESLA, INC.
|
- Install RH ski side covers
NOTE:
14x clips, 3x covers
Courtesy of TESLA, INC.
|
- Install front bash plate extrusion
NOTE:
2x bolts, T30, 16 Nm
Courtesy of TESLA, INC.
|
- Install mid aero shield
NOTE:
20x bolts, 10mm, 4 Nm, 2x push clips
Courtesy of TESLA, INC.
|
Courtesy of TESLA, INC.
|
- Install LH shear plate
NOTE:
3x screws, T25, 6 Nm, 1x bolt, 10mm, 4 Nm, 2x push clips, Install new nyloc nut 15mm, 35 Nm
Courtesy of TESLA, INC.
|
- Install RH shear plate
NOTE:
3x screws, T25, 6 Nm, 1x bolt, 10mm, 4 Nm, 2x push clips, Install new nyloc nut 15mm, 35 Nm
Courtesy of TESLA, INC.
|
- Lower vehicle until tires are touching the ground
NOTE:
Raise lift off locks, then hold lock release lever to keep locks free while vehicle is lowered
Courtesy of TESLA, INC.
|
Courtesy of TESLA, INC.
|
Courtesy of TESLA, INC.
|
- Place the RH side beaver dam in the vehicle and attach the wire harness clips.
NOTE:
2x harness clips
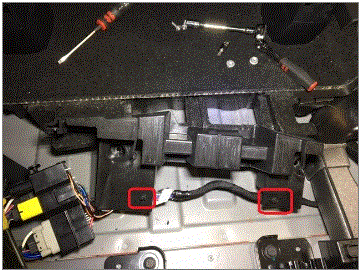 Courtesy of TESLA, INC. Courtesy of TESLA, INC.
|
- Properly seat the RH side outer beaver dam in the vehicle and secure to the body
NOTE:
2x nuts, 10mm, 10 Nm
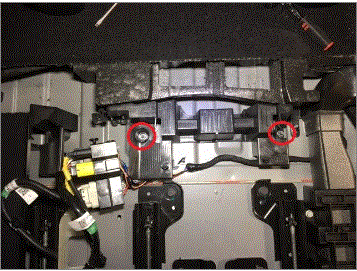 Courtesy of TESLA, INC. Courtesy of TESLA, INC.
|
- Place the LH side beaver dam in the vehicle and attach the wire harness clips.
NOTE:
2x harness clips
Courtesy of TESLA, INC.
|
- Properly seat the LH side outer beaver dam in the vehicle and secure to the body
NOTE:
2x nuts, 10mm, 10 Nm
Courtesy of TESLA, INC.
|
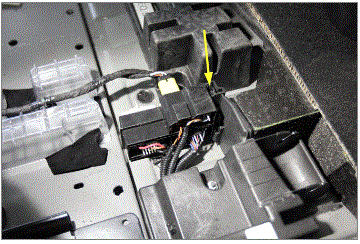
- Connect 40 seat assembly harness
NOTE:
2x connectors, Secure connector housing to bracket
Courtesy of TESLA, INC.
|
 Courtesy of TESLA, INC. Courtesy of TESLA, INC.
|
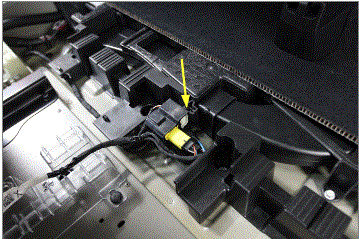
- Connect 60 seat assembly harness
NOTE:
2x connectors, Secure connector housing to bracket
Courtesy of TESLA, INC.
|
 Courtesy of TESLA, INC. Courtesy of TESLA, INC.
|
- Install Lower 2nd row RH HVAC duct and cover
NOTE:
2x bolts, 10mm, 10 Nm 1x nut, 10mm, 10 Nm, Install all sections of ducting between the B-Pillar and C-Pillar, 2 foam ducts and 2 plastic duct couplers
Courtesy of TESLA, INC.
|
- Install Lower 2nd row LH HVAC duct and cover
NOTE:
2x bolts, 10mm, 1 0 Nm 1x nut, 10mm, 10 Nm, Install all sections of ducting between the B-Pillar and C-Pillar, 2 foam ducts and 2 plastic duct couplers
Courtesy of TESLA, INC.
|
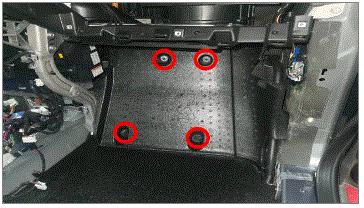
- Install passenger foot well bracket
NOTE:
2x Fan clips, 2x Tree clips
 Courtesy of TESLA, INC. Courtesy of TESLA, INC.
|
- Install the front HVAC outlet duct
Courtesy of TESLA, INC.
|
- Install RH 2nd row front floor support
NOTE:
Foam block may vary depending on vehicle configuration and production level
Courtesy of TESLA, INC.
|
- Install LH 2nd row front floor support
NOTE:
Foam block may vary depending on vehicle configuration and production level
Courtesy of TESLA, INC.
|
- Slide the insulator onto the vehicle
NOTE:
4x Sliding isolation plate, 4x clips
Courtesy of TESLA, INC.
|
Courtesy of TESLA, INC.
|
- Install front main carpet
NOTE:
4x clips
Courtesy of TESLA, INC.
|
Courtesy of TESLA, INC.
|
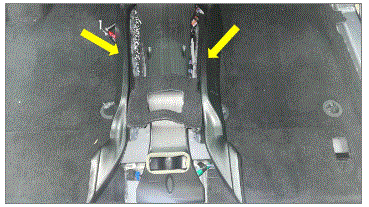
- Install the 2nd row passenger ducts
 Courtesy of TESLA, INC. Courtesy of TESLA, INC.
|
- Install 2nd row front floor
NOTE:
3x clips
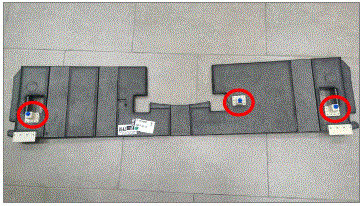 Courtesy of TESLA, INC. Courtesy of TESLA, INC.
|
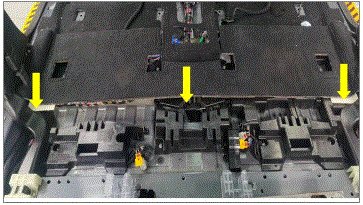 Courtesy of TESLA, INC. Courtesy of TESLA, INC.
|
- Install 2nd row floor mat
NOTE:
Some movement of the seats may be necessary, If needed, utilize the comfort switches on second row seats
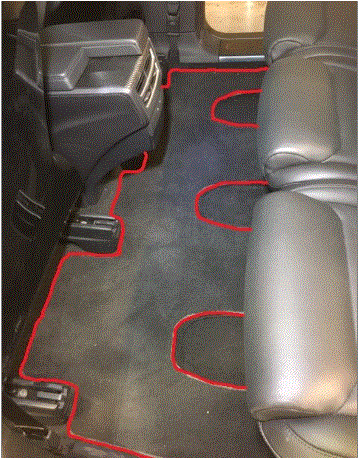 Courtesy of TESLA, INC. Courtesy of TESLA, INC.
|
- install 3rd row floor carpet
Courtesy of TESLA, INC.
|
Courtesy of TESLA, INC.
|
- Install headliner into vehicle
NOTE:
Recommend assistance
Courtesy of TESLA, INC.
|
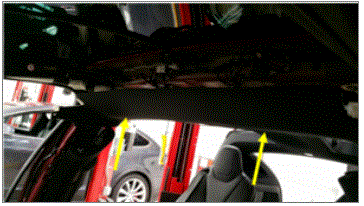 Courtesy of TESLA, INC. Courtesy of TESLA, INC.
|
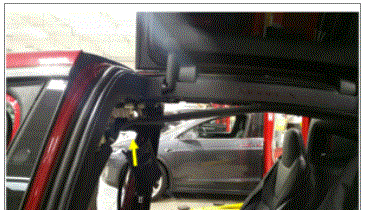 Courtesy of TESLA, INC. Courtesy of TESLA, INC.
|
- Connect headliner harness
NOTE:
1x connector
Courtesy of TESLA, INC.
|
- Raise headliner and clip into place
NOTE:
2x screws, T20, 2 Nm, 34x clips
Courtesy of TESLA, INC.
|
Courtesy of TESLA, INC.
|
Courtesy of TESLA, INC.
|
- Install LH shock tower brace
NOTE:
9x bolts, T40, 27 Nm
Courtesy of TESLA, INC.
|
- Reinstall LH rear charger duct
NOTE:
Secure to plastic ducts at top and bottom
Courtesy of TESLA, INC.
|
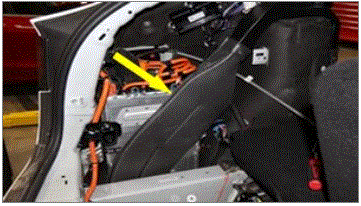 Courtesy of TESLA, INC. Courtesy of TESLA, INC.
|
- Install fasteners securing LH trunk bracket
NOTE:
2x bolts, T25, 7 Nm, 4x push clips
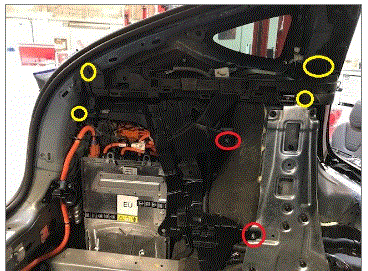 Courtesy of TESLA, INC. Courtesy of TESLA, INC.
|
- Install LH minion bracket and secure with the clips
NOTE:
3x push clips
Courtesy of TESLA, INC.
|
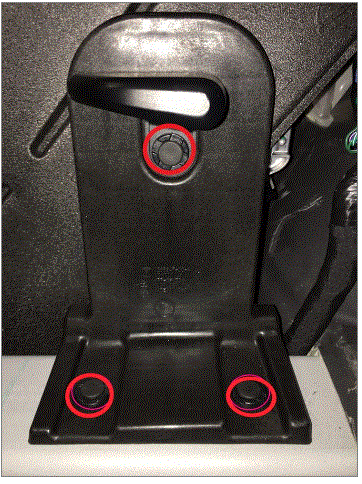 Courtesy of TESLA, INC. Courtesy of TESLA, INC.
|
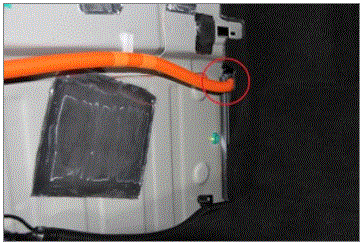
- Install LH trunk side carpet panel
NOTE:
2x connectors, Reconnect trunk light and 12V outlet connectors before positioning panel, Use caution not to pinch rear PTC harness, See image for details
Courtesy of TESLA, INC.
|
Courtesy of TESLA, INC.
|
Courtesy of TESLA, INC.
|
 Courtesy of TESLA, INC. Courtesy of TESLA, INC.
|
- Reposition the vent cover back bracket, then install vent cover to LH trunk side carpet
NOTE:
8x clips
Courtesy of TESLA, INC.
|
- Install clips securing LH rear trunk side carpet panel to bracket
NOTE:
5x push clips, One is hidden between 3rd row seat and trunk side carpet panel
Courtesy of TESLA, INC.
|
Courtesy of TESLA, INC.
|
- Install the LH trunk side load floor support
NOTE:
3x tabs, 1x clip
Courtesy of TESLA, INC.
|
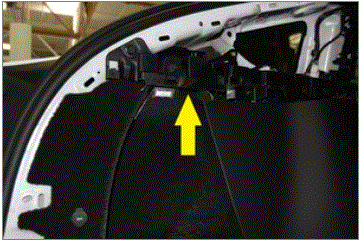
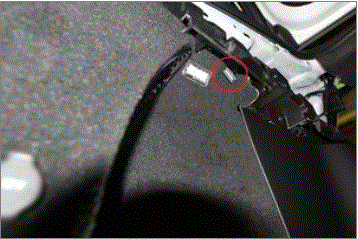
- Verify charge port mechanical release cable is in proper position in trunk side carpet panel
 Courtesy of TESLA, INC. Courtesy of TESLA, INC.
|
 Courtesy of TESLA, INC. Courtesy of TESLA, INC.
|
- Install LH lower C-pillar and secure clips along front edge
NOTE:
9x clips, 1x magnet
Courtesy of TESLA, INC.
|
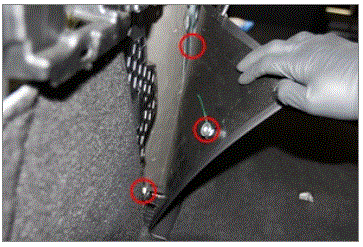
- Secure clips at rear edge of LH C-pillar lower panel
NOTE:
2x clips, 1x magnet
 Courtesy of TESLA, INC. Courtesy of TESLA, INC.
|
- Install screws securing C-pillar lower panel to LH parcel shelf support
NOTE:
2x screws, T20, 2 Nm
Courtesy of TESLA, INC.
|
- Install bolt securing front of LH lower C-pillar
NOTE:
1x patch bolt, T25, 2.5 Nm
Courtesy of TESLA, INC.
|
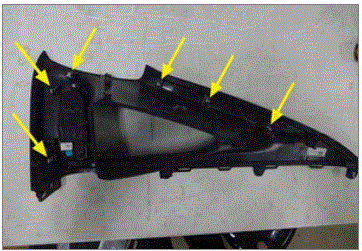
- Install LH upper C-pillar trim panel
NOTE:
6x clips
Courtesy of TESLA, INC.
|
 Courtesy of TESLA, INC. Courtesy of TESLA, INC.
|
- Install fasteners securing LH upper C-pillar trim panel
NOTE:
1x bolt, T25, 3 Nm, 3x screws, T20, 2 Nm
Courtesy of TESLA, INC.
|
- Install LH C-pillar mid trim and secure clips
NOTE:
9x clips, Install front section first, then work around to rear
Courtesy of TESLA, INC.
|
Courtesy of TESLA, INC.
|
- Install screw securing LH rear C-pillar mid trim
NOTE:
Note 1x screw, T20, 2 Nm
Courtesy of TESLA, INC.
|
- Install RH wheel house bracket
NOTE:
9x bolts, T40, 27 Nm
Courtesy of TESLA, INC.
|
- Install the RH trunk bracket
NOTE:
2x bolts, T30, 7 Nm 4x push clips
Courtesy of TESLA, INC.
|
- Install RH minion bracket and secure with clips
NOTE:
3x push clips
Courtesy of TESLA, INC.
|
- Reinstall RH trunk side carpet panel
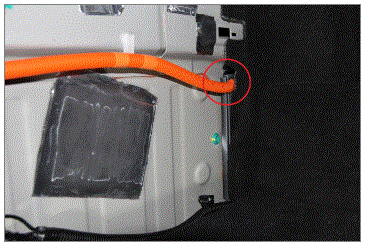
NOTE:
Reconnect trunk light connector before positioning panel, Use caution not to pinch Rear PTC harness (see picture)
Courtesy of TESLA, INC.
|
 Courtesy of TESLA, INC. Courtesy of TESLA, INC.
|
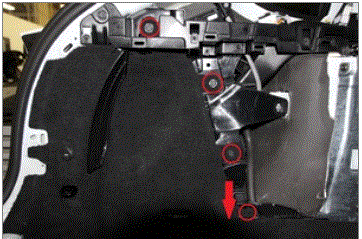
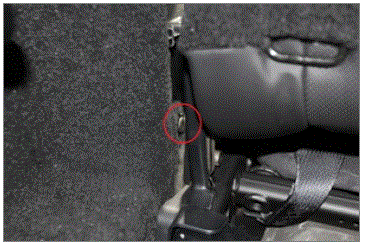
- Reinstall clips securing RH rear trunk side carpet panel to bracket
NOTE:
4x push clips
 Courtesy of TESLA, INC. Courtesy of TESLA, INC.
|
 Courtesy of TESLA, INC. Courtesy of TESLA, INC.
|
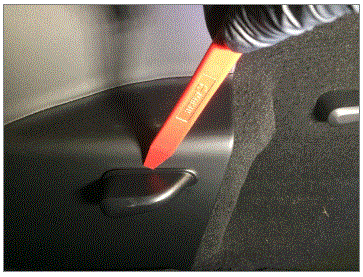
- Install trunk side nub onto RH lower C-pillar
NOTE:
3x tabs, 1x clip
 Courtesy of TESLA, INC. Courtesy of TESLA, INC.
|
- Install RH C-pillar lower panel and secure clips along front edge
NOTE:
9x clips, 1x magnet
Courtesy of TESLA, INC.
|
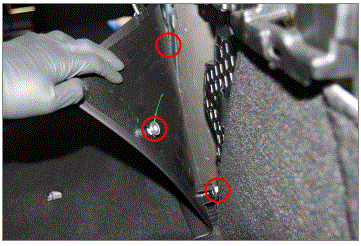
- Secure clips holding rear edge of RH C-pillar lower panel to rear trunk side carpet panel
NOTE:
3x clips, 1x magnet
 Courtesy of TESLA, INC. Courtesy of TESLA, INC.
|
- Install fasteners securing C-pillar lower panel to RH parcel shelf support
NOTE:
2x screws, T20, 2 Nm
Courtesy of TESLA, INC.
|
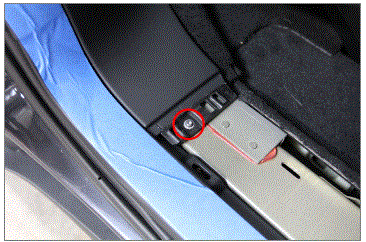
- Secure RH lower C-pillar trim to body
NOTE:
1x patch bolt, T25, 2.5 Nm
 Courtesy of TESLA, INC. Courtesy of TESLA, INC.
|
- Install RH upper C-pillar trim panel
NOTE:
6x clips
Courtesy of TESLA, INC.
|
- Reinstall fasteners securing RH upper C-pillar trim panel
NOTE:
1x bolt, T-25, 3 Nm 2x screws, T-20, 2 Nm
Courtesy of TESLA, INC.
|
- Install RH C-pillar mid trim
NOTE:
9x clips, Install front section first, then work around to rear
Courtesy of TESLA, INC.
|
Courtesy of TESLA, INC.
|
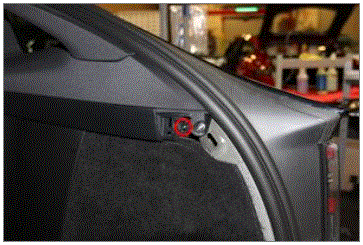
- Install screw securing RH C-pillar mid trim
NOTE:
1x screw, T20, 2 Nm
 Courtesy of TESLA, INC. Courtesy of TESLA, INC.
|
- Install 3rd row seats inside of vehicle
NOTE:
Recommend assistance
Courtesy of TESLA, INC.
|
- Install rear 3rd row seat bolts
NOTE:
4x, bolts, T-45+, 34 Nm, install new patch bolts
Courtesy of TESLA, INC.
|
- Install front 3rd row seat bolts
NOTE:
4x, bolts, T-45+, 34 Nm, install new patch bolts
Courtesy of TESLA, INC.
|
Courtesy of TESLA, INC.
|
- Connect the 3rd row seat
NOTE:
2x connectors
Courtesy of TESLA, INC.
|
- Connect 3rd row seat cushion
NOTE:
5x connectors
Courtesy of TESLA, INC.
|
- Push 3rd row seats cushion down until the clips are fully latched
NOTE:
3x clips
Courtesy of TESLA, INC.
|
- Install trunk floor carpet
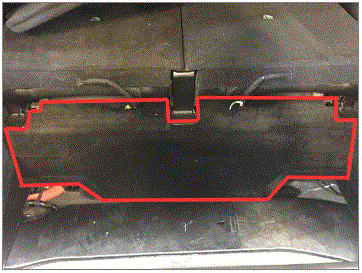 Courtesy of TESLA, INC. Courtesy of TESLA, INC.
|
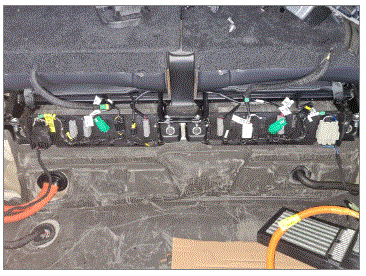 Courtesy of TESLA, INC. Courtesy of TESLA, INC.
|
- Install rear load floor support
NOTE:
4x push clips, 2x clips
Courtesy of TESLA, INC.
|
- Reinstall front lower carpet trim panel
NOTE:
Secure 3rd row seat wiring harnesses to panel
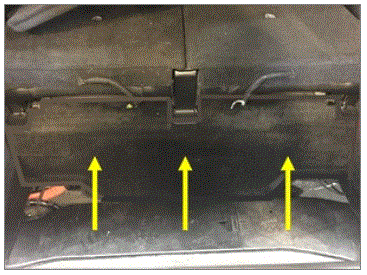 Courtesy of TESLA, INC. Courtesy of TESLA, INC.
|
- Install trunk board
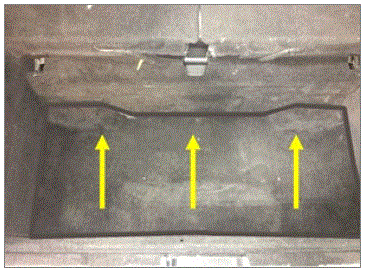 Courtesy of TESLA, INC. Courtesy of TESLA, INC.
|
- Install rear load floor
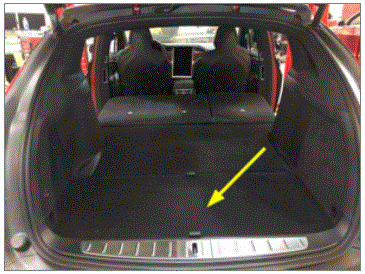 Courtesy of TESLA, INC. Courtesy of TESLA, INC.
|
- Install rear trunk sill trim
NOTE:
4x clips, 2x patch bolts, T25, 2.5 Nm, Make sure to seat liftgate seal properly, Install new patch bolts
Courtesy of TESLA, INC.
|
Courtesy of TESLA, INC.
|
Courtesy of TESLA, INC.
|
- Install LH trunk sill side trim
NOTE:
4x clips
Courtesy of TESLA, INC.
|
Courtesy of TESLA, INC.
|
- Install RH trunk sill side trim
NOTE:
4x clips
Courtesy of TESLA, INC.
|
- Position MCU for installation
Courtesy of TESLA, INC.
|
- Connect harness connectors to MCU
NOTE:
17x connectors, Recommend assistance, Number of connectors may vary depending on vehicle configuration and MCU part number revision.
Courtesy of TESLA, INC.
|
Courtesy of TESLA, INC.
|
- Install MCU into IP carrier
NOTE:
If necessary, gently lift IP top pad to clear the MCU ground tab and ensure the MCU seats fully back into the IP carrier
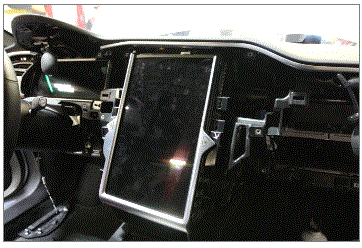 Courtesy of TESLA, INC. Courtesy of TESLA, INC.
|
- Connect ground strap to top of MCU
NOTE:
1x connector
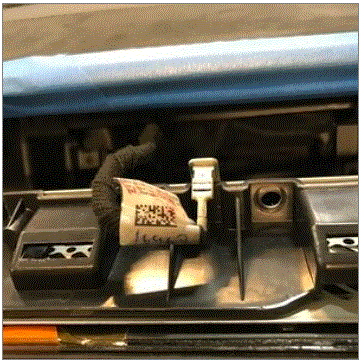 Courtesy of TESLA, INC. Courtesy of TESLA, INC.
|
Courtesy of TESLA, INC.
|
- Install bolts securing MCU to the IP carrier
NOTE:
4x bolts, T25, 7 Nm
Courtesy of TESLA, INC.
|
- Install the RH instrument panel finisher assembly
NOTE:
6x clips, Ensure vent ducting is properly aligned to vents during installation
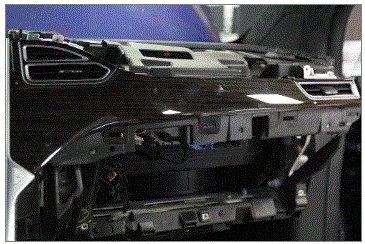 Courtesy of TESLA, INC. Courtesy of TESLA, INC.
|
- Install fasteners for the RH instrument panel finisher assembly
NOTE:
2x screws, T20, 2.3 Nm
Courtesy of TESLA, INC.
|
- Install glovebox assembly
NOTE:
6x screws, T20, 2.3 Nm, 3x connectors
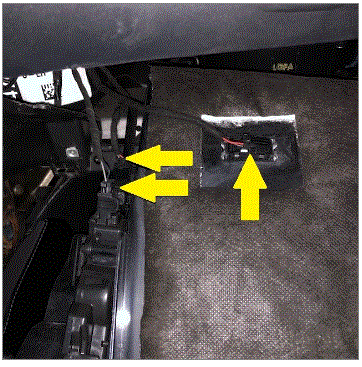 Courtesy of TESLA, INC. Courtesy of TESLA, INC.
|
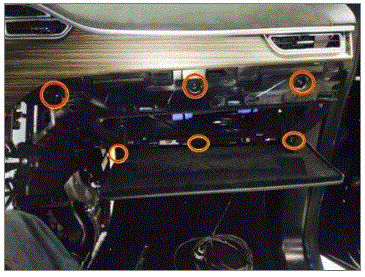 Courtesy of TESLA, INC. Courtesy of TESLA, INC.
|
- Install RH instrument panel lower assembly
NOTE:
13x clips, Replace any damaged or missing clips prior to installation
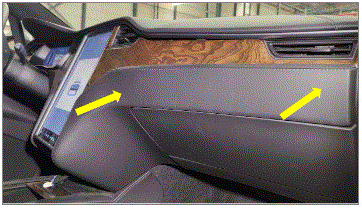 Courtesy of TESLA, INC. Courtesy of TESLA, INC.
|
- Install lower glove box trim
NOTE:
6x clips, Replace any damaged or missing clips prior to installation
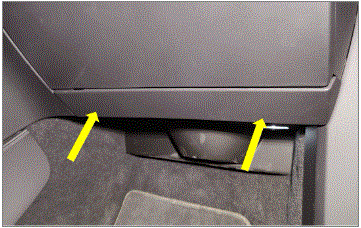 Courtesy of TESLA, INC. Courtesy of TESLA, INC.
|
- Install screw securing RH side of top pad
NOTE:
1x screw, T20, 1.2 Nm
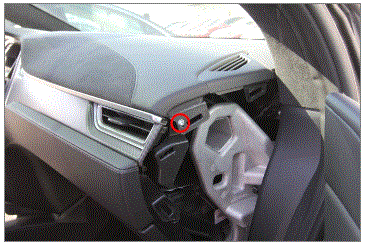 Courtesy of TESLA, INC. Courtesy of TESLA, INC.
|
- Install instrument cluster
NOTE:
4x screws, T20, 2 Nm, 3x connectors
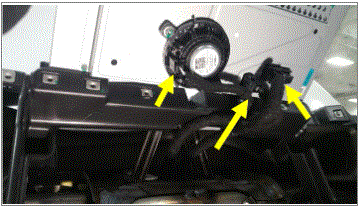 Courtesy of TESLA, INC. Courtesy of TESLA, INC.
|
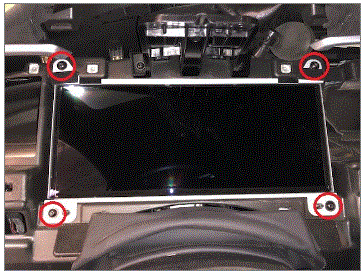 Courtesy of TESLA, INC. Courtesy of TESLA, INC.
|
- Install instrument cluster bezel to the IP carrier
NOTE:
4x screws, T20, 2.3 Nm
Courtesy of TESLA, INC.
|
- Secure the steering column gap hider trim to the IC bezel
NOTE:
2x clips
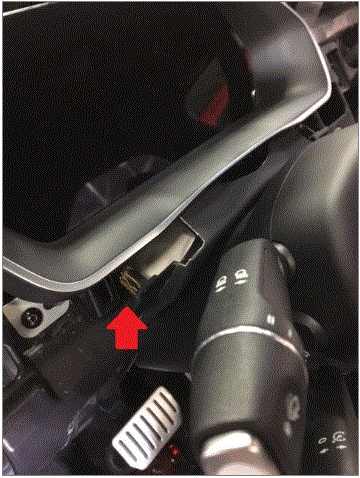 Courtesy of TESLA, INC. Courtesy of TESLA, INC.
|
- Install the LH inner IP finisher trim assembly
NOTE:
3x clips, 2x screws, T20, 2.3 Nm, Ensure vent ducting is properly aligned to vent during installation
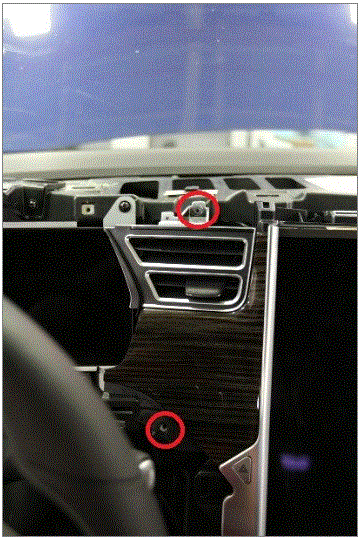 Courtesy of TESLA, INC. Courtesy of TESLA, INC.
|
- Install LH outer IP finisher trim assembly
NOTE:
2x clips, 3x screws, T20, 2.3 Nm, Ensure vent ducting is properly aligned to vent during installation
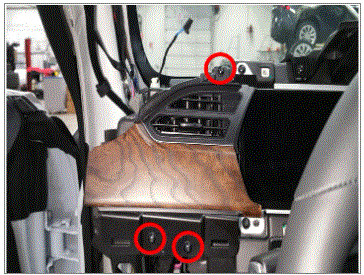 Courtesy of TESLA, INC. Courtesy of TESLA, INC.
|
- Deflate the air bag tools and securely install the top pad back to its normal position
NOTE:
19x clips, Ensure all clips are installed to the top pad and aligned to mounting points on the IP carrier before seating clips, Replace any damaged or missing clips prior to installation
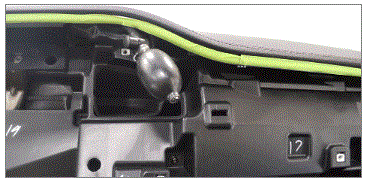 Courtesy of TESLA, INC. Courtesy of TESLA, INC.
|
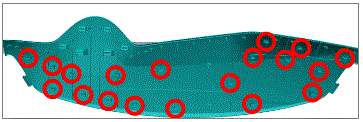 Courtesy of TESLA, INC. Courtesy of TESLA, INC.
|
- Install binnacle cover panel
NOTE:
4x clips, Replace any damaged or missing clips
Courtesy of TESLA, INC.
|
- Install the fasteners securing the IP top pad to the binnacle
NOTE:
2x screws, T20, 1.2 Nm
Courtesy of TESLA, INC.
|
- Install screw securing LH side of top pad
NOTE:
1x screw, T20, 1.2 Nm
Courtesy of TESLA, INC.
|
- Install screw securing RH side of top pad
NOTE:
1x screw, T20, 1.2 Nm
Courtesy of TESLA, INC.
|
- Remove the protective tape from the top pad aluminum trim
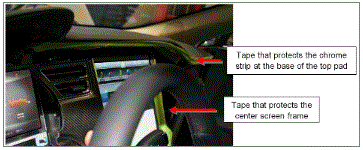 Courtesy of TESLA, INC. Courtesy of TESLA, INC.
|
- Install the steering column to the IP carrier
NOTE:
2x nuts, 13mm, 30 Nm 2x bolts, 13mm, 30 Nm 2x connectors
Courtesy of TESLA, INC.
|
Courtesy of TESLA, INC.
|
Courtesy of TESLA, INC.
|
- Install shaft to lower link
NOTE:
1x bolt, 13mm, 30 Nm, Pay attention to the installation according to the marked position
Courtesy of TESLA, INC.
|
Courtesy of TESLA, INC.
|
- Connect harness connectors for steering column motors
NOTE:
2x connectors
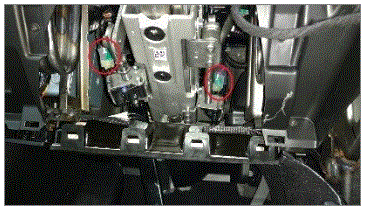 Courtesy of TESLA, INC. Courtesy of TESLA, INC.
|
- Install bracket under steering column area
NOTE:
2x screws, T20, 2 Nm
Courtesy of TESLA, INC.
|
- Connect harness to SCCM
NOTE:
1x connector, Install new retaining clip
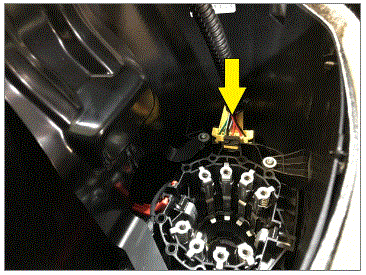 Courtesy of TESLA, INC. Courtesy of TESLA, INC.
|
- Slide SCCM over upper steering column
NOTE:
Gently jiggle the SCCM while pressing it onto the column if needed
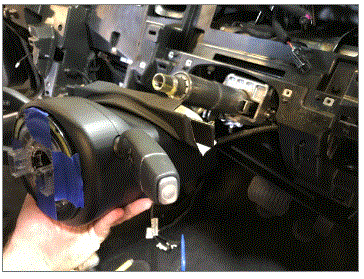 Courtesy of TESLA, INC. Courtesy of TESLA, INC.
|
- Install bolt securing steering wheel to steering column
NOTE:
1x patch bolt, 10mm allen, 80 Nm, Pay attention to the installation according to the marked position, Install new patch bolt
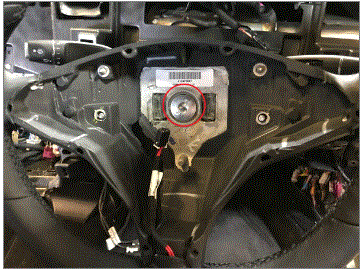 Courtesy of TESLA, INC. Courtesy of TESLA, INC.
|
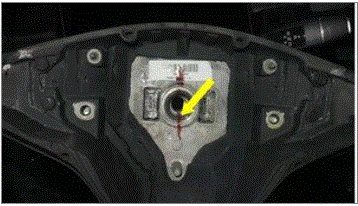 Courtesy of TESLA, INC. Courtesy of TESLA, INC.
|
- Connect the drivers front airbag and steering wheel control connectors
NOTE:
3x connectors
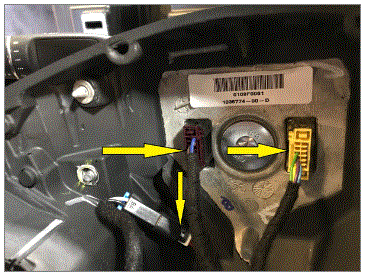 Courtesy of TESLA, INC. Courtesy of TESLA, INC.
|
- Install screws securing airbag to steering wheel
NOTE:
2x screws, T25, 7 Nm
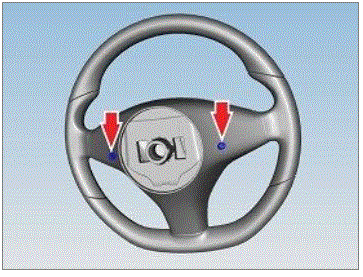 Courtesy of TESLA, INC. Courtesy of TESLA, INC.
|
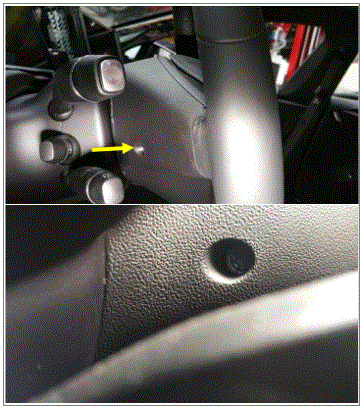 Courtesy of TESLA, INC. Courtesy of TESLA, INC.
|
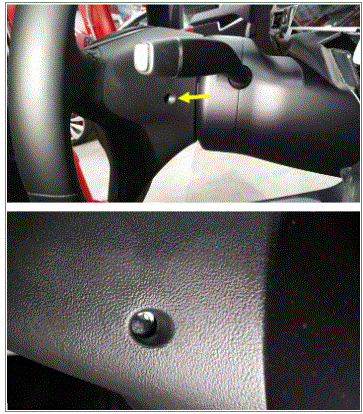 Courtesy of TESLA, INC. Courtesy of TESLA, INC.
|
- Install LH lower IP trim panel
NOTE:
9x clips
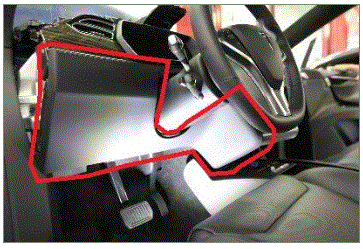 Courtesy of TESLA, INC. Courtesy of TESLA, INC.
|
- Install LH upper A-pillar to vehicle
NOTE:
1x connector, 2x datums, 6x clips, Secure LH upper A-pillar harness, Align datums into IP sub assembly, Rotate upper A-pillar panel into position engaging clips fully
Courtesy of TESLA, INC.
|
Courtesy of TESLA, INC.
|
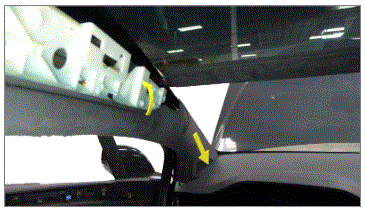 Courtesy of TESLA, INC. Courtesy of TESLA, INC.
|
- Install bolts securing LH upper A-pillar to body
NOTE:
2x bolts, 10mm, 5 Nm, 1x screw, T20, 2.5 Nm, 1x nyloc nut, 13mm, 5 Nm,
Courtesy of TESLA, INC.
|
- Install LH sunvisor bezel
NOTE:
6x clips, 5x tabs, Insert tabs and slide bezel toward rear of vehicle then secure clips
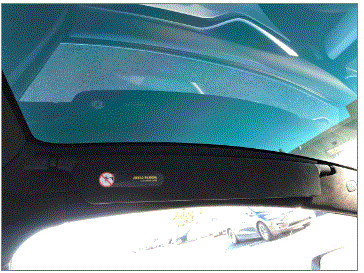 Courtesy of TESLA, INC. Courtesy of TESLA, INC.
|
- Install LH lower A-pillar
NOTE:
1x bolt, T25, 5 Nm, 1x clip
Courtesy of TESLA, INC.
|
Courtesy of TESLA, INC.
|
- Install LH IP side cover
NOTE:
5x clips
Courtesy of TESLA, INC.
|
- Connect LH B-pillar switch and temp sensor
NOTE:
2x black connector
Courtesy of TESLA, INC.
|
- Install LH upper B-pillar to body
NOTE:
4x clips, 1 magnet, 1x connector, Replace clips if damaged
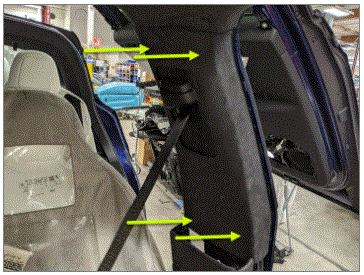 Courtesy of TESLA, INC. Courtesy of TESLA, INC.
|
- Install LH upper B-pillar
NOTE:
2x bolts, T25, 2.5 Nm, 3x clips
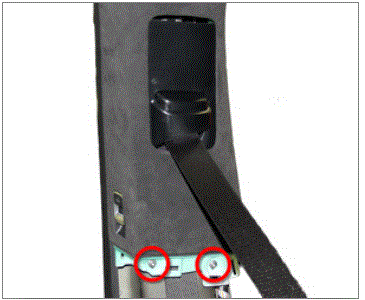 Courtesy of TESLA, INC. Courtesy of TESLA, INC.
|
- Secure upper portion of LH lower B-pillar to LH upper B-pillar
NOTE:
5x clips, Replace clips if damaged
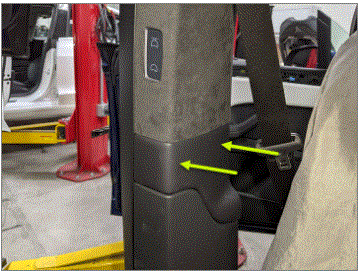 Courtesy of TESLA, INC. Courtesy of TESLA, INC.
|
- Install LH lower B-pillar
NOTE:
7x clips, 2x bolts, T25, 2.5 Nm
Courtesy of TESLA, INC.
|
- Secure applique seal to LH B-pillar applique
NOTE:
Starting at the top work your way around, Fully secure seal and verify fitment, If needed use P-80 emulsifier to assist with seal installation
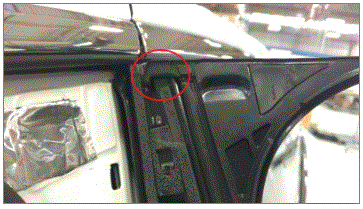 Courtesy of TESLA, INC. Courtesy of TESLA, INC.
|
- Connect LH B-Pillar camera
NOTE:
1x connector, Hold LH applique away from body to gain better access to the camera connector
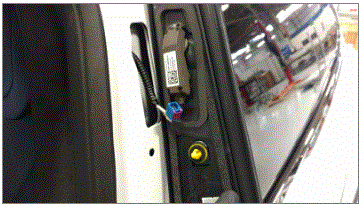 Courtesy of TESLA, INC. Courtesy of TESLA, INC.
|
- Install applique by inserting top tab first, then pushing up and securing lower clip
NOTE:
1x tab, 1x clip, Be sure to place top of applique in position behind upper seal, Insert top tab first then push up and secure lower clip
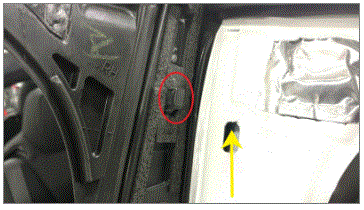 Courtesy of TESLA, INC. Courtesy of TESLA, INC.
|
- Pull back lower seal on LH B-Pillar applique and install screws securing lower LH B-Pillar applique to the body
NOTE:
2x bolts, T25, 3 Nm
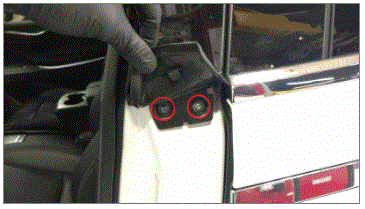 Courtesy of TESLA, INC. Courtesy of TESLA, INC.
|
- Secure lower portion of LH B-Pillar applique seal
NOTE:
3x retaining tabs, 1 tab on either side of the lower seal, 1 tab on the bottom to secure seal to applique
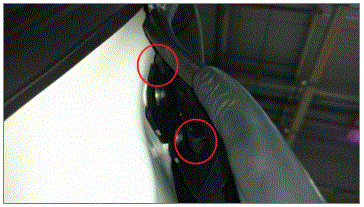 Courtesy of TESLA, INC. Courtesy of TESLA, INC.
|
- Inspect upper LH B-pillar applique seal to make sure it is fully seated
NOTE:
Adjust seal if necessary
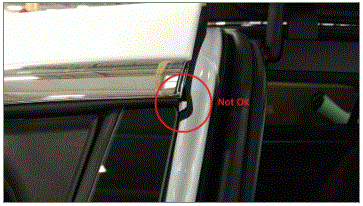 Courtesy of TESLA, INC. Courtesy of TESLA, INC.
|
- Secure top triangle portion of LH B-Pillar applique seal into position against body
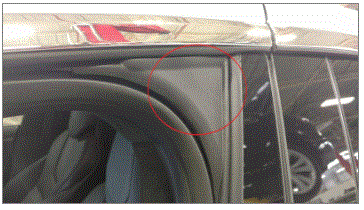 Courtesy of TESLA, INC. Courtesy of TESLA, INC.
|
- Install LH front lower door sill
NOTE:
7x clips
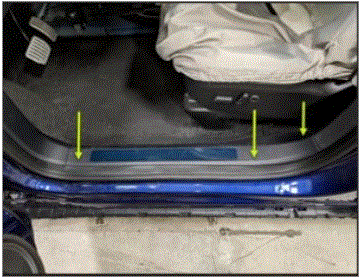 Courtesy of TESLA, INC. Courtesy of TESLA, INC.
|
- Install LH front door seal
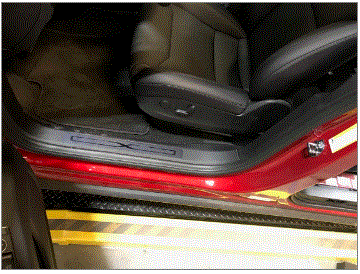 Courtesy of TESLA, INC. Courtesy of TESLA, INC.
|
- Install LH lower B-pillar sill trim
NOTE:
1x bolt, T25, 2 Nm, 2x clips
Courtesy of TESLA, INC.
|
- Install LH welcome plate
NOTE:
8x clips
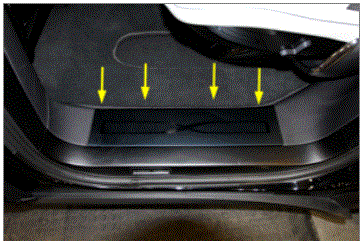 Courtesy of TESLA, INC. Courtesy of TESLA, INC.
|
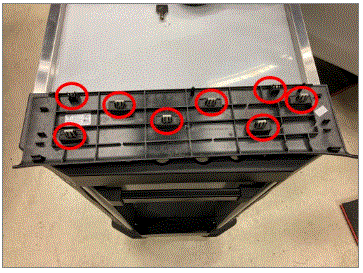 Courtesy of TESLA, INC. Courtesy of TESLA, INC.
|
- Remove tape from LH racetrack trim
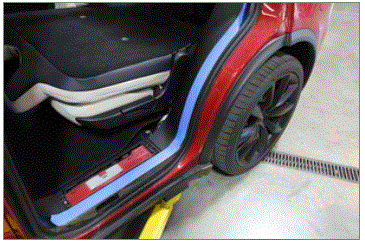 Courtesy of TESLA, INC. Courtesy of TESLA, INC.
|
- Install RH upper A-pillar to vehicle
NOTE:
1x connector, 2x datums, Secure RH upper A-pillar harness, Align datums into IP sub assembly, Rotate upper A-pillar panel into position
Courtesy of TESLA, INC.
|
Courtesy of TESLA, INC.
|
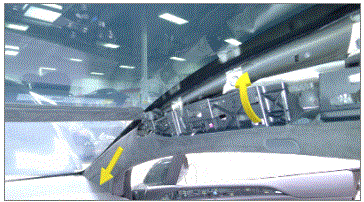 Courtesy of TESLA, INC. Courtesy of TESLA, INC.
|
- Install bolts securing RH upper A-pillar to body
NOTE:
2x bolts, 10mm, 5 Nm, 1x screw, T20, 2.5 Nm, 1x nyloc nut, 13mm, 5 Nm,
Courtesy of TESLA, INC.
|
- Install RH lower A-pillar trim
NOTE:
1x screw, T25, 5 Nm, 4x clips
Courtesy of TESLA, INC.
|
Courtesy of TESLA, INC.
|
- Install RH IP side cover
NOTE:
5x clips
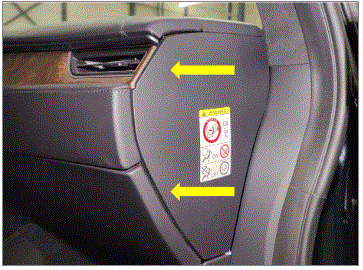 Courtesy of TESLA, INC. Courtesy of TESLA, INC.
|
- Connect RH B-pillar switch and temp sensor
NOTE:
2x black connectors
Courtesy of TESLA, INC.
|
- Install RH upper B-pillar to body
NOTE:
4x clips, 1 magnet, Replace clips if damaged
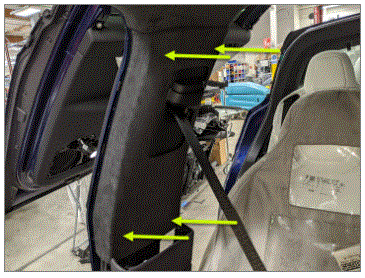 Courtesy of TESLA, INC. Courtesy of TESLA, INC.
|
- Install bolts securing RH upper B-pillar
NOTE:
2x bolts, T25, 2.5 Nm, 3x clips
Courtesy of TESLA, INC.
|
- Secure upper portion of RH lower B-pillar to RH upper B-pillar
NOTE:
5x clips
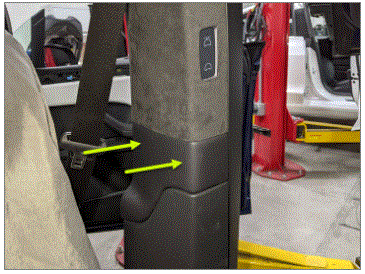 Courtesy of TESLA, INC. Courtesy of TESLA, INC.
|
- Install bolts securing RH lower B-pillar
NOTE:
2x bolts, T25, 2.5 Nm, 7x clips
Courtesy of TESLA, INC.
|
- Secure applique seal to LH B-pillar applique
NOTE:
Starting at the top work your way around, Fully secure seal and verify fitment, If needed use P-80 emulsifier to assist with seal installation
Courtesy of TESLA, INC.
|
- Connect LH B-Pillar camera
NOTE:
1x connector, Hold LH applique away from body to gain better access to the camera connector
Courtesy of TESLA, INC.
|
- Install LH B-pillar applique onto vehicle
NOTE:
1x clip, Be sure to place top of applique in position behind upper seal, Insert top tab first then push up and secure lower clip
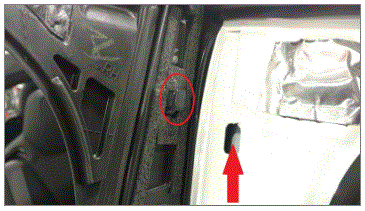 Courtesy of TESLA, INC. Courtesy of TESLA, INC.
|
- Pull back lower seal on LH B-Pillar applique and install screws securing lower LH B-Pillar applique to the body
NOTE:
2x bolts, T25, 3 Nm
Courtesy of TESLA, INC.
|
- Secure lower portion of LH B-Pillar applique seal
NOTE:
3x retaining tabs, 1 tab on either side of the lower seal, 1 tab on the bottom to secure seal to applique
Courtesy of TESLA, INC.
|
- Inspect upper LH B-pillar applique seal to make sure it is fully seated
NOTE:
Adjust seal if necessary
Courtesy of TESLA, INC.
|
- Secure top triangle portion of LH B-Pillar applique seal into position against body
Courtesy of TESLA, INC.
|
- Install RH front door seal
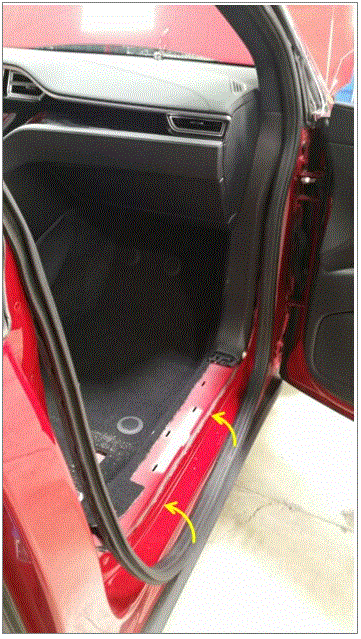 Courtesy of TESLA, INC. Courtesy of TESLA, INC.
|
- Install RH front door sill trim
NOTE:
8x clips, 3x datums
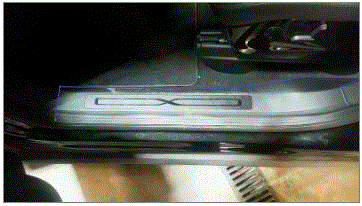 Courtesy of TESLA, INC. Courtesy of TESLA, INC.
|
Courtesy of TESLA, INC.
|
- Install RH rear door sill trim
NOTE:
2x clips, 1x screw, T25, 2.5 Nm, Install new patch bolt
Courtesy of TESLA, INC.
|
- Install RH welcome plate
NOTE:
8x clips
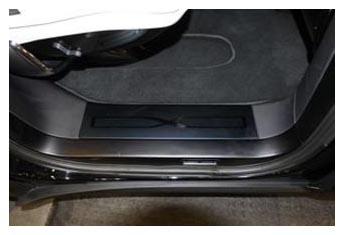 Courtesy of TESLA, INC. Courtesy of TESLA, INC.
|
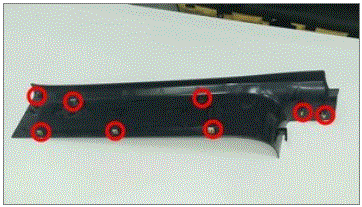 Courtesy of TESLA, INC. Courtesy of TESLA, INC.
|
- Remove masking tape from the RH lower C-pillar
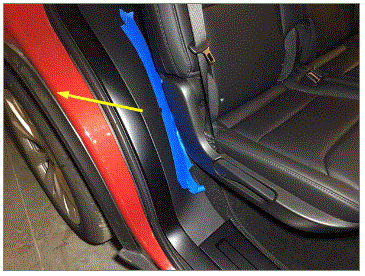 Courtesy of TESLA, INC. Courtesy of TESLA, INC.
|
- Install RH outer seat riser
NOTE:
2x bolts with washers, T45+, 34 Nm, Install new bolts
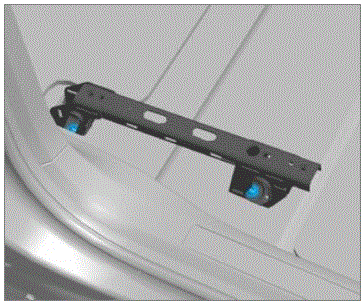 Courtesy of TESLA, INC. Courtesy of TESLA, INC.
|
Courtesy of TESLA, INC.
|
- Install LH outer seat riser
NOTE:
2x bolts with washers, T45+, 34 Nm, Install new bolts
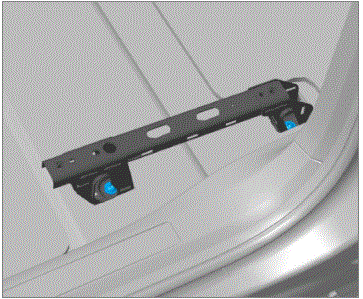 Courtesy of TESLA, INC. Courtesy of TESLA, INC.
|
Courtesy of TESLA, INC.
|
- Set inner seat riser into vehicle
NOTE:
Fold carpet back over inner seat riser once installed
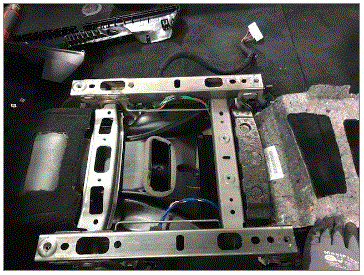 Courtesy of TESLA, INC. Courtesy of TESLA, INC.
|
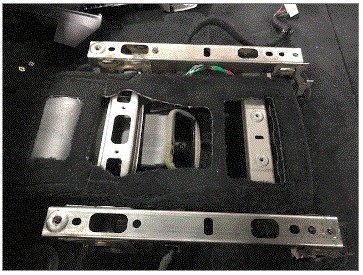 Courtesy of TESLA, INC. Courtesy of TESLA, INC.
|
- Install inner seat riser bolts
NOTE:
4x fasteners, 14mm, 33 Nm, Install new patch bolts
Courtesy of TESLA, INC.
|
Courtesy of TESLA, INC.
|
Courtesy of TESLA, INC.
|
Courtesy of TESLA, INC.
|
- Secure seat harness to inner seat riser on LH and RH sides
NOTE:
2x clips
Courtesy of TESLA, INC.
|
Courtesy of TESLA, INC.
|
Courtesy of TESLA, INC.
|
Courtesy of TESLA, INC.
|
- Install RH inner seat riser trim covers
NOTE:
2x clips, Install inner inboard cover first then inner outboard cover, Be sure to route seat harness through inner outboard cover
Courtesy of TESLA, INC.
|
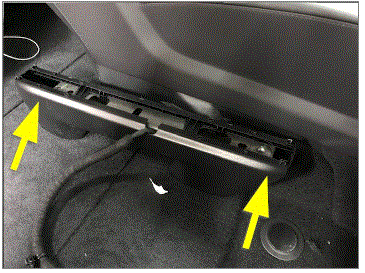 Courtesy of TESLA, INC. Courtesy of TESLA, INC.
|
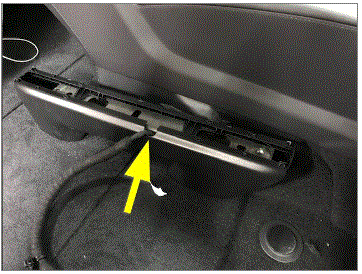 Courtesy of TESLA, INC. Courtesy of TESLA, INC.
|
- Install LH inner seat riser trim covers
NOTE:
2x clips, Install inner inboard cover first then inner outboard cover, Be sure to route seat harness through inner outboard cover
Courtesy of TESLA, INC.
|
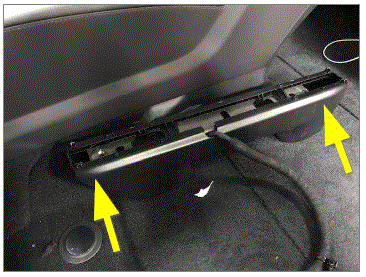 Courtesy of TESLA, INC. Courtesy of TESLA, INC.
|
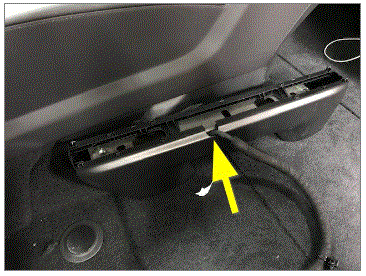 Courtesy of TESLA, INC. Courtesy of TESLA, INC.
|
- Place center console into vehicle
NOTE:
Recommend assistance
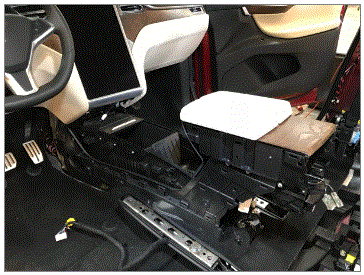 Courtesy of TESLA, INC. Courtesy of TESLA, INC.
|
- Make connections at center console harness
NOTE:
6x connectors, Number of connectors may vary depending on vehicle production range
Courtesy of TESLA, INC.
|
Courtesy of TESLA, INC.
|
- Install the bolts securing center console assembly
NOTE:
6x bolts, 10mm, 7 Nm, 1x screw, T20, 2 Nm
Courtesy of TESLA, INC.
|
Courtesy of TESLA, INC.
|
Courtesy of TESLA, INC.
|
Courtesy of TESLA, INC.
|
- Install rubber mat at the base of the console
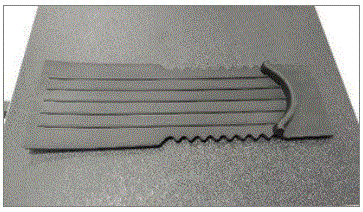 Courtesy of TESLA, INC. Courtesy of TESLA, INC.
|
- Install cup holder dividers inside console
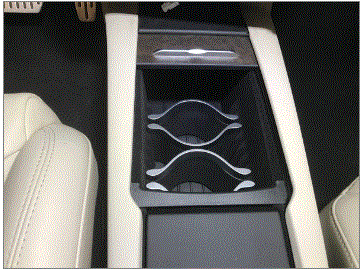 Courtesy of TESLA, INC. Courtesy of TESLA, INC.
|
- Install RH center console closeout extension
NOTE:
6x clips
Courtesy of TESLA, INC.
|
Courtesy of TESLA, INC.
|
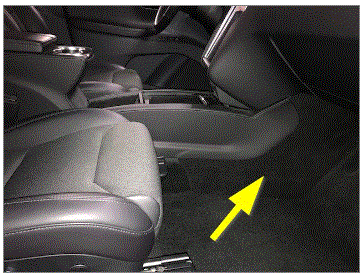 Courtesy of TESLA, INC. Courtesy of TESLA, INC.
|
- Install LH center console closeout extension
NOTE:
6x clips
Courtesy of TESLA, INC.
|
Courtesy of TESLA, INC.
|
Courtesy of TESLA, INC.
|
- Secure the RH center console side trim panel
NOTE:
13x clips
Courtesy of TESLA, INC.
|
- Secure the LH center console side trim panel
NOTE:
13x clips
Courtesy of TESLA, INC.
|
- Connect module at rear console panel
NOTE:
6x connectors
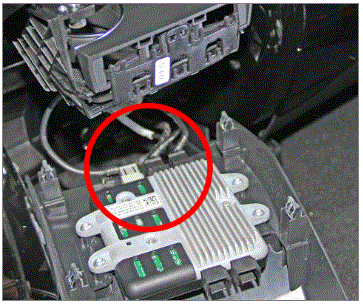 Courtesy of TESLA, INC. Courtesy of TESLA, INC.
|
Courtesy of TESLA, INC.
|
- Install the center console back panel
NOTE:
8x clips
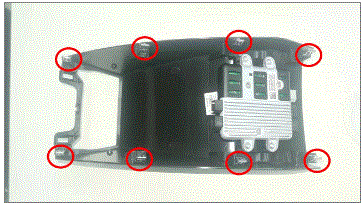 Courtesy of TESLA, INC. Courtesy of TESLA, INC.
|
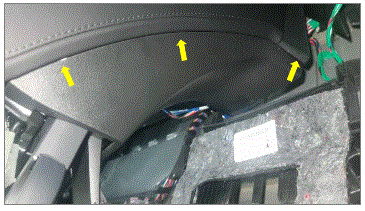 Courtesy of TESLA, INC. Courtesy of TESLA, INC.
|
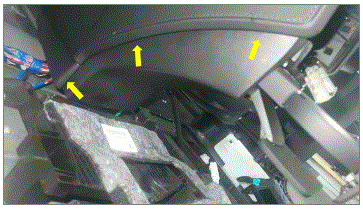 Courtesy of TESLA, INC. Courtesy of TESLA, INC.
|
- Open rear cup holder
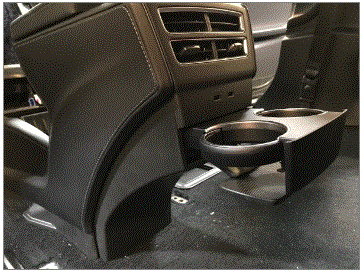 Courtesy of TESLA, INC. Courtesy of TESLA, INC.
|
- Install the rear cup holder trim panel
NOTE:
2x tabs
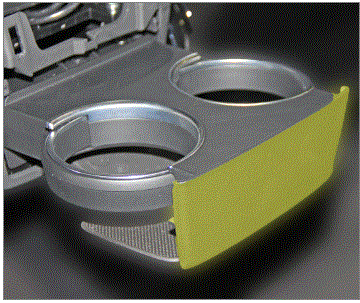 Courtesy of TESLA, INC. Courtesy of TESLA, INC.
|
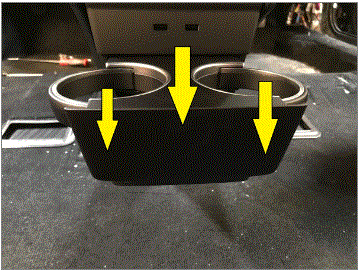 Courtesy of TESLA, INC. Courtesy of TESLA, INC.
|
- Install USB ports into rear air outlet
NOTE:
2x connectors
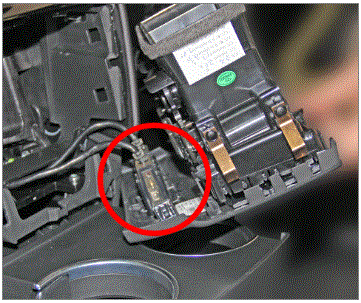 Courtesy of TESLA, INC. Courtesy of TESLA, INC.
|
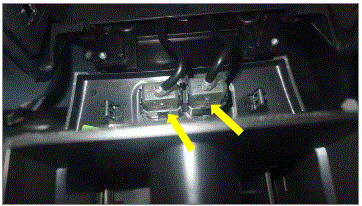 Courtesy of TESLA, INC. Courtesy of TESLA, INC.
|
- Install the center console rear air outlet
NOTE:
2x USB connections, 4x clips
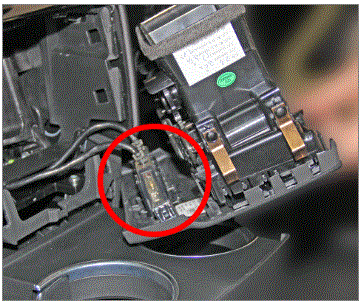 Courtesy of TESLA, INC. Courtesy of TESLA, INC.
|
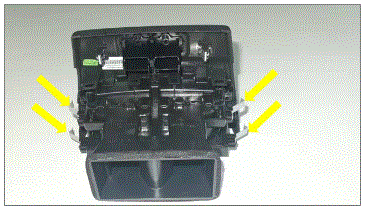 Courtesy of TESLA, INC. Courtesy of TESLA, INC.
|
- Install MCU cubby tray
NOTE:
2x clips, Ensure diagnostic cables are tucked into the appropriate position
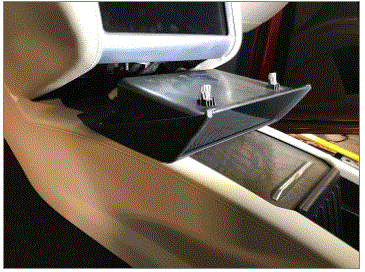 Courtesy of TESLA, INC. Courtesy of TESLA, INC.
|
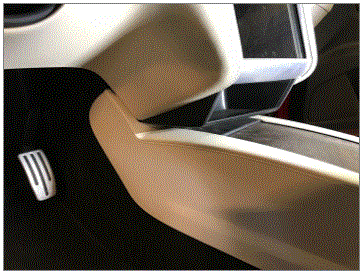 Courtesy of TESLA, INC. Courtesy of TESLA, INC.
|
- Install LH footwell cover
NOTE:
2x clips, 1x connector, Reconnect puddle lamp
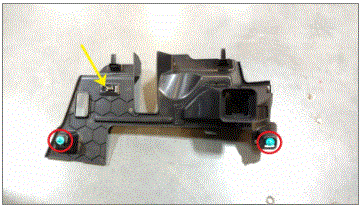 Courtesy of TESLA, INC. Courtesy of TESLA, INC.
|
- Install passenger footwell cover
NOTE:
1x connector, 2x clips, 2x datums, Make sure datums are aligned
Courtesy of TESLA, INC.
|
Courtesy of TESLA, INC.
|
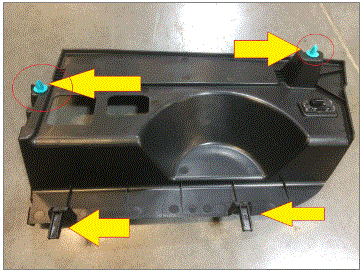 Courtesy of TESLA, INC. Courtesy of TESLA, INC.
|
- Install LH front seat into vehicle
NOTE:
Recommend assistance, Be cautious not to damage other components
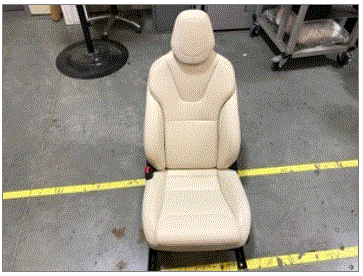 Courtesy of TESLA, INC. Courtesy of TESLA, INC.
|
- Connect LH front seat harness
NOTE:
1x connector
Courtesy of TESLA, INC.
|
- Install RH front seat into vehicle
NOTE:
Recommend assistance, Caution: Do not damage other components
Courtesy of TESLA, INC.
|
- Connect RH front seat harness
NOTE:
1x connector
Courtesy of TESLA, INC.
|
- Connect first responder loop and then 12V negative terminal
NOTE:
1x connector, 1x nut, 10mm, 5 Nm
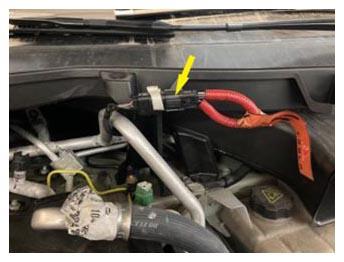 Courtesy of TESLA, INC. Courtesy of TESLA, INC.
|
Courtesy of TESLA, INC.
|
- Move LH front seat fully rearward
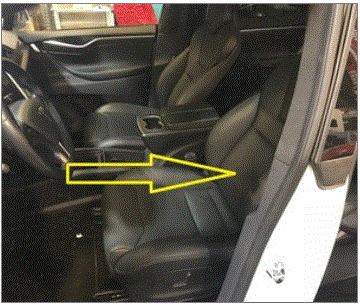 Courtesy of TESLA, INC. Courtesy of TESLA, INC.
|
- Install LH front seat front fasteners
NOTE:
2x patch bolts, T45P, 34 Nm, Install new patch bolts
Courtesy of TESLA, INC.
|
- Move LH front seat fully forward
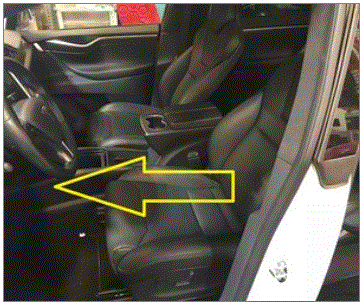 Courtesy of TESLA, INC. Courtesy of TESLA, INC.
|
- Install LH front seat rear fasteners
NOTE:
2x patch bolts, T45P, 34 Nm, Install new patch bolts
Courtesy of TESLA, INC.
|
- Move LH front seat to original position
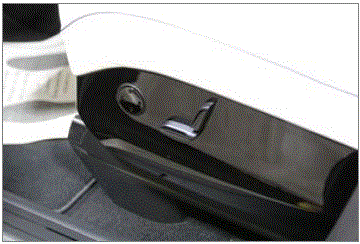 Courtesy of TESLA, INC. Courtesy of TESLA, INC.
|
- Power the RH seat fully forward for access
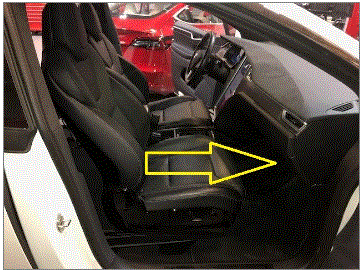 Courtesy of TESLA, INC. Courtesy of TESLA, INC.
|
- Install RH front seat rear fasteners
NOTE:
2x bolts, T45+, 34 Nm, Install new bolts
Courtesy of TESLA, INC.
|
- Move RH front seat fully rearward
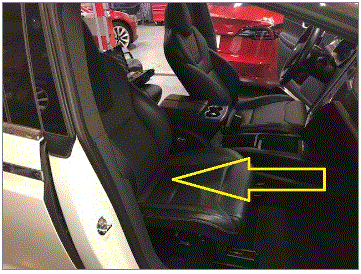 Courtesy of TESLA, INC. Courtesy of TESLA, INC.
|
- Install RH front seat front fasteners
NOTE:
2x bolts, T45+, 34 Nm, Install new bolts
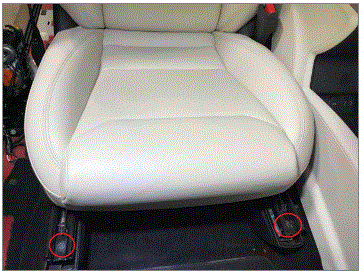 Courtesy of TESLA, INC. Courtesy of TESLA, INC.
|
- Move RH front seat to original position
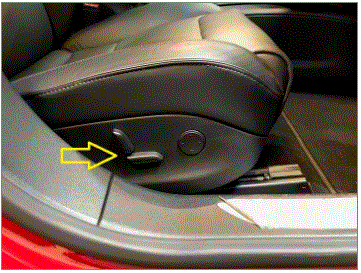 Courtesy of TESLA, INC. Courtesy of TESLA, INC.
|
- Move LH front seat to original position
Courtesy of TESLA, INC.
|
- Move RH front seat to original position
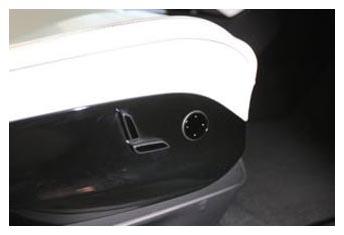 Courtesy of TESLA, INC. Courtesy of TESLA, INC.
|
- Install HEPA filter housing
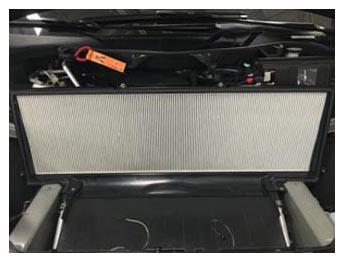 Courtesy of TESLA, INC. Courtesy of TESLA, INC.
|
- Install underhood storage unit
NOTE:
10x bolts, 10mm, 4 Nm, 10x bolts, 10mm, 7 Nm
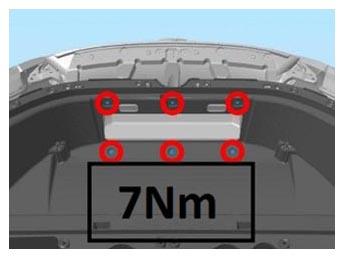 Courtesy of TESLA, INC. Courtesy of TESLA, INC.
|
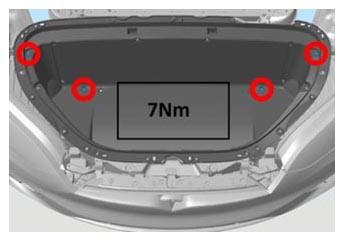 Courtesy of TESLA, INC. Courtesy of TESLA, INC.
|
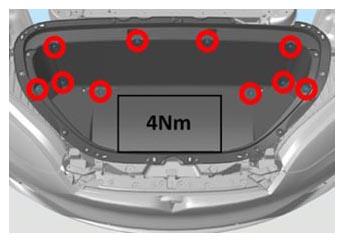 Courtesy of TESLA, INC. Courtesy of TESLA, INC.
|
- Install frunk carpet
NOTE:
2x connectors
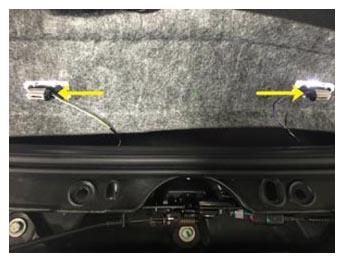 Courtesy of TESLA, INC. Courtesy of TESLA, INC.
|
- Close hood
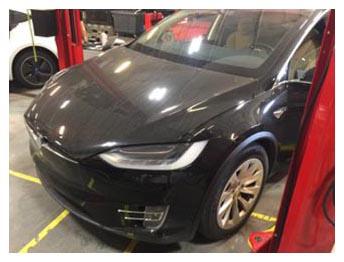 Courtesy of TESLA, INC. Courtesy of TESLA, INC.
|
- Calibrate falcon doors via UI
NOTE:
Via Controls > Calibrate, Required after 12V and FRL disconnect
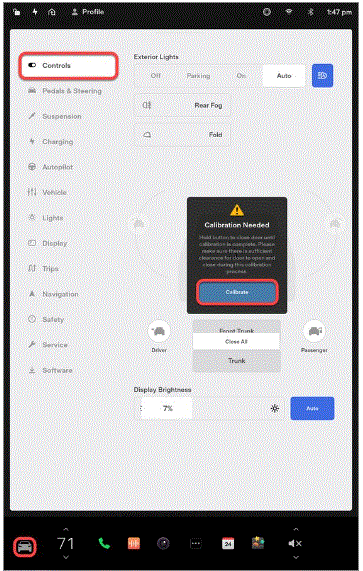 Courtesy of TESLA, INC. Courtesy of TESLA, INC.
|
- Using MCU close all doors and liftgate
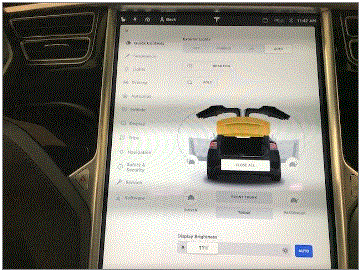 Courtesy of TESLA, INC. Courtesy of TESLA, INC.
|
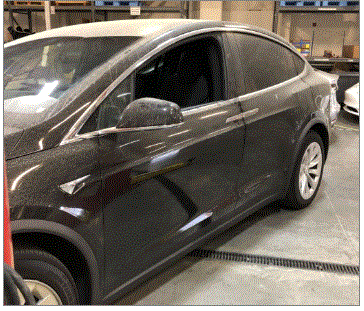 Courtesy of TESLA, INC. Courtesy of TESLA, INC.
|
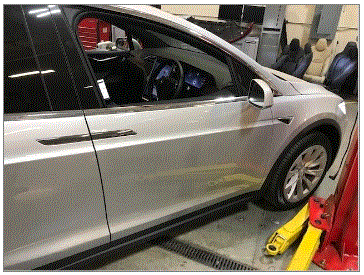 Courtesy of TESLA, INC. Courtesy of TESLA, INC.
|
- Raise LH front window
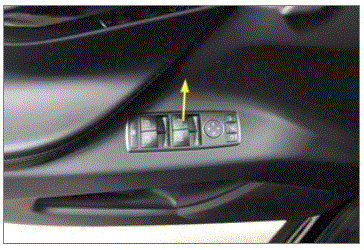 Courtesy of TESLA, INC. Courtesy of TESLA, INC.
|