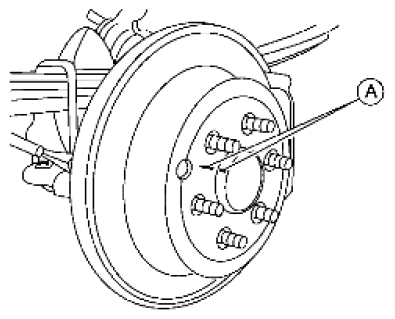
- Install the disc rotor. If reusing the disc rotor, align the matching marks as shown in illustration for installation.
 Courtesy of SUZUKI OF AMERICA CORP.
CAUTION:
Align the matching marks on the wheel hub assembly and disc rotor, if reusing the disc rotor.
- Install torque member and tighten the torque member bolts to specification. Refer to [REAR BRAKE CALIPER: EXPLODED VIEW [ON-VEHICLE REPAIR] ].
- Install the brake pads, shims and retainers on the torque member. Refer to [REAR BRAKE PAD: EXPLODED VIEW ].
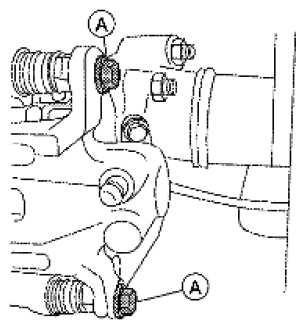
- Install caliper body and sliding pins, then tighten the sliding pin bolts (A) to the specified torque. Refer to [REAR BRAKE CALIPER: EXPLODED VIEW [ON-VEHICLE REPAIR] ].
 Courtesy of SUZUKI OF AMERICA CORP.
CAUTION:
When installing the caliper body to the torque member, wipe any oil off of the knuckle spindle, washers and caliper body attachment surfaces.
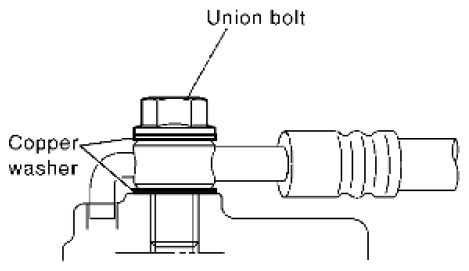
- Install brake hose by aligning with the protrusion on caliper body, then install new copper washers and union bolt. Tighten union bolt to specified torque. Refer to
[BRAKE TUBE AND HOSE: HYDRAULIC CIRCUIT
]
 Courtesy of SUZUKI OF AMERICA CORP.
CAUTION:
Use new copper washers for installation.
- Refill with new brake fluid as necessary and bleed the air. Refer to
[BRAKE FLUID: BLEEDING BRAKE SYSTEM
]
CAUTION:
- Refill with new brake fluid.
- Do not reuse drained brake fluid.
- Install the rear wheel and tire. Refer to [TIRE ROTATION
].