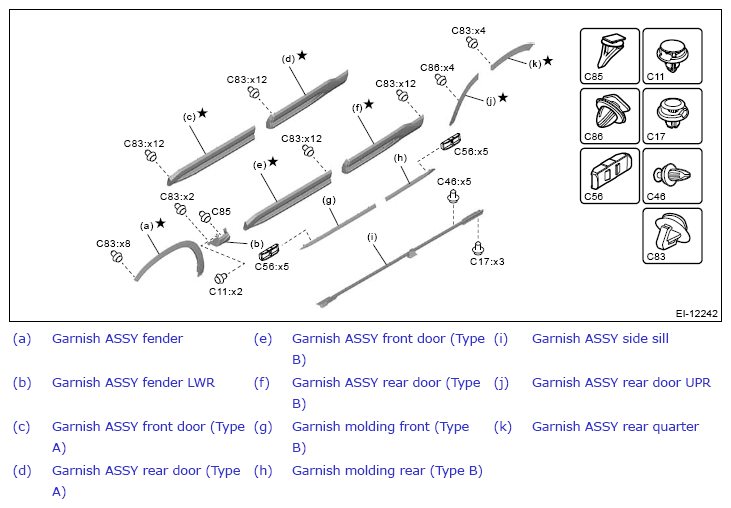
- Remove the clips and remove the garnish assembly side sill.
NOTE:
Remove with the door open to prevent door seal interference.
CAUTION:
Do not reuse the garnish assembly side sill if it has been deformed during removal
.
 Courtesy of SUBARU OF AMERICA, INC. Courtesy of SUBARU OF AMERICA, INC.
|
- Remove the garnish assembly front door and the garnish assembly rear door.
CAUTION:
Do not reuse the garnish assembly front door and the garnish assembly rear door
.
- Attach the protective tape to the periphery of the garnish.
- Heat the garnish section for 3 - 5 minutes to 40°C - 60°C (104°F - 140°F) using a heat light or a drier.
CAUTION:
Be careful not to burn yourself
.
- Separate the bonded part of double sided tape with a nylon cord or equivalent.
- Release the clips and remove the garnish assembly front door and the garnish assembly rear door.
- Remove the garnish assembly fender LWR.
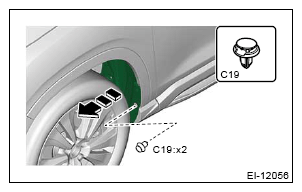
- Remove the clips and turn over the mud guard.
 Courtesy of SUBARU OF AMERICA, INC. Courtesy of SUBARU OF AMERICA, INC.
|
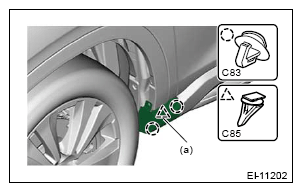
- Release the clip (a) from inside the vehicle, and remove the garnish assembly fender LWR.
 Courtesy of SUBARU OF AMERICA, INC. Courtesy of SUBARU OF AMERICA, INC.
|
CAUTION:
- Pulling with excessive force may damage the clip
.
- Do not reuse the garnish assembly fender LWR if it has been deformed during removal
.
- Remove the garnish assembly fender and the garnish assembly rear door UPR.
CAUTION:
Do not reuse the garnish assembly fender and the garnish assembly rear door UPR
.
- Attach the protective tape to the periphery of the garnish.
- Heat the garnish section for 3 - 5 minutes to 40°C - 60°C (104°F - 140°F) using a heat light or a drier.
CAUTION:
Be careful not to burn yourself
.
- Separate the bonded part of double sided tape with a nylon cord or equivalent.
- Release the clips and remove the garnish assembly fender and the garnish assembly rear door UPR.
- Remove the garnish assembly rear quarter.
CAUTION:
Do not reuse the garnish assembly rear quarter
.
- Attach the protective tape to the periphery of the garnish.
- Heat the garnish section for 3 - 5 minutes to 40°C - 60°C (104°F - 140°F) using a heat light or a drier.
CAUTION:
Be careful not to burn yourself
.
- Separate the bonded part of double sided tape with a nylon cord or equivalent.
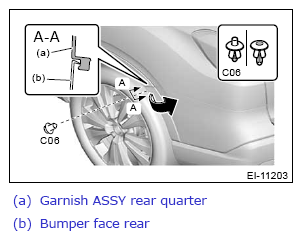
- Remove the clips, and turn over the bumper face rear.
 Courtesy of SUBARU OF AMERICA, INC. Courtesy of SUBARU OF AMERICA, INC.
|
- Release the clips, and remove the garnish assembly rear quarter.