- Disconnect the ground cable from battery. Ref. to NOTE>NOTE>BATTERY
.
NOTE:
For model with battery sensor, disconnect the ground terminal from battery sensor.
- Remove the light assembly - rear combination.
CAUTION:
Be careful not to damage the clips.
- Release the bolts and clips, then pull out the light assembly - rear combination to the vehicle rear.
- Disconnect the connector and remove the light assembly - rear combination.
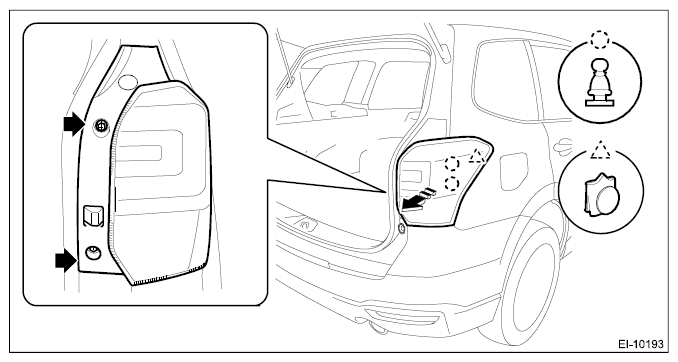 Courtesy of SUBARU OF AMERICA, INC.
- Remove the bumper face - rear.
- Remove the clips inside the wheel housing.
- Remove the clips at the lower side of the bumper face - rear.
 Courtesy of SUBARU OF AMERICA, INC.
- Detach (b) and (c) while pulling up (a) of the bumper face - rear.
- Detach (e) while pulling up (d) of the bumper face - rear.
- Perform the same procedures when detaching (f) to (h) on the opposite side.
- Detach in order from (i) to (k) by carefully pulling toward you while pulling up the center of bumper face - rear.
CAUTION:
- Pulling with excessive force may damage the bracket.
- For models with reverse sonar sensor, be careful not to damage the connector located on the gray arrow position.
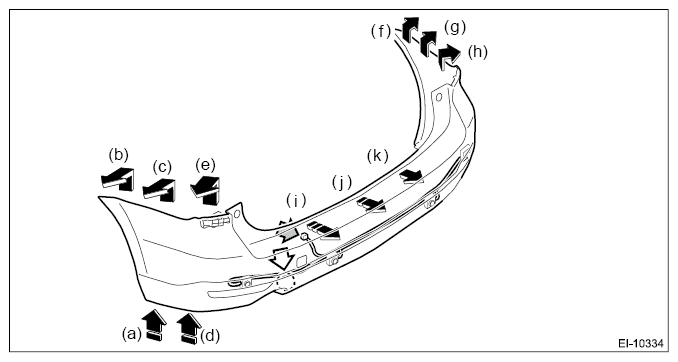 Courtesy of SUBARU OF AMERICA, INC.
- For models with reverse sonar sensor, disconnect the connector of the cord assembly - sonar.
- Remove the bolts and nuts, and remove the bumper beam COMPL - rear.
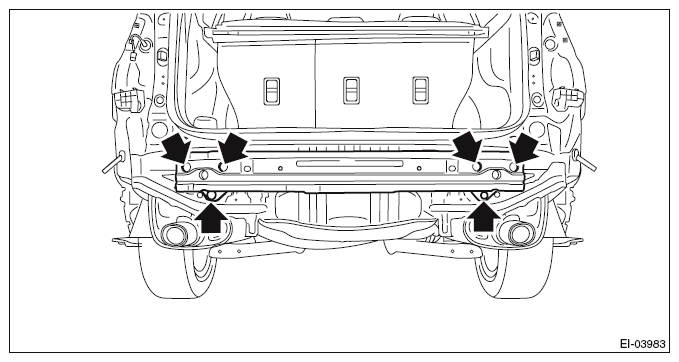 Courtesy of SUBARU OF AMERICA, INC.
NOTE:
After all nuts are removed, raise the bumper beam COMPL - rear a little to remove it from vehicle body.
- Remove bumper brackets.
CAUTION:
Do not reuse the removed bracket - rear bumper side. This may cause water leakage on the body panel.
- Remove the screws.
- Turn over the trim panel - rear apron, and detach the claw of the clip from the back side.
 Courtesy of SUBARU OF AMERICA, INC.
- From behind the bumper face - rear, release the nuts and claws and remove the reflex reflector assembly.
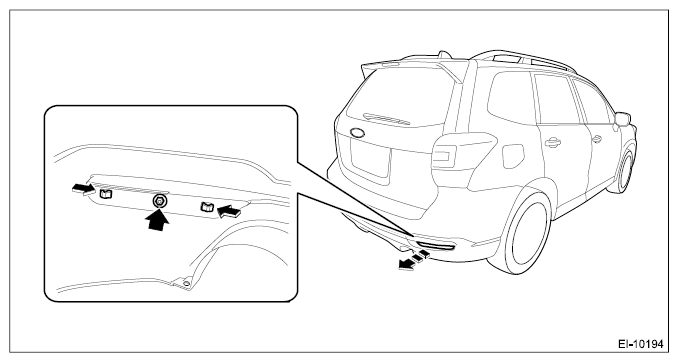 Courtesy of SUBARU OF AMERICA, INC.
- If removing the following parts, refer to "Reverse Automatic Braking".
- Cord assembly - sonar
- Sonar assembly
- Bezel - sonar