- Precautions
CAUTION:
After turning the ignition switch to OFF, you may have to wait for a while before disconnecting the battery terminals. Check appropriate precautions for battery terminal disconnection before proceeding. (Refer to WORKING PRECAUTIONS AND NOTES
)
- Disconnection of the battery ground terminal (Refer to REMOVAL
)
- Removal of instrument panel speaker panel sub-assembly No. 1 (Refer to DISASSEMBLY
)
- Removal of instrument panel speaker panel sub-assembly No. 2 (Refer to DISASSEMBLY
)
- Removal of front pillar garnish LH (Refer to DISASSEMBLY
)
- Removal of front pillar garnish RH
NOTE:
Remove the part in the same manner as LH side.
- Removal of front door scuff plate LH
- Release the 6 claws and remove the front door scuff plate LH.
 Courtesy of SUBARU OF AMERICA, INC.
- Removal of front door scuff plate RH
NOTE:
Remove the part in the same manner as LH side.
- Removal of cowl side trim board LH
- Remove the clip.
- Release the 2 clips and remove the cowl side trim board LH.
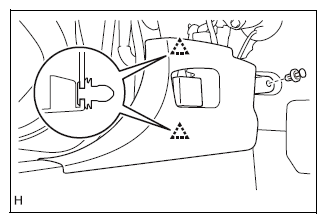 Courtesy of SUBARU OF AMERICA, INC.
- Removal of cowl side trim board RH
NOTE:
Remove the part in the same manner as LH side.
- Removal of front door opening trim weather strip LH
- Remove the front door opening trim weather strip LH.
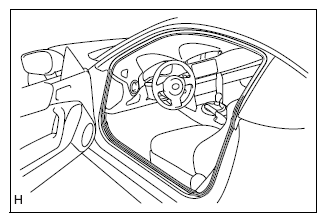 Courtesy of SUBARU OF AMERICA, INC.
- Removal of the front door opening trim weather strip RH
NOTE:
Remove the part in the same manner as LH side.
- Disconnection of front seat outer belt assembly LH (Refer to REMOVAL
)
- Disconnection of front seat outer belt assembly RH
NOTE:
Remove the part in the same manner as RH side.
- Removal of separate type rear seat cushion assembly (Refer to DISASSEMBLY
)
- Removal of separate type rear seat cushion assembly LH (Refer to DISASSEMBLY
)
- Disconnection of trunk trim cover inner LH
- Tilt the rear seat backrest assembly forward.
- Release the 2 clips and disconnect the trunk trim cover inner LH.
 Courtesy of SUBARU OF AMERICA, INC.
- Disconnection of trunk trim cover inner RH
NOTE:
Repeat the same disconnection steps for the LH side.
- Removal of quarter lower trim LH
- Pull up the rear seat backrest assembly.
- Remove the clip.
- Release the 8 clips and 8 claws, and remove the quarter lower trim LH.
WARNING:
The curtain airbag sensor of the airbag system is installed behind the quarter lower trim. Before removing the quarter lower trim, always be sure to confirm the precautions related to the SRS airbag system. (Refer to SRS AIRBAG SYSTEM
)
 Courtesy of SUBARU OF AMERICA, INC.
- Removal of quarter lower trim RH
NOTE:
Remove the part in the same manner as LH side.
- Removal of quarter trim lid LH
- According to the direction of the arrow in the figure, release the 6 claws.
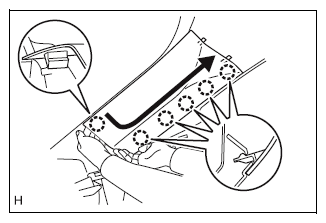 Courtesy of SUBARU OF AMERICA, INC.
- Release the 2 clips and 2 guides.
NOTE:
Hook the tether clips onto the quarter trim lid LH.
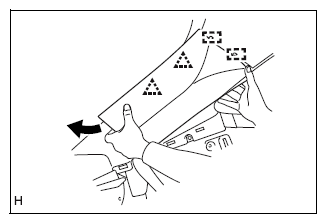 Courtesy of SUBARU OF AMERICA, INC.
- As shown in the figure, push and remove the 2 tether clips in the direction of the arrow and remove the quarter trim lid LH and the 2 tether clips as a unit.
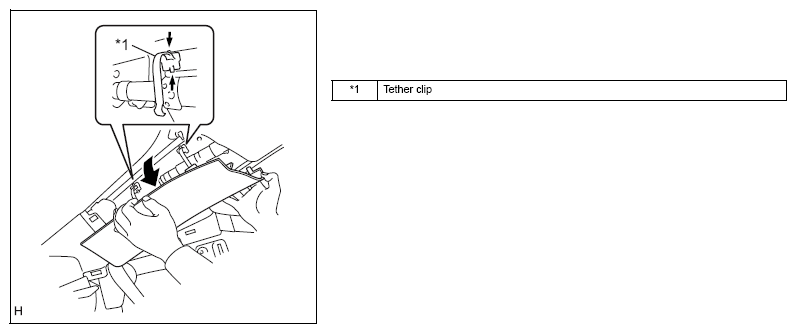 Courtesy of SUBARU OF AMERICA, INC.
- Remove the 2 tether clips from the quarter trim lid LH.
CAUTION:
If it is damaged, be sure to replace the tether clip with a new one.
- Removal of quarter trim lid RH
NOTE:
Remove the part in the same manner as LH side.
- Removal of the rear window side garnish LH
- Remove the bolt.
- Release the 2 clips, remove the guide, and remove the rear window side garnish LH.
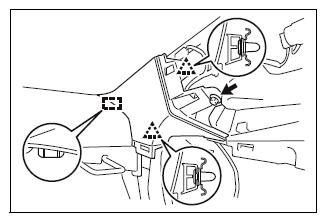 Courtesy of SUBARU OF AMERICA, INC.
- Removal of rear window side garnish RH
NOTE:
Remove the part in the same manner as LH side.
- Removal of quarter rear trim garnish front LH
- Remove the 2 bolts.
- Release the clip and claw, and remove the quarter rear trim garnish front LH.
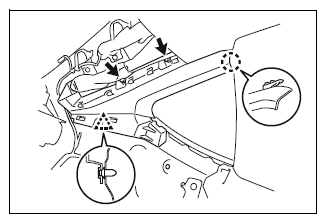 Courtesy of SUBARU OF AMERICA, INC.
- Removal of quarter rear trim garnish front RH
NOTE:
Remove the part in the same manner as LH side.
- Removal of center pillar garnish LH
- Remove the clip (B) and the 2 bolts.
- Release the clip (A) and 2 guides and remove the center pillar garnish LH.
CAUTION:
Do not reuse the upper clip (A) of the center pillar garnish RH. Once it is removed, the clip looses its affixing capability. Be sure to replace it with a new clip.
 Courtesy of SUBARU OF AMERICA, INC.
- Removal of center pillar garnish RH
NOTE:
Remove the part in the same manner as LH side.
- Removal of map light assembly (Refer to PERSONAL MAP LIGHT
)
- Removal of visor assembly RH
- Remove the 2 screws.
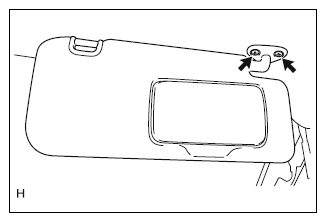 Courtesy of SUBARU OF AMERICA, INC.
- Disconnect the connector and remove the visor assembly RH (with vanity light).
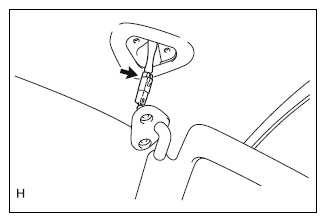 Courtesy of SUBARU OF AMERICA, INC.
- Removal of visor assembly LH
NOTE:
Remove the part in the same manner as RH side.
- Removal of visor holder
- Release the 2 claws and remove the 2 visor holders.
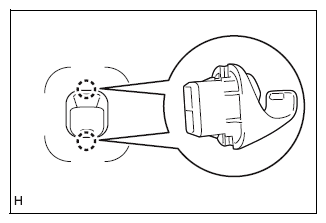 Courtesy of SUBARU OF AMERICA, INC.
- Removal of roof head lining assembly (with vanity light)
- Disconnect the connector of the front pillar RH and the 3 clamps.
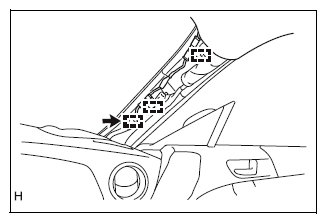 Courtesy of SUBARU OF AMERICA, INC.
- Disconnect the connector and 2 clamps at the front pillar LH.
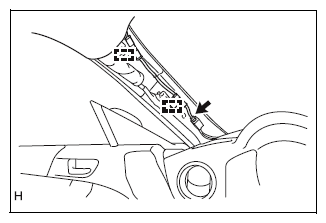 Courtesy of SUBARU OF AMERICA, INC.
- Remove the 3 clips from the rear of the vehicle.
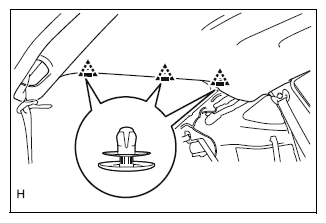 Courtesy of SUBARU OF AMERICA, INC.
- Disconnect the connector of the feeder cord assembly.
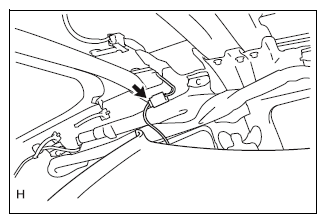 Courtesy of SUBARU OF AMERICA, INC.
- Release the clip at the front of the vehicle and remove the roof head lining assembly.
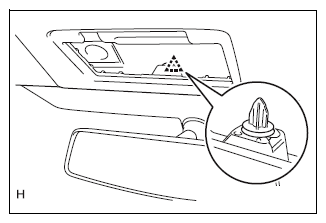 Courtesy of SUBARU OF AMERICA, INC.
- Take out the removed roof head lining assembly through the passenger's door so that the assembly does not interfere with the body interior.
CAUTION:
- To prevent distortion of the roof head lining assembly, take out the assembly with at least two persons.
- Do not allow the roof head lining to be stuck, resulting in bent or damaged lining.
- Do not damage the roof head lining assembly and body interior.
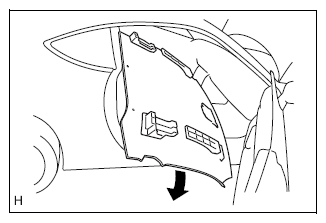 Courtesy of SUBARU OF AMERICA, INC.
- Removal of roof head lining assembly (without vanity light)
NOTE:
Repeat the same removal steps for that with vanity light.