LEMON Manuals: Even more car manuals for everyone
Home >> Subaru >> 2013 >> Legacy Premium, Automatic CVT Trans >> Repair and Diagnosis >> Heating, Ventilation & A/C (HVAC) >> HVAC Control Systems >> HVAC System (Heater, Ventilator And A/C) >> Control Panel >> Removal >> Auto A/C Model

Auto A/C Model

  1. Disconnect the ground cable from battery.
  2. Remove the center panel assembly.
    CAUTION: Do not put your finger on the fin of the air vent grille. Doing so may damage the fin.
    1. Attach the protective tape (a) to the meter visor.
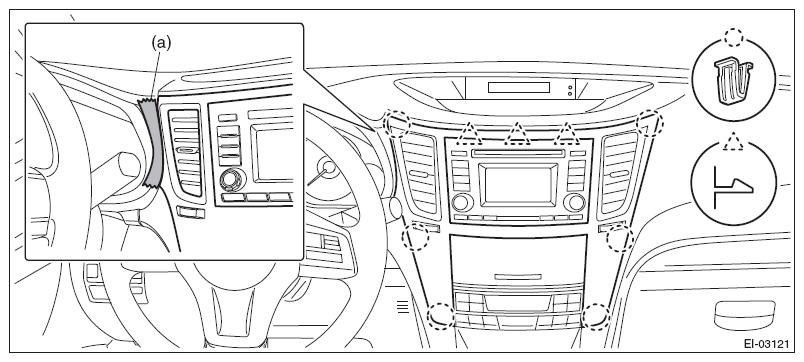
      Fig 1: Identifying Protective Tape Attached To Meter Visor
      G08348677Courtesy of SUBARU OF AMERICA, INC.
    2. Insert a finger into the air vent grille and release the left and right clips at the top of the center panel. (A), (B)
    3. Insert a finger into the air vent grille and release the left and right clips at the center of the center panel. (C), (D)
    4. Release the clips at the bottom of the center panel and remove the center panel assembly.
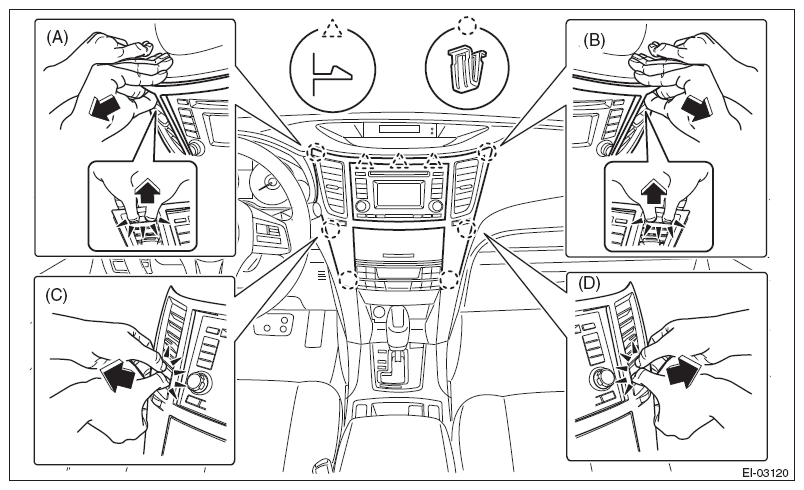
      Fig 2: Releasing Center Panel Clips
      G08348678Courtesy of SUBARU OF AMERICA, INC.
  3. Remove the audio assembly.
    1. Remove the left and right screws, and partially pull the audio out from center console.
    2. Disconnect the connectors, and remove the audio assembly.
      Fig 3: Locating Center Console Screws
      G08348679Courtesy of SUBARU OF AMERICA, INC.
  4. Remove the navigation assembly. (model with navigation)
    1. Remove the left and right screws.
    2. Disconnect the connectors, and remove the navigation assembly.
      Fig 4: Locating Navigation Assembly Screws
      G08583826Courtesy of SUBARU OF AMERICA, INC.
  5. Remove the control panel.
    1. Remove the screws and release the clip.
      Fig 5: Locating Control Panel Screws
      G06653117Courtesy of SUBARU OF AMERICA, INC.
    2. Pull forward the control module and disconnect the connector.
      Fig 6: Locating Control Module Connector
      G06652956Courtesy of SUBARU OF AMERICA, INC.