A/C Evaporator Disinfecting
Before starting procedures, obtain the following equipment and supplies:^ A/C System Disinfectant Kit P/N 21030784
^ Cleaning Gun, OTC Tool SA9216NE
CAUTION:
ORDINARY SAFETY GLASSES ARE NOT SUFFICIENT
^ Safety goggles or face shield
^ National Institute of Occupational Safety and Health (NIOSH) approved acid gas/organic vapor respirator with chlorine dioxide cartridges (3M� P/N 5103-small, 5203-medium, 5303-large), which are to be used with a pre-filter (P/N 5010) and retainer (P/N 501), or equivalents
^ Pedestal fan
^ Plug (P/N 21121827)
1. Dry evaporator by:
^ Adjusting temperature to full hot
^ Adjusting mode to heater only
^ Turning RECIRC On
^ Making sure AC button is Off
^ Close all doors and windows
^ Start engine and allow to reach operating temperature
^ Allow blower motor to operate on HI blower for five minutes, once engine reaches operating temperature
2. Raise vehicle on a hoist.
3. Check the HVAC module drain for blockage. If necessary, clear drain hole with a soft blunt tool such as the eraser end of a pencil.
4. Lower vehicle from hoist.
5. To reduce the risk of debris from entering the HVAC module, check for gaps between cowl panel foam and windshield, at base of windshield. Repair gaps by repositioning panels or by removing cowl panels and installing additional foam to panel. Use Kent Industries P/N 40115 Adhesive Back Shim Stock or equivalent 5/16 x 3/8 inch foam.
6. Place a drain pan directly below the HVAC drain to collect disinfectant and rinse water runoff.
7. Open all doors and windows in the vehicle and position pedestal fan so that it provides cross ventilation, through the vehicle, during the cleaning procedure.
8. Cover interior of vehicle to protect it from spray.
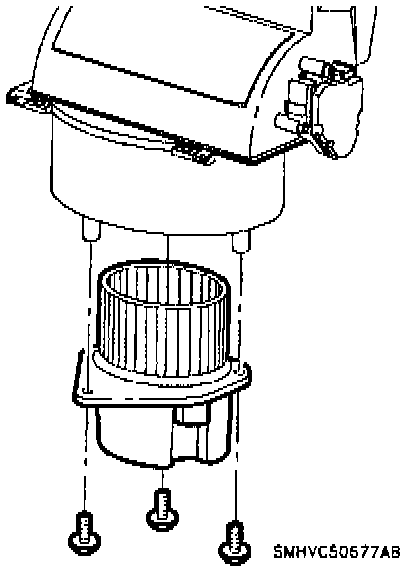
9. Disconnect blower motor connector.
10. Remove blower motor mounting screws and remove blower motor assembly.
11. Check the HVAC module for debris through the blower motor opening. Remove any debris from evaporator face.
IMPORTANT:
Use care when removing debris from front of evaporator so no damage is done to the fins.
12. Install blower motor and connect electrical connector.
Torque: 1.7 N.m (15 in-lbs)
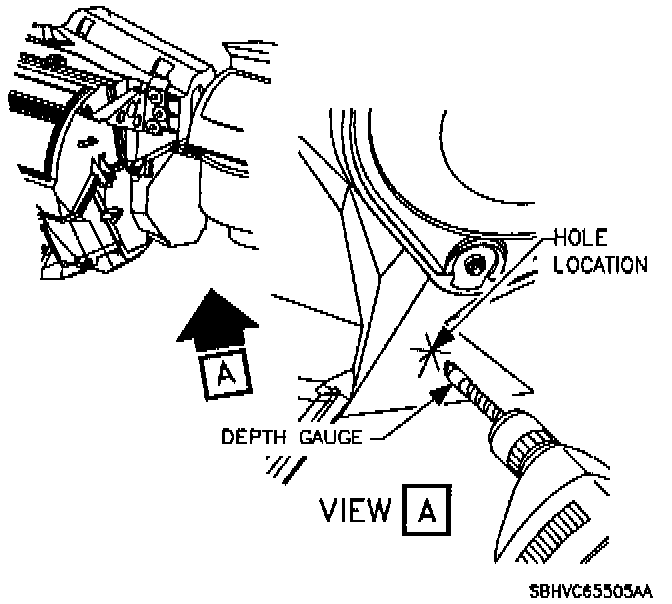
13. Using a 15/32 in. drill bit, attach a drill stop or depth gauge, or masking tape to allow for a 4 mm (5/32 in.) depth.
14. Locate the center of the triangle shaped portion of the plenum which slopes upward and to the right, next to the left-most blower motor fastener.
NOTICE:
Running the drill bit in more than 4 mm (5/32 in.) can damage the evaporator.
15. Drill a 15/32 in. hole. Be careful not to let the drill bit penetrate beyond a 4 mm (5/32 in.) depth.
CAUTION:
THIS PROCEDURE SHOULD ONLY BE PERFORMED ON A COLD CAR. IT HAS BEEN DEMONSTRATED THAT IRRITATING VAPORS WILL BE FORMED IN THE ENGINE COMPARTMENT IF THE DISINFECTANT COMING OUT OF THE DRAIN OUTLET CONTACTS HOT ENGINE COMPONENTS. DISINFECTANT CAN CAUSE SUBSTANTIAL, BUT TEMPORARY EYE INJURY. DO NOT GET DISINFECTANT IN EYES OR ON CLOTHING. WASH THOROUGHLY WITH SOAP AND WATER AFTER HANDLING. FIRST AID: IF DISINFECTANT GETS INTO EYES, HOLD EYELIDS OPEN AND FLUSH WITH A STEADY GENTLE STREAM OF WATER FOR 15 MINUTES. OBTAIN MEDICAL ATTENTION IF IRRITATION PERSISTS.
16. Allow vehicle to cool down before performing disinfectant procedure.
17. Put on rubber gloves, safety goggles and NIOSH approved acid gas/organic vapor respirator.
18. Pour the small bottle of the two part A/C System Disinfectant Kit P/N 21030784 into the large bottle. Put the cap back on the large bottle and invert bottle once or twice to mix the contents.
19. Using cleaning gun, OTC Tool SA9216NE (or equivalent siphon-type parts cleaning spray gun capable of delivering two ounces per minute of liquid with shop air at 552-620 kPa [80-90 psi]), insert siphon hose into container of disinfectant. Take care to place the bottle in a secure upright position to avoid spilling contents.
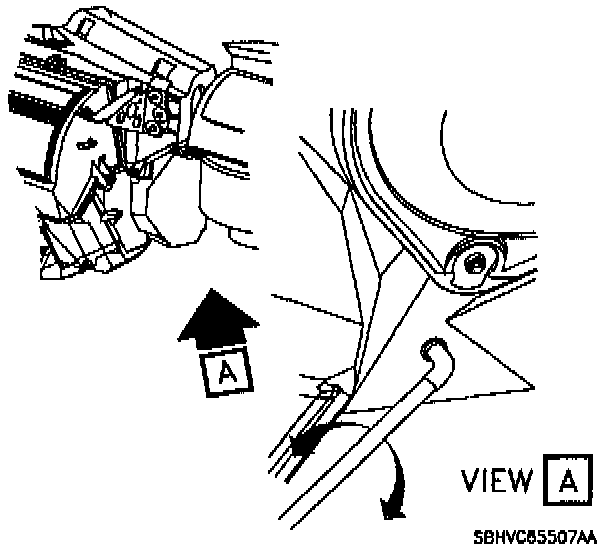
20. Insert nozzle tip of spray gun through the drilled hole and orient so spray pattern will be parallel to the evaporator face.
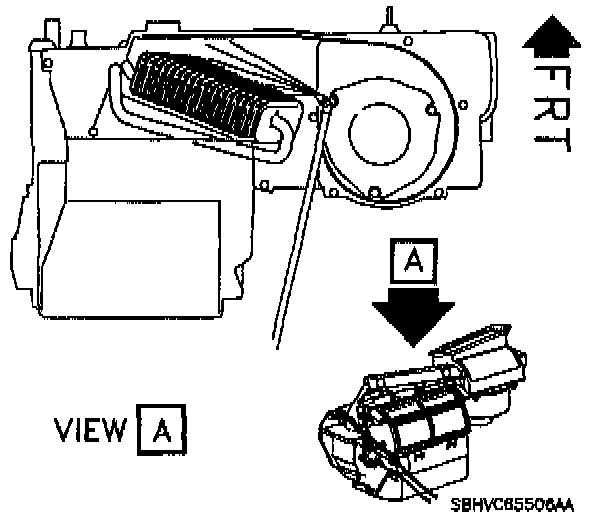
21. With blower motor on HI and engine Off, spray the entire contents of the disinfectant mix. Rotate the nozzle tip up and down while spraying disinfectant to allow for an even distribution and to ensure full coverage of the evaporator.
22. Turn blower motor Off.
23. Allow evaporator core to soak for at least five minutes.
24. With blower motor on HI, thoroughly rinse the evaporator core (using the above procedure) with one quart of clean water to remove any disinfectant residue.
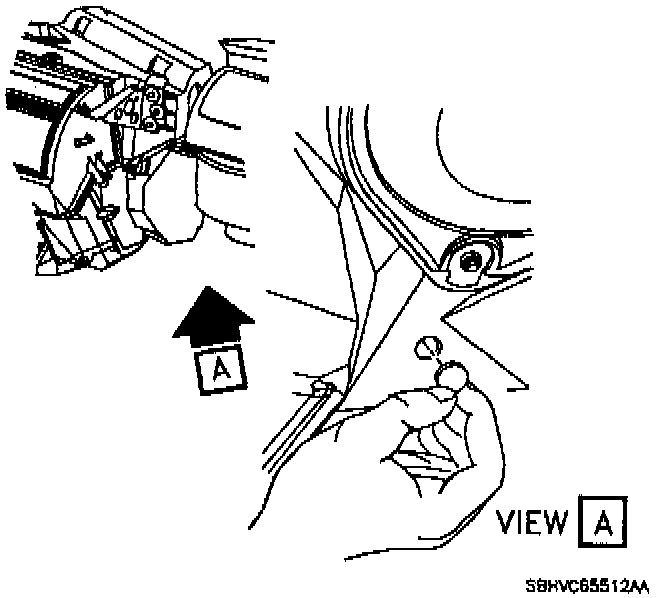
25. Install plug (P/N 21121827).
26. Properly dispose of disinfectant and rinse water runoff collected in drain pan, into a sanitary drain.
27. Remove protective covering from interior of vehicle.
28. If the delayed blower motor control module is to be installed, proceed to "Delayed Blower Motor Control Module Installation" in this bulletin.