Installing Torque Support
- Installing upper torque support =>
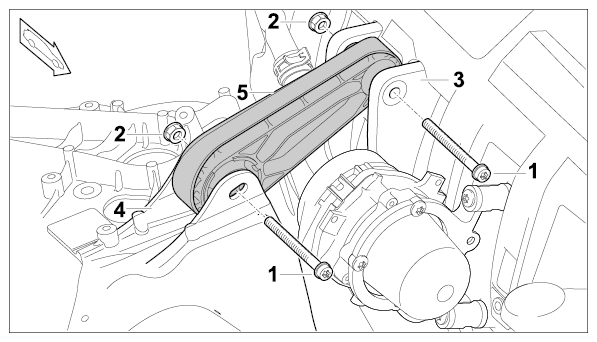
- 1.1. Move torque support into installation position. When doing so, make sure that the part identification is legible on the back, in the opposite direction to the direction of travel.
- 1.2. Use new aluminum screws and nuts. Fit the two bolts and nuts on the body and valve cover. Once the component is installed correctly, tighten according to specifications. → Installation position of upper torque support
- Aluminum screw, M10 (always use new aluminum screws)
- Nut, M10; counter when using tools; → Initial tightening: 20 Nm (15 ftlb.)
and → Final tightening: 180°
- Bracket on valve cover
- Bracket on body
- Torque support
 Courtesy of PORSCHE CARS NORTH AMERICA, INC.
- Direction of travel
- Installing lower torque support =>
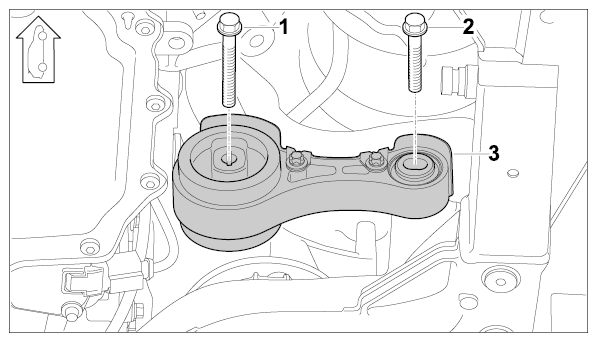
- 2.1. Move torque support into installation position.
- 2.2. Fit the two screws on the engine bracket and on the supporting frame. Once the component is installed correctly, tighten according to specifications. → Installation position of lower torque support
- Steel screw, M10 x 95; torque support to engine bracket and supporting frame → Initial tightening: 50 Nm (37 ftlb.)
and → Final tightening: 90°
- Steel screw, M10 x 65; torque support to engine bracket and supporting frame → Initial tightening: 50 Nm (37 ftlb.)
and → Final tightening: 90°
- Torque support
 Courtesy of PORSCHE CARS NORTH AMERICA, INC.
- Direction of travel