Component Overview
WARNING: This page is about a different car, the 2010 Porsche Cayenne, 2009 Porsche Cayenne, and 2008 Porsche Cayenne. However, it is still accessible from the selected car via links, so may be relevant.
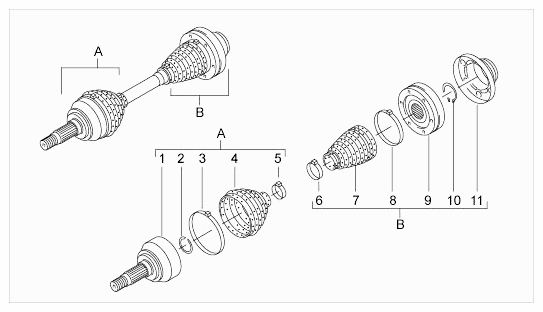 Courtesy of PORSCHE CARS NORTH AMERICA, INC.
| No. |
Designation |
Qty. |
Removal |
Fitting |
| -A- |
Outer joint |
|
|
|
| -1- |
Joint pin |
1 |
Tap joint pin out of drive shaft using a hammer and mandrel. |
Use a hammer to fit the joint pin as far as it will go on to the drive shaft. |
| -2- |
Circlip 27.5 x 2 |
1 |
Remove circlip. |
Do not confuse circlip no. 2 with circlip no. 10 on inner joint. The two parts are not identical. Ensure that the circlip is seated correctly. |
| -3- |
Hose clamp 105 x 10 |
1 |
Remove hose clamp using a hammer and chisel, for example. Do not damage boot. |
Fit hose clamp with boot on the joint pin. |
| -4- |
Boot |
1 |
Remove boot from the shaft. |
Do not confuse boot no. 4 with boot no. 7. The two parts are not identical. Position boot correctly. |
| -5- |
Hose clamp 35 x 10 |
1 |
Remove hose clamp using a hammer and chisel, for example. Do not damage boot. |
For securing the boot. |
| -B- |
Inner joint |
|
|
|
| -6- |
Hose clamp 35 x 10 |
1 |
Remove hose clamp using a hammer and chisel, for example. Do not damage boot. |
For securing the boot. |
| -7- |
Boot |
1 |
Remove boot from the shaft. |
Do not confuse boot no. 7 with boot no. 4. The two parts are not identical. Ensure correct seating. |
| -8- |
Clamp 74.5 x 10 |
1 |
Remove clamp using a hammer and chisel. |
Fit clamp with boot on the joint. The clamp lug must be positioned between two bores on the joint. |
| -9- |
Joint |
1 |
Press joint off the drive shaft. |
Fit the joint as far as it will go on to the drive shaft using a hammer and mandrel. The cap (boot holder) is part of the joint and is not available as a spare part. |
| -10- |
Circlip 28 x 1.5 |
1 |
Remove circlip carefully with a pliers. |
Do not confuse circlip no. 10 with circlip no. 2 on outer joint. The two parts are not identical. Ensure that the circlip is seated correctly. |
| -11- |
Closure cap |
1 |
Remove cap. |
Use two cheese-head bolts to centre the cap. Ensure correct seating. Seal the sealing faces with special sealant. |