Removing Body Front Section
Information
Only make cuts in the top plate. Make sure not to damage the plate underneath when doing this.
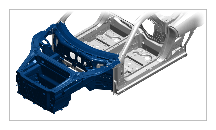 Courtesy of PORSCHE CARS NORTH AMERICA, INC.
Installation position of body front section
- Remove supporting plate for longitudinal member for wheel housing.
Information
Loosen connection points on one side only. Do not damage the sheet-metal panel underneath.
- 1.1
Drill out spotwelds. > Nr.129 - Spotweld drill bit
> VAS 882 001 - Spot-weld breaker
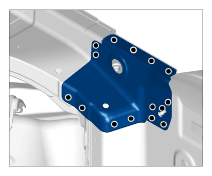 Courtesy of PORSCHE CARS NORTH AMERICA, INC. Courtesy of PORSCHE CARS NORTH AMERICA, INC.
|
Bracket for longitudinal member for wheel housing
- Heat bonding areas on supporting plate for longitudinal member for wheel housing.
- 2.1
Remove supporting plate for longitudinal member for wheel housing.
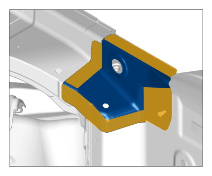 Courtesy of PORSCHE CARS NORTH AMERICA, INC. Courtesy of PORSCHE CARS NORTH AMERICA, INC.
|
Bracket for longitudinal member for wheel housing
- Make cuts.
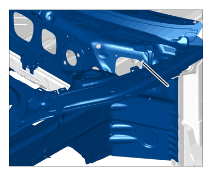 Courtesy of PORSCHE CARS NORTH AMERICA, INC. Courtesy of PORSCHE CARS NORTH AMERICA, INC.
|
Cut on upper longitudinal member
- Make cut in the cowl panel area. > Length 110 mm
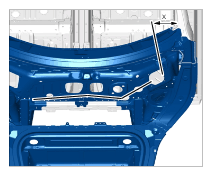 Courtesy of PORSCHE CARS NORTH AMERICA, INC.
Cuts on bulkhead/cowl panel
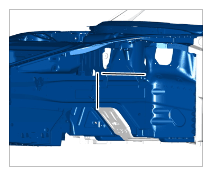 Courtesy of PORSCHE CARS NORTH AMERICA, INC. Courtesy of PORSCHE CARS NORTH AMERICA, INC.
|
Cuts on longitudinal member/spring strut mount
- Remove body front section.
- Remove cowl panel.
Information
Loosen connection points on one side only. Do not damage the sheet-metal panel underneath.
- 6.1
Drill out spotwelds.
- 6.2
Remove welded seams in area -A-
.
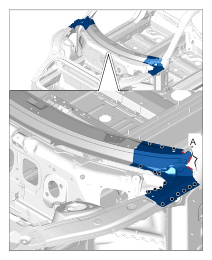 Courtesy of PORSCHE CARS NORTH AMERICA, INC. Courtesy of PORSCHE CARS NORTH AMERICA, INC.
|
Removing cowl panel
- Heat bonding areas.
- 7.1
Remove cowl panel.
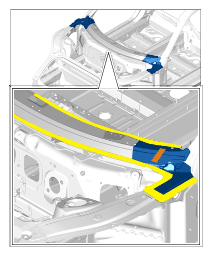 Courtesy of PORSCHE CARS NORTH AMERICA, INC. Courtesy of PORSCHE CARS NORTH AMERICA, INC.
|
Removing cowl panel
- Drill out spotwelds.
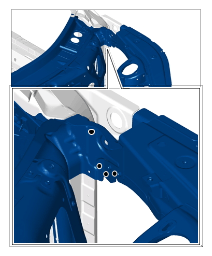 Courtesy of PORSCHE CARS NORTH AMERICA, INC. Courtesy of PORSCHE CARS NORTH AMERICA, INC.
|
Body front section, upper longitudinal member area
- Drill out rivets.
- 9.1
Do not drill out rivets -1-
.
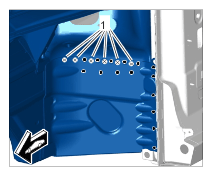 Courtesy of PORSCHE CARS NORTH AMERICA, INC. Courtesy of PORSCHE CARS NORTH AMERICA, INC.
|
Body front section, wheel housing area
- Cut welded seams in area -A-
.
- 10.1
Use a drill bit with a diameter of > Diameter 6.5 mm
to drill through rivets.
- 10.2
Drill out rivets in area -B-
using a drill bit with a diameter of > Diameter 7.2 mm
and drill through the reinforcement behind it.
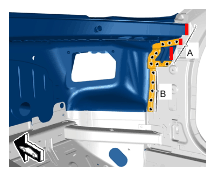 Courtesy of PORSCHE CARS NORTH AMERICA, INC. Courtesy of PORSCHE CARS NORTH AMERICA, INC.
|
Body front section, inner bulkhead area
- Use a drill bit with a diameter of > Diameter 6.5 mm
to drill through rivets.
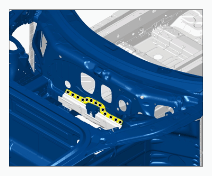 Courtesy of PORSCHE CARS NORTH AMERICA, INC. Courtesy of PORSCHE CARS NORTH AMERICA, INC.
|
Body front section, bulkhead area
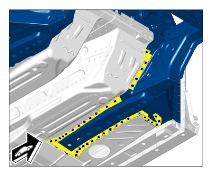 Courtesy of PORSCHE CARS NORTH AMERICA, INC. Courtesy of PORSCHE CARS NORTH AMERICA, INC.
|
Body front section, underbody area
- Cut welded seams -1-
on the bracket.
Welded seams will be replaced by bonding during installation.
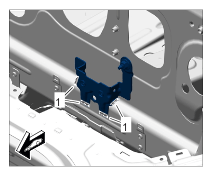 Courtesy of PORSCHE CARS NORTH AMERICA, INC. Courtesy of PORSCHE CARS NORTH AMERICA, INC.
|
Welded seams on bracket
- Drill out rivets in footwell.
- 13.1
Unscrew and remove fastening screws -1-
.
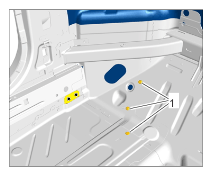 Courtesy of PORSCHE CARS NORTH AMERICA, INC. Courtesy of PORSCHE CARS NORTH AMERICA, INC.
|
Body front section, footwell area
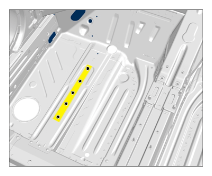 Courtesy of PORSCHE CARS NORTH AMERICA, INC. Courtesy of PORSCHE CARS NORTH AMERICA, INC.
|
Body front section, footwell area
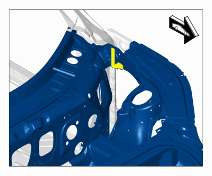
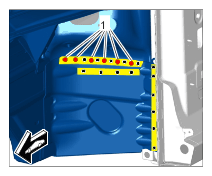
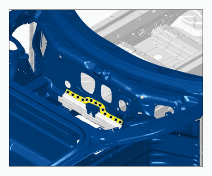
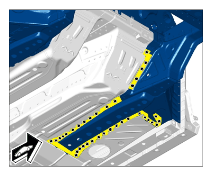
- Heat marked bonding areas.
 Courtesy of PORSCHE CARS NORTH AMERICA, INC. Courtesy of PORSCHE CARS NORTH AMERICA, INC.
|
Heating bonding areas
 Courtesy of PORSCHE CARS NORTH AMERICA, INC. Courtesy of PORSCHE CARS NORTH AMERICA, INC.
|
Heating bonding areas
 Courtesy of PORSCHE CARS NORTH AMERICA, INC. Courtesy of PORSCHE CARS NORTH AMERICA, INC.
|
Heating bonding areas
 Courtesy of PORSCHE CARS NORTH AMERICA, INC. Courtesy of PORSCHE CARS NORTH AMERICA, INC.
|
Heating bonding areas
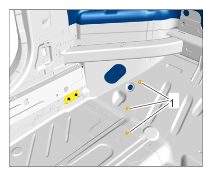 Courtesy of PORSCHE CARS NORTH AMERICA, INC. Courtesy of PORSCHE CARS NORTH AMERICA, INC.
|
Heating bonding areas
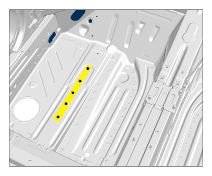 Courtesy of PORSCHE CARS NORTH AMERICA, INC. Courtesy of PORSCHE CARS NORTH AMERICA, INC.
|
Heating bonding areas
Information
For additional 3D information, see 5095IN BODY FRONT SECTION INFORMATION
- Remove remaining sections of the body front section.