Work Procedure
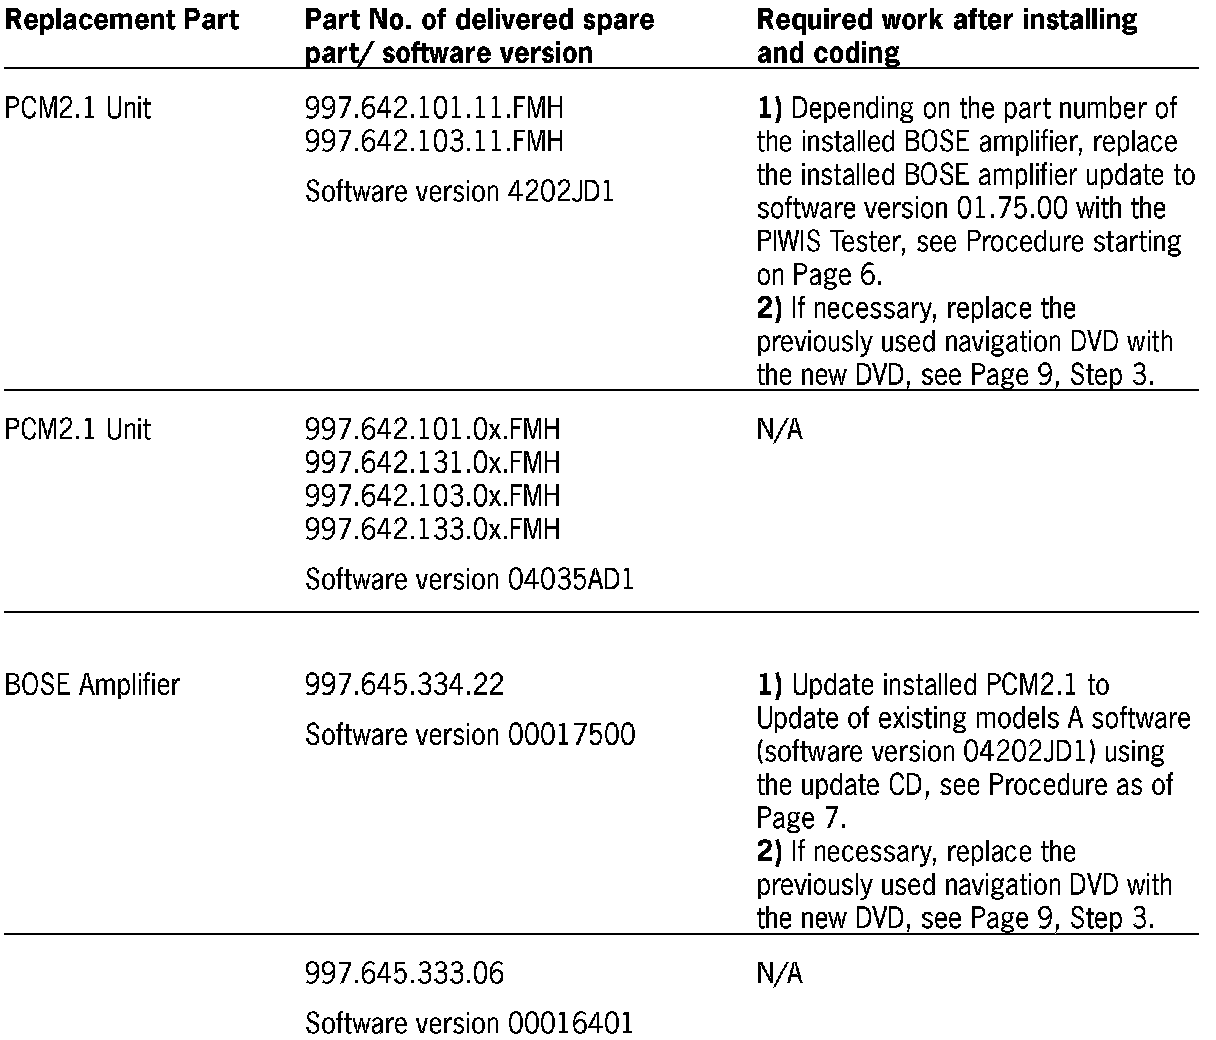
Allocation Table, PCM2.1/BOSE Amplifier
Updating or replacing the BOSE amplifier.
Replacement PCM2.1 matches the version for vehicles from M.Y. 05 as of the introduction date:
1. Check the part number of installed BOSE amplifier.
BOSE amplifier has the part number, 997.645.333.04 or 997.645.333.05:
> replace the installed BOSE amplifier with the BOSE amplifier having part number, 997.645.334.22. Then for vehicles with PCM2.1 Navigation (I No.670), replace the previously used navigation DVD with a new Navigation DVD, see Step 3, under "Replace the Navigation DVD".
BOSE amplifier has the part number 997.645.333.06:
> update the installed BOSE amplifier, continue with step 2.
2. Update the BOSE amplifier.
2.1 Introductory work.
Caution!
Malfunctions in the PCM2.1 system network if the data loading process is interrupted.
> If there is an interruption while loading the data due to power loss, malfunctions can occur in the PCM2.1 system network.
> Connect a suitable battery charger to the vehicle electrical system battery while working.
2.1.1 Switch off ignition.
2.1.2 Connect battery charger to the vehicle electrical system battery.
2.2 Update the BOSE amplifier to software version 00017500 with the PIWIS Tester. In the PIWIS Tester, the software versions of the BOSE amplifier are shown without the two prefix zeros and with decimals between the blocks of digits, e.g. 01.75.00.
2.2.1 Connect PIWIS Tester to the vehicle and switch on.
2.2.2 Switch on ignition.
2.2.3 In the start display of the PIWIS Tester, call up the "Diagnostics" menu and select the vehicle type "911 (997)".
2.2.4 In the control units selection, select "PCM2.1" and after the control unit search is complete, use the F12 key to change to the PCM2.1 component selection.
2.2.5 Select "external BOSE amplifier" and use the F12 key to change to the BOSE amplifier function selection.
2.2.6 Select the menu item "Control unit programming" and use the F12 key to change to the selection of data records to be used.
2.2.7 Check whether the records specified by the PIWIS Tester for model range and convertible top version match the respective vehicle for which an update is supposed to be performed. If necessary, change the data record selection.
2.2.8 Use the F8 key "Coding" to change to the BOSE selection display. In this display, the part number of the BOSE amplifier, the software part number, the software version, and the data record are displayed.
2.2.9 Press the F8 key "Coding" again to start the BOSE update. During the update, follow the other instructions of the PIWIS Tester. During the update process, the PCM2.1 switches to service mode and "Service" is displayed in the display of the PCM2.1 control part.
2.2.10 After the update is finished, the message "Programming successfully completed is shown on the screen of the PIWIS Tester and the current software version 01.75.00 is displayed.
2.2.11 Change to the main menu of the PIWIS Tester and shut down the tester. The PCM2.1 control part switches again from service mode to normal mode.
2.2.12 Switch off and disconnect the PIWIS tester.
2.2.13 Vehicles with PCM2.1 navigation (I No.670):
Replace previous navigation DVD with new navigation DVD, continue with Step 3, under "Replace the Navigation DVD".
Update PCM2.1
Replacement BOSE amplifier matches the version for vehicles from M.Y. 05 as of the introduction date:
1. Introductory work.
Caution!
Malfunctions in the PCM2.1 system network if the data loading process is interrupted.
> If there is an interruption while loading the data due to power loss, malfunctions can occur in the PCM2.1 system network.
> Connect a suitable battery charger to the vehicle electrical system battery while working.
1.1 Switch off ignition.
1.2 Connect battery charger to the vehicle electrical system battery.
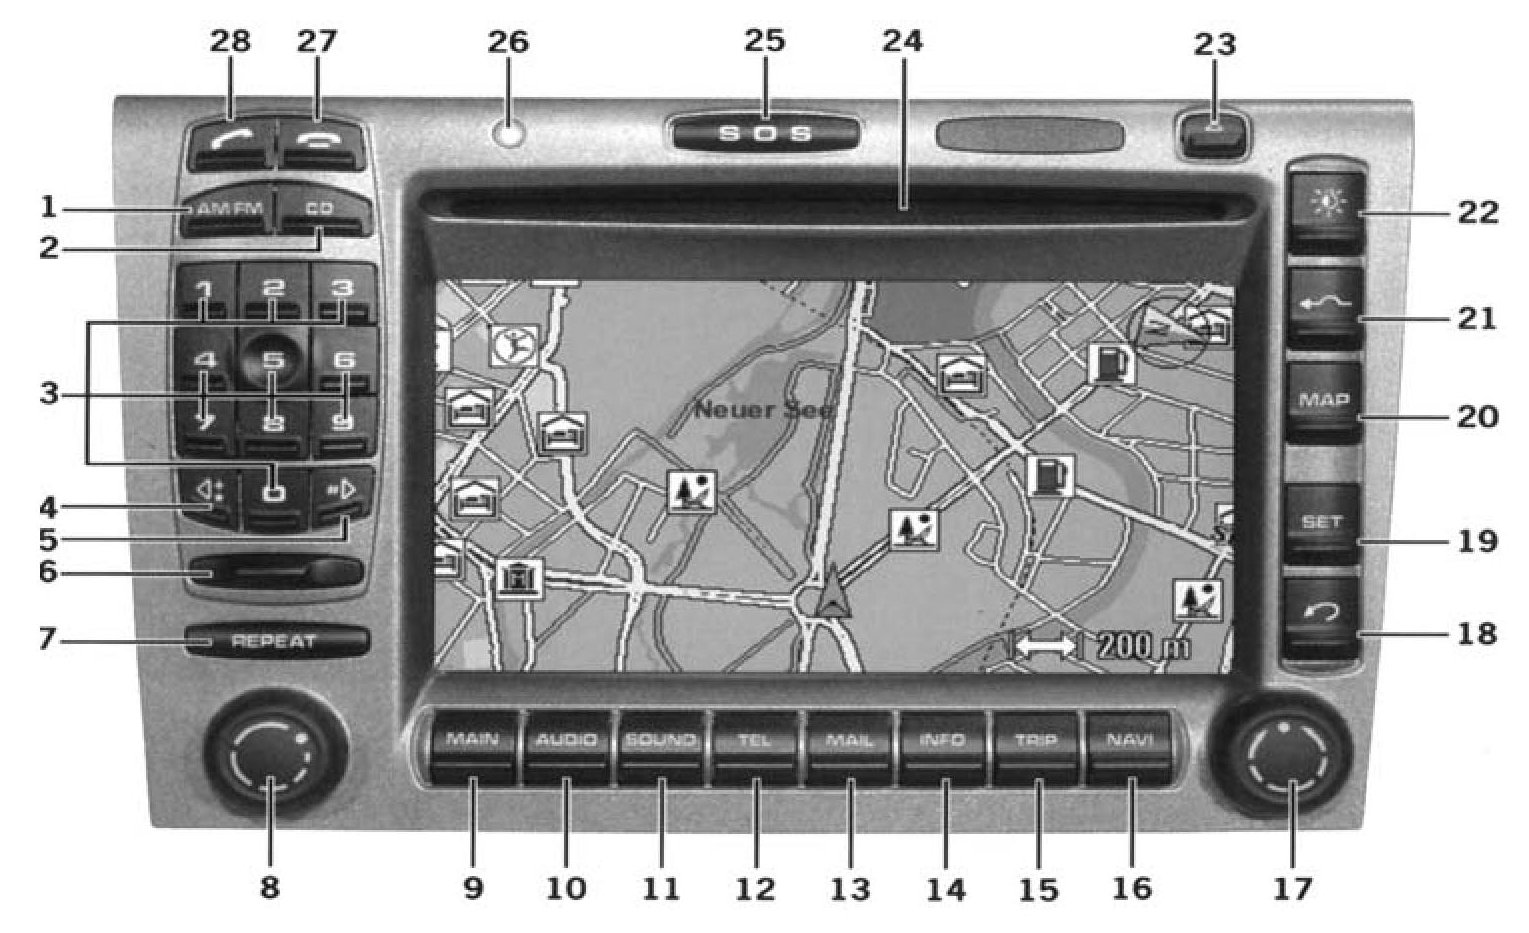
1.3 If necessary, switch on the PCM2.1 by activating the "On/Off switch" (Figure 2, Item 8).
1.4 Activate the Eject button (Figure 2, Item 23) and remove CD if present from the CD slot (Figure 2, Item 24).
2. Update PCM2.1 to software version 4202JD1 using update CD.
2.1 Insert the PCM2.1 update CD, part number, 000.043.205.46.001 in the CD slot (Figure 2, Item 24). The software update starts automatically.
2.2 In the PCM2.1 display appears: "Update software to version PCM2.1 MOPF A". The "Yes" selection is already pre-selected.
2.3 Press the rotary knob (Figure 2, Item 17) to confirm the selection "Yes" and to start the PCM2.1. There is an update for the following system components of the PCM2.1 (display in PCM2.1 display):
"Update the system software."
"Device 1 of 2."
"Update to version GW04113AD1 is being performed." "Update the PCM."
"Device 2 of 2."
"Update to version MMI 04202JD1 is being performed."
For each update step there is a bar shown that displays the loading progress.
2.4 When the update is finished, "Update successful" is displayed in the PCM2.1 display.
Note!
The message about a successful update is brief, afterwards the PCM2.1 switches off and on again automatically.
2.5 If the PCM2.1 does not switch on again automatically, switch on the PCM2.1 again by pressing the On/Off switch (Fig. 2, Item 8).
2.6 Remove update CD from the CD slot (Fig. 2, Item 24) by pressing the Eject button (Figure 2, Item 23).
2.7 If customer's audio CD was removed, insert again in the CD slot of the PCM2.1 control part.
2.8 Switch off the PCM2.1 by pressing the "On/Off switch" (Figure 2, Item 8).
3. Replace the Navigation DVD.
Note!
In vehicles with PCM2.1 navigation (I No.670), after installing a PCM2.1 with software version 04202JD1 (Update of existing models A software) or after the PCM2.1 system network has been updated to Update of existing models A software, only the new navigation DVDs can be used.
Attention!
Opening of the DVD package and inserting the navigation DVD implies acceptance of the terms of the license.
> Please observe the terms of the license.
> In this regard, request the customer to open the package on handing over the vehicle or obtain the customer's approval in advance. Then perform the following steps.
3.1 Remove the previously used navigation DVD from the navigation module in the luggage compartment.
3.2 Insert new navigation DVD in the navigation module or hand it over to the customer.
3.3 Switch off ignition.
3.4 Disconnect battery charger.