Camshaft: Service and Repair
With Engine In Vehicle
1. Disconnect battery ground cable, then drain cooling system.
2. Remove air cleaner assembly, PCV hose, EGR valve, spark plug wires and clips.
3. Remove fuel line bracket and fuel lines. Refer to MAINTENANCE PROCEDURE/RELIEVING FUEL SYSTEM PRESSURE for fuel pressure bleed procedure.
4. Remove vacuum hoses including power brake booster hose.
5. Remove all wiring and throttle linkage from TBI assembly.
6. Remove transaxle downshift bracket, then heater hose from intake manifold.
7. Remove serpentine drive belt, then tensioner to engine attaching bolts. Position tensioner/power steering pump assembly aside.
8. Remove intake manifold, pushrod cover and valve lifters.
9. Disconnect electrical connections from DIS assembly, then remove DIS assembly.
10. Remove bolt from torque strut at engine bracket, then swing strut aside.
11. Install engine lift bracket, then engine support fixtures No. J-28467-A and J-36462.
12. Raise and support vehicle, then remove both front wheel assemblies.
13. Drain engine oil, then move steering column intermediate shaft cover aside.
14. Remove steering shaft to steering gear pinch bolt, then right front lower ball joint pinch bolt.
15. Remove right front ball joint from knuckle, then lower air deflector.
16. Remove right front wheelhouse engine splash shield.
17. Remove flywheel cover, then crankshaft balancer retaining bolt. Have an assistant hold flywheel from turning while removing bolt.
18. Remove crankshaft balancer, then front cover.
19. Remove frame bolts and insulators, then brake line to frame bracket and bolt.
20. Remove oil filter, then lower frame/powertrain assembly with support fixtures. Lower passenger side just enough to access camshaft gear area.
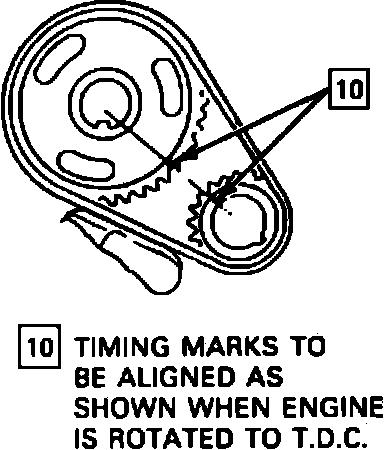
21. Align timing marks on camshaft and crankshaft sprockets, then remove camshaft sprocket bolt.
22. Remove timing chain and sprockets, then camshaft thrust plate.
23. Remove camshaft. Use care not to damage camshaft bearings.
Aligning Timing Marks. 1991-92 Models:
24. Reverse procedure to install, noting the following:
a. Ensure crankshaft and camshaft timing marks on gears are aligned, Fig. 8.
b. Torque all bolts/nuts to specifications.
With Engine Removed From Vehicle
1. Remove engine from vehicle as outlined under ENGINE.
2. Remove rocker arm cover, then push rods.
3. Remove pushrod cover, then valve lifters.
4. Remove crankshaft harmonic balancer, then front cover.
5. Remove camshaft sprocket bolt, then timing chain and sprockets.
6. Remove camshaft thrust plate, then pull camshaft from engine block. Use care not to damage camshaft bearings.
7. Reverse procedure to install, noting the following:
a. Ensure crankshaft and camshaft timing marks on gears are aligned, Fig. 8.
b. Torque all bolts/nuts to specifications.