Recall - Rear Door Side Pad Installation: Overview
Reference:NTB97-055
Date:
July 31, 1997
VOLUNTARY RECALL CAMPAIGN
1997 SENTRA REAR DOOR PAD
CAMPAIGN IDENTIFICATION NO: 97V-110
APPLIED VEHICLE:
1997 Sentra (B14) Mexico production only
APPLIED VIN:
3N1AB41D3VL028878 through 3N1AB41D8VL031985
APPLIED DATE #:
Vehicles built from May 21, 1997 through June 5, 1997
INTRODUCTION
Some 1997 Sentra sedans built in the Aguascalientes, Mexico assembly plant were shipped without rear door side pads. These vehicles should have these pads installed in both rear doors.
IDENTIFICATION NUMBER
Nissan has assigned identification number 97V-110 to this campaign. This number must appear on all communications and documentation of any nature dealing with this campaign.
NUMBER OF VEHICLES POTENTIALLY AFFECTED
Approximately 750.
DEALER RESPONSIBILITY
It is the dealer's responsibility to check each vehicle falling within the range of this campaign which for any reason enters the service department. This includes vehicles purchased from private parties or presented by transient (tourist) owners and vehicles in dealer inventory. Federal law requires that new vehicles in dealer inventory which are the subject of a safety recall must be corrected prior to sale. Failure to do so can result in civil penalties by the National Highway Traffic Safety Administration. While the federal law applies only to new cars, Nissan strongly encourages dealers to correct any used cars in their inventory prior to sale.
INSPECTION PROCEDURE
If you have vehicles in inventory that fall within the VIN range above, use SERVICE-COMM to confirm that the vehicles require this procedure.
SERVICE PROCEDURE
Perform the following procedure for the rear doors only.
Disassembly
1. Turn the dome light switch to the "OFF" position.
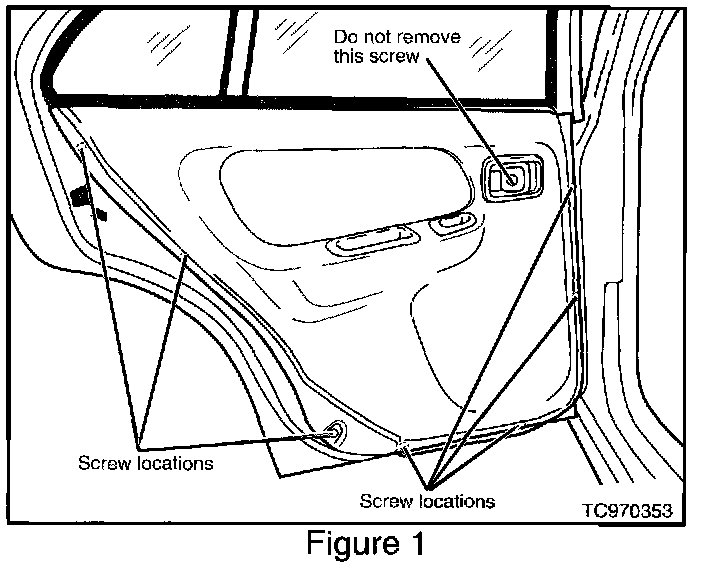
2. Remove five plastic screws and two sheet metal screws from the side and lower edges of the door finisher (see Figure 1).
NOTE:
Do not remove the screw that holds the inside door handle.
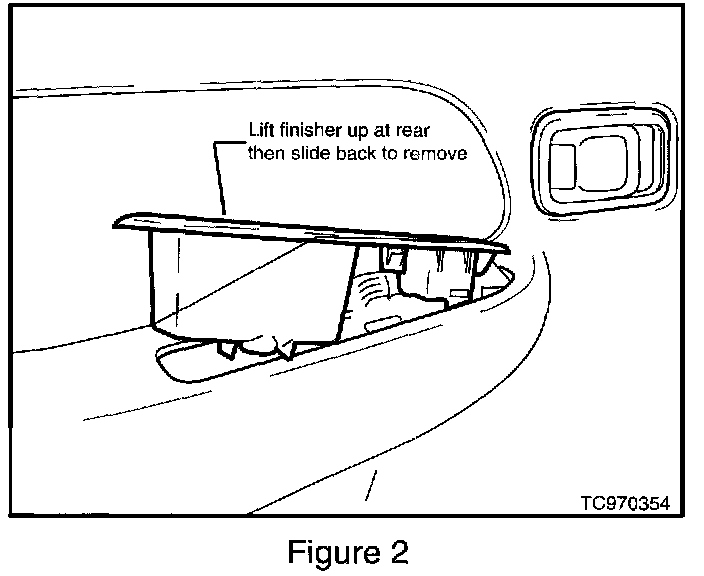
3. A. If the vehicle has power windows: (see Figure 2)
1) Remove the screw that secures the door pull/power window switch finisher.
2) Pull the finisher up from the rear then lift out.
3) Disconnect the electrical harness.
B. If the vehicle has manual windows:
1) To remove the window crank, place the edge of a shop towel behind the crank arm. Pull outward alternately from each side to release the attaching clip.
2) Re-install the clip onto the crank for later reinstallation.
3) Remove the screw that holds the door pull finisher.
4) Pull the finisher up from the rear then lift out.
4. To remove the rear door finisher:
A. Pull the finisher outward from the bottom. The inside door handle trim will pop loose as you pull the door finisher away from the door.
B. Lift the finisher upward to remove.
C. Set it aside in a safe location to prevent damage.
5. Lift the lower half of the plastic vapor barrier and tuck it out of the way in the metal door pull handle.
6. Install the new foam pad into the door. Use the pad marked "R-L" for the driver side rear door. Use the one marked "R-R" for the passenger side rear door.
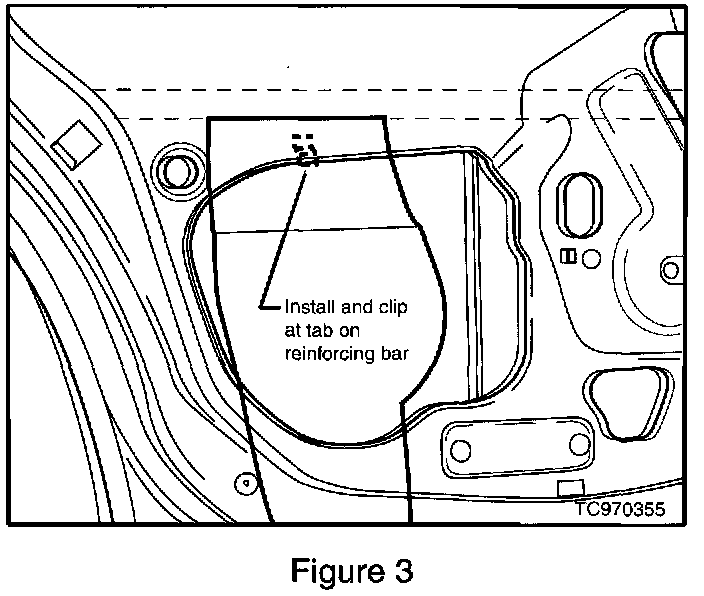
7. Insert the clip through the pad and into the mounting hole as shown (see Figure 3). Make sure the clip is correctly positioned in the downward orientation. Pull gently on the foam pad to confirm the clip is fully inserted.
Reassembly
1. Carefully position the door finisher at the top forward edge first and press downward to fit into the window portion of the door.
CAUTION:
Be careful not to scratch the window trim finisher.
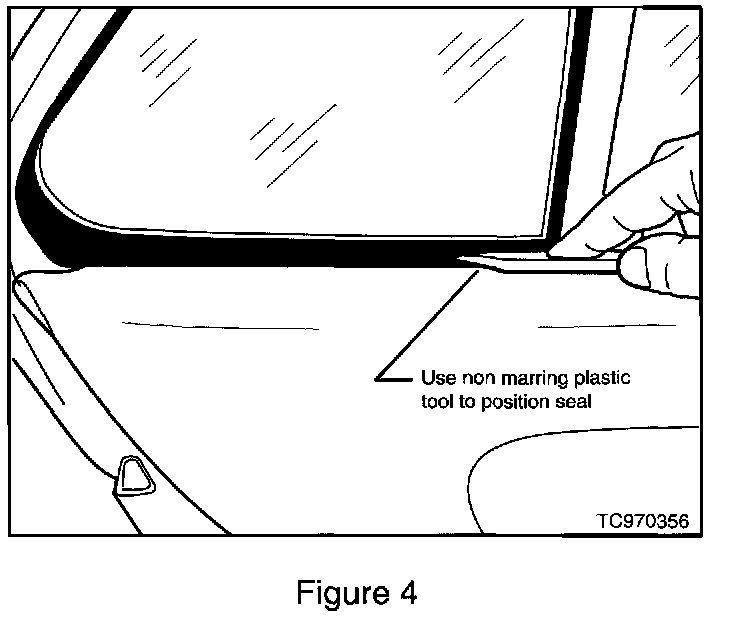
2. Use a plastic, non-marring trim tool under the rubber to reposition the weatherstrip at the rear quarter glass (see Figure 4).
3. Slide the tool rearward under the seal so that the seal is properly positioned over the door finisher.
4. To re-install the door handle trim:
A. Insert the rear portion first.
B. Press firmly to snap into position.
5. A. If the vehicle has power windows:
1) Connect the harness to the power window switch.
2) Install the switch assembly and finisher into the door forward edge first, then lower the assembly into position.
3) Fasten with the original sheet metal screw.
B. If the vehicle has manual windows:
1) With the window in the fully upward position, re-install the window crank at a 45° angle (1 - 2 o'clock position for LH door; 10 - 11 o'clock position for RH door).
2) Re-install the door pull finisher and secure with the original sheet metal screw.
6. Install the five plastic screws at the sides of the door finisher. Then install the two sheet metal screws at the bottom of the finisher (see Figure 1).
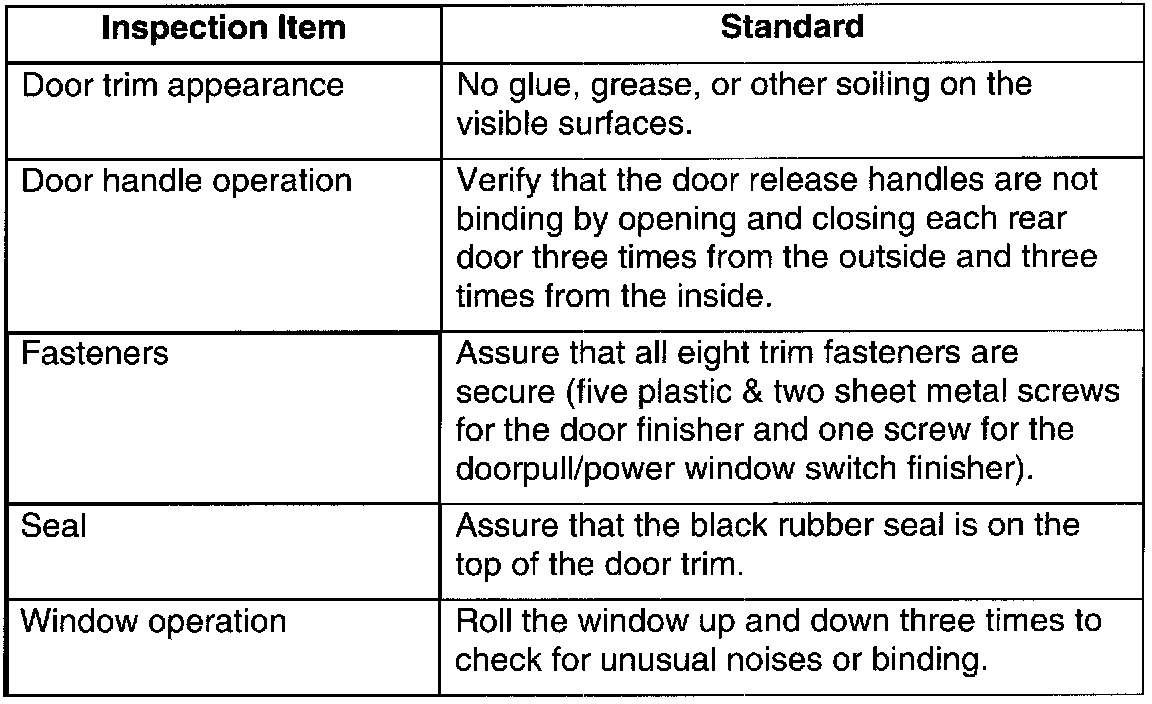
QUALITY ASSURANCE CHECK

PARTS INFORMATION
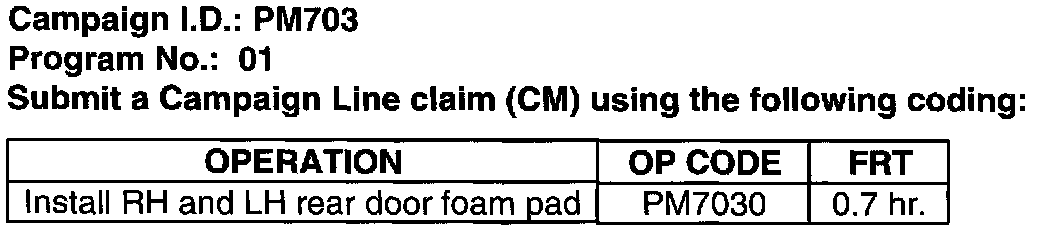
CLAIMS INFORMATION