Windows - Excessive Opening/Closing Effort
9216nissan04
Models: 1986.5-89 Truck
1987-89 Pathfinder
Section: Body & Frame
Classification: BF89-010
Bulletin No.: TS89-083
Date: June 8, 1989
WINDOW ADJUSTMENTS
APPLIED MODELS: 1986.5-89 Truck (D21)
1987-89 Pathfinder (WD21)
SERVICE INFORMATION
On some of the Applied Models excessive opening/closing effort may be required for window operation. In some cases binding may also occur.
Vehicles which exhibit these symptoms may be corrected by performing the Window Adjustment Procedure outlined on the following pages. This procedure should be followed completely.
For cases where an incident is not resolved completely after all adjustments have been performed, countermeasure parts have been developed that may further improve this incident. Countermeasure parts have been developed for the Window Regulator and the Door Glass Run Rubber.
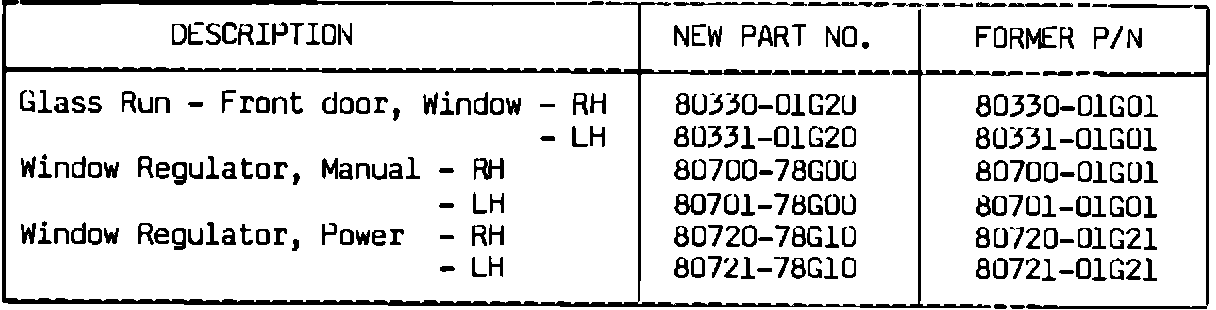
PARTS INFORMATION
The Window Adjustment Procedure should be repeated whenever any of these components are replaced.
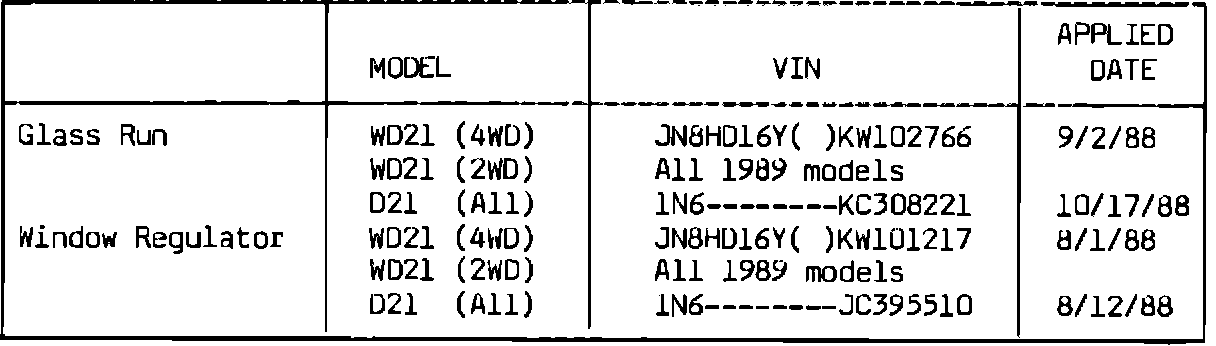
Countermeasure parts have been applied to production vehicles beginning with the following VINs.
WINDOW ADJUSTMENT PROCEDURE
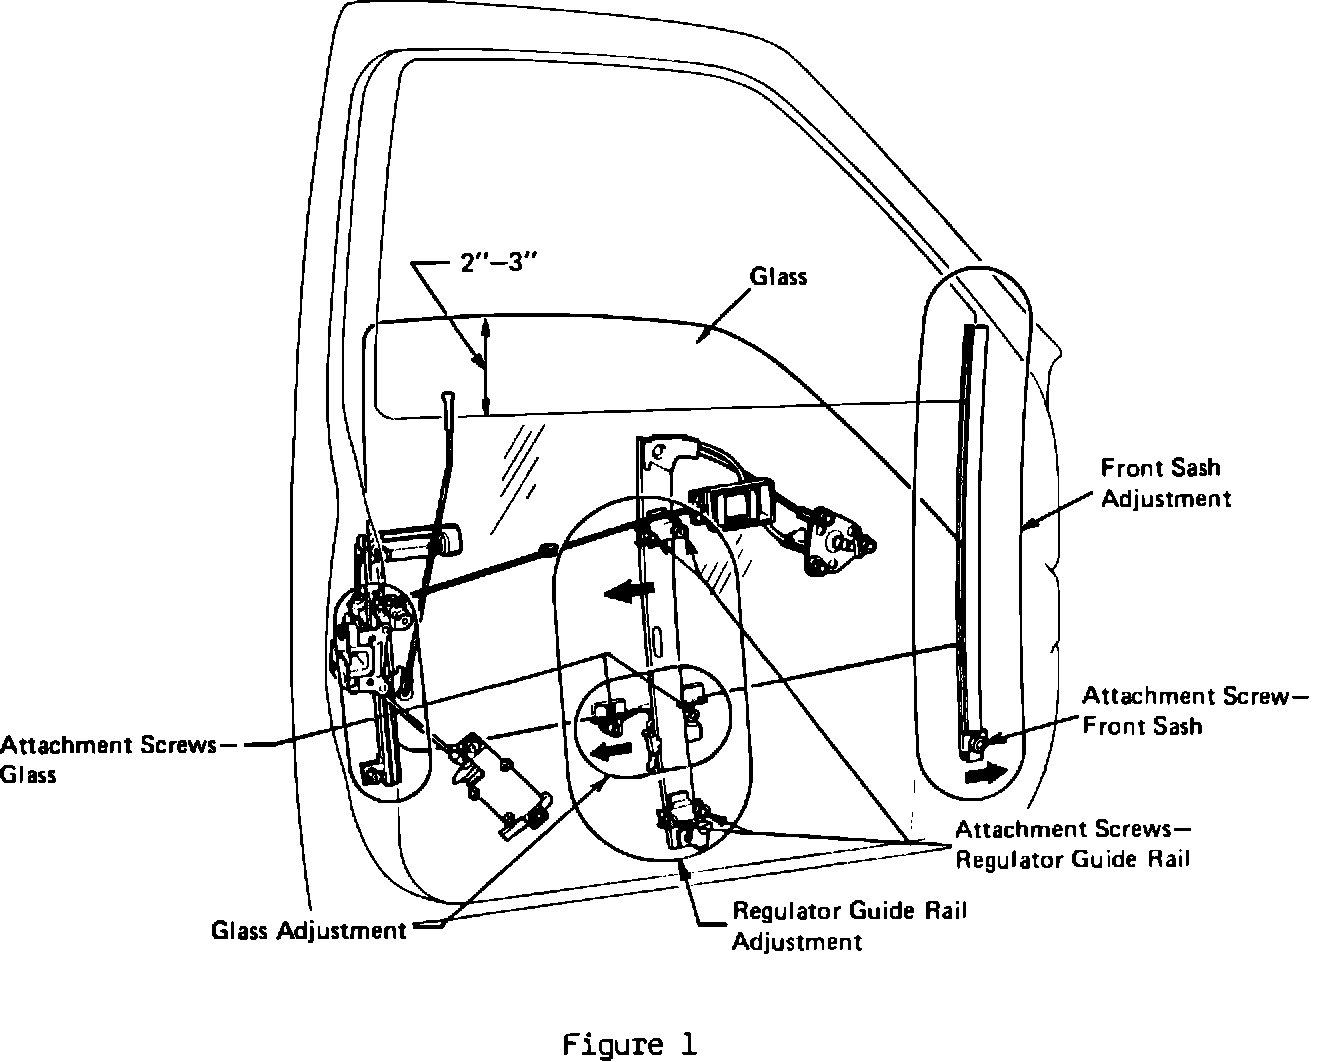
1. Lower the glass so that the top of it is approximately 2-3 inches above the top of the door panel (see Figure 1).
2. Remove the door finisher and the rear half of the plastic film on the door panel in order to get access to the four (4) attachment screws of the window regulator guide rail.
CAUTIONS:
Power Window Models Only:
^ Care should be taken when removing the door finisher so that the window switch connector does not become detached from the plastic post on the finisher.
All Models:
^ Inside handle escutcheon removal: Detach the bottom of the escutcheon first in order to prevent any damage to it.
^ Plastic film removal: When separating the plastic film from the door panel, use the edge of a small index card to cut through the sealant in order to prevent any "spider webbing" of the sealant.
3. Guide Rail Adjustment:
a. Loosen the four (4) guide rail attachment screws (see Figure 1).
b. While pulling the glass rearward, tighten the four (4) screws.
c. Raise the glass to check if binding still occurs. (NOTE: For power windows, attach an auxiliary window to operate glass.) If binding is corrected, proceed to Step 6; if binding still occurs, proceed to Step 4.
4. Front Sash Adjustment:
a. Lower the glass so that the top of it is approximately 2-3 inches above the top of the door panel.
b. Remove the portion of the plastic film covering the lower attachment screw of the front sash (see Figure 1).
CAUTION:
When separating the plastic film from the door panel use the edge of a small index card to cut through the sealant to prevent any "spider webbing" of the sealant.
c. Loosen the front sash attachment screw.
d. Push the screw fully forward and then tighten it.
e. Raise the glass to check if binding still occurs. If binding is corrected, proceed to Step 6; if binding still occurs, proceed to Step 5.
5. Glass Adjustment:
a. Lower the glass so that the top of it is approximately 2-3 inches above the top of the door panel.
b. Loosen the two (2) glass attachment screws.
c. Pull the glass rearward and tighten the two (2) screws.
6. Reinstall the plastic film on the door panel and the door finisher.
CAUTION:
Inside handle escutcheon installation: Attach the top of the escutcheon first, then pull it downward to complete the installation.