Installation (2.0L DOHC)
- Install rear timing belt covers (if removed). Install rear crankshaft sprocket and flange. See Figure.
- Install right silent shaft sprocket and spacer. Ensure chamfered end of spacer is facing into seal. Align timing marks on silent shaft rear crankshaft sprockets with timing marks on engine case.
- Install rear timing belt and tensioner. Hold tensioner tightly against belt while tightening bolts. To check tension, depress belt with finger midway between sprockets. Deflection should be .20-.28" (5.0-7.1 mm).
- Install crankshaft and oil pump sprockets. Install camshaft and oil pump sprockets. Tighten camshaft sprocket bolts to specification while holding hexagon area of camshaft. See TORQUE SPECIFICATIONS at end of article. Install idler pulley.
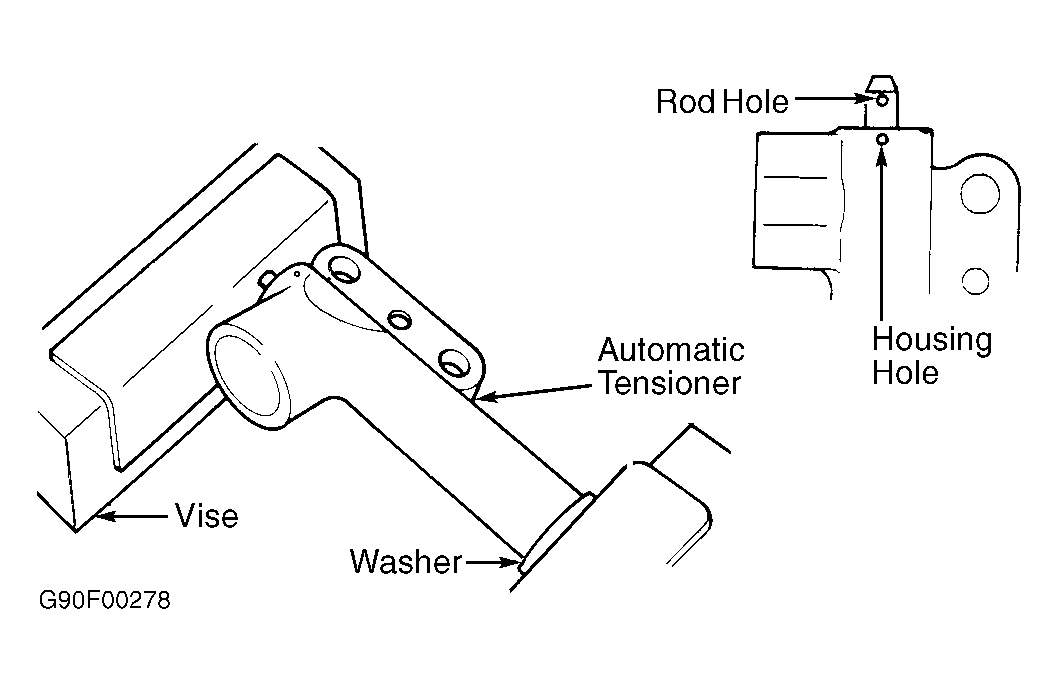
- Retract automatic tensioner rod into tensioner housing by placing tensioner assembly in a soft-jawed vise. Push rod back into automatic tensioner in small increments until both rod and housing holes are aligned. See Fig 1. Install a .055" (1.39 mm) diameter wire into holes.
 Courtesy of MITSUBISHI MOTOR SALES OF AMERICA.
- Remove automatic tensioner from vise with wire attached. Install tensioner and arm. Install tensioner pulley on tensioner arm. Ensure pin holes of tensioner pulley shaft are left of pulley center bolt. Tighten center bolt.
- Rotate camshaft sprockets so dowel pins face upward and timing marks on sprockets align. See Figure. Outer marks on sprockets should be aligned with cylinder head surface.
- When exhaust camshaft sprocket is released, camshaft will rotate one tooth in counterclockwise direction. Ensure this rotation is compensated for when installing timing belt. Rotate crankshaft and oil pump sprockets to align timing marks.
- If reusing old timing belt, ensure belt is installed in original direction of rotation. Remove silent shaft access plug from cylinder block. Insert .31" (8.0 mm) diameter Phillips screwdriver. See Figure. If screwdriver can be inserted 2.36" (59.9 mm) or more, timing mark alignment is okay.
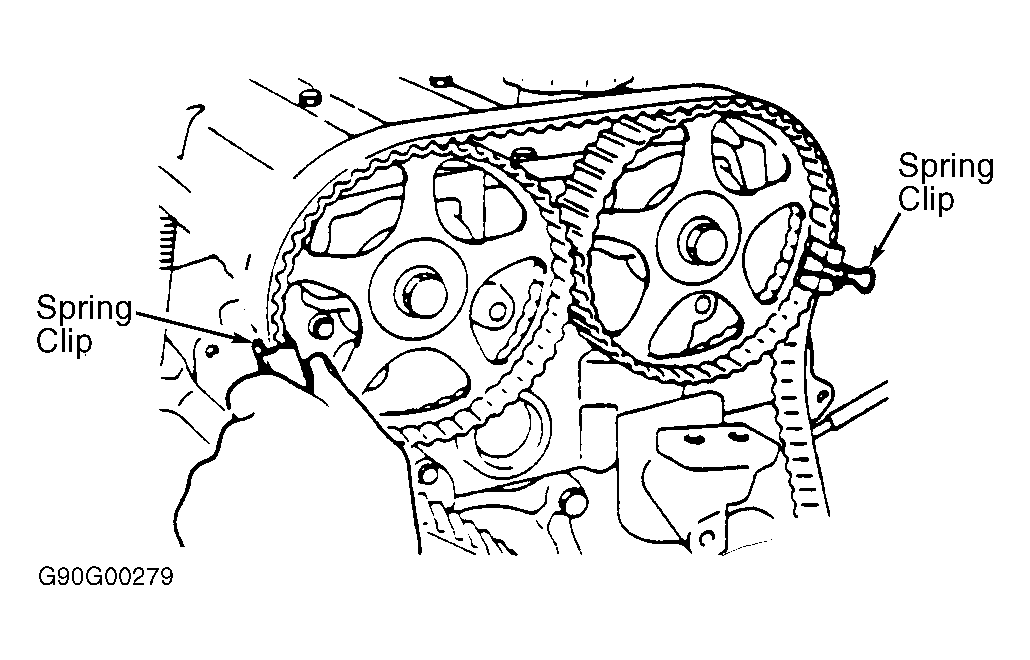
- If screwdriver cannot be inserted at least 2.36" (59.9 mm), remove screwdriver and rotate oil pump sprocket one full turn. Reinsert screwdriver. Leave screwdriver in place until timing belt is installed. Install timing belt on intake camshaft sprocket. Use spring clip to hold belt on sprocket. See Fig 2.
 Courtesy of MITSUBISHI MOTOR SALES OF AMERICA.
- Install wrench on both camshaft sprocket bolts. Install timing belt around exhaust camshaft sprocket while holding camshaft sprocket bolt so timing mark on camshaft sprocket is aligned with timing mark.
- Install another spring clip on timing belt and camshaft sprocket to hold belt on sprocket. Install timing belt in following sequence: around idler pulley, oil pump sprocket, crankshaft sprocket and tensioner pulley.
- Remove both spring clips. Rotate tensioner pulley inward toward timing belt until belt does not sag. Temporarily tighten center bolt on tensioner pulley. Ensure all timing marks are aligned. Remove Phillips screwdriver from silent shaft access hole. Install plug. Remove wrench from camshaft sprocket bolts.
- To adjust belt tension, rotate crankshaft 1/4 turn counterclockwise, and then rotate clockwise until cylinder No. 1 is at TDC. Ensure timing marks are aligned. Loosen center bolt on tensioner pulley. Note location of pin holes in tensioner pulley.
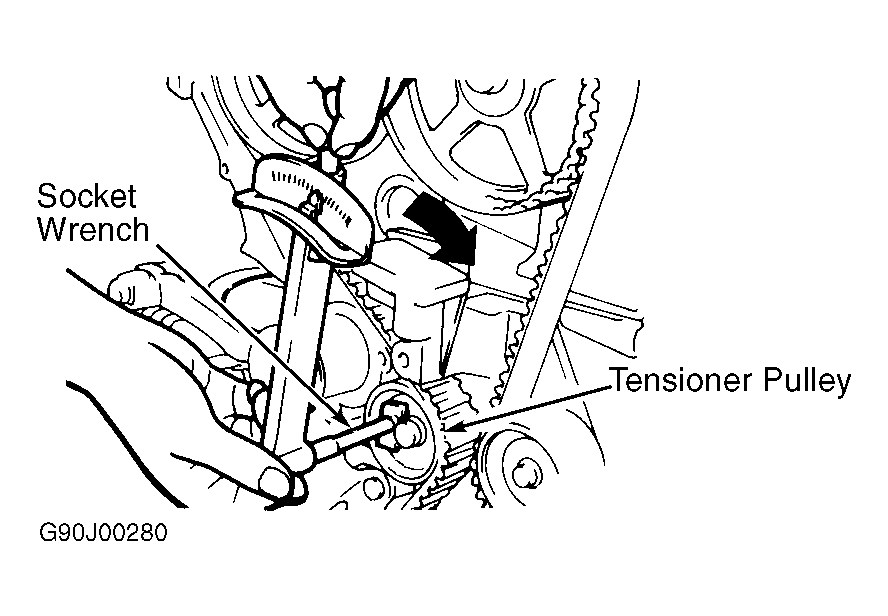
- Using INCH-lb. torque wrench and Socket Wrench (MD998752), apply 22-24 INCH lbs. (2.6-2.8 N.m) on tensioner pulley. See Fig 3. With torque applied to tensioner pulley, tighten tensioner pulley center bolt to 31-40 ft. lbs. (42-54 N.m).
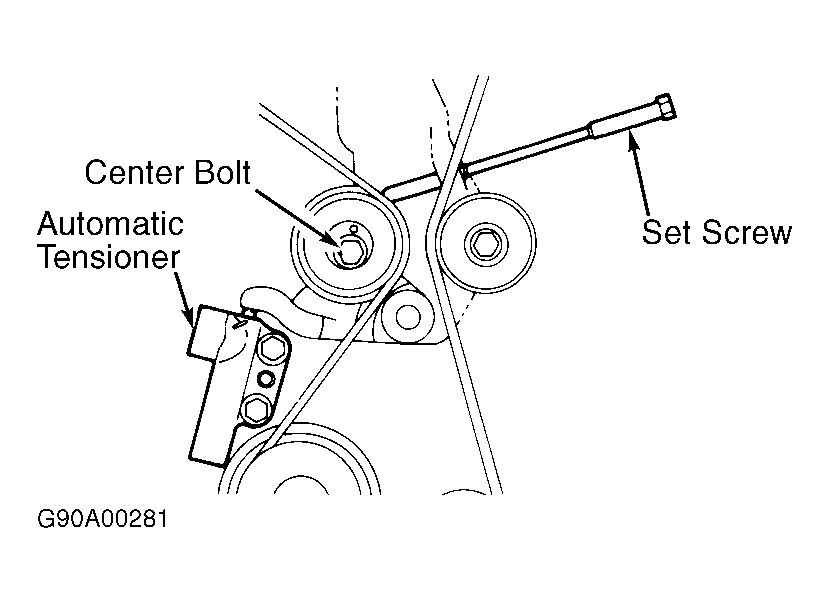
- Install Set Screw (MD998738) in support bracket until set screw end contacts tensioner arm. See Fig 4. Rotate set screw further until wire can be removed from automatic tensioner. Remove set screw.
 Courtesy of MITSUBISHI MOTOR SALES OF AMERICA.
 Courtesy of MITSUBISHI MOTOR SALES OF AMERICA.
- Rotate crankshaft clockwise 2 complete revolutions, and allow to remain in this position for about 15 minutes. Measure distance between tensioner arm and automatic tensioner body. Distance should be .15-.18" (3.8-4.5 mm).
- If distance cannot be measured due to lack of clearance, use alternate method. Install set screw until it contacts tensioner arm.
- Rotate set screw inward while counting number of turns until tensioner arm contacts automatic tensioner housing. Number of turns should be 2 1/2-3 if belt tension is correct. Remove set screw. Install rubber plug in rear timing belt cover.
- To complete installation, reverse removal procedure. Apply sealant to contact areas on semi-circular packing and rocker cover before installing. Ensure correct bolts are installed in proper location in timing belt covers.