34 11 000 Removing and installing/replacing brake pads on both disc brakes (2 pistons)
WARNING: This page is about a different car, the 2010 BMW X5, 2009 BMW X5, 2008 BMW X5, and 2007 BMW X5. However, it is still accessible from the selected car via links, so may be relevant.
Special tools required:
IMPORTANT:
The brake pad wear sensor must be replaced once it has been removed (brake pad wear sensor loses its retention capability in the brake pad). Retaining spring: for vehicles older than 48 months it is recommended to replace the retaining spring!
IMPORTANT:
So as not to damage the surface coating, if possible do not mechanically clean the guide surfaces for the brake pads on the brake caliper mounting bracket. Instead, clean with brake cleaner BMW part no. 83 19 2 154 780 and apply a thin coating of brake pad paste BMW part no. 81 22 9 407 103.
Necessary preliminary tasks:
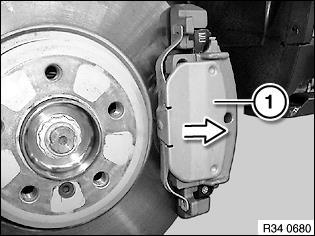
Lever out retaining spring (1) in direction of arrow towards rear.
 Courtesy of BMW OF NORTH AMERICA, INC.
Installation: Attach retaining spring first at top and bottom on brake caliper and then allow to engage in recesses of brake caliper housing.
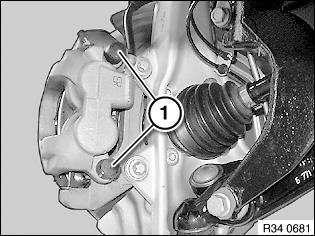
Remove plastic plugs (1).
 Courtesy of BMW OF NORTH AMERICA, INC.
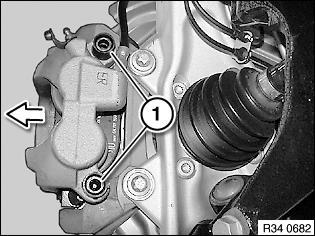
Unscrew guide bolts (1). Withdraw brake caliper backwards.
 Courtesy of BMW OF NORTH AMERICA, INC.
IMPORTANT:
Guide screws (1) are hexagon socket screws (width across flats 9 )! Tie brake caliper back and do not allow to hang from brake hose.
Installation: Only clean guide bolts; do not grease.
Check threads. Replace all guide screws which are not in perfect condition. Tightening torque, see 34 11 4AZ in 34 11 FRONT BRAKE
.
IMPORTANT:
When forcing piston back: - Pay attention to brake fluid level in expansion tank; brake fluid that spills over will damage paintwork.
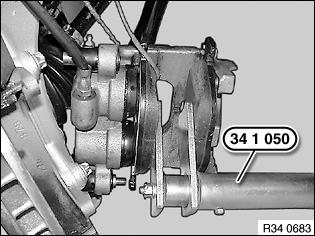
Press back brake pads and piston with special tool 34 1 050.
 Courtesy of BMW OF NORTH AMERICA, INC.
IMPORTANT:
Mark any worn brake pads. In the event of one-sided brake pad wear, do not change brake pads round. Observe minimum thickness of brake pads. See BRAKES - TECHNICAL DATA
. Do not apply grease to brake pad backplate.
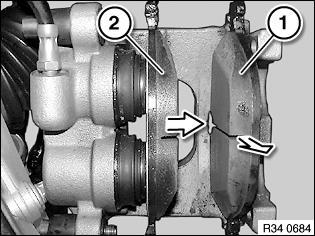
Remove outer brake pad (1) in direction of arrow. Force inner brake pad (2) in direction of arrow off piston and remove.
 Courtesy of BMW OF NORTH AMERICA, INC.
NOTE:
The inner brake pad is seated with springs in the piston or in the brake caliper housing.
Clean brake pads.
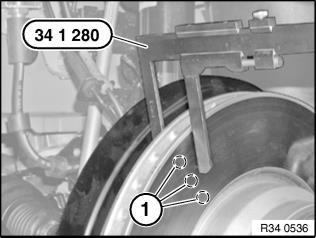
Check minimum brake disc thickness: - Position special tool 34 1 280 at three measuring points in area (1) and measure. - Compare measurement result and lowest value with setpoint value. See BRAKES - TECHNICAL DATA
.
 Courtesy of BMW OF NORTH AMERICA, INC.
IMPORTANT:
New brake pads may only be fitted if the brake disc thickness is greater than the minimum brake disc thickness (MIN TH). See BRAKES - TECHNICAL DATA
.
IMPORTANT:
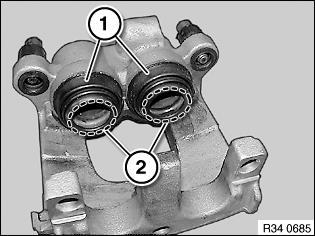
Dust boot must not come into contact with brake pad paste as this may cause the dust boot to swell.
Check dust boot (1) for damage and replace if necessary. Clean contact surface (2) of brake piston with brake cleaner and apply a thin coating of brake pad paste.
 Courtesy of BMW OF NORTH AMERICA, INC.
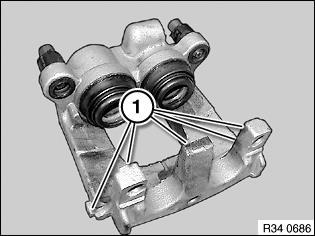
Clean contact surfaces (1) of brake pad tee heads/brake caliper housing with brake cleaner and apply a thin coating of brake pad paste.
 Courtesy of BMW OF NORTH AMERICA, INC.
So as not to damage the surface coating, if possible do not mechanically clean pad guides (1). Instead, clean with brake cleaner and apply a thin coating of brake pad paste.
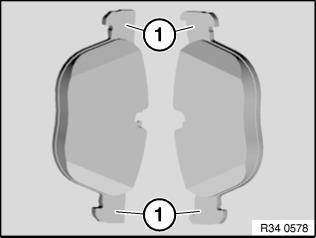 Courtesy of BMW OF NORTH AMERICA, INC.
NOTE:
After completing work: - Fully depress brake pedal several times so that brake pads contact brake discs. - When installing new brake pads at front and rear axles, brake fluid level must be brought up to "MAX" marking. - Read and comply with notes on braking in new brake discs / brake pads . - When replacing linings, reset CBS display in accordance with factory specification.