Hydraulic Control Assembly - Antilock Brakes: Service and Repair
Hydraulic Control Unit (HCU)
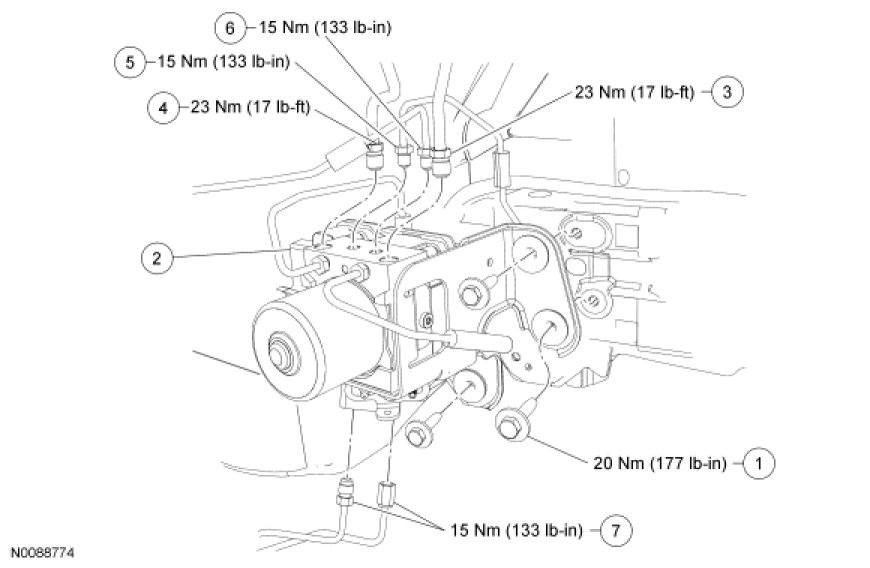
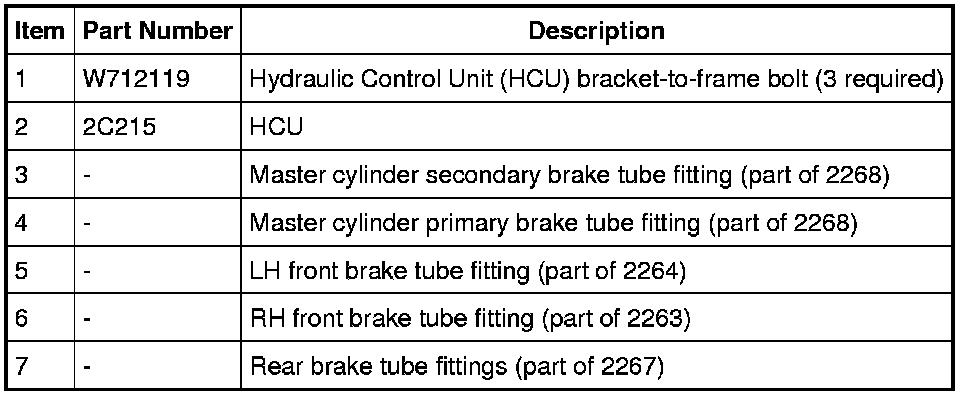
Removal and Installation
WARNING: Do not use any fluid other than clean brake fluid meeting manufacturer's specification. Additionally, do not use brake fluid that has been previously drained. Following these instructions will help prevent system contamination, brake component damage and the risk of serious personal injury.
WARNING: Carefully read cautionary information on product label. For EMERGENCY MEDICAL INFORMATION seek medical advice. For additional information, consult the product Material Safety Data Sheet (MSDS) if available. Failure to follow these instructions may result in serious personal injury.
NOTICE: Do not spill brake fluid on painted or plastic surfaces or damage to the surface may occur. If brake fluid is spilled onto a painted or plastic surface, immediately wash the surface with water.
NOTE: When installing a new ABS module/Hydraulic Control Unit (HCU) assembly, it must be configured (either by download/upload or uploading the as-built data method).
All vehicles
1. Remove the Air Cleaner (ACL) and the ACL outlet pipe.
2. Disconnect the master cylinder brake tube fittings from the HCU.
- To install, tighten to 23 Nm (17 lb-ft).
Vehicles with 3.0L engine
3. Disconnect the master cylinder brake tube fittings from the master cylinder and remove the brake tubes.
- To install, tighten to 23 Nm (17 lb-ft).
All vehicles
4. NOTE: The brake tubes must be installed in the same location as removed.
Disconnect the front brake tube fittings from the HCU.
- To install, tighten to 15 Nm (133 lb-in).
5. Disconnect the rear brake tube fittings from the jumper tubes.
- To install, tighten to 15 Nm (133 lb-in).
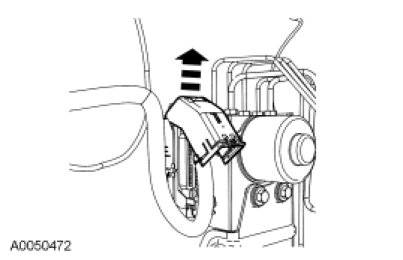
6. Disconnect the electrical connector by rotating the protective cover.
7. Remove the 3 HCU bracket-to-frame bolts and remove the HCU.
- To install, tighten to 20 Nm (177 lb-in).
8. To install, reverse the removal procedure.
- Bleed the brake system.