Separate rear fender - AR63.50-P-1400-02CW
WARNING: This page is about a different car, the 2011 Mercedes-Benz C300, 2010 Mercedes-Benz C300, 2009 Mercedes-Benz C300, and 2008 Mercedes-Benz C300. However, it is still accessible from the selected car via links, so may be relevant.
MODIFICATION NOTES
| 26.1.09 |
Modification to repair method |
Steps 13, 14, 15, 16 |
 Courtesy of MERCEDES-BENZ USA
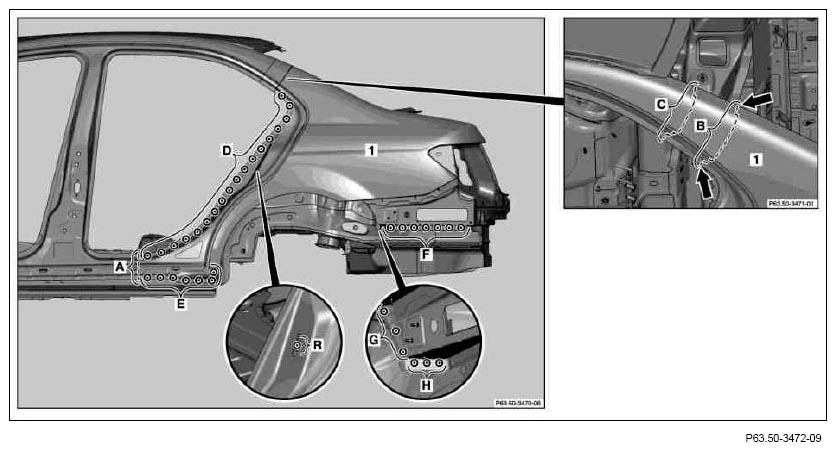
- Scribe separation line along rear fender (1) with metal needle template (area A).
 Transfer separation line from new part (area A).
- 2.1 Position metal needle template at Y-markings and scribe orientation line on rear fender (1) (area B).
Scribe separation line for crimping flange approx. 10 mm offset from Y-markings (arrows). If necessary, expose Y-markings.
- 2.2 Only if C-pillar is also damaged transfer orientation line from new part and scribe on rear fender (1) with metal needle template (area C).
Scribe separation line for crimping flange approx. 10 mm offset.
- 3 Cut rear fender (1) at separation point (area A).
Do not damage side longitudinal member below (area A).
- 4.1 Cut also rear fender (1) at separation point (areas B).
- 4.2 Only if C-pillar is also damaged, cut rear fender (1) at separation point (area C).
Do not damage C-pillar below (areas B and C).
- 5 Expose spot welds on rear fender (1) (areas D, E, F, G, H and R).
- 6 Cut out spot welds on rear fender (1) (areas D, E, F, G, H and R).
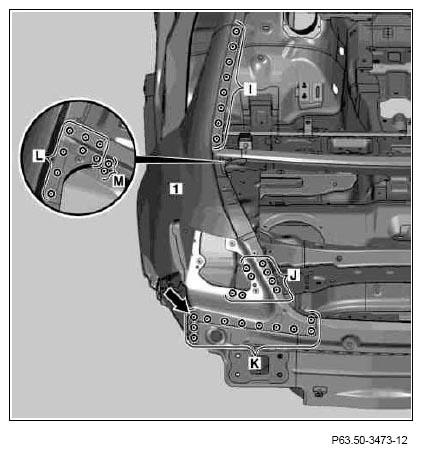
- 7 Expose spot welds on rear fender (1) (areas I, J, K, L and M).
- 8 Cut out spot welds on rear fender (1) (areas I, J, K, L and M).
Cut out spot weld on rear fender (1) through two panel thicknesses (arrow).
 Courtesy of MERCEDES-BENZ USA
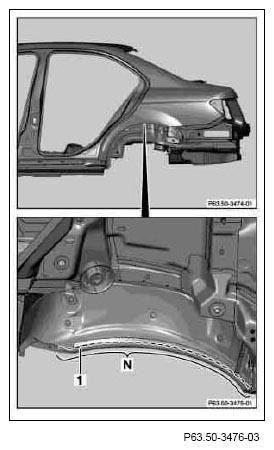
- 9 Separate rear fender (1) at separation point with FSC 1.6 window removal tool (area N).
Rear fender (1) is bonded to outer rear wheel well in area (N).
- 10 Remove damaged rear fender (1)
- 11 Remove adhesive residues in area (N).
A maximum of 2 mm of adhesive residue may be left Pull off loose adhesive material (remaining pieces which are not completely cut off).
- 12 Repair bare parts with touch up applicator.
 Courtesy of MERCEDES-BENZ USA
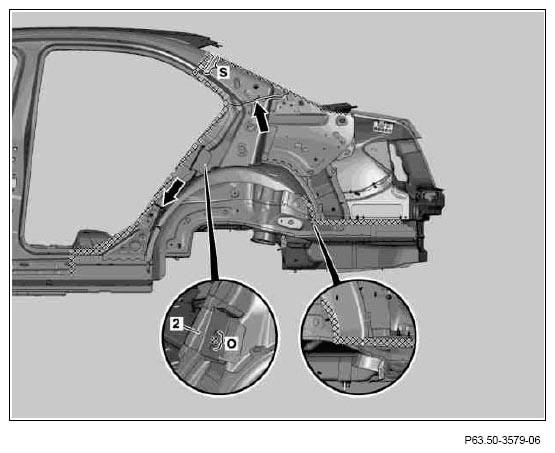
- 13 Sand connection surfaces down to bare metal in the cross-hatched areas.
Grind spot weld flanges down to bare metal on both sides.
Damaged foam rubber parts must be removed and replaced (arrows).
- 14 Grind mating surfaces for plug welding down to bare metal (area O).
- 15 Remove drill shavings.
 Courtesy of MERCEDES-BENZ USA
- 16 Coat insides of spot weld flanges with zinc dust paint.
Observe pre-treatment of bonding surfaces.
- 17 Crimp connecting flange toward inside using sheet metal crimping pliers (area S).
Use sheet metal crimping pliers for heavily accessible areas.