- Cover timing case recess and cylinder head with clean rag.
 Parts which have fallen into the timing case recess or in the cylinder head must be removed.
- Insert new riveted link (7.1) and new middle plate (7.2) together with centering fork (3) into the ends of the new timing chain (2). Fix center plate (7.2) with new riveted link (7.1).
 Courtesy of MERCEDES-BENZ USA
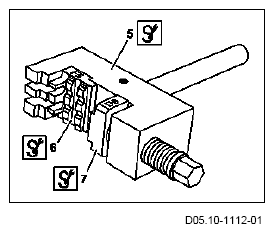
 Place assembly insert (6) with the digit F5 into the
rivet press tool (5) and fix with mounting screw.
Place assembly insert (6) with the digit F5 into the
rivet press tool (5) and fix with mounting screw.-
Place assembly insert (7) with the digit D9 into the
riveting tool (5).
The assembly insert
(7)
is able to move on the pressure screw and is loosely mounted.
- Press in new riveted link (7.1) as far as the stop with the
riveting tool (5).
Ensure that the riveted link and the
riveting tool (5) are aligned. Do not allow the
centering fork (3) which is pressed out to drop into the timing case recess.
-
Remove assembly inserts (6, 7) from rivet press tool (5)
Dismount riveting tool (5).
 Courtesy of MERCEDES-BENZ USA
-
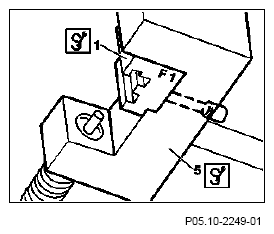
Place assembly insert (1) with the digit F1 into the
rivet press tool (5) and fix with mounting screw.
 Courtesy of MERCEDES-BENZ USA
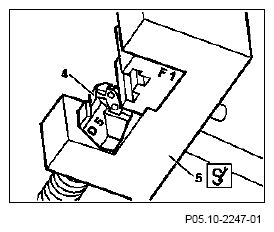
- Place movable
assembly insert (4) with the digit D5 into the
riveting tool (5).
 Courtesy of MERCEDES-BENZ USA
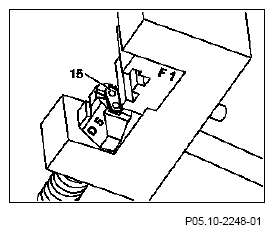
- Insert new outer plate (15) into the movable
assembly insert (4).
The outer plate (15) is held by a magnet.
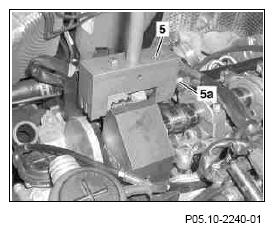 Courtesy of MERCEDES-BENZ USA
-
Fit on rivet press tool (5)
The guide spacers must lie on the control chain rollers (2). Ensure that riveted link (7.1) and outer plate (15) are aligned.
-
Screw in pressure screw (5a) at
rivet press tool (5) until solid resistance is felt.
While turning the
pressure screw (5a), ensure that the pin in rivet link (7.1) is inserted in the holes in external mounting link (15).
-
Take off riveting tool (5).
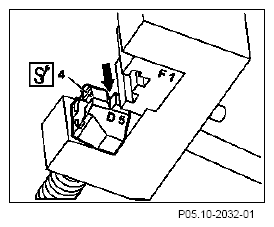 Courtesy of MERCEDES-BENZ USA
- Turn over movable
assembly insert (4) to the riveting section (arrow).
-
Fit rivet press tool (5) at the center onto one of both timing chain pins of the riveted link (7.1).
-
Tighten thrust spindle (5a) of
rivet press tool (5) and rivet first control chain bolt of riveted link (7.1).
-
Release thrust spindle (5a) and
fit rivet press tool (5) on second control chain bolt of riveted link (7.1).
-
Tighten thrust spindle (5a) of
rivet press tool (5) and rivet second control chain bolt.
-
Release thrust spindle (5a)
and remove rivet press tool (5).
 Check both rivets (arrows), re-rivet if required.
- Remove rag from timing case recess and cylinder head.
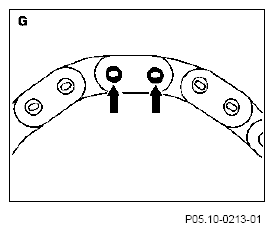 Courtesy of MERCEDES-BENZ USA