Remove/install air spring - AR32.22-P-1500TX
MODEL 219.3 with CODE (489) AIRmatic (semi-active air suspension)
 Courtesy of MERCEDES-BENZ USA
 Courtesy of MERCEDES-BENZ USA
 MODIFICATION NOTES
| 29.11.11 |
Check rear spring fixture, added |
Operation step 9 |
|
  |
Remove/install |
|
|
 |
Notes on self-locking nuts and bolts |
|
AH00.00-N-0001-01A |
| |
|
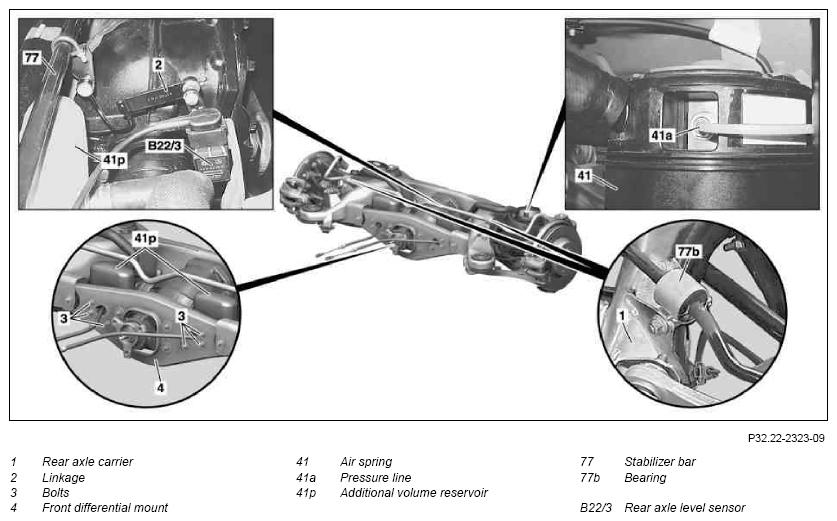
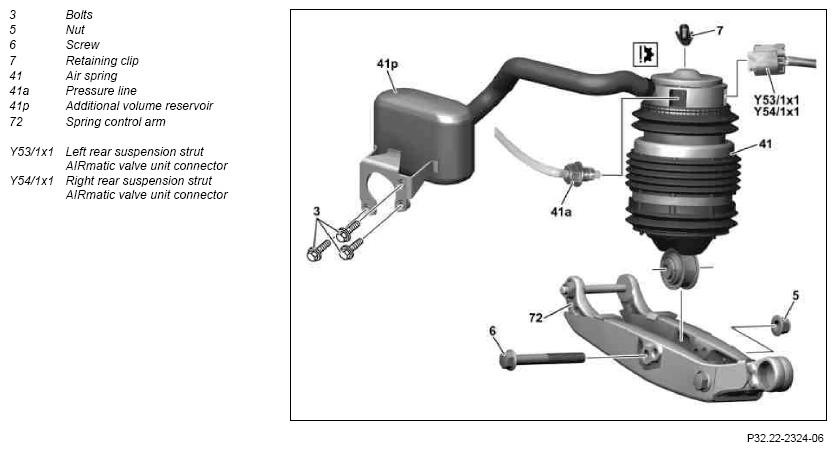
The air spring (41) may only be removed together with the container for additional volume (41p). The connector hose from the air spring (41) to the container for additional volume (41p) must not be detached as leaks occur as a result. Furthermore it is to be ensured that the air springs (41) are emptied completely before removal with STAR DIAGNOSIS. If the air springs (41) are not installed and filled according to the specifications, these can be predamaged and malfunction a short time later. |
|
| |
|
 Tighten nuts and bolts of chassis components only when vehicle is in the ready-to-drive condition.
 |
|
| 1 |
Remove rear axle |
|
AR35.10-P-0010TX |
| 2 |
Disconnect pressure line (41a) from air spring (41) |
When reinstalling the old air spring (41) ensure that the pressure line (41a) is screwed carefully onto the plastic thread, as if screwed on improperly the plastic thread will be damaged and therefore the air spring (41) will be irreparably damaged.
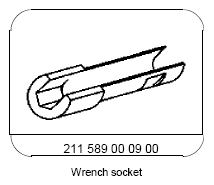
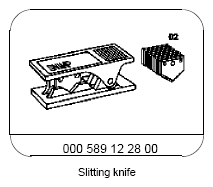
If a new air spring (41) is installed, detach the old screw connection on the pressure line (41a). To do this break open the clamping ring, detach bolt head and insert pressure line (41a) up to marking in the new screw connection. Pull back pressure line (41a) a short distance so that the peripheral retaining edges in the inside of the clamping ring engage in the line outer surface.
 Seal pressure line (41a) with blind plugs during repair work.
 |
|
|
Damaged pressure line connections or damage pressure lines (41a) must be repaired before assembly. |
AR32.22-P-2001-02TX |
 |
*BA32.25-P-1004-04K |
 |
Fig 4 |
|
Figure |
| 3 |
Unclip linkage (2) of rear axle level sensor (B22/3) from stabilizer bar (77) |
|
|
| 4 |
Remove right and left bearing (77b) of stabilizer bar (77) on rear axle carrier (1) |
|
*BA32.20-P-1003-04J |
| 5 |
Undo bolts (3) of additional volume reservoir (41p) from front center assembly mounting (4) |
|
*BA32.22-P-1009-03A |
| 6 |
Detach air spring (41) from spring control arm (72); to do so, remove nut (5) and pull out bolt (6) |
|
|
| 7 |
Remove air springs (41) together with additional volume reservoir (41p) |
Do not twist air spring (41) as this produces creases in the air spring bellows which would then cause the air spring (41) to malfunction. |
|
|
If the old air spring (41) is to be used again, then any parts left over from the destroyed retaining clip (7) must be removed from the air spring (41) and the retaining clip (7) replaced. |
AR32.22-P-1500-02TX |
 |
Checking |
|
|
| 8 |
Check condition of air spring (41) |
|
AR32.22-P-1500-05TX |
| 9 |
Check rear spring fixture |
Rear spring fixture damaged or kinked: ↓ |
|
Install rear spring fixture reinforcement and weld in.
When repairing the rear spring fixture use a reinforcement with the part number A 211 328 00 85.
Round wire brush
Wet and dry vacuum cleaner
MIG-MAG inert gas welder |
AR64.20-P-1255-01T |
| Sealant |
*BR00.45-Z-1003-01A |
| Seam seal |
*BR00.45-Z-1041-01A |
| Cavity preservation |
*BR00.45-Z-1003-05A |
| 10 |
Install in the reverse order |
|
|
REAR AXLE STABILIZER BAR
| Number |
Designation |
Model 219 |
| BA32.20-P-1003-04J |
Bolt, torsion bar to rear axle carrier |
Nm |
70 |
AIR SUSPENSION
| Number |
Designation |
Model 219 with AIRmatic code 489 |
| BA32.22-P-1009-03A |
Bolt, additional volume reservoir to front center assembly mount |
Nm |
20 |
SUSPENSION STRUTS
| Number |
Designation |
Model 219 with AIRmatic |
| BA32.25-P-1004-04K |
Air suspension pressure line to rear air spring |
Nm |
5 |
 Courtesy of MERCEDES-BENZ USA
 Courtesy of MERCEDES-BENZ USA
 REPAIR MATERIALS
| Number |
Designation |
Order number |
| BR00.45-Z-1003-01A |
White sealing compound, 310 ml, DBL 6069.20 |
A 001 989 63 20 |
| BR00.45-Z-1041-01A |
Seam sealant, sprayable 310 ml |
A 002 989 84 20 |
| BR00.45-Z-1003-05A |
Cavity sealant, solvent-free (1 l container) |
A 000 986 72 70 05 |