Install rear crossmember - AR64.20-P-1100-05GZ
 |
Measures for preventing damage to vehicles or components when performing arc welding work |
All models |
AH00.00-N-0005-01A |
COMMERCIALLY AVAILABLE TOOLS
| Number |
Designation |
| WH58.30-Z-1003-02A |
Clamping pliers |
| WH58.30-Z-1001-03A |
Round wire brush, braided, dia. 70 mm |
| WH58.30-Z-1023-04A |
Abrasive disk, dia. 50 mm, 80 m/s (max. 23,000 rpm) |
| WH58.30-Z-1024-04A |
Abrasive disk, dia. 115 mm, 80 m/s (max. 13,250 rpm) |
WORKSHOP EQUIPMENT
| WE58.40-Z-1001-02A |
Inert gas welder |
| WE58.40-Z-1002-02A |
Spot welder |
| WE58.40-Z-1001-03A |
Drill (electric/pneumatic) |
| WE58.40-Z-1002-03A |
Straight grinder (electric/pneumatic) |
| WE58.40-Z-1003-03A |
Angle grinder (electric/pneumatic) |
| WE58.40-Z-1005-03A |
Wet/dry vacuum cleaner |
REPAIR MATERIALS
| Number |
Designation |
Order number |
| BR00.45-Z-1001-07A |
Zinc dust paint suitable for spot welding |
A 000 986 34 42 |
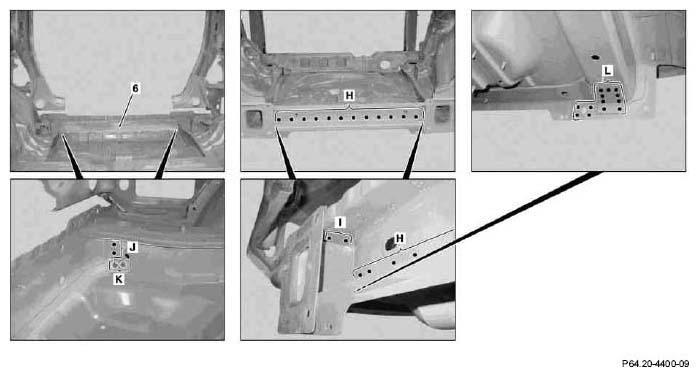 Courtesy of MERCEDES-BENZ OF NORTH AMERICA.
- Insert rear inner crossmember section (6) and fasten with clamping pliers
 .
.
- Weld in rear crossmember inner section (areas H, I, J and L) with
 .
.
- Drill holes for
 in rear crossmember inner section (area K).
- Weld in rear crossmember inner section (area K) with
.
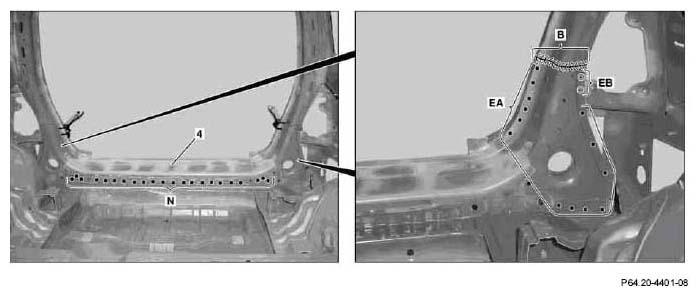 Courtesy of MERCEDES-BENZ OF NORTH AMERICA.
- Insert D-ring section (4) and fasten with clamping pliers.
- Weld in D-ring section (areas EA and N) with
.
- Weld in D-ring section (area EB) with
.
- Weld in D-ring section (area B) with
 .
.
- Grind continuous welds of D-ring section down flat.
- Clean welds.
- Insert lock carrier reinforcement (3) and fasten with clamping pliers
.
- Weld in lock carrier reinforcement (areas F and G) with
.
- Clean welds.
- Apply primer to areas no longer accessible during further work
 Do not apply primer to flanges still to be welded!
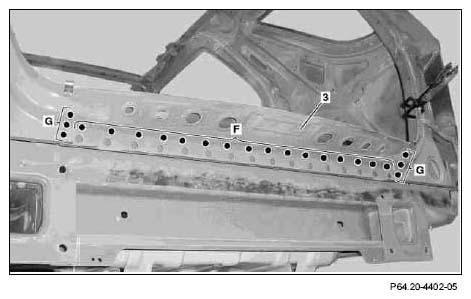 Courtesy of MERCEDES-BENZ OF NORTH AMERICA.
 Courtesy of MERCEDES-BENZ OF NORTH AMERICA.
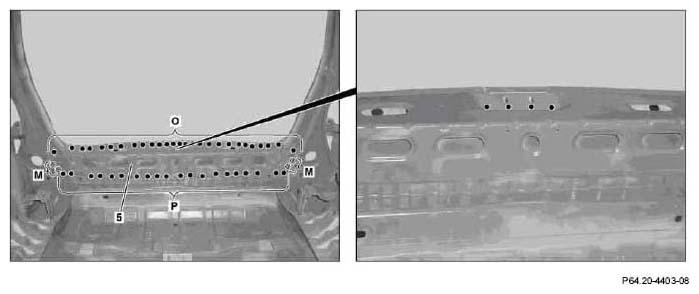
- Insert lock carrier (5) and fasten with clamping pliers
.
- Weld in lock carrier (areas O and P) with
.
- Weld in lock carrier (area M) with
.
- Clean welds.
- Apply primer to areas no longer accessible during further work.
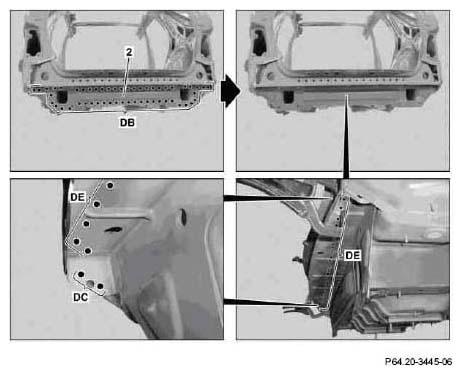
- Insert rear outer crossmember section (2) and fasten with clamping pliers.
- Weld in rear crossmember outer section (areas DB, DC and DE) with
.
- Clean welds.
- Apply primer to areas no longer accessible during further work
Do not apply primer to flanges still to be welded!
Do not apply primer to flanges still to be welded!
 Courtesy of MERCEDES-BENZ OF NORTH AMERICA.