Install / gauge the crankshaft bearings - AR03.20-P-4341-01CVA
Modification notes
| 10.3.04 |
Figure changed from 0.030...0.052 mm to 0.026...0.050 mm |
Value modified in BE03.20-P-1001-04E on engine 112 except 112.951, 113.940/941/942/943/944/948/ 960/961/963/965/966/967/968/980/981 / 984/986 |
*BE03.20-P-1001-04E |
| 10.3.04 |
Figure changed from 0.030...0.052 mm to 0.026...0.050 mm |
Value modified in BE03.20-P-1001-04E for engine 113.992 |
*BE03.20-P-1001-04E |
Inspection data of crankshaft bearing clearance
| Number |
Designation |
Engine 112 except 112.951/976, Engine 113.940/941/ 942/943/944/ 948/960/961/ 963/964/965/ 966/967/968/ 971/980/981/ 984/986 |
Engine 113.987/988/989 /990/991/993 |
Engine 113.992/995 |
| BE03.20-P-1001-04E |
Main bearing play |
Radial when new |
mm |
0.026...0.050 |
0.026...0.050 |
0.026...0.050 |
| Axial when new |
mm |
0.10...0.266 |
0.10...0.266 |
0.10...0.266 |

Crankshaft bearing cap
| Number |
Designation |
Engine 112,113 |
| BA03.20-P-1001-01D |
Bolt for crankshaft bearing cap |
M8 |
Stage 1 |
Nm |
20 |
| Stage 2 |
∠° |
90 |
| BA03.20-P-1002-01D |
Side bolt for crankshaft bearing cap |
M8 |
|
Nm |
30 |
| BA03.20-P-1003-01D |
Bolt for crankshaft bearing cap |
M10 |
Stage 1 |
Nm |
5 |
| Stage 2 |
Nm |
30 |
| Stage 3 |
∠° |
90 |
- Blow through oil galleries in direction of flow oil with compressed air.
- Clean the bearing points in the crankcase, main bearing cap and main bearing journal of crankshaft with a chamois leather.
 If a bearing damage has occurred, it may be necessary to remove any swarf from the connecting rod bores, oil ducts, the crankshaft and crankcase casings as well as the crankcase! Do not use any hard objects for cleaning.
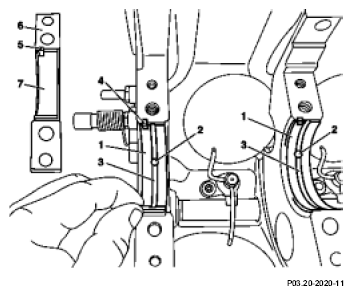
- Insert the bearing shell top halves (1) with oil drillings (2) and oil grooves (3) into the crankcase.
When doing this, ensure that the anti-twist locks (4) of the bearing shell halves (1) are located in the recesses of the crankcase.
 Courtesy of MERCEDES-BENZ OF NORTH AMERICA.
- Insert the bearing shell bottom halves (7) into the bearing caps (6).
When doing this, ensure that the anti-twist locks (5) of the bottom bearing shell halves (7) are located in the recesses of the bearing caps (6).
- Mount bearing cap (6), tighten without rotation angle for measuring procedure
.
- Measure and note the bearing diameter (actual dimension) at all four crankshaft bearings.
Subtract the radial bearing clearance of the individually measured bearing diameters from this.
- Grind all four crankshaft bearing points to the calculated bearing diameter.
Note the assignment of the determined bearing diameters to the crankshaft bearing points.
- Remove bearing cap (6) again.
- Insert crankshaft into crankcase.
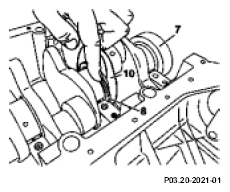
- Measure the axial play of the crankshaft and examine the crankshaft contact point for wear.
 Courtesy of MERCEDES-BENZ OF NORTH AMERICA.
Maintain the axial play of the crankshaft when the crankshaft is ground to repair size. If it is necessary to grind the crankshaft at the contact point of the axial bearing (bearing point 3), order thrust washer parts kit repair size 1 and measure the axial play of the crankshaft without thrust washer.
For this purpose, add the axial bearing play to the thickness measured for the repair size thrust plate (8) and subtract the measured axial play without the repair thrust plate (8) to obtain the dimension by which the crankshafts must be ground at the contact point of the axial bearing (bearing point 3).
- Remove crankshaft.
- Grind the crankshaft at the contact point to the calculated dimension.
- Insert crankshaft ground to repair dimension into crankcase.
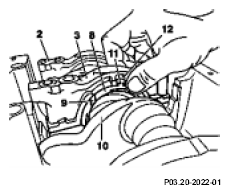
- Install the top repair thrust washers (8).
The oil grooves of the thrust washers (8) must point toward the crankshaft webs (10).
- Install bearing caps (6) according to their markings.
When installing the fit bearing cap, hold both repair thrust plates (8) tight. The anti-twist locks (11) of the repair thrust plates (8) must be located in the slots (12) of the fit bearing cap. The oil grooves (9) of the thrust plates (8) must point toward the crank webs (10).
 Courtesy of MERCEDES-BENZ OF NORTH AMERICA.
- Moisten the thread and head contact surface of the bolts of the bearing caps with oil.
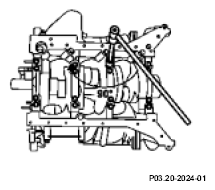
- Tighten the bolts of the bearing caps as specified in the tightening pattern
Note specified torque and tightening angle of the bolts. If no torquing angle wrench is available, the bolts can be torqued further by the specified angle in a single operation using a wrench and locking handle. Do not use a flexi-rod torque wrench for tightening in order to avoid any angle errors.
- Turn crankshaft to check for unobstructed movement.
 Courtesy of MERCEDES-BENZ OF NORTH AMERICA.