With power seat system
- Switch the ignition off (LOCK).
- Disconnect the negative battery terminal and wait for 1 min or more. (See NEGATIVE BATTERY TERMINAL DISCONNECTION/CONNECTION
.)
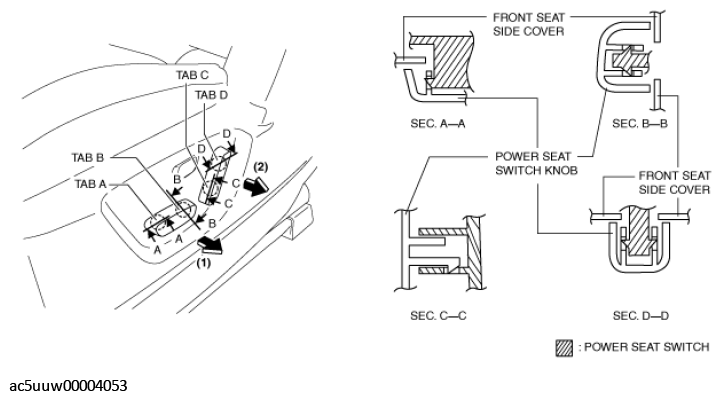
- Pull the power seat switch knob in the direction of the arrow (1) shown in the figure, and remove it while disengaging tabs A and B.
 Courtesy of MAZDA MOTORS CORP.
- Pull the power seat switch knob in the direction of the arrow (2) shown in the figure, and remove it while disengaging tabs C and D.
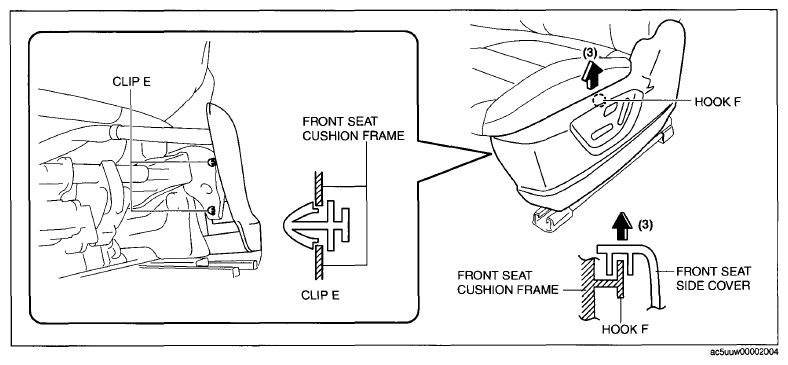
- Remove clip E from the front seat cushion frame.
 Courtesy of MAZDA MOTORS CORP.
- Pull up the front seat side cover in the direction of the arrow (3) shown in the figure and set hook F aside.
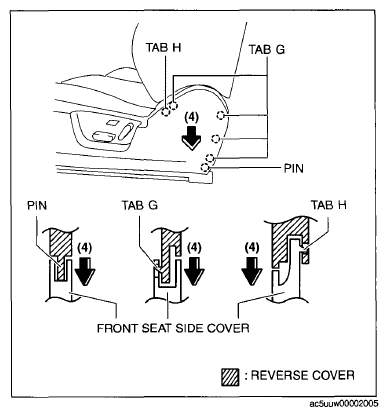
- Pull the front seat side cover in the direction of the arrow (4) shown in the figure and disengage the tabs G and H, and the pin.
 Courtesy of MAZDA MOTORS CORP.
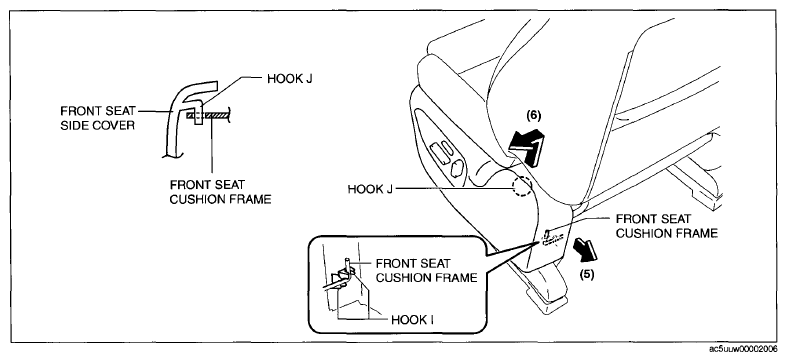
- Pull the front seat side cover in the direction of the arrow (5) shown in the figure and set hook I aside.
 Courtesy of MAZDA MOTORS CORP.
- Pull the front seat side cover in the direction of the arrow (6) shown in the figure and set hook J aside.
- Disconnect the power seat switch connector (with power seat) and the position memory switch connector. (With position memory)
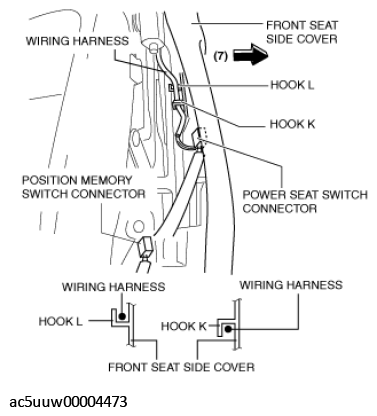 Courtesy of MAZDA MOTORS CORP.
- Set the wiring harness aside from hooks K and L, and remove the front seat side cover in the direction of the arrow (7) shown in the figure.
- Remove the power seat switch. (See POWER SEAT SWITCH REMOVAL/INSTALLATION .)
- Remove the position memory switch. (With position memory system) (See POSITION MEMORY SWITCH REMOVAL/INSTALLATION .)
- Install in the reverse order of removal.
- When the passenger's seat is removed, perform the DTC inspection for the SAS control module using the M-MDS and verify that no DTCs are displayed. (See DTC INSPECTION [SAS CONTROL MODULE (STANDARD DEPLOYMENT CONTROL SYSTEM - MEXICO SPEC.)]
.) (See DTC INSPECTION [SAS CONTROL MODULE (TWO-STEP DEPLOYMENT CONTROL SYSTEM - US/CANADA SPEC.)]
.)
- When the passenger's seat is replaced with a new one, perform the occupant classification sensor calibration using the M-MDS. (See OCCUPANT CLASSIFICATION SENSOR CALIBRATION [TWO-STEP DEPLOYMENT CONTROL SYSTEM - US/CANADA SPEC.]
.)