Headliner Removal/Installation: Removal
- Disconnect the negative battery terminal. (See NEGATIVE BATTERY TERMINAL DISCONNECTION/CONNECTION
.)
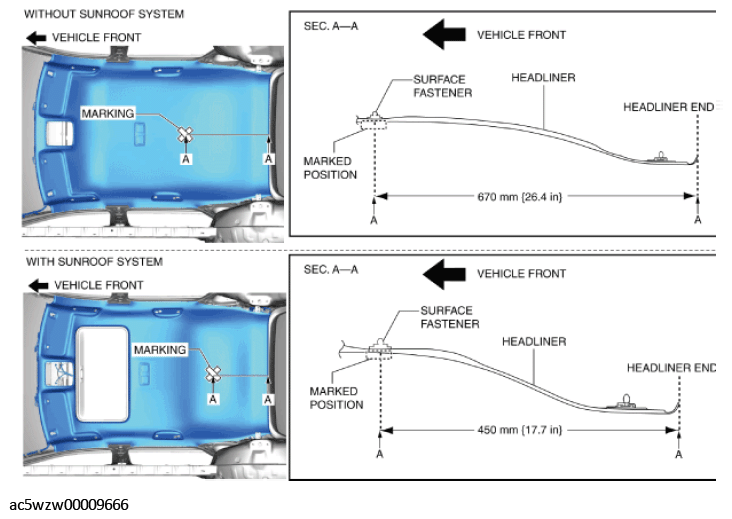
- Mark the position shown in the figure using tape to verify the position of the surface fastener.
 Courtesy of MAZDA MOTORS CORP.
- Remove the following parts:
- Sunroof seaming welt (With sunroof system) (See SUNROOF UNIT REMOVAL/INSTALLATION
.)
- A-pillar trim (See A-PILLAR TRIM REMOVAL/INSTALLATION .)
- Front map light (See FRONT MAP LIGHT REMOVAL/INSTALLATION
.)
- Sunvisor (See SUNVISOR REMOVAL/INSTALLATION .)
- Lower decoration panel (With center display) (See DECORATION PANEL REMOVAL/INSTALLATION .)
- Front scuff plate (See FRONT SCUFF PLATE REMOVAL/INSTALLATION .)
- Passenger-side front side trim (With center display) (See FRONT SIDE TRIM REMOVAL/INSTALLATION .)
- Glove compartment (With center display) (See GLOVE COMPARTMENT REMOVAL/INSTALLATION .)
- Dashboard under cover (With center display) (See DASHBOARD UNDER COVER REMOVAL/INSTALLATION .)
- Passenger-side lower panel (With center display) (See LOWER PANEL REMOVAL/INSTALLATION .)
- Assist handle (See ASSIST HANDLE REMOVAL/INSTALLATION .)
- Rear scuff plate (See REAR SCUFF PLATE REMOVAL/INSTALLATION .)
- B-pillar lower trim (See B-PILLAR LOWER TRIM REMOVAL/INSTALLATION .)
- Adjust anchor cover on the front seat belt (See FRONT SEAT BELT REMOVAL/INSTALLATION
.)
- Upper anchor installation bolt on the front seat belt (See FRONT SEAT BELT REMOVAL/INSTALLATION
.)
- B-pillar upper trim (See B-PILLAR UPPER TRIM REMOVAL/INSTALLATION .)
- Rear seat cushion (See REAR SEAT CUSHION REMOVAL/INSTALLATION
.)
- Trunk board (See TRUNK BOARD REMOVAL/INSTALLATION .)
- Bass-box (With Bose ®) (See BASS-BOX REMOVAL/INSTALLATION
.)
- Sub-trunk (See SUB-TRUNK REMOVAL/INSTALLATION .)
- Trunk end trim (See TRUNK END TRIM REMOVAL/INSTALLATION .)
- Trunk side trim (See TRUNK SIDE TRIM REMOVAL/INSTALLATION .)
- C-pillar trim (See C-PILLAR TRIM REMOVAL/INSTALLATION .)
- Head restraint
- Fold the rear seat backs.
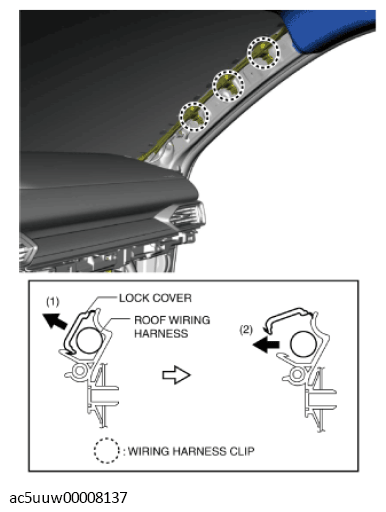
- Open the lock covers of the wiring harness clips in the direction of arrow (1) shown in the figure and remove the roof wiring harness in the direction of arrow (2).
 Courtesy of MAZDA MOTORS CORP.
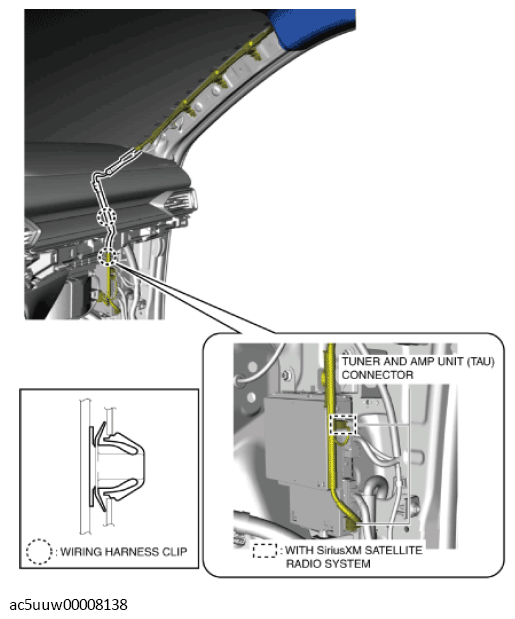
- Remove the wiring harness clips and disconnect the tuner and amp unit (TAU) connectors. (With center display)
 Courtesy of MAZDA MOTORS CORP.
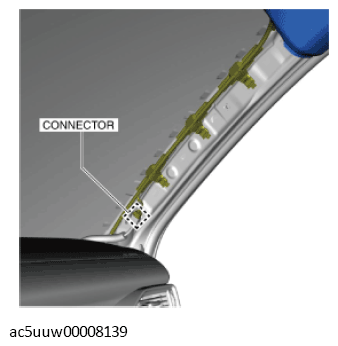
- Disconnect the connector. (Without center display)
 Courtesy of MAZDA MOTORS CORP.
- Disconnect rear washer hose B.
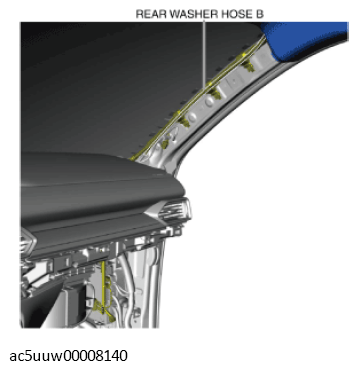 Courtesy of MAZDA MOTORS CORP.
- Pull the roof wiring harness and rear washer hose B in the direction of the arrow shown in the figure and pull them out.
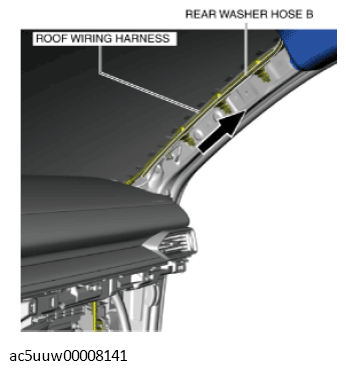 Courtesy of MAZDA MOTORS CORP.
- Disconnect rear washer hose C from the joint pipe.
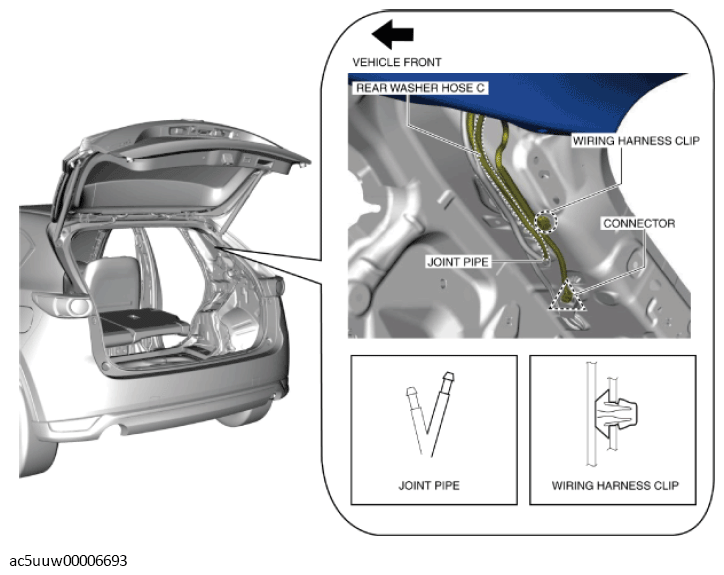 Courtesy of MAZDA MOTORS CORP.
- Remove the wiring harness clip.
- Disconnect the connector.
- Remove wiring harness clips A and B.
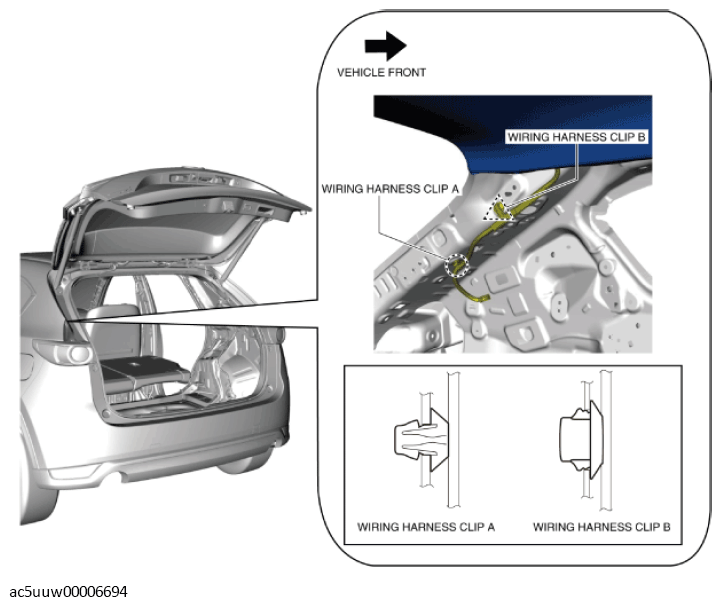 Courtesy of MAZDA MOTORS CORP.
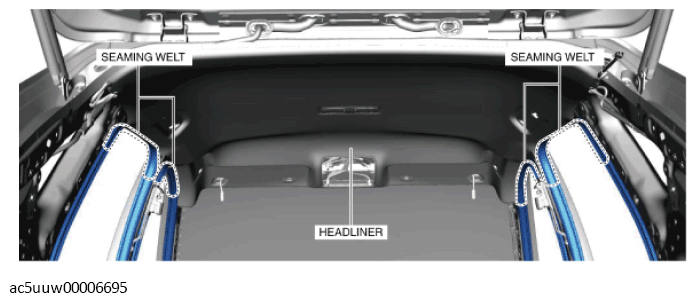
- Temporarily install the seaming welts shown in the figure to the headliner.
CAUTION:
- If the clips are detached without temporarily installing the seaming welts, the headliner may fall off and the part may be damaged. Before detaching the clips, temporarily install the seaming welts to prevent the headliner from falling off.
 Courtesy of MAZDA MOTORS CORP.
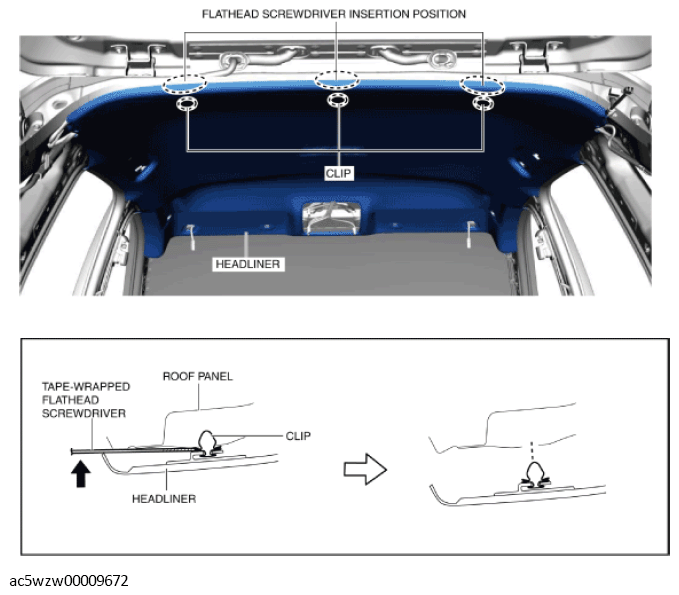
- Insert a tape-wrapped flathead screwdriver into the position shown in the figure, move it in the direction of the arrow, and detach the clips.
 Courtesy of MAZDA MOTORS CORP.
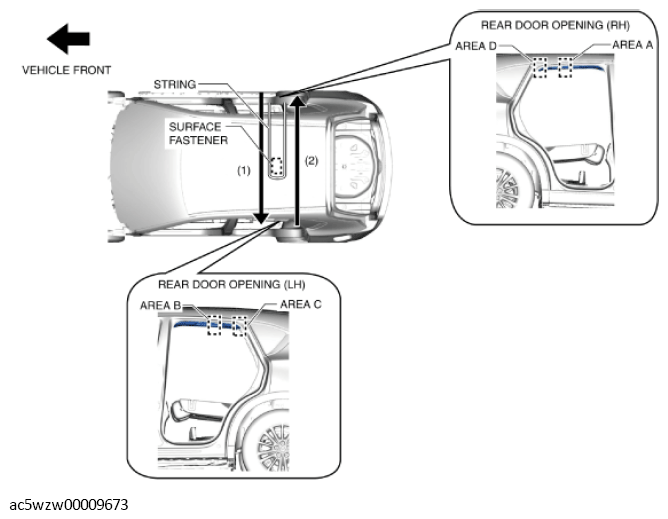
- For vehicles without the sunroof system, hook a string with the surface fastener using the following procedure.
- Insert the steel wire processed for the preparation before servicing and a string between the roof panel and the headliner from area A shown in the figure.
 Courtesy of MAZDA MOTORS CORP.
- Move the steel wire in the direction of arrow (1) shown in the figure and pull it out of area B shown in the figure.
- Insert the steel wire between the roof panel and the headliner from area C shown in the figure.
- Move the steel wire in the direction of arrow (2) shown in the figure and pull it out of area D shown in the figure.
- Adjust the string position so that the string contacts the surface fastener.
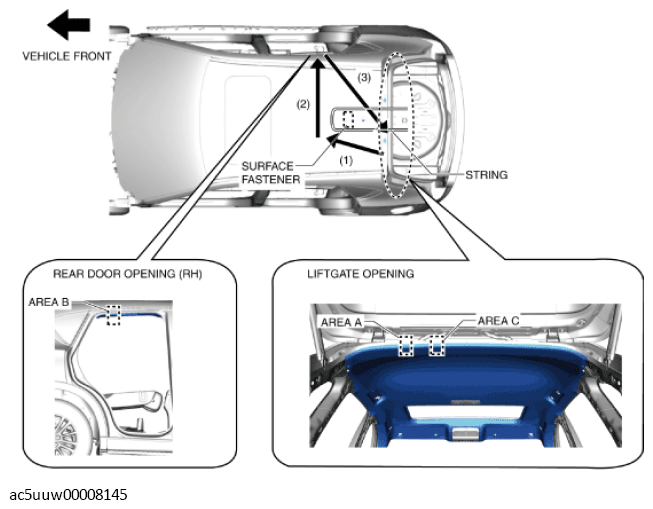
- For vehicles with the sunroof system, hook a string to the surface fastener using the following procedure.
- Insert the steel wire processed for the preparation before servicing and a string between the roof panel and the headliner from area A shown in the figure.
 Courtesy of MAZDA MOTORS CORP.
- Move the steel wire in the order of arrows (1) and (2) shown in the figure and pull it out of area B shown in the figure.
- Insert the steel wire between the roof panel and the headliner from area B shown in the figure.
- Move the steel wire in the direction of arrow
- shown in the figure and pull it out of area C shown in the figure.
- Adjust the string position so that the string contacts the surface fastener.
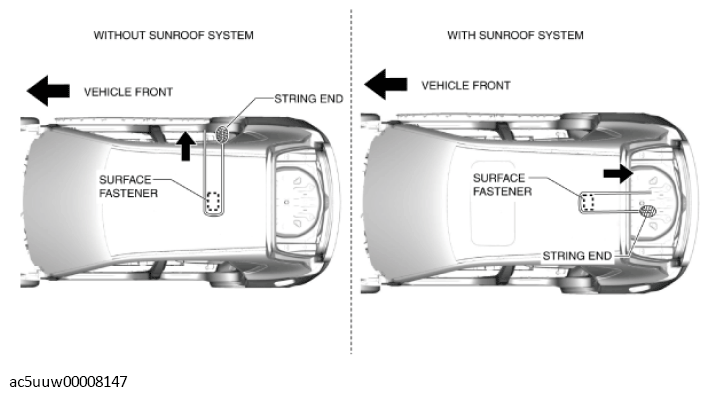
- Pull the string in the direction of the arrow with the string end shown in the figure held and disconnect the surface fastener.
 Courtesy of MAZDA MOTORS CORP.
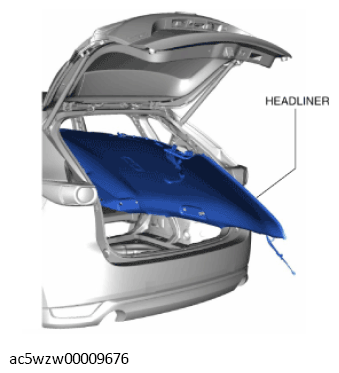
- Partially peel back the seaming welts and take the headliner out from the opened liftgate.
 Courtesy of MAZDA MOTORS CORP.