Fuel gauge sender unit (main)
- Perform the "Fuel Line Safety Procedure" referring to the "BEFORE SERVICE PRECAUTION". (See BEFORE SERVICE PRECAUTION
.)
- Refer to the [FUEL DRAINING PROCEDURE] and drain the fuel. (See FUEL DRAINING PROCEDURE
.)
- Disconnect the negative battery cable. (See NEGATIVE BATTERY CABLE DISCONNECTION/CONNECTION
.)
- Remove the rear seat cushion. (See REAR SEAT CUSHION REMOVAL/INSTALLATION
.)
- Remove the fuel pump unit. (See FUEL PUMP UNIT REMOVAL/INSTALLATION
)
- Rotate the fuel gauge sender unit component in the direction of the arrow shown in the figure (1) and remove the fuel gauge sender unit component from the fuel tank.
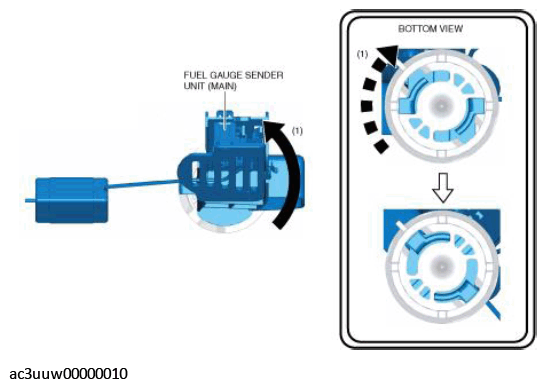 Courtesy of MAZDA MOTORS CORP.
- While pressing the fuel gauge sender unit cover tabs in the direction of the arrows (1) shown in the figure, remove the fuel gauge sender unit cover in the direction of the arrow (2).
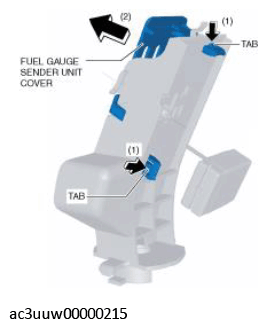 Courtesy of MAZDA MOTORS CORP.
- While pressing the fuel gauge sender unit (main) tab in the direction of the arrow (1) shown in the figure, remove the fuel gauge sender unit (main) in the direction of the arrow (2).
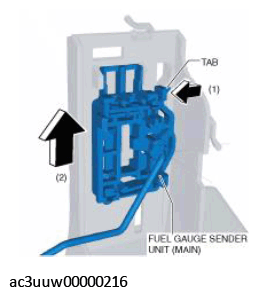 Courtesy of MAZDA MOTORS CORP.
- Install in the reverse order of removal.
- Perform the fuel leakage inspection referring to "AFTER SERVICE PRECAUTION". (See AFTER SERVICE PRECAUTION
.)