| 1 |
VERIFY FREEZE FRAME DATA HAS BEEN RECORDED
- Has FREEZE FRAME DATA been recorded?
|
Yes |
Go to the next step. |
| No |
Record FREEZE FRAME DATA on repair order, then go to the next step. |
| 2 |
VERIFY RELATED REPAIR INFORMATION AVAILABILITY
- Verify related Service Bulletins and/or on-line repair information availability
- Is any related repair information available?
|
Yes |
Perform repair or diagnosis according to the available repair information
- If the vehicle is not repaired, go to the next step.
|
| No |
Go to the next step. |
| 3 |
INSPECT PSP SWITCH CONNECTOR CONDITION
- Switch the ignition to off
- Disconnect the PSP switch connector.
- Inspect for poor connection (such as damaged/pulled-out pins, corrosion).
- Is there any malfunction?
|
Yes |
Repair or replace the terminal and/or connector, then go to Step 7 |
| No |
Go to the next step |
| 4 |
INSPECT PCM CONNECTOR CONDITION
- Disconnect the PCM connector.
- Inspect for poor connection (such as damaged/pulled-out pins, corrosion).
- Is there any malfunction?
|
Yes |
Repair or replace the terminal and/or connector, then go to Step 7. |
| No |
Go to the next step. |
| 5 |
INSPECT PSP SWITCH SIGNAL CIRCUIT FOR SHORT TO GROUND OR OPEN CIRCUIT
|
Yes |
Go to the next step. |
| No |
Repair or replace the wiring harness for a possible short to ground or open circuit, then go to Step 7. |
| 6 |
INSPECT PSP SWITCH
|
Yes |
Replace the PSP switch, then go to the next step. |
| No |
Go to the next step. |
| 7 |
VERIFY DTC TROUBLESHOOTING COMPLETED
- Make sure to reconnect all disconnected connectors.
- Start the engine and warm it up completely.
- Clear the DTC from the PCM memory using the M-MDS.
- Drive the vehicle above 60 km/h {37 mph}
for 1 min.
- Verify that the ECT PID is above 60°C {140°F}
using the M-MDS.
- Is the PENDING CODE for this DTC present?
|
Yes |
Replace the PCM, then go to the next step.
(See
PCM REMOVAL/INSTALLATION [L5]
.) |
| No |
Go to the next step. |
| 8 |
VERIFY AFTER REPAIR PROCEDURE
|
Yes |
Go to the applicable DTC inspection.
(See
DTC TABLE [L5]
.) |
| No |
DTC troubleshooting completed. |
| 10 |
PRESSURIZE THE EVAP SYSTEM WITH NITROGEN TO TEST FOR LEAKS
- Verify that the control valve on the panel Is in the HOLD position then open the nitrogen bottle valve.
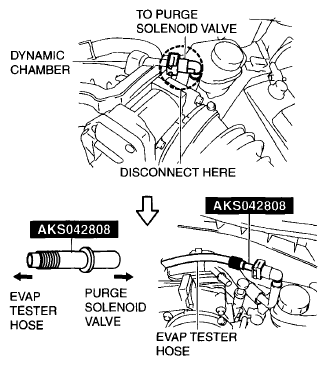
- Disconnect the purge solenoid valve hose from the dynamic chamber and insert SST
AKS042808 into the purge solenoid valve hose.
  Courtesy of MAZDA MOTORS CORP.MAZDA MOTORS CORP. Courtesy of MAZDA MOTORS CORP.MAZDA MOTORS CORP.
- Connect the EVAP Tester Hose to SST
AKS042808.
- Connect the M-MDS to the DLC-2.
- Switch the ignition to ON (Engine off)
- Access the datalogger for the PCM.
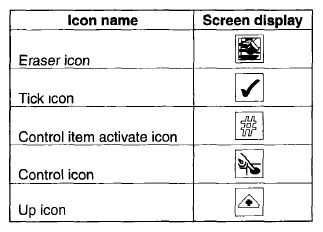
- Press the eraser icon to deselect the highlighted PIDs
Courtesy of MAZDA MOTORS CORP.MAZDA MOTORS CORP.
- Select PIDs EVAPCP and EVAPCV, then click the tick icon.
- Command EVAPCP to 100% duty cycle to open the purge solenoid valve.
- To open the purge solenoid valve, click the control item activate icon.
- Click the EVAPCP box on the left-hand side of the screen to select it.
- Click the control icon on the right-hand side of the screen
- Click the up icon immediately below the control icon.
- Each click increases the duty cycle by 10%.
- Continue clicking until the M-MDS shows the purge solenoid valve is open 100%.
- Command EVAPCV to ON to Close the CV solenoid valve.
- To close the CV solenoid valve, click the control item activate icon
- Click the EVAPCV box in the upper left-hand corner of the screen to select it.
- Click the control icon on the right-hand side of the screen.
- Click the up icon immediately below the control icon (the EVAPCV should now be on).
- Turn the control valve to the TEST position and let the system fill. A drop in the gauge pressure should be noted along with the flow meter being pegged at maximum flow for several minutes depending on how full or empty the fuel tank is, and how long it takes to completely fill and pressurize the evaporative emissions system hoses.
NOTE:
- If the gauge and the flow meter do not settle to a measurable level after 2-3 min,
then refer to the appropriate Service Information
to verify that the canister vent valve is properly closed. If the canister vent valve is properly closed, the EVAP system has a large leak.
- Does the test indicate that a leak exists?
|
Yes |
Go to Step 12 to locate the leak. |
| No |
EXCEPT P0456:00, go to the next step. If diagnosing P0456:00 go to Step 12. |
| 11 |
CHECKING SYSTEM FOR BLOCKAGE
- Leave the tester in the test position
- Using the M-MDS datalogger, command the CV solenoid valve open.
- To open the CV solenoid valve, click the down icon (the EVAPCV should now be off).
 Courtesy of MAZDA MOTORS CORP. Courtesy of MAZDA MOTORS CORP.
- Does the flow indicator in the flow meter immediately jump to the top?
|
Yes |
Go to the next step |
| No |
System is blocked between the CV solenoid valve and the fuel tank pressure sensor; locale and remove blockage then perform Step 10. |