Center Panel Lower Removal/Installation
- Disconnect the negative battery cable.
- Remove the following parts:
- Upper panel (See
UPPER PANEL REMOVAL/INSTALLATION .)
- Decoration panel (See
DECORATION PANEL REMOVAL/INSTALLATION .)
- Shift lever knob (MTX) (See
MANUAL TRANSAXLE SHIFT MECHANISM REMOVAL/INSTALLATION
.)
- Shift panel (See
SHIFT PANEL REMOVAL/INSTALLATION .)
- Pull the center panel lower in the direction of the arrow(1) shown in the illustration while detaching clips B.
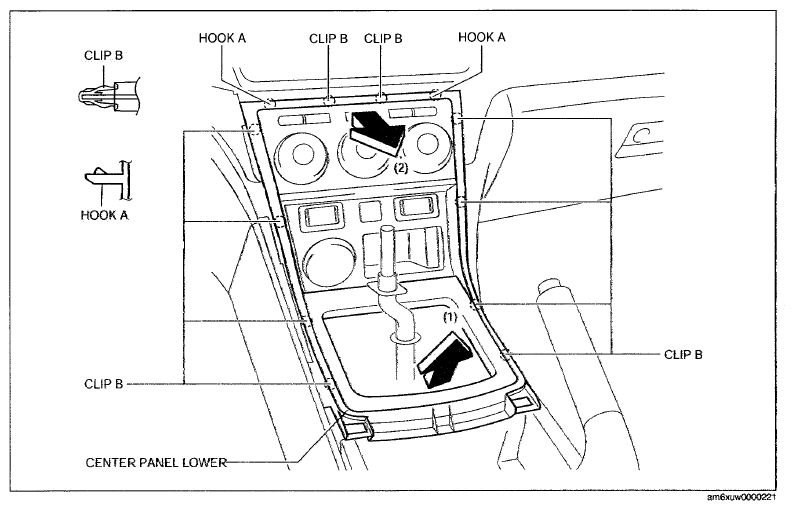 Courtesy of MAZDA MOTORS CORP.
- Pull the center panel lower in the direction of the arrow(2) shown in the illustration and remove it while detaching clips B and hooks A.
- Disconnect the PAD indicator light bulb connector. (Vehicles with PAD indicator light bulb)
- Disconnect the seat warmer switch connector. (Vehicles with seat warmer)
- Disconnect the advanced keyless entry and push button start connector. (Vehicles with advanced keyless entry and push button start system)
- Disconnect the accessory socket (front) connector.
- Disconnect the cigarette lighter socket connector. (Arab Gulf Cooperation Council)
- Install in the reverse order of removal.