Removal and Installation
- Remove the center instrument panel finish panel. For additional information, refer to INSTRUMENT PANEL FINISH PANEL - CENTER .
- Remove the 3 RH instrument panel finish panel screws.
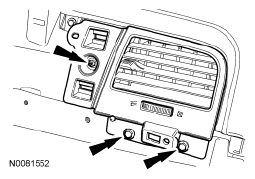 Courtesy of FORD MOTOR CO.
- Remove the RH instrument panel finish panel.
- Remove the RH instrument panel side finish panel.
- Pull the instrument panel side trim finish outward to release the retaining clips.
- Open the glove compartment.
- Lower the glove compartment in the following sequence.
- Lift upward and remove the 2 glove compartment stops.
- Fully lower the glove compartment.
- Remove the 3 glove compartment screws.
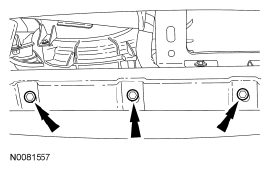 Courtesy of FORD MOTOR CO.
- Remove the RH lower glove compartment screw.
- Remove the glove compartment assembly.
- Pull the glove compartment assembly outward to release the retaining clips.
- Disconnect the electrical connectors.
- To install, reverse the removal procedure.
- To install, make sure to align the retaining clips to the adjacent retaining clip holes.