Display Brightness Does Not Change With Dimming Control
- Place ignition switch in "ACC" position. With headlights on, check dimming of other displays while rotating dimmer switch. If other displays dim, replace EIM. If no displays dim, go to next step.
- With headlights on, check dimming of message center while rotating dimmer switch. If message center dims, go to step 6). If not, check instrument panel fuse. If fuse is okay, go to step 4). If not, go to next step.
- Before replacing fuse, turn ignition off. Using ohmmeter, check for short to ground in White/Lt. Blue wire (at fuse panel). If shorted, repair White/Lt. Blue wire (Circuit No. 294). If not, replace fuse.
- Measure input voltage at instrument panel fuse. If reading is greater than 10 volts, go to next step. If reading is less than 10 volts, repair White/Lt. Blue wire at headlight switch as required.
- Check parking light/taillight fuse. If fuse is okay, go to step 6). If not, check for short to ground in Lt. Blue/Red wire. If shorted, repair Lt. Blue/Red wire (Circuit No. 19). If not, replace fuse.
- Remove instrument cluster. Measure rheostat voltage between Lt. Blue/Red wire (Pin No. 2) and ground. Reading should be less than 3 volts with headlights off and greater than 5 volts with headlights on. Go to next step.
- Turn ignition off. Measure voltage changes between Brown/White wire (Pin No. 16) and ground. With dimmer switch in full counterclockwise position, reading should be battery voltage. With dimmer switch in full clockwise position, reading should be 1/2 battery voltage. If readings are correct, replace EIM. If not, repair White/Lt. Blue wire between EIM and headlight switch.
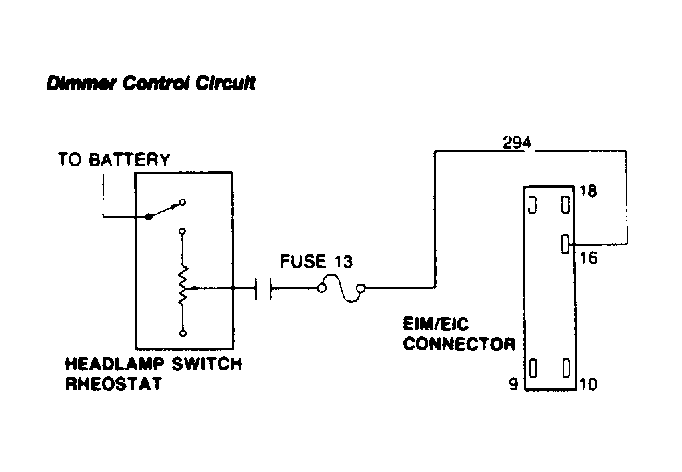 Courtesy of FORD MOTOR CO.