Removal [09/2014 - ]: Procedure
WARNING: This page is about a different variant/trim than selected.
- DRAIN AUTOMATIC TRANSMISSION FLUID
- Remove the drain plug and gasket, and drain the automatic transmission fluid.
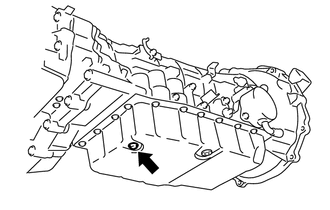 Courtesy of © TOYOTA, LICENSE AGREEMENT TMS1002 Courtesy of © TOYOTA, LICENSE AGREEMENT TMS1002
|
- Install the drain plug and a new gasket.
Torque: 20 N.m (204 kgf/cm, 15 ft.lbf)
- REMOVE NO. 1 EXHAUST PIPE SUPPORT BRACKET SUB-ASSEMBLY
- Remove the 2 nuts, 4 bolts and No. 1 exhaust pipe support bracket sub-assembly.
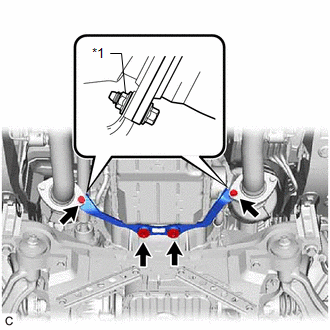 Courtesy of © TOYOTA, LICENSE AGREEMENT TMS1002 Courtesy of © TOYOTA, LICENSE AGREEMENT TMS1002
|
HINT:
When removing the exhaust pipe bolts, hold the nuts while loosening the bolts.
- REMOVE AUTOMATIC TRANSMISSION OIL PAN SUB-ASSEMBLY
- Remove the 20 bolts, automatic transmission oil pan sub-assembly and automatic transmission oil pan gasket.
NOTE:
Some fluid will remain in the automatic transmission oil pan sub-assembly. Remove all of the bolts, and carefully remove the automatic transmission oil pan sub-assembly.
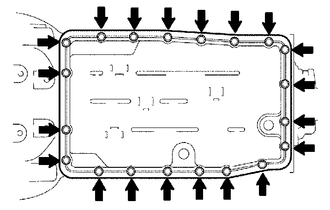 Courtesy of © TOYOTA, LICENSE AGREEMENT TMS1002 Courtesy of © TOYOTA, LICENSE AGREEMENT TMS1002
|
- Remove the 6 transmission oil cleaner magnets from the automatic transmission oil pan sub-assembly.
- Examine the particles in the automatic transmission oil pan sub-assembly.
- Use the removed transmission oil cleaner magnets to collect any steel chips.
Examine the chips and particles in the automatic transmission oil pan sub-assembly and on the transmission oil cleaner magnets to determine what type of wear might be found in the automatic transmission with transfer assembly.
Result
Steel (magnetic):
Bearing, gear and clutch plate wear
Brass (non-magnetic):
Bushing wear
- REMOVE VALVE BODY OIL STRAINER ASSEMBLY
- Remove the 4 bolts and valve body oil strainer assembly.
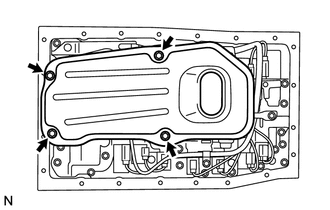 Courtesy of © TOYOTA, LICENSE AGREEMENT TMS1002 Courtesy of © TOYOTA, LICENSE AGREEMENT TMS1002
|
NOTE:
Be careful as some fluid will come out of the valve body oil strainer assembly.
- Remove the O-ring from the valve body oil strainer assembly.
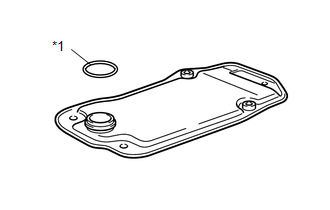 Courtesy of © TOYOTA, LICENSE AGREEMENT TMS1002 Courtesy of © TOYOTA, LICENSE AGREEMENT TMS1002
|
- DISCONNECT TRANSMISSION WIRE
- Remove the bolt and temperature sensor clamp.
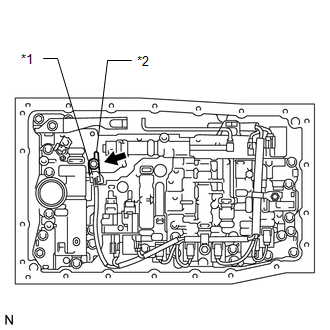 Courtesy of © TOYOTA, LICENSE AGREEMENT TMS1002 Courtesy of © TOYOTA, LICENSE AGREEMENT TMS1002
|
| *1 |
Temperature Sensor Clamp |
| *2 |
ATF Temperature Sensor |
- Disconnect the ATF temperature sensor.
- Remove the 2 bolts and 2 valve body wire harness clamps.
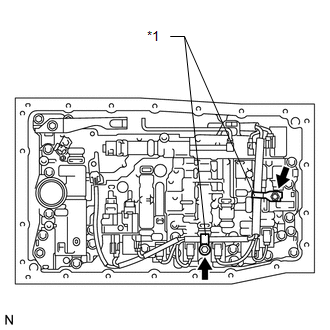 Courtesy of © TOYOTA, LICENSE AGREEMENT TMS1002 Courtesy of © TOYOTA, LICENSE AGREEMENT TMS1002
|
| *1 |
Valve Body Wire Harness Clamp |
- Disconnect the 9 shift solenoid valve connectors.
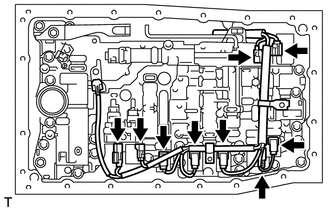 Courtesy of © TOYOTA, LICENSE AGREEMENT TMS1002 Courtesy of © TOYOTA, LICENSE AGREEMENT TMS1002
|
- REMOVE TRANSMISSION WIRE
- Disconnect the transmission wire connector.
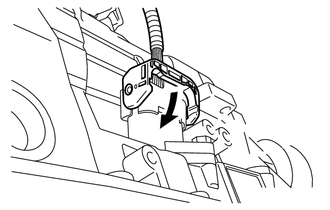 Courtesy of © TOYOTA, LICENSE AGREEMENT TMS1002 Courtesy of © TOYOTA, LICENSE AGREEMENT TMS1002
|
HINT:
Disengage the claw, pull down the lever, and disconnect the transmission wire connector.
- Remove the bolt and transmission wire.
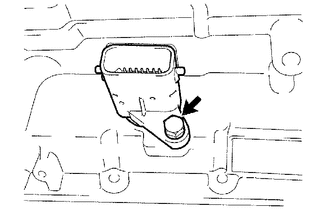 Courtesy of © TOYOTA, LICENSE AGREEMENT TMS1002 Courtesy of © TOYOTA, LICENSE AGREEMENT TMS1002
|
- Remove the O-ring from the transmission wire.
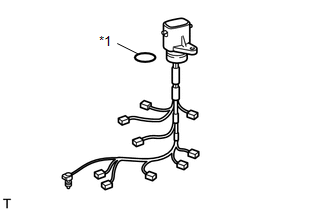 Courtesy of © TOYOTA, LICENSE AGREEMENT TMS1002 Courtesy of © TOYOTA, LICENSE AGREEMENT TMS1002
|
- Remove the O-ring from the ATF temperature sensor.
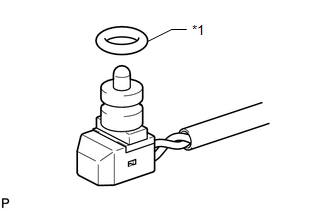 Courtesy of © TOYOTA, LICENSE AGREEMENT TMS1002 Courtesy of © TOYOTA, LICENSE AGREEMENT TMS1002
|