Removal [03/2017 - 04/2020]: Procedure
WARNING: This page does not describe the selected car, but rather 7 other vehicles, including the 2024 Lexus LC 500, 2023 Lexus LC 500, 2022 Lexus LC 500, 2021 Lexus LC 500, and 2020 Lexus LC 500. However, it is still accessible from the selected car via links, so may be relevant.
- REMOVE REAR FLOOR SIDE MEMBER COVER LH
- Remove the 2 clips, 3 bolts, nut, screw and rear floor side member cover LH.
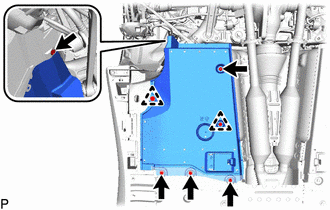 Courtesy of © TOYOTA, LICENSE AGREEMENT TMS1002 Courtesy of © TOYOTA, LICENSE AGREEMENT TMS1002
|
- REMOVE REAR FLOOR SIDE MEMBER COVER RH
- Remove the 2 clips, 3 bolts, nut, screw and rear floor side member cover RH.
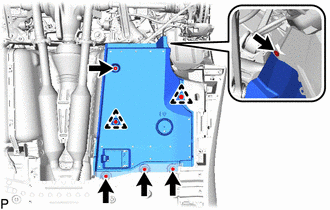 Courtesy of © TOYOTA, LICENSE AGREEMENT TMS1002 Courtesy of © TOYOTA, LICENSE AGREEMENT TMS1002
|
- REMOVE FRONT FENDER SEAL LH
- Remove the 3 clips, grommet and front fender seal LH.
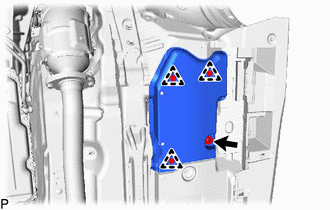 Courtesy of © TOYOTA, LICENSE AGREEMENT TMS1002 Courtesy of © TOYOTA, LICENSE AGREEMENT TMS1002
|
- REMOVE FRONT FENDER SEAL RH
- Remove the 3 clips, grommet and front fender seal RH.
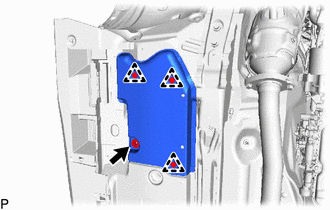 Courtesy of © TOYOTA, LICENSE AGREEMENT TMS1002 Courtesy of © TOYOTA, LICENSE AGREEMENT TMS1002
|
- REMOVE FRONT FLOOR COVER LH
- Remove the 4 grommets, 6 clips, nut, bolt and front floor cover LH.
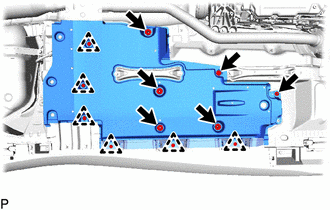 Courtesy of © TOYOTA, LICENSE AGREEMENT TMS1002 Courtesy of © TOYOTA, LICENSE AGREEMENT TMS1002
|
- REMOVE FRONT FLOOR COVER RH
- Remove the 4 grommets, 6 clips, nut, bolt and front floor cover RH.
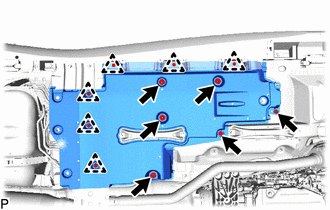 Courtesy of © TOYOTA, LICENSE AGREEMENT TMS1002 Courtesy of © TOYOTA, LICENSE AGREEMENT TMS1002
|
- REMOVE FRONT SEAT ASSEMBLY
Refer to REMOVAL [03/2017 - 05/2023]
- DISCONNECT OXYGEN SENSOR CONNECTOR
Refer to PROCEDURE - Step 8
- REMOVE OXYGEN SENSOR (for Bank 1)
Refer to PROCEDURE - Step 9
- REMOVE OXYGEN SENSOR (for Bank 2)
Refer to PROCEDURE - Step 10
- REMOVE FRONT CENTER FLOOR BRACE SUB-ASSEMBLY
- Remove the 12 bolts and front center floor brace sub-assembly.
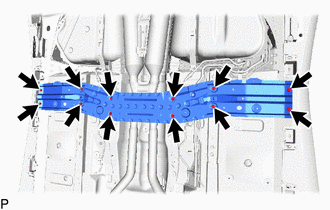 Courtesy of © TOYOTA, LICENSE AGREEMENT TMS1002 Courtesy of © TOYOTA, LICENSE AGREEMENT TMS1002
|
- REMOVE NO. 2 DIFFERENTIAL SUPPORT PROTECTOR
- Remove the 3 nuts and No. 2 differential support protector.
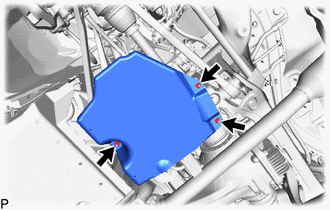 Courtesy of © TOYOTA, LICENSE AGREEMENT TMS1002 Courtesy of © TOYOTA, LICENSE AGREEMENT TMS1002
|
- REMOVE NO. 1 DIFFERENTIAL SUPPORT PROTECTOR
- Remove the 3 nuts and No. 1 differential support protector.
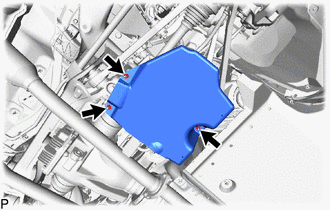 Courtesy of © TOYOTA, LICENSE AGREEMENT TMS1002 Courtesy of © TOYOTA, LICENSE AGREEMENT TMS1002
|
- REMOVE REAR NO. 4 BUMPER SIDE SUPPORT LH
- Remove the 2 screws, 2 clips, grommet and rear No. 4 bumper side support LH.
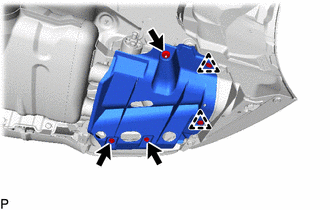 Courtesy of © TOYOTA, LICENSE AGREEMENT TMS1002 Courtesy of © TOYOTA, LICENSE AGREEMENT TMS1002
|
- REMOVE REAR NO. 4 BUMPER SIDE SUPPORT RH
- Remove the 2 screws, 2 clips, grommet and rear No. 4 bumper side support RH.
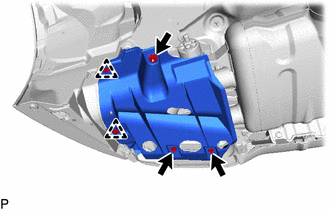 Courtesy of © TOYOTA, LICENSE AGREEMENT TMS1002 Courtesy of © TOYOTA, LICENSE AGREEMENT TMS1002
|
- REMOVE FRONT EXHAUST PIPE ASSEMBLY
- Remove the 4 bolts and 4 nuts to disconnect the front exhasut pipe assembly from the exhaust manifold sub-assembly LH and exhaust manifold sub-assembly RH.
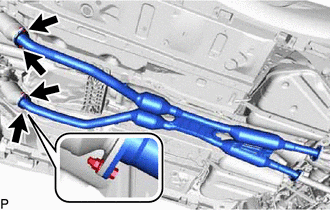 Courtesy of © TOYOTA, LICENSE AGREEMENT TMS1002 Courtesy of © TOYOTA, LICENSE AGREEMENT TMS1002
|
- Remove the 4 bolts, 4 nuts and front exhaust pipe assembly from the exhaust tailpipe assembly.
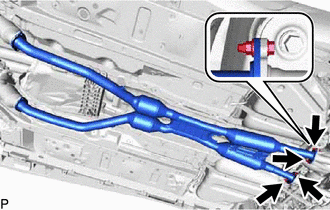 Courtesy of © TOYOTA, LICENSE AGREEMENT TMS1002 Courtesy of © TOYOTA, LICENSE AGREEMENT TMS1002
|
- Remove the 4 gaskets.
- REMOVE EXHAUST TAILPIPE ASSEMBLY
WARNING:
To prevent burns, do not touch the engine, exhaust pipe or other high temperature components while the engine is hot.
- Detach the 2 clamps and disconnect the 4 connectors.
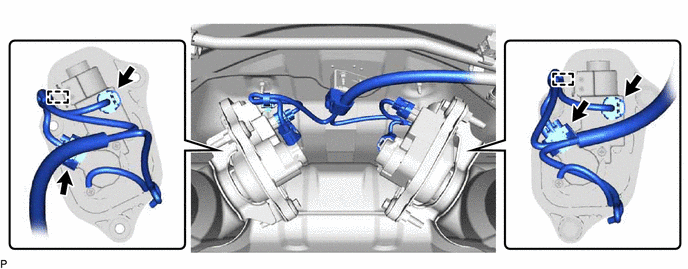 Courtesy of © TOYOTA, LICENSE AGREEMENT TMS1002 Courtesy of © TOYOTA, LICENSE AGREEMENT TMS1002
|
- Remove the 6 exhaust pipe supports and exhaust tailpipe assembly.
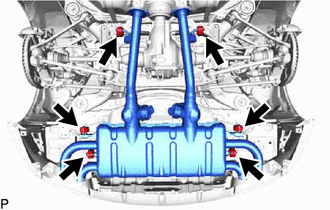 Courtesy of © TOYOTA, LICENSE AGREEMENT TMS1002 Courtesy of © TOYOTA, LICENSE AGREEMENT TMS1002
|
- REMOVE EXHAUST PIPE GAS CONTROL ACTUATOR SUB-ASSEMBLY
- Remove the 6 bolts and 4 nuts.
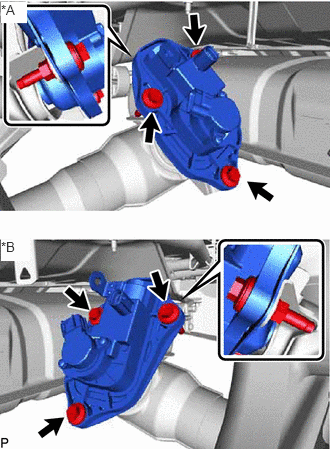 Courtesy of © TOYOTA, LICENSE AGREEMENT TMS1002 Courtesy of © TOYOTA, LICENSE AGREEMENT TMS1002
|
| *A |
for RH Side |
| *B |
for LH Side |
- Remove the 2 exhaust pipe gas control actuator sub-assemblies from the exhaust tailpipe assembly.