Installation [05/2023 - ]: Procedure
WARNING: This page does not describe the selected car, but rather 7 other vehicles, including the 2024 Lexus LC 500, 2023 Lexus LC 500, 2022 Lexus LC 500, 2021 Lexus LC 500, and 2020 Lexus LC 500. However, it is still accessible from the selected car via links, so may be relevant.
- INSTALL RADIO RECEIVER ASSEMBLY
- INSTALL NO. 1 RADIO BRACKET
- Install the No. 1 radio bracket with the 3 screws.
 Courtesy of © TOYOTA, LICENSE AGREEMENT TMS1002 Courtesy of © TOYOTA, LICENSE AGREEMENT TMS1002
|
- INSTALL NO. 2 RADIO BRACKET
- Install the No. 2 radio bracket with the 3 screws.
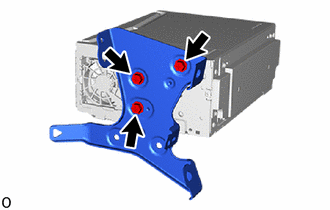 Courtesy of © TOYOTA, LICENSE AGREEMENT TMS1002 Courtesy of © TOYOTA, LICENSE AGREEMENT TMS1002
|
- INSTALL LOWER INSTRUMENT COVER
- Attach the guide and clip to install the lower instrument cover with the 2 screws.
 Courtesy of © TOYOTA, LICENSE AGREEMENT TMS1002 Courtesy of © TOYOTA, LICENSE AGREEMENT TMS1002
|
- INSTALL RADIO RECEIVER ASSEMBLY WITH BRACKET
- Connect each connector.
- Attach the clamp as indicated by the arrows in the shown in the illustration.
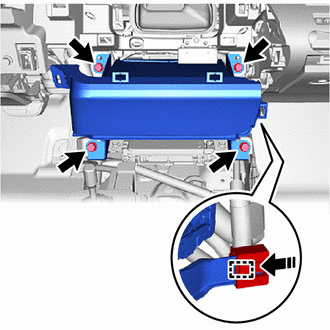 Courtesy of © TOYOTA, LICENSE AGREEMENT TMS1002 Courtesy of © TOYOTA, LICENSE AGREEMENT TMS1002
|
 |
Install in this Direction |
- Install the radio receiver assembly with bracket with the 4 bolts.
- INSTALL INTEGRATION CONTROL AND PANEL ASSEMBLY
Refer to REMOVAL [05/2023 - ]
- INSTALL REAR CONSOLE BOX POCKET
- Attach the guide and claw to install the rear console box pocket.
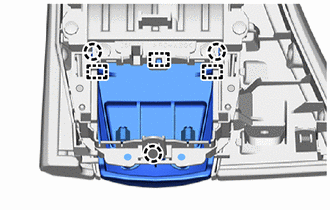 Courtesy of © TOYOTA, LICENSE AGREEMENT TMS1002 Courtesy of © TOYOTA, LICENSE AGREEMENT TMS1002
|
- Install the 4 screws.
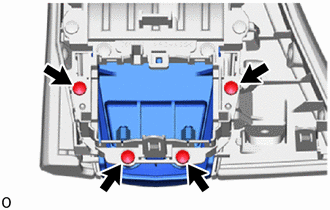 Courtesy of © TOYOTA, LICENSE AGREEMENT TMS1002 Courtesy of © TOYOTA, LICENSE AGREEMENT TMS1002
|
- INSTALL SWITCH AND VOLUME SET
- Attach the claw and install the switch and volume set with the 4 screws.
 Courtesy of © TOYOTA, LICENSE AGREEMENT TMS1002 Courtesy of © TOYOTA, LICENSE AGREEMENT TMS1002
|
- INSTALL REFRESHING SEAT SWITCH
Refer to PROCEDURE - Step 1
- INSTALL PATTERN SELECT SWITCH
Refer to PROCEDURE - Step 1
- INSTALL RADIO REMOTE TUNING SWITCH ASSEMBLY
- Connect the 3 connectors.
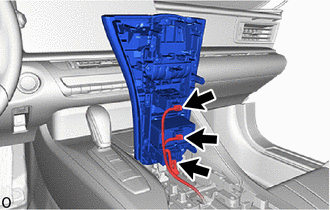 Courtesy of © TOYOTA, LICENSE AGREEMENT TMS1002 Courtesy of © TOYOTA, LICENSE AGREEMENT TMS1002
|
- Attach the claw to install the radio remote tuning switch assembly in the direction of the arrow shown in the illustration.
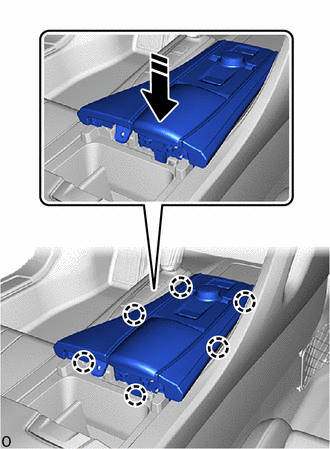 Courtesy of © TOYOTA, LICENSE AGREEMENT TMS1002 Courtesy of © TOYOTA, LICENSE AGREEMENT TMS1002
|
|
Install in this Direction |
- Install the screw.
 Courtesy of © TOYOTA, LICENSE AGREEMENT TMS1002 Courtesy of © TOYOTA, LICENSE AGREEMENT TMS1002
|
- INSTALL CONSOLE PLATE
- Attach the claw and guide to install the console plate as shown in the illustration.
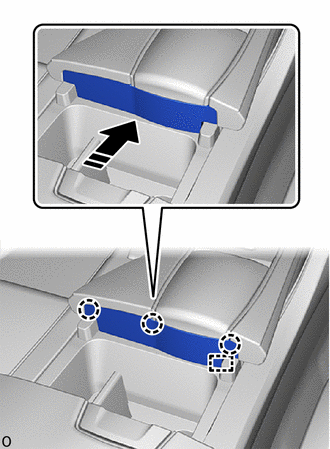 Courtesy of © TOYOTA, LICENSE AGREEMENT TMS1002 Courtesy of © TOYOTA, LICENSE AGREEMENT TMS1002
|
|
Install in this Direction |
- CONNECT CABLE TO NEGATIVE BATTERY TERMINAL
Refer to PROCEDURE - Step 2
- INSTALL NO. 2 DECK BOARD
Refer to PROCEDURE - Step 13
- INITIALIZATION AFTER RECONNECTING BATTERY TERMINAL
HINT:
When disconnecting and reconnecting the battery, there is an automatic learning function that completes learning when the respective system is used.
Refer to AUTOMATIC LEARNING CHART [05/2023 - ]
- PERFORM REGISTRATION
HINT:
When replacing the radio receiver assembly, perform registration.
Refer to REGISTRATION [05/2023 - ]