- INSTALL RADIO RECEIVER ASSEMBLY
- INSTALL NO. 1 RADIO BRACKET
- Install the No. 1 radio bracket with the 3 screws.
 Courtesy of © TOYOTA, LICENSE AGREEMENT TMS1002 Courtesy of © TOYOTA, LICENSE AGREEMENT TMS1002
|
- INSTALL NO. 2 RADIO BRACKET
- Install the No. 2 radio bracket with the 3 screws.
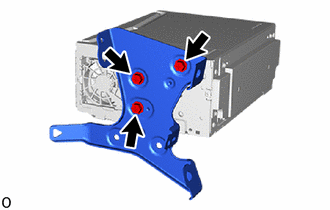 Courtesy of © TOYOTA, LICENSE AGREEMENT TMS1002 Courtesy of © TOYOTA, LICENSE AGREEMENT TMS1002
|
- INSTALL LOWER INSTRUMENT COVER
- Attach the guide and clip to install the lower instrument cover with the 2 screws.
 Courtesy of © TOYOTA, LICENSE AGREEMENT TMS1002 Courtesy of © TOYOTA, LICENSE AGREEMENT TMS1002
|
- INSTALL RADIO RECEIVER ASSEMBLY WITH BRACKET
- Connect each connector.
- Attach the clamp as indicated by the arrows in the shown in the illustration.
 Courtesy of © TOYOTA, LICENSE AGREEMENT TMS1002 Courtesy of © TOYOTA, LICENSE AGREEMENT TMS1002
|
 |
Install in this Direction |
- Install the radio receiver assembly with bracket with the 4 bolts.
- INSTALL INTEGRATION CONTROL AND PANEL ASSEMBLY
Refer to INSTALLATION [05/2023 - ]
- INSTALL REAR CONSOLE BOX POCKET
- Attach the guide and claw to install the rear console box pocket.
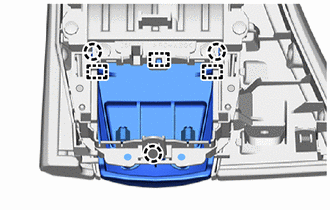 Courtesy of © TOYOTA, LICENSE AGREEMENT TMS1002 Courtesy of © TOYOTA, LICENSE AGREEMENT TMS1002
|
- Install the 4 screws.
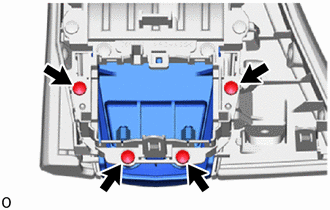 Courtesy of © TOYOTA, LICENSE AGREEMENT TMS1002 Courtesy of © TOYOTA, LICENSE AGREEMENT TMS1002
|
- INSTALL SWITCH AND VOLUME SET
- Attach the claw and install the switch and volume set with the 4 screws.
 Courtesy of © TOYOTA, LICENSE AGREEMENT TMS1002 Courtesy of © TOYOTA, LICENSE AGREEMENT TMS1002
|
- INSTALL REFRESHING SEAT SWITCH
Refer to PROCEDURE - Step 1
- INSTALL PATTERN SELECT SWITCH
Refer to PROCEDURE - Step 1
- INSTALL RADIO REMOTE TUNING SWITCH ASSEMBLY
- Connect the 3 connectors.
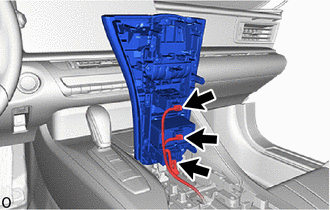 Courtesy of © TOYOTA, LICENSE AGREEMENT TMS1002 Courtesy of © TOYOTA, LICENSE AGREEMENT TMS1002
|
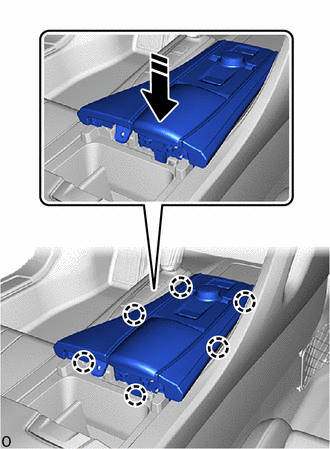
- Attach the claw to install the radio remote tuning switch assembly in the direction of the arrow shown in the illustration.
 Courtesy of © TOYOTA, LICENSE AGREEMENT TMS1002 Courtesy of © TOYOTA, LICENSE AGREEMENT TMS1002
|
|
Install in this Direction |
- Install the screw.
 Courtesy of © TOYOTA, LICENSE AGREEMENT TMS1002 Courtesy of © TOYOTA, LICENSE AGREEMENT TMS1002
|
- INSTALL CONSOLE PLATE
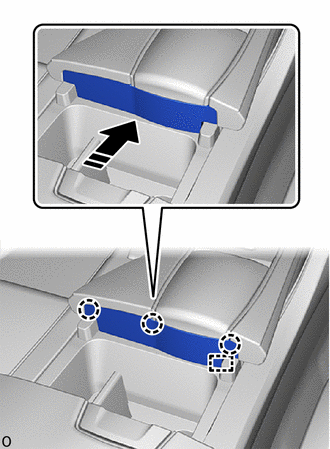
- Attach the claw and guide to install the console plate as shown in the illustration.
 Courtesy of © TOYOTA, LICENSE AGREEMENT TMS1002 Courtesy of © TOYOTA, LICENSE AGREEMENT TMS1002
|
|
Install in this Direction |
- CONNECT CABLE TO NEGATIVE AUXILIARY BATTERY TERMINAL
Refer to PROCEDURE - Step 2
- INSTALL NO. 2 DECK BOARD
Refer to PROCEDURE - Step 13
- INITIALIZATION AFTER RECONNECTING AUXILIARY BATTERY TERMINAL
HINT:
When disconnecting and reconnecting the auxiliary battery, there is an automatic learning function that completes learning when the respective system is used.
Refer to AUTOMATIC LEARNING CHART [05/2023 - ]
- PERFORM REGISTRATION
HINT:
When replacing the radio receiver assembly, perform registration.
Refer to REGISTRATION [05/2023 - ]