- REMOVE NO. 5 HEATER TO REGISTER DUCT
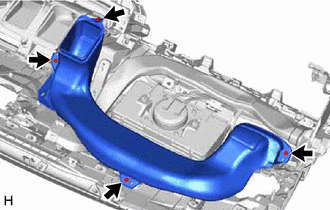
- Remove the 4 screws <A> and the No. 5 heater to register duct.
 Courtesy of © TOYOTA, LICENSE AGREEMENT TMS1002 Courtesy of © TOYOTA, LICENSE AGREEMENT TMS1002
|
 |
Screw <A> |
- REMOVE NO. 2 SIDE DEFROSTER NOZZLE DUCT
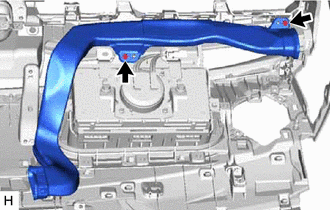
- Remove the 2 screws <A> and the No. 2 side defroster nozzle duct.
 Courtesy of © TOYOTA, LICENSE AGREEMENT TMS1002 Courtesy of © TOYOTA, LICENSE AGREEMENT TMS1002
|
|
Screw <A> |
- REMOVE NO. 1 SIDE DEFROSTER NOZZLE DUCT
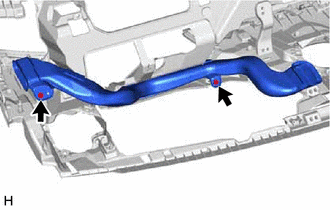
- w/ Headup Display:
- Remove the 2 screws <A> and the No. 1 side defroster nozzle duct.
 Courtesy of © TOYOTA, LICENSE AGREEMENT TMS1002 Courtesy of © TOYOTA, LICENSE AGREEMENT TMS1002
|
|
Screw <A> |
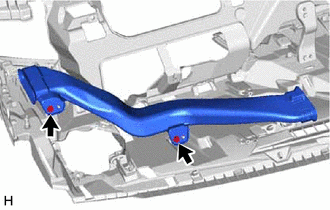
- w/o Headup Display:
 Courtesy of © TOYOTA, LICENSE AGREEMENT TMS1002 Courtesy of © TOYOTA, LICENSE AGREEMENT TMS1002
|
|
Screw <A> |
Remove the 2 screws <A> and the No. 1 side defroster nozzle duct.
- REMOVE DEFROSTER NOZZLE ASSEMBLY
- w/ Headup Display:
- Remove the 4 screws <A> and the defroster nozzle assembly.
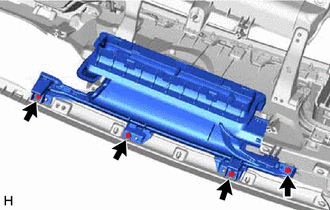 Courtesy of © TOYOTA, LICENSE AGREEMENT TMS1002 Courtesy of © TOYOTA, LICENSE AGREEMENT TMS1002
|
|
Screw <A> |
- w/o Headup Display:
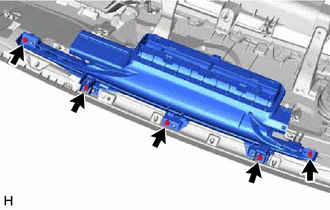 Courtesy of © TOYOTA, LICENSE AGREEMENT TMS1002 Courtesy of © TOYOTA, LICENSE AGREEMENT TMS1002
|
|
Screw <A> |
Remove the 5 screws <A> and the defroster nozzle assembly.
- REMOVE INSTRUMENT PANEL PASSENGER AIRBAG ASSEMBLY
Refer to PROCEDURE - Step 7 [10/2020 - 11/2021]
, or refer to PROCEDURE - Step 7 [11/2021 - 10/2022]
, or refer to PROCEDURE - Step 7 [10/2022 - 10/2023]
, or refer to PROCEDURE - Step 7 [10/2023 - ]
- REMOVE NAVIGATION ANTENNA ASSEMBLY WITH BRACKET
Refer to PROCEDURE - Step 8 [10/2020 - 11/2021]
, or refer to PROCEDURE - Step 8 [11/2021 - 10/2022]
, or refer to PROCEDURE - Step 8 [10/2022 - 10/2023]
, or refer to PROCEDURE - Step 8 [10/2023 - ]
- REMOVE NO. 4 HEATER TO REGISTER DUCT SUB-ASSEMBLY
- Remove the 2 screws <A> and the No. 4 heater to register duct sub-assembly.
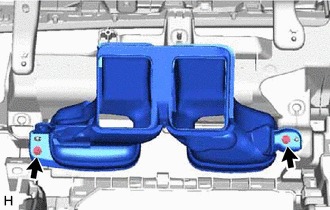 Courtesy of © TOYOTA, LICENSE AGREEMENT TMS1002 Courtesy of © TOYOTA, LICENSE AGREEMENT TMS1002
|
|
Screw <A> |
- REMOVE NO. 2 INSTRUMENT PANEL SAFETY PAD SUB-ASSEMBLY
- Detach the clip and remove the No. 2 instrument panel safety pad sub-assembly.
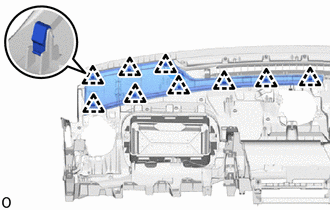 Courtesy of © TOYOTA, LICENSE AGREEMENT TMS1002 Courtesy of © TOYOTA, LICENSE AGREEMENT TMS1002
|
- REMOVE COIN BOX ASSEMBLY
- Remove the 4 screws and coin box assembly.
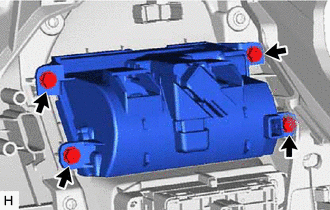 Courtesy of © TOYOTA, LICENSE AGREEMENT TMS1002 Courtesy of © TOYOTA, LICENSE AGREEMENT TMS1002
|
- REMOVE GLOVE COMPARTMENT DOOR LOCK ASSEMBLY
- Remove the 2 screws.
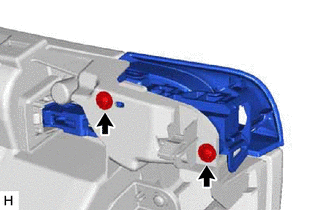 Courtesy of © TOYOTA, LICENSE AGREEMENT TMS1002 Courtesy of © TOYOTA, LICENSE AGREEMENT TMS1002
|
- Pull in the direction indicated by the arrow shown in the illustration and remove the glove compartment door lock assembly.
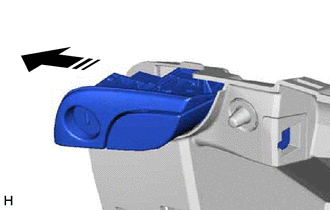 Courtesy of © TOYOTA, LICENSE AGREEMENT TMS1002 Courtesy of © TOYOTA, LICENSE AGREEMENT TMS1002
|
 |
Remove in this Direction |
- REMOVE GLOVE COMPARTMENT DOOR LOCK CYLINDER ASSEMBLY
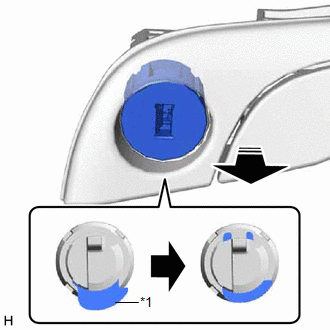 Courtesy of © TOYOTA, LICENSE AGREEMENT TMS1002 Courtesy of © TOYOTA, LICENSE AGREEMENT TMS1002
|
| *1 |
Cylinder Lock |
|
Remove in this Direction |
Press the cylinder lock to release it and pull out the glove compartment door lock cylinder assembly from the glove compartment door assembly to remove it as shown in the illustration.